本文最后更新于:2023年12月30日 晚上
(摘下眼镜)Furry?(戴上眼镜)Fuzzer!
0x00. 一切开始之前 在上一篇文章 当中我们分析了 syzkaller 三大组件当中的 syz-manager 的源码,本篇文章我们继续来分析 syz-fuzzer 的源码
与 syz-manager 所不同的是,syz-fuzzer 位于 Guest VM 当中,本质上涵盖了一个传统 fuzzer 的所有基本功能 :输入生成与变异、启动新进程(syz-executor)执行输入、获取覆盖率信息…
在 syz-fuzzer 运行过程中其会通过 RPC 调用 syz-manager 中的部分函数,因此本篇也会分析上篇所未涉及到的 syz-manager 中的一些函数:)
这一系列文章确实鸽了挺久了,但最近确实是比较忙没啥时间写博客(这一篇其实之前大致的初稿就写好了,但是后面又鸽掉了…),不知道下一篇会是什么时候了 XD
0x01. 基本结构体 相比于直接开始一头雾水地分析源码,笔者认为还是有必要在此之前先列出一些基本的结构体,你也可以把这一节当成一个表来查 :)
Fuzzing 过程相关 1. Syscall:单个系统调用的基本信息 syzkaller 以系统调用为基本输入单位 ,定义于 prog/types.go 中的 Syscall 结构体被用来表示单个系统调用的基本信息:
1
2
3
4
5
6
7
8
9
10
11
12
13
type Syscall struct {int uint64 string string int
当我们编写 syzlang 文件时,我们可以为系统调用添加一些属性 ,这被封装于内嵌在 Syscall 里的 SyscallAttrs 结构体中:
1 2 3 4 5 6 7 8 9 10 11 12 13 14 15 16 17 18 type SyscallAttrs struct {bool uint64 uint64 bool bool bool bool
2. ChoiceTable:系统调用生成优先级表 定义于 prog/prio.go 中的 ChoiceTable 是 syz-fuzzer 中非常核心的一个结构,其用于表示对于给定的系统调用 x,在添加入系统调用 y 后,代码覆盖率会上升的可能性 :
1 2 3 4 5 6 7 8 type ChoiceTable struct {int32 map [int ]bool
优先级权重值存放在二维数组 run 中,需要注意的是这个优先级为累加值 ,例如有给定的三个系统调用 A、B、C,有这样的一个生成优先级表 prios:
1
2
3
4
A B CA 1 2 1 B 2 1 2 C 3 1 2
那么在 run 表中则会将一列的结果逐个加起来,从而有这样的一个结果:
1
2
3
4
A B CA 1 3 4 B 2 3 5 C 3 4 6
为什么要这么做笔者也不知道 :(
3. weights:权重 定义于 prog/prio.go 中的 weights 结构体用于表示【目标系统调用的权重】:
1
2
3
4
5
type weights struct {int int32 int32
4. Call:用作输入的单个系统调用 syzkaller 的 fuzzing 以 syscall 为单位,Syscall 结构体用于表示单个系统调用的基本信息,Call 结构体则表示带有参数的一个系统调用 ,是 syzkaller 中所谓的最小输入单位
1
2
3
4
5
6
7
type Call struct {string
5. ArgCtx:带上下文的参数 系统调用的参数用 Arg 接口表示, ArgCtx 为实现了该接口的带有上下文的一个参数:
1
2
3
4
5
6
7
type ArgCtx struct {uint64 bool
6. Prog:单个输入程序 通常情况下我们并不仅以一个系统调用作为输入,而是以一组系统调用序列 作为输入单位——即一个程序 ,这也是 syzkaller 中实质上的最小输入单位 ,在 syz-fuzzer 当中使用 Prog 结构体来表示单个输入 :
1
2
3
4
5
type Prog struct {string
6. Candidate:序列化的单个输入项 我们通常会有多个 syz-fuzzer 进程与 VM,而我们更希望在 fuzzer 之间共享那些有用的输入 ,这通常通过 syz-fuzzer 向 syz-manager 发起 RPC poll() 来完成——candidate 用以表示序列化后的输入 ,从而方便在不同 进程间传递:
1
2
3
4
5
type Candidate struct {byte bool bool
7. CallInfo:单个系统调用的运行结果 执行完程序之后我们自然想要知道程序的执行结果,在 syz-fuzzer 当中使用 CallInfo 结构体表示单个系统调用的执行结果 :
1
2
3
4
5
6
7
8
type CallInfo struct {uint32 uint32 int
其中 CompMap 为一个二重映射 uint64 → 【uint64 → bool】 ,我们将在后文解释这个东西:
1 2 3 4 5 6 7 8 type CompMap map [uint64 ]map [uint64 ]bool
8. ProgInfo:单个程序的运行结果 syzkaller 中单次运行的最小粒度其实是由一组系统调用构成的一个程序,因此程序的运行结果很自然地就是由一组 CallInfo 构成:
1
2
3
4
type ProgInfo struct {
9. Env:syz-executor 的执行环境信息 Env 结构体用来记录 syz-executor 的执行环境信息,如输入、输出、执行的命令行等:
1
2
3
4
5
6
7
8
9
10
11
12
13
14
15
type Env struct {byte byte string string int uint64 uint64
10. WorkTriage/WorkCandidate/WorkSmash :实际的单个输入项 在 fuzzing 过程当中 我们实际上不直接以 raw 的 Prog 作为输入,我们还想要在输入上标识更多额外的信息——因此便需要加上一层 wrapper,一共有如下三种类型 :
1 2 3 4 5 6 7 8 9 10 type WorkTriage struct {int
WorkCandidate:由 hub(也就是 syz-manager)传来的程序
1 2 3 4 5 6 7 type WorkCandidate struct {
1 2 3 4 5 6 7 type WorkSmash struct {int
11. Cover:覆盖率信息 主流的 fuzzer 都是基于覆盖率指导的,syzkaller 也不例外,在 syz-fuzzer 中使用 Cover 结构体表示覆盖率信息:
没有注释所以笔者也没太看明白是怎么个意思:(
目前推测 key 是 program counter,val 目前无实际意义只是用来占位表示覆盖到了该地址
1 type Cover map [uint32 ]struct {}
输入生成变异相关 0. hint 机制 我们首先来看 syz-executor 中一个重要的变异机制——mutate with hint (可以理解为 hint 辅助的变异),在 hint.go 开头有如下注释:
1.CompMap:用作比较的参数的收缩/扩展替换取值表【核心】 CompMap 为一个 uint64 到 [uint64 到 bool 的映射] 的映射,用来在输入变异的时候进行参数值的替换 :
1 2 3 4 5 6 7 8 type CompMap map [uint64 ]map [uint64 ]bool
看着比较抽象,笔者看了半天也不知道这™是个啥玩意,下面我们结合 prog/hints_test.go 中的示例来看:)
条件分支 是现代编程语言中的一个基本结构,例如我们有如下函数,其会根据不同的取值进入不同的分支:
我们给该函数传入的参数为 0x1234567890abcdef 在该函数当中参数由于强制类型转换而发生了截断 ,我们称之为收缩 (shrink),由于参数截断之后一个条件都匹配不上,所以我们一个分支都进不去:(
那么如果我们想要走进不同的分支该怎么办呢? 0x1234567890abcdef 截断成 u8 后变成 0xef,如果我们想要走进第一个条件分支那就要替换成 0xab;类似地, 0x1234567890abcdef 截断成 u16 后变成 0xcdef,如果我们想要走进第二个条件分支那就要替换成 0xcdcd ; 0x1234567890abcdef 截断成 u32 后变成 0xabcdef,如果我们想要走进第三个条件分支那就要替换成 0xefefef ; 而如果我们想要走进最后一个条件分支,则需要将参数整个替换成 0x0101010101010101 ,由此我们得到如下 CompMap :
1 2 3 4 5 6 CompMap{0xef : compSet(0xab , 0xef ),0xcdef : compSet(0xcdcd ),0x90abcdef : compSet(0xefefefef ),0x1234567890abcdef : compSet(0x0101010101010101 ),
根据该 CompMap ,我们最后得到可以用来替换原参数的新参数值为 :
1 2 3 4 5 6 []uint64 {0x0101010101010101 ,0x1234567890abcdab ,0x1234567890abcdcd ,0x12345678efefefef ,
在 syzkaller 的实际运行过程当中,这些比较操作数对应的是内核中的代码分支 ,syzkaller 通过 KCOV 获取这些比较操作数,从而对程序输入变异以获取更高的代码覆盖率
全局管控相关 1. Fuzzer:基本信息 Fuzzer 结构体用以存储一个 syz-fuzzer 的所有基本信息,定义于 syz-fuzzer/fuzzer.go 中:
1 2 3 4 5 6 7 8 9 10 11 12 13 14 15 16 17 18 19 20 21 22 23 24 25 26 27 28 29 30 31 32 33 34 35 36 37 38 type Fuzzer struct {string chan struct {}map [int ]bool uint64 uint32 bool bool bool map [hash.Sig]struct {}int64 int64
2. Target:目标架构信息 定义于 prog/target.go 中的 Target 结构体用以表示 fuzzing 目标架构的基本信息:
懒得翻译了,太多字了,自己看:)
1 2 3 4 5 6 7 8 9 10 11 12 13 14 15 16 17 18 19 20 21 22 23 24 25 26 27 28 29 30 31 32 33 34 35 36 37 38 39 40 41 42 43 44 45 46 47 48 49 50 51 52 53 54 55 56 57 58 59 60 61 62 63 64 65 type Target struct {string string string uint64 uint64 uint64 uint64 bool bool func () func (c *Call, fixStructure bool ) error func (c ExecCall) string map [string ]func (g *Gen, typ Type, dir Dir, old Arg) map [string ]bool uint64 int map [string ]*Syscallmap [string ]uint64 func (target *Target) map [string ]*ResourceDescmap [string ][]*Syscall
3. Proc:syz-executor 实例对象 在 syz-fuzzer 当中 Proc 结构体被用以表示一个 syz-executor 实例
1 2 3 4 5 6 7 8 9 10 11 type Proc struct {int
其中 env 成员用以表示单个 syz-executor 的运行环境,定义于 pkg/ipc/ipc.go 中:
1 2 3 4 5 6 7 8 9 10 11 12 13 14 15 type Env struct {byte byte string string int uint64 uint64
Env->cmd 则用以表示执行 syz-executor 的命令信息,包括 pid、配置、命令行参数等:
1 2 3 4 5 6 7 8 9 10 11 12 type command struct {int string chan []byte chan error byte
command->cmd 为最终用来执行 syz-executor 的命令行,来自于 golang 原生的 exec 库
4. WorkQueue:待使用的单 syz-fuzer 的全局输入队列 在 syz-fuzzer 当中所有的输入都被存放在 WorkQueue 队列当中,一个 syz-fuzzer 可能会启动多个 syz-executor 进程,他们共享同一个 WorkQueue:
1 2 3 4 5 6 7 8 9 10 11 12 13 14 15 type WorkQueue struct {int chan struct {}
我们可以看到 WorkQueue 为 WorkTriage/WorkCandidate/WorkSmash 都分别建立了一个新的队列
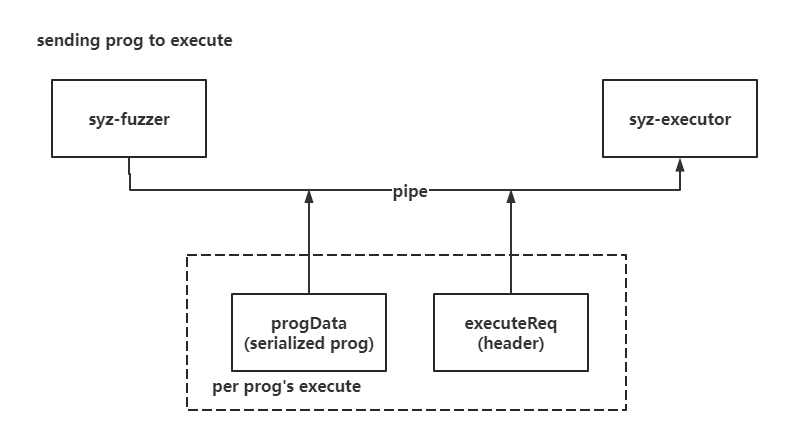
fuzzer & executor 通信相关 1. executeReq:fuzzer→executor 请求头 fuzzing 的主体进程由 syz-fuzzer 完成,syz-executor 仅需要完成单个输入程序的运行,因此 syz-fuzzer 需要多次与 syz-executor 间通信:发送待运行的数据并接收运行结果
syz-fuzzer 与 syz-executor 间通信通过管道完成,因此每次通信前 syz-fuzzer 需要手动告诉 syz-executor 本次待接收的数据类型、长度等信息,这些信息被封装在固定大小的 executeReq 结构体当中:
1 2 3 4 5 6 7 8 9 10 11 12 type executeReq struct {uint64 uint64 uint64 uint64 uint64 uint64 uint64 uint64
我们可以理解为 executeReq 为单次请求的请求头,后面跟着的序列化输入程序 progData 为单次请求的请求体,故 syz-fuzzer 向 syz-executor 发送单个程序执行请求的示例如下:
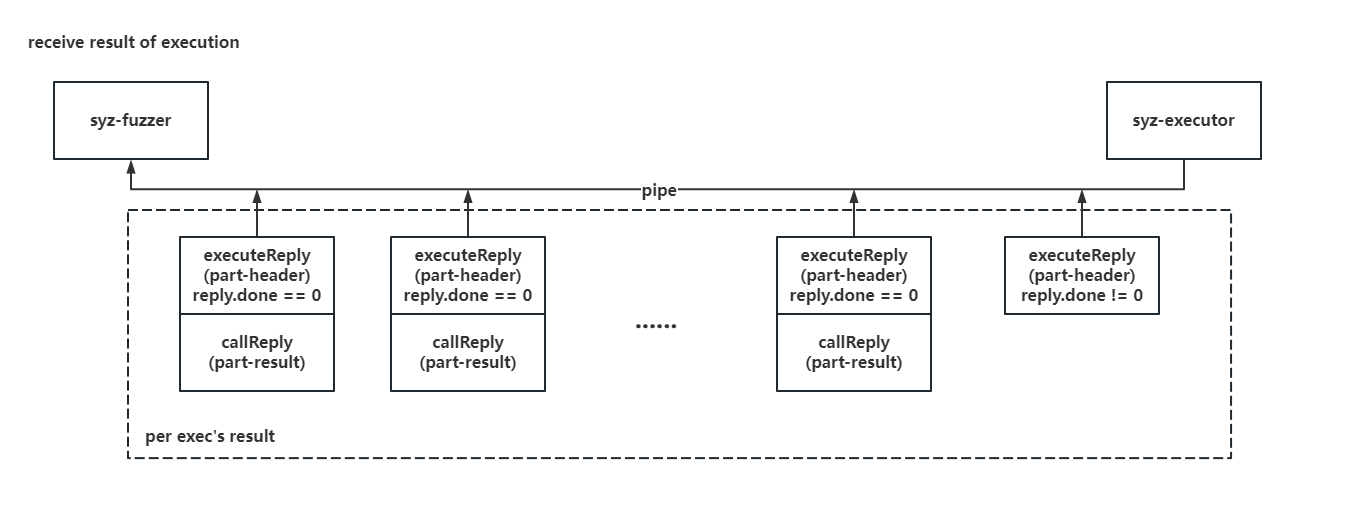
2. executeReply & callReply:executor 方响应的单个系统调用执行结果 有收便有发,syz-executor 在完成执行后会通过另一个管道将执行结果发送给 syz-fuzzer,由于 syzkaller 以单个系统调用为执行的最小粒度,因此syz-executor 每次返回给 syz-fuzzer 的便是单个系统调用的执行结果 ,使用一个头部 executeReply 标识信息,使用 callReply 存储具体结果:
1 2 3 4 5 6 7 8 9 10 11 12 13 14 15 16 17 18 19 type executeReply struct {uint32 uint32 uint32 type callReply struct {uint32 uint32 uint32 uint32 uint32 uint32 uint32 uint32
executeReply 中的 done 标志位用以标识传输是否结束,对于来自 syz-fuzzer 的单次执行请求,syz-executor 的返回结果如下(以一个 done != 0 的 executeReply 作为终止):
0x02. main():与 manager 建立 RPC 连接,进行初始化工作 我们还是按照惯例从程序入口点进行分析,syz-fuzzer() 的 main() 函数做的工作比较简单,主要还是一些初始化工作以及引导后续工作流程
初始化参数解析与 RPC 连接,获取语料库与输入 Step.I - 一些初始化工作 一开始还是惯例的各种初始化和配置参数解析工作
1 2 3 4 5 6 7 8 9 10 11 12 13 14 15 16 17 18 19 20 21 22 23 24 25 26 27 28 29 30 31 32 33 func main () 50 )var ("name" , "test" , "unique name for manager" )"os" , runtime.GOOS, "target OS" )"arch" , runtime.GOARCH, "target arch" )"manager" , "" , "manager rpc address" )"procs" , 1 , "number of parallel test processes" )"output" , "stdout" , "write programs to none/stdout/dmesg/file" )"test" , false , "enable image testing mode" ) "runtest" , false , "enable program testing mode" ) "raw_cover" , false , "fetch raw coverage" )defer tool.Init()()0 , "fuzzer started" )if err != nil {"%v" , err)if err != nil {"failed to create default ipc config: %v" , err)if *flagRawCover {
接下来会创建一个 shutdown channel 并启动一个协程进行监测,当该 channel 有数据时说明遇到了一些情况,此时 syz-fuzzer 需要主动退出
1 2 3 4 5 6 7 8 shutdown := make (chan struct {})go func () 0 , "SYZ-FUZZER: PREEMPTED" )1 )
osutil.HandleInterrupts() 则是一个根据不同的目标 os 进行定制的函数,对于 unix 系 os 而言该函数定义于 osutil_unix.go 中,其会等待收到三个 SIGINT 信号才真正关闭程序:
1 2 3 4 5 6 7 8 9 10 11 12 13 14 15 16 17 func HandleInterrupts (shutdown chan struct {}) go func () make (chan os.Signal, 3 )close (shutdown)"SIGINT: shutting down...\n" )"SIGINT: shutting down harder...\n" )"SIGINT: terminating\n" )int (syscall.SIGINT))
Step.II - 与 syz-manager 间建立 RPC 通信,加载语料库 回到 main() 中,接下来会收集 Guest 信息并尝试与 Host(syz-manager) 间建立 RPC 连接,若失败则直接退出,这里我们传给 syz-manager 的是 rpctype.ConnectArgs,收到的响应结果为 rpctype.ConnectRes ,其中包含有很多信息:
1 2 3 4 5 6 7 8 9 10 11 12 13 14 15 16 17 18 19 20 21 22 23 24 25 26 27 28 29 30 31 checkArgs := &checkArgs{if *flagTest {return 0 , "dialing manager at %v" , *flagManager)if err != nil {"failed to create an RPC client: %v " , err)1 , "connecting to manager..." )if err := manager.Call("Manager.Connect" , a, r); err != nil {"failed to call Manager.Connect(): %v " , err)
syz-fuzzer 中的 RPC 都会调用到 syz-manager/rpc.go 中的 RPCServer 的成员函数,我们最终会调用到 syz-manager 上的 Connect() 函数进行连接,其核心是调用 RPCServer.RPCManagerView.fuzzerConnect() 最小化语料库并拷贝 BugFrame 等信息,这里就不展开分析了:)
接下来解析要开启的特性标志位;随后检查与 syz-manager 进行 RPC 连接的响应结果中的 CoverFilterBitmap 是否为空,不为空则写入到 "syz-cover-bitmap" 文件中,该信息主要是给 syz-executor 用的:
1 2 3 4 5 6 7 8 9 featureFlags, err := csource.ParseFeaturesFlags("none" , "none" , true )if err != nil {if r.CoverFilterBitmap != nil {if err := osutil.WriteFile("syz-cover-bitmap" , r.CoverFilterBitmap); err != nil {"failed to write syz-cover-bitmap: %v" , err)
之后若 syz-manager 返回结果中的 CheckResult 为空,则重新生成配置信息后通过 RPC 调用 syz-manager 的 Manager.Check() ,若有错误则直接退出:
1 2 3 4 5 6 7 8 9 10 11 12 13 14 15 16 17 18 19 20 21 if r.CheckResult == nil {if err != nil {if r.CheckResult == nil {new (rpctype.CheckArgs)if err := manager.Call("Manager.Check" , r.CheckResult, nil ); err != nil {"Manager.Check call failed: %v" , err)if r.CheckResult.Error != "" {"%v" , r.CheckResult.Error)
这次 RPC 实际上会调用到 syz-manager 中的 machineChecked(),该函数会调用 loadCorpus() 完成语料库的加载 :
1 2 3 4 5 6 7 8 9 func (mgr *Manager) map [*prog.Syscall]bool ) {defer mgr.mu.Unlock()
回到 syz-fuzzer,若 CheckResult 不为空则调用 target.UpdateGlobs() 将 manager 返回数据存放到 GlobFiles 映射中,再调用 Setup() 根据所开启的特性配置 executor 的参数并调用 osutil.RunCmd() 在 5min 后启动 executor,这里就不展开了
1 2 3 4 5 6 else {if err = host.Setup(target, r.CheckResult.Features, featureFlags, config.Executor); err != nil {
之后日志输出开启的系统调用数量及特性信息,创建 IPC 配置信息,若设置了 runtest 标志位(默认为 false)则调用 runTest() 后直接返回,这个主要是测试用的这里就不展开了:
1 2 3 4 5 6 7 8 9 10 11 log.Logf(0 , "syscalls: %v" , len (r.CheckResult.EnabledCalls[sandbox]))for _, feat := range r.CheckResult.Features.Supported() {0 , "%v: %v" , feat.Name, feat.Reason)if *flagRunTest {return
之后创建 needPoll channel 并写入数据,主要用来标识是否需要向 syz-manager() 发起 poll(向 syz-manager 获取语料库与 candidate);接下来创建了一个标识当前 syz-fuzzer 信息的 Fuzzer 结构体以及一个 ipc.Gate 结构体(用于将并发级别和窗口限制为给定的值):
1 2 3 4 5 6 7 8 9 10 11 12 13 14 15 16 17 18 19 20 21 22 23 24 make (chan struct {}, 1 )struct {}{}make (map [hash.Sig]struct {}),make ([]uint64 , StatCount),2 **flagProcs, gateCallback)
接下来是一个小循环,调用 poll() 以向 syz-manager 获取语料库与 candidate 加入到本地工作队列中 :
1 2 3 4 5 6 for needCandidates, more := true , true ; more; needCandidates = false {nil )0 , "fetching corpus: %v, signal %v/%v (executing program)" ,len (fuzzer.corpus), len (fuzzer.corpusSignal), len (fuzzer.maxSignal))
poll():通过 RPC 向 syz-manager 获取语料库与 candidate 加入本地工作队列中 该函数主要做了两件事:
通过 RPC 向 syz-manager 获取语料库与 candidate
将获得的 candidate 加入本地工作队列中
1 2 3 4 5 6 7 8 9 10 11 12 13 14 15 16 17 18 19 20 21 22 23 24 25 26 27 28 29 30 func (fuzzer *Fuzzer) bool , stats map [string ]uint64 ) bool {if err := fuzzer.manager.Call("Manager.Poll" , a, r); err != nil {"Manager.Poll call failed: %v" , err)1 , "poll: candidates=%v inputs=%v signal=%v" ,len (r.Candidates), len (r.NewInputs), maxSignal.Len())for _, inp := range r.NewInputs {for _, candidate := range r.Candidates {if needCandidates && len (r.Candidates) == 0 && atomic.LoadUint32(&fuzzer.triagedCandidates) == 0 {1 )return len (r.NewInputs) != 0 || len (r.Candidates) != 0 || maxSignal.Len() != 0
该函数会通过 RPC 调用到 syz-manager 中 syz-manager/rpc.go 下的 Poll() 函数:
首先会获取在 syz-manager 中该 syz-fuzzer 的信息,并检查最大信号量
1 2 3 4 5 6 7 8 9 10 11 12 13 14 15 16 17 18 19 20 21 22 23 func (serv *RPCServer) error {defer serv.mu.Unlock()if f == nil {1 , "poll: fuzzer %v is not connected" , a.Name)return nil if !newMaxSignal.Empty() {len (serv.maxSignal))for _, f1 := range serv.fuzzers {if f1 == f || f1.rotated {continue
如果该 syz-fuzzer 对应的 VM 实例正在轮转运行,则直接返回
1 2 3 4 if f.rotated {return nil
接下来写入新的最大信号,之后检查 syz-fuzzer 是否向 syz-manager 请求了新的 candidate,若是则调用 candidateBatch() 获取,该函数的作用主要是从 syz-manager 上的 candidate 队列中获取一定数量的 candidate
1 2 3 4 r.MaxSignal = f.newMaxSignal.Split(2000 ).Serialize()if a.NeedCandidates {
若获取到的 candidate 数量为 0,说明是第一次 poll(),这时便从初始化时所读取的语料库中获取输入作为 candidate 返还给 syz-fuzzer
1 2 3 4 5 6 7 8 9 10 11 12 13 14 15 16 17 18 19 20 21 22 23 24 if len (r.Candidates) == 0 {const initialBatch = 50 if len (a.Stats) == 0 && batchSize < initialBatch {for i := 0 ; i < batchSize && len (f.inputs) > 0 ; i++ {len (f.inputs) - 1 append (r.NewInputs, f.inputs[last])if len (f.inputs) == 0 {nil 4 , "poll from %v: candidates=%v inputs=%v maxsignal=%v" ,len (r.Candidates), len (r.NewInputs), len (r.MaxSignal.Elems))return nil
构建【系统调用生成优先级表】 接下来是正式进行 fuzzing 之前最核心的一步——构建【系统调用生成优先级表】 choiceTable ,该表的作用是:
计算对于给定的系统调用 x,在添加入系统调用 y 后,代码覆盖率会上升的可能性
从而在后续的 fuzzing 过程当中使用该表对输入进行变异
1 2 3 4 5 calls := make (map [*prog.Syscall]bool )for _, id := range r.CheckResult.EnabledCalls[sandbox] {true
choiceTable 的计算通过 定义于prog/prio.go 中的 BuildChoiceTable() 完成:
首先建立两个表:
① Syscall→bool 的表 enable,表示启用的系统调用 ,并将所有系统调用都初始化为 true
② int→bool 的表 noGenerateCalls ,表示不用于生成的系统调用
接下来遍历系统调用属性(在 syzlang 规则文件中编写),若某个系统调用不开启则将其从 enable 表中去除,若某个系统调用不用于生成则将其从 enable 表中去除并添加到 noGenerateCalls 表
之后创建第三个表 generateCalls,为 enable 表的拷贝,表示用于生成的系统调用 ,并根据系统调用号进行从小到大的排序
这里的【生成】指的是生成新的输入,即我们是否在输入生成时添加该系统调用
1 2 3 4 5 6 7 8 9 10 11 12 13 14 15 16 17 18 19 20 21 22 23 24 25 26 func (target *Target) map [*Syscall]bool ) *ChoiceTable {if enabled == nil {make (map [*Syscall]bool )for _, c := range target.Syscalls {true make (map [int ]bool )for call := range enabled {if call.Attrs.Disabled {delete (enabled, call)else if call.Attrs.NoGenerate {true delete (enabled, call)var generatableCalls []*Syscallfor c := range enabled {append (generatableCalls, c)if len (generatableCalls) == 0 {panic ("no syscalls enabled and generatable" )func (i, j int ) bool {return generatableCalls[i].ID < generatableCalls[j].ID
接下来判断语料库中是否包含有禁用的系统调用,若是则直接退出
1 2 3 4 5 6 7 8 for _, p := range corpus {for _, call := range p.Calls {if !enabled[call.Meta] && !noGenerateCalls[call.Meta.ID] {"corpus contains disabled syscall %v\n" , call.Meta.Name)panic ("disabled syscall" )
最后调用 target.CalculatePriorities(corpus) 基于语料库进行系统调用生成优先级表的计算
完成后生成一个新的表 run 作为结果与生成&不生成系统调用表一起返回,其中存储的是对于启用的系统调用而言的加权权重的累加和
例如有给定的三个系统调用 A、B、C,有这样的一个生成优先级表 prios:
1 2 3 4 A B CA 1 2 1 B 2 1 2 C 3 1 2
那么在 run 表中则会将一列的结果逐个加起来,从而有这样的一个结果:
1 2 3 4 A B CA 1 3 4 B 2 3 5 C 3 4 6
为什么要这么做笔者也不知道:(
1 2 3 4 5 6 7 8 9 10 11 12 13 14 15 16 17 18 19 20 prios := target.CalculatePriorities(corpus)make ([][]int32 , len (target.Syscalls))for i := range run {if !enabled[target.Syscalls[i]] {continue make ([]int32 , len (target.Syscalls))var sum int32 for j := range run[i] {if enabled[target.Syscalls[j]] {return &ChoiceTable{target, run, generatableCalls, noGenerateCalls}
【核心】target.CalculatePriorities(corpus):计算 call-to-call 的权重表 定义于 prog/prio.go 中的 CalculatePriorities(corpus) 为系统调用生成优先级表的核心计算过程,代码其实比较简单(不过注释很长),主要分为静态优先级 与动态优先级 两部分进行计算,默认进行静态优先级的计算,若语料库不为空则再计算动态优先级:
1 2 3 4 5 6 7 8 9 10 11 12 13 14 15 16 17 18 19 20 21 22 23 24 25 func (target *Target) int32 {if len (corpus) != 0 {for i, prios := range dynamic {for j, p := range prios {return static
对于给定的系统调用 X,添加系统调用 Y 的优先级为:prioHigh 为一个常量 1000
① calcStaticPriorities():静态优先级计算 Step.I - 计算资源使用情况
注:这里的【资源】更严谨地说应该是 syzlang 中的 resource
calcStaticPriorities() 用以完成静态优先级的计算,该函数首先会调用 calcResourceUsage() 获取当前的【资源使用情况】:
该函数的返回结果为一个二重映射 资源名(string)→【系统调用号(int)→权重(weights)】
该函数的核心逻辑便是调用 ForeachType() 进行分析
1 2 3 4 5 6 7 8 9 10 func (target *Target) int32 {func (target *Target) map [string ]map [int ]weights {make (map [string ]map [int ]weights)func (t Type, ctx *TypeCtx) return uses
我们稍后再来分析传入的闭包函数,我们首先分析 ForeachType() ,其会遍历系统调用表并调用 foreachTypeImpl():
1 2 3 4 5 func ForeachTypePost (syscalls []*Syscall, f func (t Type, ctx *TypeCtx) for _, meta := range syscalls {false , f)
foreachTypeImpl() 用以处理单个系统调用,其首先会创建一个 类型→bool 的映射 seen,接下来会创建一个闭包函数 rec ,该函数会根据传入类型的不同进行不同操作:
注:这里的类型应当为 syzlang 中的类型
若是指针类型 (PtrType ),则递归调用 rec
若是数组类型(ArrayType ),则递归调用 rec
若是结构体类型(StructType)且不在 seen 中,将其添加到 seen 中,并为每一个结构体成员调用 rec
若是联合类型(UnionType)且不在 seen 中,将其添加到 seen 中,并为每一个联合成员调用 rec
其他合法类型则直接跳过,非法类型(syzlang 编译期错误)则 panic
最后调用上层传入的闭包函数(我们在 ForeachTypePost() 中传入 preorder = false)
1 2 3 4 5 6 7 8 9 10 11 12 13 14 15 16 17 18 19 20 21 22 23 24 25 26 27 28 29 30 31 32 33 34 35 36 37 38 39 40 41 42 43 44 45 46 47 48 49 func foreachTypeImpl (meta *Syscall, preorder bool , f func (t Type, ctx *TypeCtx) make (map [Type]bool )var rec func (*Type, Dir) func (ptr *Type, dir Dir) if preorder {if ctx.Stop {return switch a := (*ptr).(type ) {case *PtrType:case *ArrayType:case *StructType:if seen[a] {break true for i, f := range a.Fields {case *UnionType:if seen[a] {break true for i, f := range a.Fields {case *ResourceType, *BufferType, *VmaType, *LenType, *FlagsType,case Ref:default :panic ("unknown type" )if !preorder {if ctx.Stop {panic ("Stop is set in post-order iteration" )
而 foreachTypeImpl() 实际上便是为传入的系统调用的每个参数都调用 rec(),若存在返回值也为其调用 rec:
1 2 3 4 5 6 7 for i := range meta.Args {if meta.Ret != nil {
现在我们回到 calcResourceUsage() 看其传给 ForeachType() 的闭包函数,也是根据系统调用的参数的类型不同进行处理:
这里的 a 为 Type 接口, a.Desc 为 ResourceDesc类型,即对一个资源的描述,其 Kind 域为一个 string 数组,Values 域为一个 uint64 数组
若是资源类型 (ResourceType ):
若在 AuxResources 表(辅助资源表,即扮演着辅助角色但是在所有系统调用中都会用到的资源(例如uid/gid))里已有记录,则调用 noteUsage() 更新权重值,这里给的权重值为 1
否则,遍历 a.Desc.Kind ,调用 noteUsage() 更新权重值,这里给除了最后一个 Kind 以外的权重值为 2,最后一个为 10
若是指针类型(PttrType),则判断指针所指对象类型(结构体/联合体/数组)并调用 noteUsage() 更新权重值,这里给的权重值都为 10
若是 buffer 类型(BufferType),则根据 a.Kind 进行不同处理:
BufferBlobRand, BufferBlobRange, BufferText, BufferCompressed :无处理BufferString, BufferGlob :若 a.SubKind != "",则调用 noteUsage() 更新权重值,这里给的权重值为 2BufferFilename:调用 noteUsage() 更新权重值,这里给的权重值为 10
若为 VMA 类型 (VmaType),则调用 noteUsage() 更新权重值,这里给的权重值为 5
对于整型则检查 a.Kind 是否为 IntPlain, IntRange,若不是则直接 panic
1 2 3 4 5 6 7 8 9 10 11 12 13 14 15 16 17 18 19 20 21 22 23 24 25 26 27 28 29 30 31 32 33 34 35 36 37 38 39 40 41 42 43 44 45 46 47 48 49 func (t Type, ctx *TypeCtx) switch a := t.(type ) {case *ResourceType:if target.AuxResources[a.Desc.Name] {1 , ctx.Dir, "res%v" , a.Desc.Name)else {"res" for i, k := range a.Desc.Kind {"-" + kint32 (10 )if i < len (a.Desc.Kind)-1 {2 case *PtrType:if _, ok := a.Elem.(*StructType); ok {10 , ctx.Dir, "ptrto-%v" , a.Elem.Name())if _, ok := a.Elem.(*UnionType); ok {10 , ctx.Dir, "ptrto-%v" , a.Elem.Name())if arr, ok := a.Elem.(*ArrayType); ok {10 , ctx.Dir, "ptrto-%v" , arr.Elem.Name())case *BufferType:switch a.Kind {case BufferBlobRand, BufferBlobRange, BufferText, BufferCompressed:case BufferString, BufferGlob:if a.SubKind != "" {2 , ctx.Dir, fmt.Sprintf("str-%v" , a.SubKind))case BufferFilename:10 , DirIn, "filename" )default :panic ("unknown buffer kind" )case *VmaType:5 , ctx.Dir, "vma" )case *IntType:switch a.Kind {case IntPlain, IntRange:default :panic ("unknown int kind" )
这里大量用到了 noteUsage() 函数,该函数其实就是用来更新传入的表中 X 到 Y 的权重值 (取最大值):
1 2 3 4 5 6 7 8 9 10 11 12 13 14 15 16 17 func noteUsage (uses map [string ]map [int ]weights, c *Syscall, weight int32 , dir Dir, str string , args ...interface {}) if uses[id] == nil {make (map [int ]weights)if dir != DirOut {if weight > uses[id][c.ID].in {if weight > uses[id][c.ID].inout {
Step.II - 建立 call-to-call 的权重表 现在我们回到 calcStaticPriorities() 中,在完成了资源使用表 uses 的建立之后,接下来会建立 call-to-call 的权重表 prios:
遍历资源使用表中的每个权重,基于参数方向赋予静态权重值(例如,当 c0 为创建了一个资源的调用,而 c1 为使用该资源的调用,则一个更高的权重将被赋予)
调用 normalizePrio() 将表中权重值进行标准化
对于自我系统调用权重进行单独赋值
1 2 3 4 5 6 7 8 9 10 11 12 13 14 15 16 17 18 19 20 21 22 23 24 prios := make ([][]int32 , len (target.Syscalls))for i := range prios {make ([]int32 , len (target.Syscalls))for _, weights := range uses {for _, w0 := range weights {for _, w1 := range weights {if w0.call == w1.call {continue 3 /2 + w0.inout*w1.inoutfor c0, pp := range prios {9 / 10 return prios
完成基于资源使用的权重值计算之后静态优先级就算计算完毕了:)
② calcDynamicPrio():动态优先级计算 动态优先级的计算基于现有的语料库完成,这一部分的代码比较简单,主要是遍历语料库,对于同时出现的系统调用对 X、Y 的优先级值 +1,完成后调用 normalizePrio() 进行标准化:
1 2 3 4 5 6 7 8 9 10 11 12 13 14 15 func (target *Target) int32 {make ([][]int32 , len (target.Syscalls))for i := range prios {make ([]int32 , len (target.Syscalls))for _, p := range corpus {for idx0, c0 := range p.Calls {for _, c1 := range p.Calls[idx0+1 :] {return prios
③ normalizePrio():优先级值标准化 这个函数逻辑比较简单,主要就是将权重值标准化到 [prioLow..prioHigh] 范围:
1 2 3 4 5 6 7 8 9 10 11 12 13 14 15 16 17 18 19 20 const (10 1000 func normalizePrio (prios [][]int32 ) for _, prio := range prios {int32 (1 )for _, p := range prio {if max < p {for i, p := range prio {
为每个 syz-executor 启动一个协程,正式开始 fuzz 完成前面的所有准备工作之后,接下来我们终于可以正式开始进行 fuzzing 了,syz-fuzzer 会调用 newProc() 为每个要启动的 syz-executor 创建一个 Proc 实例对象(都存放在 fuzzer.procs 列表中),并为每个 syz-executor 启动一个新的协程负责具体的 fuzzing 工作 (proc.Loop())
1 2 3 4 5 6 7 8 9 10 11 12 13 14 if r.CoverFilterBitmap != nil {0 , "starting %v fuzzer processes" , *flagProcs)for pid := 0 ; pid < *flagProcs; pid++ {if err != nil {"failed to create proc: %v" , err)append (fuzzer.procs, proc)go proc.loop()
最后主线程调用 pollLoop(),循环等待需要 poll 的情况
0x03. pollLooop():循环等待处理 fuzzing 协程请求,与 syz-manager 通信 fuzzing 的工作是由协程 proc.loop() 完成的,在继续深入 fuzzing 过程之前我们先来看看主线程最后还会做些什么:)
主线程在启动这些协程之后所需要做的工作其实就是响应这些协程的请求,并负责与 syz-manager 间进行 RPC 通信,通过一个不会返回的 pollLoop() 函数完成,该函数核心其实就是一个无限循环 :
循环等待 ticker (每 3s 响应一次的计时器)或 fuzzer.needPoll 这两个 channel 之一有数据传来
如果是 fuzzer.needPoll 传来请求或是距离上次 poll 的时间大于 10s:
检查 workQueue 是否需要新的 candidate(candidate 数量少于 executor 数量),若不是且本次请求处理为 fuzzer.needPoll 传来请求,则等到到距离上次 poll 的时间大于 10s
收集 executor 数据,调用 poll() 通过 RPC 向 syz-manager 获取新的 candidate
1 2 3 4 5 6 7 8 9 10 11 12 13 14 15 16 17 18 19 20 21 22 23 24 25 26 27 28 29 30 31 32 33 34 35 36 37 38 39 40 unc (fuzzer *Fuzzer) pollLoop() {var execTotal uint64 var lastPoll time.Timevar lastPrint time.Time3 * time.Second * fuzzer.timeouts.Scale).Cfor {false select {case <-ticker: case <-fuzzer.needPoll: true if fuzzer.outputType != OutputStdout && time.Since(lastPrint) > 10 *time.Second*fuzzer.timeouts.Scale {0 , "alive, executed %v" , execTotal)if poll || time.Since(lastPoll) > 10 *time.Second*fuzzer.timeouts.Scale {if poll && !needCandidates {continue make (map [string ]uint64 )for _, proc := range fuzzer.procs {"exec total" ] += atomic.SwapUint64(&proc.env.StatExecs, 0 )"executor restarts" ] += atomic.SwapUint64(&proc.env.StatRestarts, 0 )for stat := Stat(0 ); stat < StatCount; stat++ {0 )if !fuzzer.poll(needCandidates, stats) {
0x04. proc.loop():真正负责 fuzzing 的核心协程 下面我们来到 syz-fuzzer 的另一个核心——真正的 fuzzing 过程 ,syz-fuzzer 会为每个 syz-executor 启动一个新的协程负责具体的 fuzzing 工作(对于 executor 来说相当于督工和不断给任务的上司属于是),该协程对应 proc.loop() 函数,该函数的核心其实还是一个无限循环 :
1 2 3 4 5 6 7 8 func (proc *Proc) 100 if proc.fuzzer.config.Flags&ipc.FlagSignal == 0 {2 for i := 0 ; ; i++ {
从全局 WorkQueue 中获取输入,分类处理执行 大循环的核心逻辑之一为不断地从全局 WorkQueue 中获取新的输入,按照其类型不同调用不同的处理函数,完成后又继续下一轮循环
1 2 3 4 5 6 7 8 9 10 11 12 13 14 item := proc.fuzzer.workQueue.dequeue()if item != nil {switch item := item.(type ) {case *WorkTriage:case *WorkCandidate:case *WorkSmash:default :"unknown work type: %#v" , item)continue
该函数用来处理 WorkQueue 中的 WorkTraige,即可能会提供新覆盖率的程序 :
一开始先调用 signalPrio() 检查该输入之前执行结果的 errno,为 0 则 prio |= 1 << 1,同时还会检查是否 item.p 的 target 不包含 item.p.Calls[call] 对应的调用,若是则 prio |= 1 << 0
判断是否产生了语料库中没有的新信号,若无则直接返回
1 2 3 4 5 6 7 8 9 10 11 12 13 14 15 16 func (proc *Proc) 1 , "#%v: triaging type=%x" , proc.pid, item.flags)if newSignal.Empty() {return ".extra" "extra" if item.call != -1 {"call #%v %v" , item.call, callName)3 , "triaging input for %v (new signal=%v)" , logCallName, newSignal.Len())
完成前面的这些判断工作之后,接下来来到一个会运行三次的小循环:
调用 proc.executeRaw() 将该输入重新执行一次 ,若执行失败(这里的 reexecutionSuccess() 主要检查信号长度是否不为 0)则重新开始循环,失败 2次直接返回
获取执行所得信号与覆盖率,将覆盖率合并到 inputCover 中,如果 rawCover 为空则还会往里边放一份
1 2 3 4 5 6 7 8 9 10 11 12 13 14 15 16 17 18 19 20 21 22 23 24 25 26 27 28 29 30 var inputCover cover.Coverconst (3 3 0 uint32 {}for i := 0 ; i < signalRuns; i++ {if !reexecutionSuccess(info, &item.info, item.call) {if notexecuted > signalRuns/2 +1 {return continue if len (rawCover) == 0 && proc.fuzzer.fetchRawCover {append ([]uint32 {}, thisCover...)if newSignal.Empty() && item.flags&ProgMinimized == 0 {return
这里这个 Merge() 其实笔者没太看明白 :(
目前笔者推测 pc 是 program counter ,这样比较能说得通,不过这样为什么不用 map[uint32]bool 呢?
1 2 3 4 5 6 7 8 9 10 func (cov *Cover) uint32 ) {if c == nil {make (Cover)for _, pc := range raw {struct {}{}
循环结束后会检查 item 的标志位,如果未设置 ProgMinimized 说明该输入还未进行最小化,此时调用 prog.Minimize() 将输入进行最小化
这里传入的闭包函数主要是一个 minimizeAttempts (3)次的小循环,其中会调用 proc.execute() 执行最小化后的程序,执行失败则返回,若三次循环执行中无法再产生新的信号信号则返回 true,否则返回 false
1 2 3 4 5 6 7 8 9 10 11 12 13 14 15 16 17 if item.flags&ProgMinimized == 0 {false ,func (p1 *prog.Prog, call1 int ) bool {for i := 0 ; i < minimizeAttempts; i++ {if !reexecutionSuccess(info, &item.info, call1) {continue if newSignal.Intersection(thisSignal).Len() == newSignal.Len() {return true return false
最后将这个输入序列化后发送给 syz-manager 并将其添加到本地语料库中 ,如果未设置 ProgSmashed 标志位则再将这个输入放到 WorkSmash 队列中
1 2 3 4 5 6 7 8 9 10 11 12 13 14 15 16 17 18 19 data := item.p.Serialize()2 , "added new input for %v to corpus:\n%s" , logCallName, data)if item.flags&ProgSmashed == 0 {
② proc.execute():执行输入,将有意思的输入放到 traige 队列 该函数的逻辑比较简单,主要便是调用 proc.executeRaw() 执行传入的输入,并调用 checkNewSignal() 检查执行的结果,将其中有意思的那些放入 traige 队列:
1 2 3 4 5 6 7 8 9 10 11 12 13 14 func (proc *Proc) if info == nil {return nil for _, callIndex := range calls {if extra {-1 , info.Extra)return info
executeRaw() 函数的主要逻辑其实就是先检查禁用的系统调用然后是一个伪无限循环调用 proc.env.Exec() 执行输入(好多层套娃),若执行失败则进行错误记录并休眠 1s 后重新进行,执行成功则直接返回
1 2 3 4 5 6 7 8 9 10 11 12 13 14 15 16 17 18 19 20 21 22 23 24 25 26 27 28 29 30 31 func (proc *Proc) defer proc.fuzzer.gate.Leave(ticket)for try := 0 ; ; try++ {1 )if err != nil {if err == prog.ErrExecBufferTooSmall {1 )return nil if try > 10 {"executor %v failed %v times: %v" , proc.pid, try, err)4 , "fuzzer detected executor failure='%v', retrying #%d" , err, try+1 )continue 2 , "result hanged=%v: %s" , hanged, output)return info
Env.Exec():启动 syz-executor 并将输入程序序列化后交给其执行 Env.Exec() 函数用来启动 syz-executor 并将输入交给其进行执行,syz-executor 在被启动后会一直等待 syz-fuzzer 传来的输入并执行 ,而不是每个输入都要重新启动一次 executor:
首先将输入序列化到 env.in (作为 syz-executor 的输入,syz-executor 会反序列化后再将其执行),并将 env.out 的前 4 字节(ncmd and nsig )置 0;这里我们注意到 syz-fuzzer 与 syz-executor 间有两种传递数据的方式:管道/共享内存
接下来检查 executor 是否已启动,若未启动( env.cmd == nil )则调用 makeCommand() 启动 syz-executor
接下来调用 cmd.exec() 真正开始让 syz-executor 执行程序 ,若出错则关闭 syz-executor(等 executeRaw() 的下次循环重新启动)
最后解析程序输出,返回结果
1 2 3 4 5 6 7 8 9 10 11 12 13 14 15 16 17 18 19 20 21 22 23 24 25 26 27 28 29 30 31 32 33 34 35 36 37 38 39 40 41 42 43 44 45 46 47 48 49 50 51 52 53 func (env *Env) byte , info *ProgInfo, hanged bool , err0 error ) {if err != nil {return var progData []byte if !env.config.UseShmem {for i := 0 ; i < 4 ; i++ {0 1 )if env.cmd == nil { if p.Target.OS != targets.TestOS && targets.Get(p.Target.OS, p.Target.Arch).HostFuzzer {"./" 1 )if err0 != nil {return if err0 != nil { close ()nil return if info != nil && env.config.Flags&FlagSignal == 0 {if !env.config.UseForkServer {close ()nil return
【核心】makeCommand():建立通信管道,启动 syz-executor makeCommand() 函数是真正启动 syz-executor 的函数,其首先会先创建一个临时文件夹 syzkaller-testdir 并更改权限为 0777:
1 2 3 4 5 6 7 8 9 10 11 12 13 14 15 16 17 18 19 20 21 22 23 24 25 26 27 28 29 30 31 32 func makeCommand (pid int , bin []string , config *Config, inFile, outFile *os.File, outmem []byte , tmpDirPath string ) error ) {"syzkaller-testdir" )if err != nil {return nil , fmt.Errorf("failed to create temp dir: %v" , err)if config.UseForkServer {10 defer func () if c != nil {close ()if err := os.Chmod(dir, 0777 ); err != nil {return nil , fmt.Errorf("failed to chmod temp dir: %v" , err)
接下来创建三个用以与 syz-executor 通信的管道,分别用于捕获输出、向 executor 传递命令、从 executor 接收命令:
1 2 3 4 5 6 7 8 9 10 11 12 13 14 15 16 17 18 19 20 21 22 23 24 if err != nil {return nil , fmt.Errorf("failed to create pipe: %v" , err)defer wp.Close()if err != nil {return nil , fmt.Errorf("failed to create pipe: %v" , err)defer inwp.Close()if err != nil {return nil , fmt.Errorf("failed to create pipe: %v" , err)defer outrp.Close()make (chan []byte , 1 )
接下来会调用 osutil 中的 Command() 创建一个 exec.Cmd 实例(该函数为 golag 原生的 exec.Command() 的 wrapper),executor 实际上要等到后面显式调用 Start() 或 Run() 才正式开始运行(参见创建进程 · Go语言标准库 ):
1 2 3 4 5 6 7 8 9 cmd := osutil.Command(bin[0 ], bin[1 :]...)if inFile != nil && outFile != nil {append (append ([]string {}, os.Environ()...), "ASAN_OPTIONS=handle_segv=0 allow_user_segv_handler=1" )
若是未设置 FlagDebug 则还会启动一个新的协程持续读取 syz-executor 输出管道中的内容:
1 2 3 4 5 6 7 8 9 10 11 12 13 14 15 16 17 18 19 20 21 22 23 24 25 26 27 28 if config.Flags&FlagDebug != 0 {close (c.readDone)else {go func (c *command) const bufSize = 128 << 10 make ([]byte , bufSize)var size uint64 for {if n > 0 {uint64 (n)if size >= bufSize*3 /4 {copy (output, output[size-bufSize/2 :size])2 if err != nil {close (c.readDone)return
最后调用 cmd.Start() 真正启动 syz-executor(该方法不会阻塞父进程),并启动一个新的协程等待 syz-executor 的退出:
1 2 3 4 5 6 7 8 9 10 11 12 13 14 15 16 17 18 19 20 21 22 23 24 25 26 27 if err := cmd.Start(); err != nil {return nil , fmt.Errorf("failed to start executor binary: %v" , err)make (chan error , 1 )go func (c *command) close (c.exited)5 * time.Second))if c.config.UseForkServer {if err := c.handshake(); err != nil {return nil , errnil return tmp, nil
【核心】cmd.exec():将单个程序输入传递给 syz-executor 执行 command.exec() 函数用以将一个序列化后的输入传递给 syz-executor 进程执行,传递的方式主要是通过在 makeCommand() 中建立的 ipc→executor 管道完成的:
1 2 3 4 5 6 7 8 9 10 11 12 13 14 15 16 17 18 19 20 21 22 23 24 25 func (c *command) byte ) (output []byte , hanged bool , err0 error ) {uint64 (c.config.Flags),uint64 (opts.Flags),uint64 (c.pid),uint64 (c.config.Timeouts.Syscall / time.Millisecond),uint64 (c.config.Timeouts.Program / time.Millisecond),uint64 (c.config.Timeouts.Scale),uint64 (len (progData)),byte )(unsafe.Pointer(req))[:]if _, err := c.outwp.Write(reqData); err != nil {"executor %v: failed to write control pipe: %v" , c.pid, err)return if progData != nil {if _, err := c.outwp.Write(progData); err != nil {"executor %v: failed to write control pipe: %v" , c.pid, err)return
对于单个输入程序的传输实际上会先传递一个 executeReq 头部,接下来再传递序列化后的输入程序:
当数据传递过去之后输入程序就已经开始执行了 ,因此该函数后面的部分就都是对结果的处理;)
完成数据发送后会启动一个协程定时等待 executor 执行完毕,若超时则会将 executor 给 kill 掉:
1 2 3 4 5 6 7 8 9 10 11 12 13 done := make (chan bool )make (chan bool )go func () select {case <-t.C:true case <-done:false
随后是一个无限大循环,从 executor→ipc 管道中读取 syz-executor 的执行结果,同样是一个 header executeReply 带一份数据 callReply ,单次请求可能有多份返回数据因此这里是一个无限循环,通过 executeReply 中的 done 标志位标识结束:
1 2 3 4 5 6 7 8 9 10 11 12 13 14 15 16 17 18 19 20 21 22 23 24 25 26 27 28 29 30 31 exitStatus := -1 uint32 )(unsafe.Pointer(&c.outmem[0 ]))4 :]for {byte )(unsafe.Pointer(reply))[:]if _, err := io.ReadFull(c.inrp, replyData); err != nil {break if reply.magic != outMagic {"executor %v: got bad reply magic 0x%x\n" , c.pid, reply.magic)1 )if reply.done != 0 {int (reply.status)break byte )(unsafe.Pointer(callReply))[:]if _, err := io.ReadFull(c.inrp, callReplyData); err != nil {break if callReply.signalSize != 0 || callReply.coverSize != 0 || callReply.compsSize != 0 {"executor %v: got call reply with coverage\n" , c.pid)1 )copy (outmem, callReplyData)len (callReplyData):]
syz-fuzzer 接收 syz-executor 返回数据的示例如下图所示:
最后检查本次执行结果,如果说执行结果一切顺利则直接返回,否则会终止 syz-executor 的继续运行 :
1 2 3 4 5 6 7 8 9 10 11 12 13 14 15 16 17 18 19 20 21 22 23 24 25 26 27 28 close (done)if exitStatus == 0 {return if err := c.wait(); <-hang {true if err != nil {append (output, err.Error()...)append (output, '\n' )return if exitStatus == -1 {if exitStatus == statusFail {"executor %v: exit status %d\n%s" , c.pid, exitStatus, output)return
proc.smashInput() 用以执行并变异刚刚被加入到语料库中的程序 (即 WorkSmash ):
首先检查 faultInjectionEnabled ,若设置了则调用 proc.failCall()
该函数用以将一个 fault 注入到程序中,其会循环一百次,设置 newProg.Calls[call].Props.FailNth = nth (newProg 为输入程序的克隆)后调用 proc.executeRaw() 进行执行
接下来检查 comparisonTracingEnabled ,若设置了则调用 proc.executeHintSeed() 使用 hint 进行变异
随后获取 syz-fuzzer 当前快照,并循环一百次:调用 prog.Mutate() 将输入程序进行变异后再调用 proc.executeAndCollide() 执行变异后的程序
1 2 3 4 5 6 7 8 9 10 11 12 13 14 15 func (proc *Proc) if proc.fuzzer.faultInjectionEnabled && item.call != -1 {if proc.fuzzer.comparisonTracingEnabled && item.call != -1 {for i := 0 ; i < 100 ; i++ {1 , "#%v: smash mutated" , proc.pid)
变异函数 prog.Mutate() 我们将在下一节中深入分析,本节我们先来看另外两个函数:
proc.executeHintSeed():使用 hint 变异程序并执行 该函数首先会将输入程序执行一次,接下来调用 prog.MutateWithHints 使用执行所得的 CompMap 对输入程序中的一些参数值进行替换 ,最后再将该输入程序执行一次:
1 2 3 4 5 6 7 8 9 10 11 12 13 14 15 func (proc *Proc) int ) {1 , "#%v: collecting comparisons" , proc.pid)if info == nil {return func (p *prog.Prog) 1 , "#%v: executing comparison hint" , proc.pid)
在 MutateWithHints() 当中输入进程会先被克隆一份,接下来使用 ForeachArg 遍历指定系统调用中的每个参数,并传入了一些闭包函数套娃(套中套中套属于是):
1 2 3 4 5 6 7 8 9 10 11 12 13 14 15 16 17 18 func (p *Prog) int , comps CompMap, exec func (p *Prog) func () if p.Target.sanitize(c, false ) != nil {return func (arg Arg, _ *ArgCtx)
类似于我们上文分析的 ForeachType(),ForeachArg() 会为该调用的返回值与每一个参数都调用 foreachArgImpl(),该函数首先会调用上层传入的闭包 generateHints(),接下来会根据参数类型进行不同操作:
GroupArg (逻辑上的一组参数,即结构体 与数组 ):获取并遍历其中的每个成员,递归调用 foreachArgImpl()PointerArg (指针类型):判断其指向 (pointee)是否为 nil,若否,递归调用 foreachArgImpl()UnionArg (联合体类型):递归调用 foreachArgImpl()
1 2 3 4 5 6 7 8 9 10 11 12 13 14 15 16 17 18 19 20 21 22 23 24 25 26 27 28 29 30 31 32 33 34 35 36 37 38 39 40 41 42 43 44 45 46 47 48 49 50 51 52 53 54 55 func ForeachArg (c *Call, f func (Arg, *ArgCtx) if c.Ret != nil {for _, arg := range c.Args {func foreachArgImpl (arg Arg, ctx *ArgCtx, f func (Arg, *ArgCtx) defer func () if ctx.Stop {return switch a := arg.(type ) {case *GroupArg:0 if typ, ok := a.Type().(*StructType); ok {var totalSize uint64 for i, arg1 := range a.Inner {if i == overlayField {if totalSize < ctx.Offset {if varlen && totalSize > claimedSize || !varlen && totalSize != claimedSize {panic (fmt.Sprintf("bad group arg size %v, should be <= %v for %#v type %#v" ,case *PointerArg:if a.Res != nil {0 case *UnionArg:
现在我们来看 generateHints() 函数,该函数首先会调用 Arg 接口的 Type() 函数获取类型并进行判断,对于大部分类型好像都是直接返回,仅有以下通过:
ConstType:会检查 IsPad 标志位,若不为真才会继续BufferType 中的 BufferString, BufferGlob:会检查值的长度,为 0 才会继续其他的不在如下代码中的类型
1 2 3 4 5 6 7 8 9 10 11 12 13 14 15 16 17 18 19 20 21 22 23 24 25 26 27 28 29 30 31 func generateHints (compMap CompMap, arg Arg, exec func () if typ == nil || arg.Dir() == DirOut {return switch t := typ.(type ) {case *ProcType:return case *ConstType:if IsPad(typ) {return case *CsumType:return case *BufferType:switch t.Kind {case BufferFilename:return case BufferString, BufferGlob:if len (t.Values) != 0 {return
最后会根据参数实际的存储类型进行判断:
对于常量参数 ConstArg 类型会调用 checkConstArg() 处理
对于数据参数 DataArg 类型,首先会判断是否为 BufferCompressed 类型,若是则调用 checkCompressedArg() ,否则调用 checkDataArg() 处理
1 2 3 4 5 6 7 8 9 10 11 switch a := arg.(type ) {case *ConstArg:case *DataArg:if typ.(*BufferType).Kind == BufferCompressed {else {
这三个函数都会调用到 shrinkExpand(),所以我们先来看看这个函数的实现,该函数用以使用给定的 CompMap 对参数进行替换,返回结果为可以用来进行替换的新参数值 ,其具体实现我们就不深入了,这里来看注释:
1 2 3 4 5 6 7 8 9 10 11 12 13 14 15 16 17 18 19 20 21 22 23 24 25 26 27 28 29 30 31
下面我们来看这三个 check*Arg() ,我们首先看用来处理常量的 checkConstArg(),主要逻辑是嗲用 shrinkExpand() 并对其结果(CompMap 类型)进行遍历,将 arg.Val 依次替换为其提供的 replacer 值,并调用上层回调函数(也就是 execValidate() ,里面还会调用上层传入的闭包函数,最后会调用 proc.execute() ,也就是说对于 shrinkExpand() 提供的每个替换结果其都会执行一次 ):
1 2 3 4 5 6 7 8 9 10 func checkConstArg (arg *ConstArg, compMap CompMap, exec func () for _, replacer := range shrinkExpand(original, compMap, arg.Type().TypeBitSize(), false ) {
接下来看 checkCompressedArg() ,主要就是将数据解压后逐 4 字节进行遍历,每次遍历时都会再调用 shrinkExpand() 获取可替换值并再对其结果进行遍历,调用上层传入的闭包函数执行替换数据后的程序:
1 2 3 4 5 6 7 8 9 10 11 12 13 14 15 16 17 18 19 20 21 22 23 24 func checkCompressedArg (arg *DataArg, compMap CompMap, exec func () defer dtor()make ([]byte , 8 )for i := 0 ; i < len (data); i += 4 {make ([]byte , 8 )copy (original, data[i:])for _, replacer := range shrinkExpand(val, compMap, 64 , true ) {copy (data[i:], bytes)copy (data[i:], original)
checkDataArg() 逻辑基本上与 checkCompressedArg() 一致,不过是逐字节遍历且没有解压过程:
1 2 3 4 5 6 7 8 9 10 11 12 13 14 15 16 17 18 19 func checkDataArg (arg *DataArg, compMap CompMap, exec func () make ([]byte , 8 )len (data)if size > maxDataLength {for i := 0 ; i < size; i++ {make ([]byte , 8 )copy (original, data[i:])for _, replacer := range shrinkExpand(val, compMap, 64 , false ) {copy (data[i:], bytes)copy (data[i:], original)
proc.executeAndCollide():简易的变异执行: 该函数的逻辑比较简单,首先会将程序执行一次,之后循环执行两次,不过会调用 proc.randomCollide() 先将原始程序进行处理后再执行:
1 2 3 4 5 6 7 8 9 10 11 12 func (proc *Proc) if proc.execOptsCollide.Flags&ipc.FlagThreaded == 0 {return const collideIterations = 2 for i := 0 ; i < collideIterations; i++ {
randomCollide() 流程如下:
首先会有 20% 的几率调用 prog.DoubleExecCollide() (把源程序拷贝一份附加到其自身的末,并使用第一部分的资源),若未出错则直接返回
接下来有 20% 的几率调用 prog.DupCallCollide() (将程序中的部分调用进行复制并标记为异步),若未出错则直接返回
最后会调用 prog.AssignRandomAsync() (确保使用一个异步调用生产的资源的调用与其至少间隔一个非异步调用)并有 50% 的几率调用 prog.AssignRandomRerun():
1 2 3 4 5 6 7 8 9 10 11 12 13 14 15 16 17 18 19 20 21 22 func (proc *Proc) if proc.rnd.Intn(5 ) == 0 {if err == nil {return pif proc.rnd.Intn(4 ) == 0 {if err == nil {return pif proc.rnd.Intn(2 ) != 0 {return p
生成新输入/变异现有输入,执行 继续回到 loop() 的无限循环中,如果说全局 WorkQueue 空了,说明这个时候我们要自己想办法弄新的输入了,首先我们要获取 syz-fuzzer 当前的快照(其中包括语料库、语料库权重值、总的权重值),之后进行判断:
若语料库为空,或是已经进行了 generatePeriod 次循环,此时调用 target.Generate() 生成新的输入程序
否则,选择一份现有的输入,调用 prog.Mutate() 将该输入进行变异,生成新的输入
1 2 3 4 5 6 7 8 9 10 11 12 13 14 15 16 ct := proc.fuzzer.choiceTableif len (fuzzerSnapshot.corpus) == 0 || i%generatePeriod == 0 {1 , "#%v: generated" , proc.pid)else {1 , "#%v: mutated" , proc.pid)
【核心】target.Generate():生成一个新的输入程序 该函数本体其实比较简短,主要就是随机生成指定数量的系统调用并打包到一个新的 Prog 结构体当中,生成的依据主要是我们前面给出的 ChoiceTable 表,最后移除程序末尾多余的系统调用便直接返回了:
1 2 3 4 5 6 7 8 9 10 11 12 13 14 15 16 17 18 19 20 21 22 23 24 25 26 27 func (target *Target) int , ct *ChoiceTable) *Prog {nil )for len (p.Calls) < ncalls {len (p.Calls))for _, c := range calls {append (p.Calls, c)for len (p.Calls) > ncalls {1 )return p
生成单个系统调用的核心函数是 generateCall():
首先会检查 insertPoint 是否不为 0(为 0 则说明刚开始生成第一个系统调用),若是则随机选取程序中已有的一个调用,若其未设置 NoGenerate 属性则将其 id (系统调用号)作为 biasCall,即生成的第一个系统调用完全随机,后续系统调用则根据优先级表进行生成
接下来调用 ChoiceTable 的 choose 方法,对于第一个系统调用而言其会从 ChoiceTable 中随机选取一个系统调用作为 biasCall,接下来从优先级表中选取 biasCall 对应的优先级数据,从中随机选取一个范围中优先级最高的一个返回
最后调用 generateParticularCall() 生成该系统调用所要用到的数据,这里就不展开了
1 2 3 4 5 6 7 8 9 10 11 12 13 14 15 16 17 18 19 20 21 22 23 24 25 26 27 28 29 30 31 32 33 34 35 func (ct *ChoiceTable) int ) int {if bias < 0 { len (ct.calls))].IDif !ct.Generatable(bias) {"bias to disabled or non-generatable syscall %v\n" , ct.target.Syscalls[bias].Name)panic ("disabled or non-generatable syscall" )int32 (r.Intn(int (run[len (run)-1 ])) + 1 ) len (run), func (i int ) bool {return run[i] >= xif !ct.Generatable(res) {panic ("selected disabled or non-generatable syscall" )return resfunc (r *randGen) int ) []*Call {-1 if insertionPoint > 0 {if !insertionCall.Attrs.NoGenerate {return r.generateParticularCall(s, meta)
【核心】prog.Mutate():变异一个输入程序 该函数的核心其实是一个随机变异 的循环,这里的变量 r 为一个随机数生成器:
生成一个 [0, 5) 之间的随机数,若为 0 则执行 mutator.squashAny()
上一条未命中,则生成一个 [0, 100) 间随机数,若 >= 1 则执行 mutator.splice()
上一条未命中,则生成一个 [0, 31) 间随机数,若 >= 20 则执行 mutator.insertCall()
上一条未命中,则生成一个 [0, 11) 间随机数,若 >= 10 则执行 mutateArg()
皆未命中,执行 mutator.removeCall()
终止循环的条件是 上述变异操作之一成功执行 & 系统调用数不为 0 ,此外还有 2/3 的概率重新进入循环
1 2 3 4 5 6 7 8 9 10 11 12 13 14 15 16 17 18 19 20 21 22 23 24 25 26 27 28 29 30 31 32 33 34 35 36 37 38 39 40 41 42 43 func (p *Prog) int , ct *ChoiceTable, noMutate map [int ]bool , corpus []*Prog) {if ncalls < len (p.Calls) {len (p.Calls)for stop, ok := false , false ; !stop; stop = ok && len (p.Calls) != 0 && r.oneOf(3 ) {switch {case r.oneOf(5 ):case r.nOutOf(1 , 100 ):case r.nOutOf(20 , 31 ):case r.nOutOf(10 , 11 ):default :if got := len (p.Calls); got < 1 || got > ncalls {panic (fmt.Sprintf("bad number of calls after mutation: %v, want [1, %v]" , got, ncalls))
接下来我们来看这五个不同的变异方案
mutator.squashAny():随机变异一个系统调用的参数 该函数一开始会调用 Prog.complexPtr(),其中主要会调用 ForEachArg() 遍历用例程序的参数
1 2 3 4 5 func (ctx *mutator) bool {
传入给 ForEachArg() 的回调函数主要调用 isComplexPtr() 判断每个调用的参数中是否存在复杂指针(多级指针),若是,则将该调用添加到作为返回值的数组中,即这个函数其实主要是针对多级指针的变异 :
1 2 3 4 5 6 7 8 9 10 11 func (p *Prog) for _, c := range p.Calls {func (arg Arg, ctx *ArgCtx) if ptrArg, ok := arg.(*PointerArg); ok && p.Target.isComplexPtr(ptrArg) {append (res, complexPtr{ptrArg, c})true return
接下来会从返回列表中随机选择一个指针,若其对应的调用不允许变异则直接返回,若非指针则调用 squashPtr()
1 2 3 4 5 6 7 ptr := complexPtrs[r.Intn(len (complexPtrs))]if ctx.noMutate[ptr.call.Meta.ID] {return false if !p.Target.isAnyPtr(ptr.arg.Type()) {
接下来会调用 ForEachSubArg()(本质上为 ForEachArgImpl() 的封装),对之前随机选取的系统调用的参数进行遍历,这里传入的回调函数主要是检查 arg.Dir() 是否为 DirOut,若没有一个参数符合则直接返回 false
1 2 3 4 5 6 7 8 9 10 11 var blobs []*DataArgvar bases []*PointerArgfunc (arg Arg, ctx *ArgCtx) if data, ok := arg.(*DataArg); ok && arg.Dir() != DirOut {append (blobs, data)append (bases, ctx.Base)if len (blobs) == 0 {return false
最后一部分主要是调用 analyze() 进行分析,之后调用 mutateData() 来对参数的数据进行变异,以及对指针的更新
1 2 3 4 5 6 7 8 9 10 11 12 13 14 15 16 17 18 19 20 len (blobs))0 , maxBlobLen)if baseSize < base.Res.Size() {return true
mutator.splice():随机选取语料库中一个程序的系统调用插入到程序随机位置中 该函数为编译过程当中概率最大的主分支,不过其逻辑比较简短:
首先从语料库中随机复制一个程序
选择一个随机下标 idx ,在待变异程序该下标处插入 p0 的系统调用组
从末尾移除多余的调用
1 2 3 4 5 6 7 8 9 10 11 12 13 14 15 func (ctx *mutator) bool {if len (ctx.corpus) == 0 || len (p.Calls) == 0 || len (p.Calls) >= ctx.ncalls {return false len (ctx.corpus))]len (p.Calls))append (p.Calls[:idx], append (p0c.Calls, p.Calls[idx:]...)...)for i := len (p.Calls) - 1 ; i >= ctx.ncalls; i-- {return true
mutator.insertCall():随机生成一个系统调用插入到程序中随机位置 该函数的逻辑也比较简短,若程序中调用数量已经达到 ncalls 的限制则直接返回,否则会先调用 analyze() 进行分析,随后调用 generateCall() 生成一个系统调用并插入到程序中的一个随机位置
1 2 3 4 5 6 7 8 9 10 11 12 13 14 15 16 17 18 19 20 21 func (ctx *mutator) bool {if len (p.Calls) >= ctx.ncalls {return false len (p.Calls)+1 , 5 )var c *Callif idx < len (p.Calls) {for len (p.Calls) > ctx.ncalls {return true
mutator.mutateArg():随机变异程序中某一系统调用的参数 该函数的主要作用便是随机变异程序中某一系统调用的参数,这里就不深入展开分析了,感兴趣可以直接看源码:
1 2 3 4 5 6 7 8 9 10 11 12 13 14 15 16 17 18 19 20 21 22 23 24 25 26 27 28 29 30 31 32 33 34 35 36 37 38 39 40 41 42 43 44 45 46 func (ctx *mutator) bool {if len (p.Calls) == 0 {return false if idx < 0 {return false if ctx.noMutate[c.Meta.ID] {return false true for stop, ok := false , false ; !stop; stop = ok && r.oneOf(3 ) {true if len (ma.args) == 0 {return false if !ok1 {false continue len (calls)for len (p.Calls) > ctx.ncalls {if idx < 0 || idx >= len (p.Calls) || p.Calls[idx] != c {panic (fmt.Sprintf("wrong call index: idx=%v calls=%v p.Calls=%v ncalls=%v" ,len (calls), len (p.Calls), ctx.ncalls))if updateSizes {return true
mutator.removeCall():随机移除程序中的一个系统调用 该函数也比较简短,主要就是随机移除程序中的一个系统调用,如果程序中没有系统调用则不会进行移除操作:
1 2 3 4 5 6 7 8 9 func (ctx *mutator) bool {if len (p.Calls) == 0 {return false len (p.Calls))return true
至此,syz-fuzzer 主体源码逻辑分析完毕
简单总结的话,笔者感觉其实主要都是偏工程性的东西比较多🤔