【EXPR.0x00】MIT 6.828 课程实验报告
本文最后更新于:2023年8月13日 晚上
不如 Windows XP 好用
0x00.一切开始之前
为什么要写这篇博客?参见 https://arttnba3.cn/2022/03/18/PIECES-0X03-SHELL_OUTSIDE-3-IDEALIST_DEATH/
MIT 6.828 是十分著名的一个综合性的操作系统实验课程,由麻省理工大学(MIT)开设,一共有 6 个 lab,基于 XV6——一个为OS课程教学而开发的 OS kernel,手把手带你一步步补全一个操作系统内核。笔者认为这是十分优秀且富有完成价值的一个 OS 实验,因此笔者决定趁大三寒假实习的空闲时间将本课程补完。
笔者选用其 2018 年的实验课程,因为自从 2019 起他们转向了 RISC-V,而笔者暂时不想离开 X86 的舒适区(笑),因为本次实验的主要目的还是学习操作系统,笔者不想在学习其他架构上花费太多时间
PRE.环境搭建
参见 https://pdos.csail.mit.edu/6.828/2018/tools.html
Tools Used in 6.828
You’ll use two sets of tools in this class: an x86 emulator, QEMU, for running your kernel; and a compiler toolchain, including assembler, linker, C compiler, and debugger, for compiling and testing your kernel. This page has the information you’ll need to download and install your own copies. This class assumes familiarity with Unix commands throughout.
We highly recommend using a Debathena machine, such as athena.dialup.mit.edu, to work on the labs. If you use the MIT Athena machines that run Linux, then all the software tools you will need for this course are located in the 6.828 locker: just type ‘add -f 6.828’ to get access to them.
If you don’t have access to a Debathena machine, we recommend you use a virtual machine with Linux. If you really want to, you can build and install the tools on your own machine. We have instructions below for Linux and MacOS computers.
It should be possible to get this development environment running under windows with the help of Cygwin. Install cygwin, and be sure to install the flex and bison packages (they are under the development header).
For an overview of useful commands in the tools used in 6.828, see the lab tools guide.
为了开始本次实验,我们主要需要这两样东西:
一个 x86 模拟器:QEMU——用以运行内核
一套编译工具,包括汇编器、链接器、C 编译器、调试器——用以编译与测试内核
Compiler Toolchain
为了完成本次实验,笔者用了一个近乎全新的 Ubuntu 21.10,按课程页面进行如下操作:
1 | |
检查,出现类似下面的输出说明安装成功
1 | |
QEMU Emulator
为了更好地进行实验,MIT 6.828 课程的教师们将 qemu 进行了一定的改造,因此我们需要手动编译安装 patch 后的 QEMU
首先补充安装一些库:
1 | |
从 GitHub 拉源码:
1 | |
在源码目录下进行需要的配置,[] 里的是可选项(输入命令时不带这个框)
--prefix=PFX:指定安装 qemu 的目录,若未指定则默认为/usr/local--target-list="i386-softmmu x86_64-softmmu:精简化要安装的架构
1 | |
最后编译就完事了
1 | |
可能出现的错误
笔者在编译 qemu 时遇到了这样的错误:
2
3
4
5
6
7
8
9...
CC stubs/qmp_pc_dimm_device_list.o
AR libqemustub.a
LINK qemu-ga
/usr/bin/ld: qga/commands-posix.o: in function `dev_major_minor':
/home/arttnba3/Desktop/MIT_6.828/qqemu/qga/commands-posix.c:633: undefined reference to `major'
/usr/bin/ld: /home/arttnba3/Desktop/MIT_6.828/qqemu/qga/commands-posix.c:634: undefined reference to `minor'
collect2: error: ld returned 1 exit status
make: *** [Makefile:288: qemu-ga] Error 1参照 [v3] build: include sys/sysmacros.h for major() and minor() - Patchwork ,在 qemu 源码目录下的
qga/commands-posix.c加上一个#include <sys/sysmacros.h>继续 make install,之后还可能出现这样一个错误:
2
3
4
5
6
7...
Building optionrom/kvmvapic.img
Building optionrom/kvmvapic.raw
Signing optionrom/kvmvapic.bin
install -d -m 0755 "/usr/local/share/qemu"
install: cannot change permissions of ‘/usr/local/share/qemu’: No such file or directory
make: *** [Makefile:382: install-datadir] Error 1我们手动创建
/usr/local/share/qemu这个目录即可之后继续 make install,又报缺一个目录的错误(不能一次报完嘛 - - )
2
3
4install -d -m 0755 "/usr/local/share/qemu"
install -d -m 0755 "/usr/local/etc/qemu"
install: cannot change permissions of ‘/usr/local/etc/qemu’: No such file or directory
make: *** [Makefile:392: install-confdir] Error 1依旧手动创建之,然后 make install,这里需要注意我们应当以 root 权限执行
0x01.Lab 1: Booting a PC
lab 页面: [https://pdos.csail.mit.edu/6.828/2018/labs/lab1/](Lab 1: PC Bootstrap and GCC Calling Conventions)
该 lab 大量内容与 【CODE.0x00】从零开始的32位操作系统开发手记 - arttnba3’s blog重复,相关知识笔者于本篇博客中仅做简述,不再重复摘抄,如有需要请自行阅读笔者的这篇博客
该 lab 总共三个部分:
熟悉 x86 汇编语言、QEMU x86 模拟器、PC的开机引导流程
测试我们用于引导内核的 boot loader(xv6源码下
boot目录)深入研究 6.828 内核的初始模板(JOS)
在开始实验之前我们首先把 xv6 源码拉到本地:
1 | |
对于 MIT 的学生来说需要将实验过程 make handin 之后提交到对应的仓库,不过笔者只是大洋彼岸旁听的(笑)所以这一步就跳过了
Part 1: PC Bootstrap
这一部分的主要目的是让学生熟悉一个计算机是如何启动的,通电——载入 BIOS——BIOS载入 MBR——跳转到 MBR——(载入 loader)——载入内核
参见笔者的这篇博客
Getting Started with x86 assembly
MIT 为那些不熟悉 x86 汇编语言的人准备了 PC Assembly Language Book,接下来我们来看 Exercise1:
Exercise 1. Familiarize yourself with the assembly language materials available on the 6.828 reference page. You don’t have to read them now, but you’ll almost certainly want to refer to some of this material when reading and writing x86 assembly.
We do recommend reading the section “The Syntax” in Brennan’s Guide to Inline Assembly. It gives a good (and quite brief) description of the AT&T assembly syntax we’ll be using with the GNU assembler in JOS.
这一部分主要就是熟悉 x86 汇编语言,笔者在高中的时候就已经会了故这里直接跳过(笑),不过其推荐的材料还是值得一读的。
比较令笔者不适的是实验中涉及到的汇编代码都是丑陋的 AT&T 语法而并非优美的 x86 语法(恼)
Simulating the x86
这一步我们开始编译 JOS(xv6)并尝试使用 qemu 运行,在刚刚 clone 下来的源码目录下进行:
1 | |
其会生成一个磁盘镜像文件
接下来启动 qemu,MIT 在其提供的 Makefile 文件中写好了启动的代码:
1 | |
启动界面如下,这两个界面都可以进行输入,还是十分方便的:
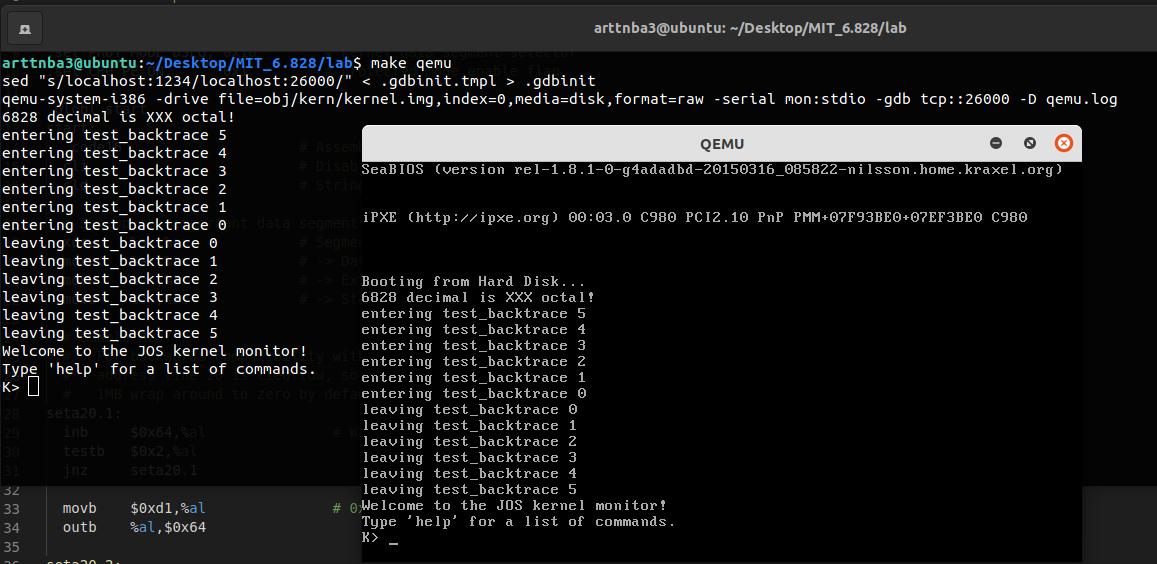
在最初时 JOS 只提供了两个命令:help 和 kerninfo,补完剩下的功能让其成为一个完整的内核便是我们在后面几个 lab 中要做的事情 
The PC’s Physical Address Space
一台 PC 的物理地址通常遵循如下布局(32位下):
1 | |
关于前面这 1MB 的具体内存布局,可以参见 【CODE.0x00】从零开始的32位操作系统开发手记 - arttnba3’s blog
The ROM BIOS
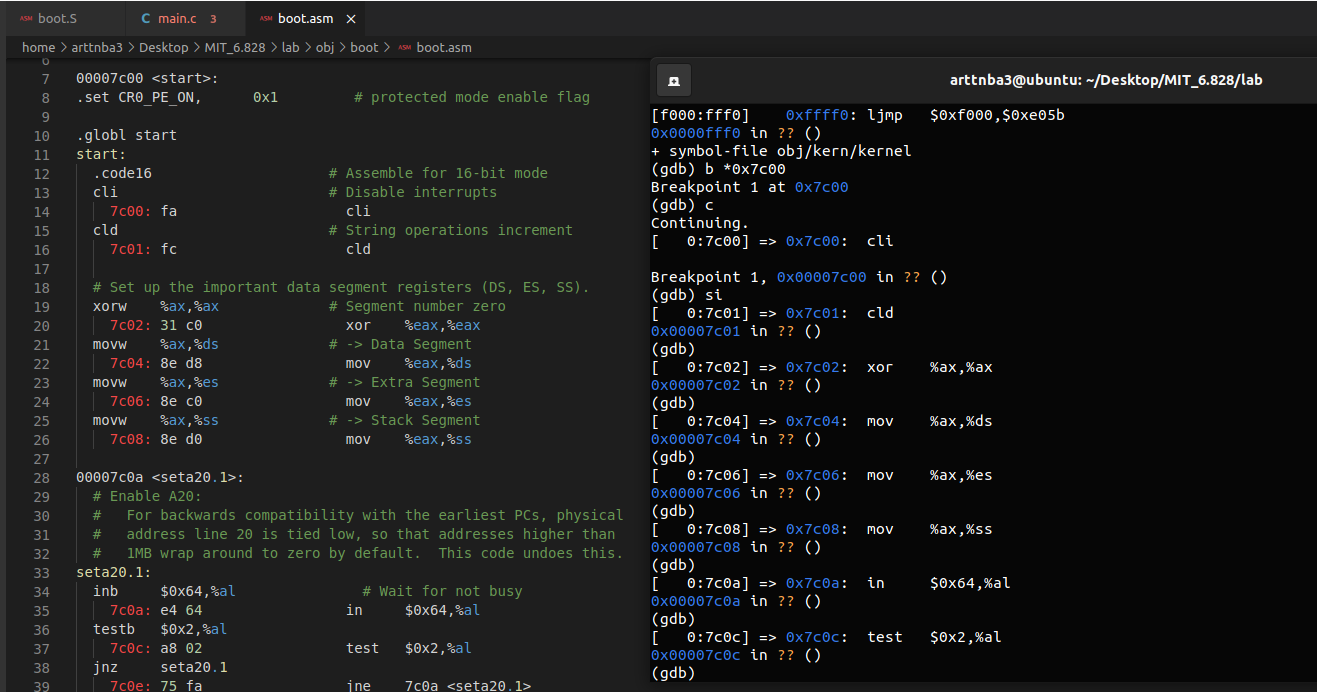
在这部分实验中我们将使用 gdb 来调试 qemu,MIT 同样在 Makefile 中编写好了相应的命令行,我们只需要在第一个终端界面中执行:
1 | |
其会启动一个等待 gdb 连接 的qemu
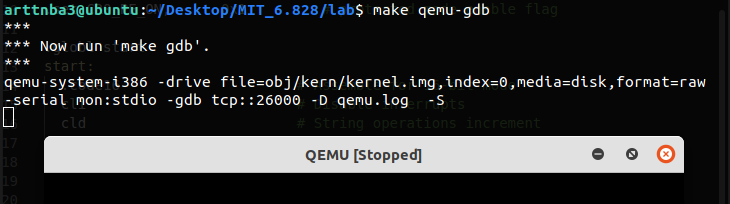
接下来在第二个终端中执行:
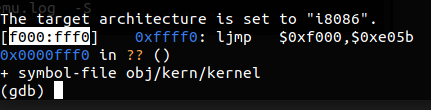
1 | |
其会启动 gdb 并自动连接上 qemu,这里我们可以看到 CS:IP 为 0xf000:0xfff0,即此时执行的代码地址为 0xffff0 ,其实就是 BIOS 的入口点
为了原汁原味模拟 MIT 实验的感觉,笔者并未装上 pwn 手常用的 pwndbg 插件(其实只是懒 + 怕出现奇怪的问题)
MIT 对这个启动过程总结出如下三点:
IBM PC 启动时执行 0x000ffff0 处代码,这是为 ROM BIOS 保留的内存区域的顶部
PC 启动时
CS = 0xf000,IP = 0xfff0执行的第一条指令为跳转指令,跳转至
CS = 0xf000, IP = 0xe05b处
为什么QEMU 的启动流程是这样的?这首先是 Intel 设计 8088 处理器的模式,之后被 IBM 用在了最初的 PC 上,这是因为在 PC 上, BIOS 被“硬连线”(hard-wired)到物理地址的 0x0000f0000 - 0x000fffff 处(物理地址起始 64KB),这个设计保证了 BIOS 在启动或是系统重启时总能是第一个拿到机器控制权的,因为此时 RAM 中还没有任何其他的软件可以让处理器运行(笔者认为这是一句废话)。QEMU 自己有着一个 BIOS,在处理器复位后,其处在实模式下,且会将 CS:IP 设置为 0xf000:0xfff0,因此 PC 从此处的代码开始执行——将 CS 寄存器左移 4 位再加上 IP 寄存器便获得了当前执行的代码的地址 0xffff0——20位的地址线撑起了 1MB 的内存空间。
当笔者翻译完 MIT 实验页面的这一段话之后发现这完全没有任何意义——对于二进制人来说这是再基础不过的知识了,因此后面只会酌情引入 MIT 实验文档的翻译,更多的是笔者自己认为有必要写下的笔记,例如上面的这一段话的末尾部分便是笔者自己写的。
接下来看 Exercise 2,主要是让我们尝试跟进调试一下 BIOS,感受一下他会做些什么:
Exercise 2. Use GDB’s si (Step Instruction) command to trace into the ROM BIOS for a few more instructions, and try to guess what it might be doing. You might want to look at http://web.archive.org/web/20040404164813/members.iweb.net.au/~pstorr/pcbook/book2/book2.htm, as well as other materials on the 6.828 reference materials page. No need to figure out all the details - just the general idea of what the BIOS is doing first.
BIOS 主要完成的工作便是设置中断向量表(Interrupt Vector Table,位于 0x000 ~ 0x3fff),初始化一些设备(例如 VGA display),此时显存被映射到 0xa0000 ~ 0xbffff,显示适配器的 BIOS 被加载到 0xc0000 ~ 0xc7fff,此时我们直接向显存映射区写入内容便可以在屏幕上显示字符
之后 BIOS 会读出硬盘上的第一个扇区到 0x7c00 处,并跳转到该处,我们称被载入的第一个扇区为主引导记录(Master Boot Record, aka MBR),其从 BIOS 手中接过启动 PC 的接力棒
MIT 原实验文档中写的是 BIOS 将中断描述符表(Interrupt Descriptor Table)载入到内存当中,但笔者认为在实模式下应当为中断向量表,这是因为中断描述符是一个属于保护模式下的概念,这里做出改正
Part 2: The Boot Loader
通常 PC 的硬盘与软盘上的空间被按照 扇区 进行划分,最常见的扇区大小为 512B,单个扇区也是我们读写磁盘最小的操作单位,若磁盘是可引导的,则第一个扇区称为引导扇区,因为该扇区中存放着 引导加载程序 的代码,BIOS 在 PC 启动后完成其工作后会将该扇区读到内存中的 0x7c00 ~ 0x7fff 处,之后使用一个 jmp 跳转指令跳转至 CS:IP = 0000:7C00,将控制权交给这一部分代码
MIT 文档认为,这个地址是相当随意的,但经笔者考证这是一个有来头的地址,参见【CODE.0x00】从零开始的32位操作系统开发手记 - arttnba3’s blog
由于 CD-ROM 的出现在 PC 发展史中较晚,这给了 PC 架构师足够的时间去重新思考并设计功能更加强大的引导方式,CD-ROM 通常使用 2048B 的扇区大小,且 BIOS 会将更多的扇区作为引导映像载入内存中,这部分内容可以参见“El Torito” Bootable CD-ROM Format Specification
6.828 的 boot loader 包含两个文件:boot/boot.S 与 boot/main.c,其完成以下两个工作:
将处理器从实模式切换到保护模式(boot.S)
打开 A20-Gate 以支持大于 1MB 的地址空间
加载全局段描述符表
设置 cr0 寄存器对应标志位,进入保护模式
通过 x86 的特殊 I/O 指令从磁盘上读取内核并将之载入内存,跳转到内核(boot.c)
通过
in与out这两条指令读取磁盘数据检查并分析 ELF header,跳转到内核
在大二下学习操作系统课程时笔者有幸尝试亲手写过一个内核(虽然远没有完成),其中就包括写 loader,因此这一部分笔者还是相对较为熟悉的,不过 MIT 代码的精炼程度远非笔者从 另一本书上抄抄改改而来的代码 所能比拟的,推荐大家仔细阅读(笑)
下面看 Exercise 3,主要是参照 6.828 的手册学习 GDB,这里就不贴过程了:
Exercise 3. Take a look at the lab tools guide, especially the section on GDB commands. Even if you’re familiar with GDB, this includes some esoteric GDB commands that are useful for OS work.
Set a breakpoint at address 0x7c00, which is where the boot sector will be loaded. Continue execution until that breakpoint. Trace through the code in boot/boot.S, using the source code and the disassembly file obj/boot/boot.asm to keep track of where you are. Also use the x/i command in GDB to disassemble sequences of instructions in the boot loader, and compare the original boot loader source code with both the disassembly in obj/boot/boot.asm and GDB.
Trace into bootmain() in boot/main.c, and then into readsect(). Identify the exact assembly instructions that correspond to each of the statements in readsect(). Trace through the rest of readsect() and back out into bootmain(), and identify the begin and end of the for loop that reads the remaining sectors of the kernel from the disk. Find out what code will run when the loop is finished, set a breakpoint there, and continue to that breakpoint. Then step through the remainder of the boot loader.
6.828 还提供给我们一份反编译后的 loader 文件,位于 obj/boot/boot.asm,为上面两个文件编译后在内存中的样子,并附上了贴心的注释,推荐大家配合着这份文件进行调试,极致享受(笑)
接下来解决一些 6.828 的习题:
At what point does the processor start executing 32-bit code? What exactly causes the switch from 16- to 32-bit mode?
在
boot.main.c中的 bootmain() 中通过((void (*)(void)) (ELFHDR->e_entry))();跳转到内核入口点当 MBR 设置了 cr0 寄存器的
PE标志位后,处理器从实模式进入到保护模式,对应的汇编代码为ljmp $0x8,$0x7c32,这是在加载了全局段描述符表后使用代码段描述符完成的一个跳转指令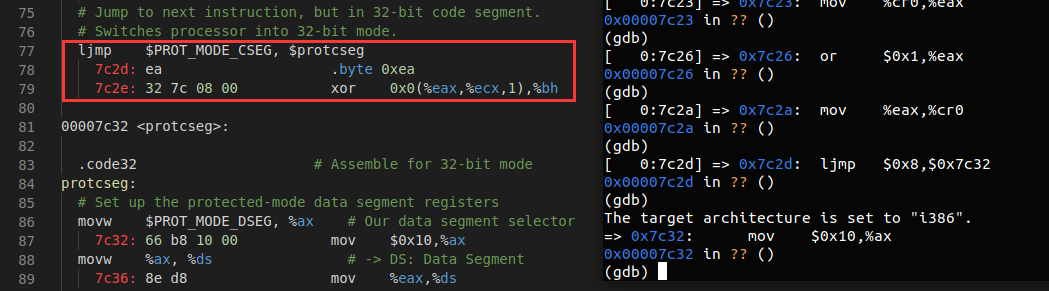
What is the last instruction of the boot loader executed, and what is the first instruction of the kernel it just loaded?
boot loader 执行的最后一条指令为
((void (*)(void)) (ELFHDR->e_entry))();,对应汇编代码call *0x10018——这是 kernel 的入口点,而 kernel 执行的第一条指令为movw $0x1234, 0x472
Where is the first instruction of the kernel?
- kernel 的第一条指令在其 ELF 入口点标注的位置,这里是
0x10018
- kernel 的第一条指令在其 ELF 入口点标注的位置,这里是
How does the boot loader decide how many sectors it must read in order to fetch the entire kernel from disk? Where does it find this information?
- loader 首先会从磁盘上读取前面一张页的内容(大小0x1000),在判断这是一个合法的 ELF header 之后解析其节表(其中包含每一节(section,也称段(segment))的相关信息,包括该段在文件内的偏移(p_offset)、在内存中的加载地址(p_vaddr)、在文件中的大小(p_filesz)、该段在内存中的大小(p_memsz)、该段的标志位(p_flags,主要标识 rwx 权限)),根据节表信息从磁盘上读取数据
Loading the Kernel
首先看 Exercise 4,主要是复习你的 C 语言知识,尤其是关于指针的那一部分(笑),这一块可以参考大名鼎鼎的 K&R C,以及装载链接ELF文件等基础知识,笔者推荐阅读《程序员的自我修养》
Exercise 4. Read about programming with pointers in C. The best reference for the C language is The C Programming Language by Brian Kernighan and Dennis Ritchie (known as ‘K&R’). We recommend that students purchase this book (here is an Amazon Link) or find one of MIT’s 7 copies.
Read 5.1 (Pointers and Addresses) through 5.5 (Character Pointers and Functions) in K&R. Then download the code for pointers.c, run it, and make sure you understand where all of the printed values come from. In particular, make sure you understand where the pointer addresses in printed lines 1 and 6 come from, how all the values in printed lines 2 through 4 get there, and why the values printed in line 5 are seemingly corrupted.
There are other references on pointers in C (e.g., A tutorial by Ted Jensen that cites K&R heavily), though not as strongly recommended.
Warning: Unless you are already thoroughly versed in C, do not skip or even skim this reading exercise. If you do not really understand pointers in C, you will suffer untold pain and misery in subsequent labs, and then eventually come to understand them the hard way. Trust us; you don’t want to find out what “the hard way” is.
接下来是 Exercise 5,主要是改 Makefile 文件中指定的链接地址然后重新调试体验一下,这里就跳过了
Exercise 5. Trace through the first few instructions of the boot loader again and identify the first instruction that would “break” or otherwise do the wrong thing if you were to get the boot loader’s link address wrong. Then change the link address in boot/Makefrag to something wrong, run make clean, recompile the lab with make, and trace into the boot loader again to see what happens. Don’t forget to change the link address back and make clean again afterward!
最后是 Exercise 6,使用 GDB 指令在 BIOS 将控制权交给 MBR 时查看内存 0x00100000 处的数据
Exercise 6. We can examine memory using GDB’s x command. The GDB manual has full details, but for now, it is enough to know that the command x/Nx ADDR prints N words of memory at ADDR. (Note that both ‘x’s in the command are lowercase.) Warning: The size of a word is not a universal standard. In GNU assembly, a word is two bytes (the ‘w’ in xorw, which stands for word, means 2 bytes).
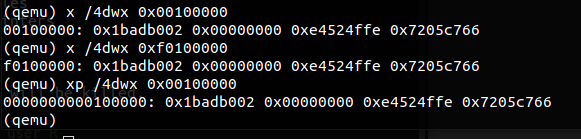
Reset the machine (exit QEMU/GDB and start them again). Examine the 8 words of memory at 0x00100000 at the point the BIOS enters the boot loader, and then again at the point the boot loader enters the kernel. Why are they different? What is there at the second breakpoint? (You do not really need to use QEMU to answer this question. Just think.)
虽然要求只看 8 个 word,但是笔者还是习惯多看一些(笑),这里可以看到在刚刚运行到 MBR 时该处数据都是0
1 | |
接下来在进入内核时再次查看此处数据,发现已经被覆盖上了新的数据,主要是内核的汇编代码
1 | |
这里我们注意到一个数字0x1badb002——这是 Multiboot Specification 标准要求的一个位于 header 的 magic number,在启动时会校验这个数,详情可以参见 https://www.gnu.org/software/grub/manual/multiboot/multiboot.html
Part 3: The Kernel
在本部分中我们将开始学习 JOS 的最小实现的细节,并开始写一些代码。如同 boot loader 一般,内核在一开始也先执行一些汇编代码,以让 C 代码能恰当地执行
Using virtual memory to work around position dependence
MBR 的链接地址于加载地址完全匹配,因为其运行在实模式下,他的一切都很真!实模式主打的就是真实!,但内核的加载地址与链接地址却存在相当大的差别,OS 更倾向于被链接到一个更高的虚拟地址上运行,但其实际则位于物理低地址
接下来我们使用 objdump 查看编译出的内核 ELF 文件来验证这个结论,结果如下:
1 | |
VMA 为虚拟地址,LMA 为加载地址,可见确实如此。这是因为当 OS kernel 被运行在较高的虚拟地址时,其可以很方便地将虚拟地址空间的低地址部分留给用户程序使用,但通常大部分 32 位机器并没有足够大的内存,他们在 0xf0100000 处往往没有任何物理内存,因此我们需要实现虚拟地址到物理地址的映射,这需要借助页表的帮助。
在设置 cr0 寄存器的 PG 标志位前,我们的内存管理模式是分段模式,此时我们对内存的访问使用的是线性地址(linear address)——由段选择子与段描述符表来描述分段,完成线性地址到物理地址的映射;在设置了 cr0 寄存器的 PG 标志位之后,我们对内存访问使用的就是虚拟地址(virtual)——由页表描述虚拟地址空间到物理地址空间的映射,并由 MMU 完成翻译
32位下最常用的是二级页表,6.828 十分贴心地在 kern/entrypgdir.c 中手写了一个静态初始化的页表结构,设置了虚拟地址 0xf0000000 ~ 0xf0400000 到物理地址 0x00000000 ~ 0x00400000 映射,以及虚拟地址 0x00000000 ~ 0x00400000 到物理地址 0x00000000 ~ 0x00400000 映射。
若我们尝试访问不属于这两个地址范围的地址,则会触发缺页中断,由于我们尚未设置对应的中断处理程序,因此会导致 QEMU crash 并退出
接下来是 Exercise 7,查看分页机制开启前后 0x00100000 与 0xf0100000 这两个地址上的数据
Exercise 7. Use QEMU and GDB to trace into the JOS kernel and stop at the
movl %eax, %cr0. Examine memory at 0x00100000 and at 0xf0100000. Now, single step over that instruction using the stepi GDB command. Again, examine memory at 0x00100000 and at 0xf0100000. Make sure you understand what just happened.What is the first instruction after the new mapping is established that would fail to work properly if the mapping weren’t in place? Comment out the
movl %eax, %cr0in kern/entry.S, trace into it, and see if you were right.
结果如下,在成功建立页表映射之后这两个地址的数据是一致的,因为完成映射后这两个虚拟地址空间指向同一物理地址空间:
1 | |
Formatted Printing to the Console
这部分要求我们阅读 kern/printf.c, lib/printfmt.c, kern/console.c 以了解 xv6 向控制台输出字符的实现。在正式开始阅读代码之前,我们先自行思考一下:如何在一块 80 * 24 的屏幕上实现各种各样的输出功能?
我们不难想到,所有的输出操作最终都可以通过使用一个“输出原语”实现——「输出单个字符」,我们在实现其他的输出功能,例如 printf 或是 puts 时,只需要在这些函数内部多次调用这个输出原语即可。
这个输出原语应当完成如下功能:
在屏幕光标处输出字符,并适当移动光标(例如普通字符则将光标向后移动一个字符,而
\b则将光标向前移动一个字符,\n则将光标移到下一行)控制输出字符的颜色
完成基础的换行功能,当屏幕被字符填充满时进行滚屏
前面我们讲到,在 BIOS 时期有一部分显存被映射到内存当中,其实我们只需要直接往显存上写入数据即可控制屏幕输出,因此最终涉及到与显卡交互的其实只有光标
0xB800~0xBFFF 这块区域是供文本模式使用的显存,当我们在显存内的相应位置写入数据时,屏幕上就会出现对应的字符,在文本模式下显示器支持 80 x 25 16 色文本显示的窗口,一个字符占用两个字节:第一个字节为 ASCII 码,第二个字节为颜色信息
现在我们来看 xv6 的源码,其使用一个 cons_putc() 函数实现了这个字符输出原语,定义于 kern/console.c 中:
1 | |
我们看到其最终调用三个函数:serial_putc()、lpt_putc()、cga_putc(),咋一看有些一头雾水,看函数名后缀似乎这三个函数都是用来输出单个字符的?
先看第一个函数 serial_putc(),其中调用了 inb() 和 outb() 两个函数,这是两个封装好的用以操作端口的函数,展开以后其实就是内联汇编写的 inb 和 outb 指令,单位都是字节
1 | |
那么我们可以知道其主要功能就是从 Line Status Register 中读取数据,若不为 COM_LSR_TXRDY 则重试(最多 12800次),否则说明 Transmit buffer 已就绪,之后便向 Transmit buffer 中写入我们要输出的字符
这里调用了一个 delay 函数,主要是由于历史遗留问题从而需要显式地从 0x84 端口中读取 4 次 1 字节
1 | |
serial_putc() 的功能已经明了:检查对应端口状态,写入字符,接下来我们来看 lpt_putc(),还是从一个奇怪的端口读取数据并检查,之后向另外两个端口写入奇怪的数据,因为笔者不是硬件相关开发者所以这里就不深究了(笑):
1 | |
最后是 cga_putc(),这是实现字符规范化字符打印的核心函数:
首先检查若未设置颜色参数则默认设置黑底白字
之后是对特殊字符的处理,对于普通字符则是直接写显存
在完成之后检查光标是否越界,若是则进行滚屏,这里实现的方法比较简单粗暴,直接移动整块内存后清空最后一行,将光标位置向前移动80字符(一行的宽度)
最后向显卡对应寄存器写入光标位置
1 | |
这个实现方法和笔者当时写实验性质 OS kernel 的时候倒是一样,不过令笔者不爽的是 xv6 将
\t实现为别扭的 5 个空格(恼)
这么一轮分析下来这个字符输出原语已经基本上分析得差不多了,剩下的一些高级的封装函数笔者就不深入分析贴在这里了,主要就是借助这个字符输出原语实现的一些 tricks,其中对于格式化字符串输出 xv6 实现为 printfmt() 函数,其核心为 vprintfmt() 函数,主要是用一个有穷自动状态机解析格式化字符串并从栈上读取参数输出。
接下来是 Exercise 8,补充格式化字符串打印中的 %o 参数的实现
Exercise 8. We have omitted a small fragment of code - the code necessary to print octal numbers using patterns of the form “%o”. Find and fill in this code fragment.
xv6 非常贴心地将数字输出实现为一个无前缀的多进制输出函数 printnum() ,参考 glibc 中 printf 的 8 进制输出是没有前缀的,我们只需要从栈上获取对应数值、设置 base后直接跳转调用即可
1 | |
内核入口点是 kern/entry.S,之后会调用到 kern/init.c 中的 i386_init(),其中有一句调用了 %o 的输出语句
1 | |
我们 make clean 之后重新 make 再 make qemu,查看效果,成功实现 %o 的输出功能:

最后是 6.828 的一些练习题:
Explain the interface between printf.c and console.c. Specifically, what function does console.c export? How is this function used by printf.c?
console.c提供了单个字符输出的函数cputchar(),在printf.c中封装为putch()函数进行单个字符的输出Explain the following from console.c:
1 if (crt_pos >= CRT_SIZE) {
2 int i;
3 memmove(crt_buf, crt_buf + CRT_COLS, (CRT_SIZE - CRT_COLS) * sizeof(uint16_t));
4 for (i = CRT_SIZE - CRT_COLS; i < CRT_SIZE; i++)
5 crt_buf[i] = 0x0700 | ‘ ‘;
6 crt_pos -= CRT_COLS;
7 }这段代码的作用是在光标超出 80 x 24 显示区域时进行滚屏,主要原理就是将第一行往后的数据都向前移动一行,光标向前清空一行的显存为空格后向前移动一行(行宽 80 字符)
For the following questions you might wish to consult the notes for Lecture 2. These notes cover GCC’s calling convention on the x86.
Trace the execution of the following code step-by-step:
int x = 1, y = 3, z = 4;
cprintf(“x %d, y %x, z %d\n”, x, y, z);In the call to
cprintf(), to what doesfmtpoint? To what doesappoint?二进制选手的送分题,指向格式化字符串的指针与 x、y、z 三个参数都在栈上,fmt指针指向存放格式化字符串的位置,这里应该是位于 .data 段上,ap则指向栈上的参数 xList (in order of execution) each call to
cons_putc,va_arg, andvcprintf. Forcons_putc, list its argument as well. Forva_arg, list whatappoints to before and after the call. Forvcprintflist the values of its two arguments.题目太长不看。cons_putc的参数为要输出的字符的数据,定义为一个 int 类型,实际上只用到了低 2 字节,第一个字节为 ASCII 码,第二个字节为显示的字符颜色与背景色;对于va_arg而言,ap指向栈上的某个位置,这个位置上应当存放着我们的可变长参数组中的某个参数,在调用后其会指向下一个参数;vcprintf的两个参数一个是格式化字符串,另一个则是va_arg容器
Run the following code.
unsigned int i = 0x00646c72;
cprintf(“H%x Wo%s”, 57616, &i);What is the output? Explain how this output is arrived at in the step-by-step manner of the previous exercise. Here’s an ASCII table that maps bytes to characters.
The output depends on that fact that the x86 is little-endian. If the x86 were instead big-endian what would you set
ito in order to yield the same output? Would you need to change57616to a different value?Here’s a description of little- and big-endian and a more whimsical description.
将代码添加到
init.c中,实测输出如下:1
He110 World57616 作为 16 进制输出为 e110,而 变量 i 的值被作为一个字符串解析(我们输入的参数为指向 i 的指针),因此输出 “rld”;如果是大端序的话前者不会有变化而后者因为直接碰到 “\0” 于是什么也不输出
In the following code, what is going to be printed after
'y='? (note: the answer is not a specific value.) Why does this happen?cprintf(“x=%d y=%d”, 3);
y会是一个相对随机的值,有一定概率会是一个指向栈上的指针(old rbp),关键得看编译器生成的代码;这是因为我们在调用 cprintf 时在格式字符串中写有两个参数,但我们只传了一个参数,cprintf 会从栈上存放 3 的位置再往后读一个参数打印出来
Let’s say that GCC changed its calling convention so that it pushed arguments on the stack in declaration order, so that the last argument is pushed last. How would you have to change
cprintfor its interface so that it would still be possible to pass it a variable number of arguments?使用最后一个参数来指定参数的数量即可。
最后还有个打印不同颜色的 Challenge,懒得做了
The Stack
这一节主要讲 x86 下 C 的函数运行时栈与调用约定,并编写一个能够打印堆栈 backtrace 的函数(类似于 Linux 内核 crash 以后打印错误的那种函数)
首先是 Exercise 9,找到内核栈初始化的代码、内核栈在内存中的位置,以及内核保留栈空间的方法与堆栈指针被初始化指向该空间的位置
Exercise 9. Determine where the kernel initializes its stack, and exactly where in memory its stack is located. How does the kernel reserve space for its stack? And at which “end” of this reserved area is the stack pointer initialized to point to?
在内核入口函数中在调用 i386_init() 之前有一段代码初始化了内核栈
1 | |
我们上手调试一下,结果如下,我们看到堆栈指针寄存器(esp)指向 0xf0110000,而栈帧指针寄存器(ebp)指向 0 地址,关于这两个寄存器之间的关系笔者不再赘叙,请各位读者自行复习 C 函数调用栈相关知识,可以看到这里我们的内核栈被初始化到内存高地址中一个固定的位置:
1 | |
6.828 文档中向我们揭示了栈回溯的原理:按照 C 函数调用栈的相关约定,ebp指针指向栈底,这个位置上存放了上一层调用的 ebp,再往后一个位置存放的是该函数的返回地址,即上层调用函数中调用了这个函数的指令的下一条指令的地址,因此利用 ebp 我们便可以回溯多层函数调用栈
下面看 Exercise 10,主要是让我们通过调试感知 C 函数调用栈
Exercise 10. To become familiar with the C calling conventions on the x86, find the address of the
test_backtracefunction in obj/kern/kernel.asm, set a breakpoint there, and examine what happens each time it gets called after the kernel starts. How many 32-bit words does each recursive nesting level oftest_backtracepush on the stack, and what are those words?Note that, for this exercise to work properly, you should be using the patched version of QEMU available on the tools page or on Athena. Otherwise, you’ll have to manually translate all breakpoint and memory addresses to linear addresses.
然后是 Exercise 11,让我们补全实现 mon_backtrace()
Exercise 11. Implement the backtrace function as specified above. Use the same format as in the example, since otherwise the grading script will be confused. When you think you have it working right, run make grade to see if its output conforms to what our grading script expects, and fix it if it doesn’t. After you have handed in your Lab 1 code, you are welcome to change the output format of the backtrace function any way you like.
If you use
read_ebp(), note that GCC may generate “optimized” code that callsread_ebp()beforemon_backtrace()‘s function prologue, which results in an incomplete stack trace (the stack frame of the most recent function call is missing). While we have tried to disable optimizations that cause this reordering, you may want to examine the assembly ofmon_backtrace()and make sure the call toread_ebp()is happening after the function prologue.
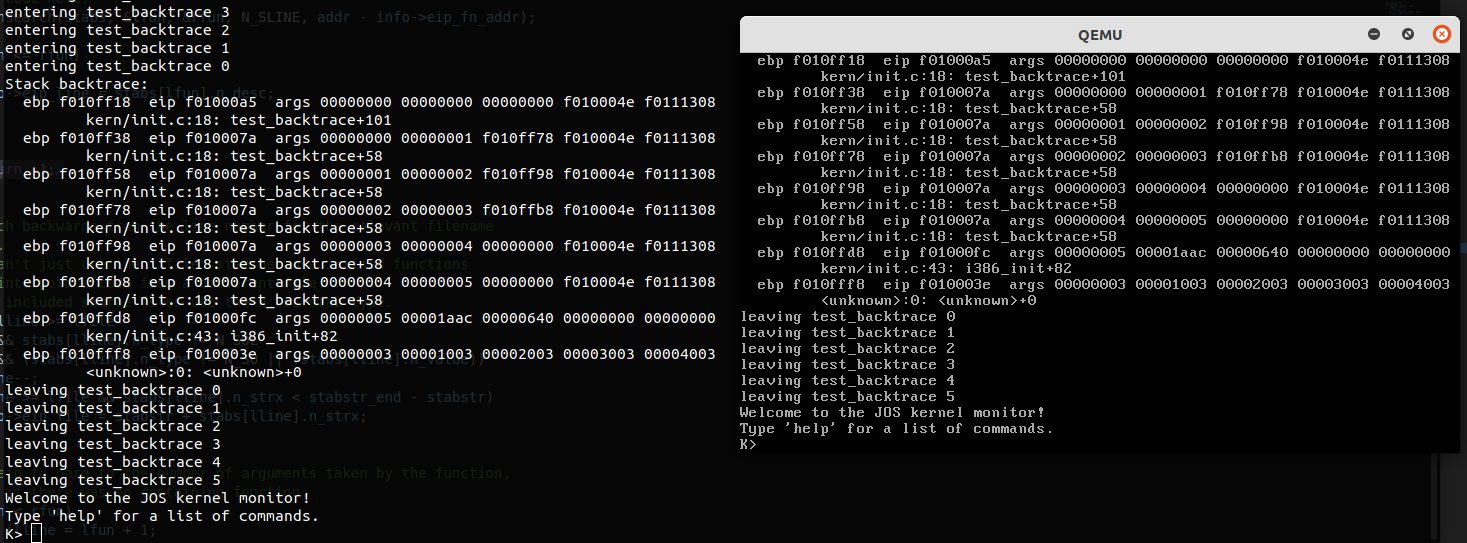
我们需要实现打印如下格式的栈回溯
1 | |
在内核初始化时将 ebp 设为了0,这提供给我们一个很好的作为判断栈回溯终止的条件,最终的栈回溯函数代码如下,由于 6.828 说他们提供的 read_ebp() 函数可能会被编译器优化掉所以笔者自己写了内联汇编:
AT & T 语法,非常🥚疼
1 | |
运行结果如下,成功打印栈回溯:
1 | |
最后是 lab 1 的最后一个练习——Exercise 12,要求我们打印栈回溯信息的同时打印函数名、函数位于的源文件及他们在源文件中的行号
Exercise 12. Modify your stack backtrace function to display, for each eip, the function name, source file name, and line number corresponding to that eip.
In
debuginfo_eip, where do _STAB* come from? This question has a long answer; to help you to discover the answer, here are some things you might want to do:
- look in the file kern/kernel.ld for _STAB*
- run objdump -h obj/kern/kernel
- run objdump -G obj/kern/kernel
- run gcc -pipe -nostdinc -O2 -fno-builtin -I. -MD -Wall -Wno-format -DJOS_KERNEL -gstabs -c -S kern/init.c, and look at init.s.
- see if the bootloader loads the symbol table in memory as part of loading the kernel binary
Complete the implementation of
debuginfo_eipby inserting the call tostab_binsearchto find the line number for an address.Add a backtrace command to the kernel monitor, and extend your implementation of
mon_backtraceto calldebuginfo_eipand print a line for each stack frame of the form:K> backtrace
Stack backtrace:
ebp f010ff78 eip f01008ae args 00000001 f010ff8c 00000000 f0110580 00000000
kern/monitor.c:143: monitor+106
ebp f010ffd8 eip f0100193 args 00000000 00001aac 00000660 00000000 00000000
kern/init.c:49: i386_init+59
ebp f010fff8 eip f010003d args 00000000 00000000 0000ffff 10cf9a00 0000ffff
kern/entry.S:70: +0
K>Each line gives the file name and line within that file of the stack frame’s eip, followed by the name of the function and the offset of the eip from the first instruction of the function (e.g., monitor+106 means the return eip is 106 bytes past the beginning of monitor).
Be sure to print the file and function names on a separate line, to avoid confusing the grading script.
Tip: printf format strings provide an easy, albeit obscure, way to print non-null-terminated strings like those in STABS tables.
printf("%.*s", length, string)prints at mostlengthcharacters ofstring. Take a look at the printf man page to find out why this works.You may find that some functions are missing from the backtrace. For example, you will probably see a call to
monitor()but not toruncmd(). This is because the compiler in-lines some function calls. Other optimizations may cause you to see unexpected line numbers. If you get rid of the -O2 from GNUMakefile, the backtraces may make more sense (but your kernel will run more slowly).
我们如果要从头实现这个功能的话可能会有点麻烦,好在 JOS 为我们提供了一个可以实现该功能的库函数 debuginfo_eip(),直接拿来用就行
在拿来用之前我们需要注意其并未实现行号功能,我们还需要手动在 kern/debug.c 中补全实现,这一块原理比较复杂,主要靠其提供的 stab_binsearch() 函数实现,感兴趣的可以了解一下 stab:
1 | |
在 backtrace 中需要注意的是其提供的函数名指针并非以 \0 结尾所以我们还需要手动指定输出长度,最终 backtrace 函数的代码如下:
1 | |
最终运行效果如下:
运行 make grade 以检查 lab 1 的完成情况,可以看到我们成功完成了 lab 1 的代码部分,至此, lab 1 结束

0x02.Lab 2: Memory Management
在这一部分当中我们需要实现 OS kernel 的内存管理模块,分为两部分:
物理内存分配器:我们需要将所有的物理内存以「页」为单位进行管理,并记录下各个页的状态(空闲或已被分配)、共享该页面的进程数量等,并实现分配与释放物理页的函数
虚拟内存分配器:我们需要完成对页表的管理,主要是实现虚拟地址到物理地址的映射的建立功能
首先用 git 拉 lab2 的代码下来,这里笔者前面 lab 1 的代码没有 handin 所以前面提示了一下:
1 | |
lab 2 新增了这些文件:
- inc/memlayout.h
- kern/pmap.c
- kern/pmap.h
- kern/kclock.h
- kern/kclock.c
memlayout.h 中描述了虚拟地址空间的布局,我们需要通过修改 pmap.c 来实现;在 memlayout.h 与 pmap.h 中定义了 Pageinfo 结构体,用以描述单个物理页,与 Linux 内核的做法类似,一个 Pageinfo 对应一张物理页,所以在该结构体中只需要存储该页的状态即可;kclock.c 与 kclock.h 用以操作电池后备时钟与 CMOS RAM 硬件,其在 BIOS 中记录了 PC 的物理内存容量与其他东西,在 pmap.c 中的代码需要读取该设备以计算可用物理内存,这部分代码 xv6 已经帮我们实现好了所以我们暂时不需要了解 CMOS 的原理
在笔者的 【CODE.0x00】从零开始的32位操作系统开发手记 - arttnba3’s blog 中记录了三种获取可用物理内存容量与布局的方式,原型来自 Linux 内核
在 memlayout.h 中对将要建立的内存布局描述如下:
1 | |
Part 1: Physical Page Management
操作系统应当要管理好内存中的每一张内存页,JOS 同样以页为粒度进行管理,在本部分中我们需要为 JOS 编写一个物理内存页分配器,其使用一个链表来将空闲的物理页对应的 Pageinfo 结构体相连
在 Exercise 1 中要求我们实现该物理内存页分配器的几个函数
Exercise 1. In the file kern/pmap.c, you must implement code for the following functions (probably in the order given).
boot_alloc()mem_init()(only up to the call tocheck_page_free_list(1))page_init()page_alloc()page_free()
check_page_free_list()andcheck_page_alloc()test your physical page allocator. You should boot JOS and see whethercheck_page_alloc()reports success. Fix your code so that it passes. You may find it helpful to add your ownassert()s to verify that your assumptions are correct.
笔者本人很想直接写一个 buddy system(笑),但一是技术力好像不大够的样子,二是在对 JOS 没有足够了解的情况下还是先按照给的注释来实现
我们先来看 kern/pmap.c ,在一开头声明了这几个全局变量:
1 | |
npages:以页为单位的物理内存总量npages_basemem:以页为单位的可用内存总量kern_pgdir:内核的页全局目录表pages:页结构体(PageInfo)数组的指针page_free_list:空闲的物理页单向链表头节点
那么我们这里可以看出来这个内存管理有点类似于 FLATMEM 内存模型:直接由一个大的 page 结构体数组对应一块可用物理内存区域。再加上 “只有一个单向链表的 buddy system”,大概就如下图所示(笔者拿两张讲 Linux的图拆开拼成的)
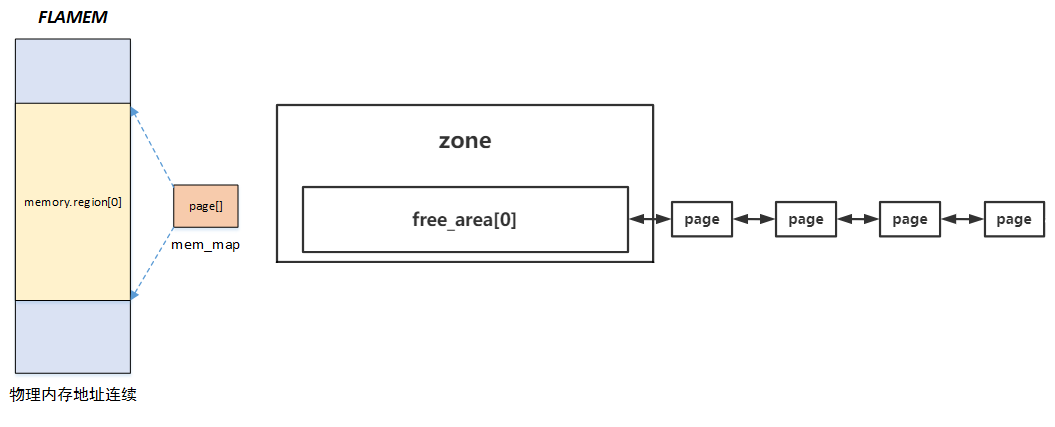
这里我们需要注意一点:PageInfo 结构体并不需要存储地址信息,因为他是一个结构体数组直接对应整个物理内存空间,相应地就有 pages[0] 对应地址 0,pages[1] 对应地址 0x1000…我们其实很容易能得到 PageInfo 地址到物理页帧之间的转换公式,这里我们直接看在 kern/pmap.h 中实现的两个转换函数:
1 | |
当然,我们现在所说的都是虚拟地址,我们仍需要一个虚拟地址与物理地址之间直接转换的函数,参照上图,由于是线性映射,故直接减去一个差值即可,在kern/pmap.h 中便实现了虚拟地址到物理地址转换的函数:
1 | |
现在我们可以开始补完 Exercise 1 的几个函数的代码了
boot_alloc():物理内存线性分配器
按惯例,先看注释:
1 | |
该函数为一个简易的 physical memory allocator,只在 JOS 建立其虚拟内存系统时使用,算是内核初始化过程中的一个临时函数
其功能主要是返回以页为单位的连续的物理内存空间的虚拟地址的起始地址,n为0时返回下一个空闲页面,OOM时 panic
掌握了这些信息就可以开始写了,函数一开头定义了一个 static 的变量 nextfree,表示其分配方式是从内存一开始线性往后切割的,由于这是一个虚拟地址所以我们在计算是否 OOM 时还需要转化成物理地址,因为预设页表只映射了 4MB 内存故这里超出 4MB 我们直接 OOM panic;对页大小的对齐直接使用 ROUNDUP 即可
ROUNDUP 是 GCC 的宏还是 JOS 的宏呢?暂且不考证(其实是没找到),这里直接“拿来主义”
1 | |
mem_init():初始化二级页表,建立 freelist(part1)
按顺序接下来到 mem_init() 函数,惯例先看注释,主要是初始化内核地址空间:
1 | |
首先是通过 i386_detect_memory() 检测可用内存容量,之后用 boot_alloc() 分配一张页面做二级页表的 PGD,并建立自我映射,设置对应权限,以此我们便能通过虚拟地址访问页表了
参见
memlayout.h中的内存布局,UVPT指向 PGD 起始地址,PDX()则是将虚拟地址转换到页目录表项下标的宏,PTE_U表示 ring0~ring3都能访问,PTE_P表示该页面存在
1 | |
接下来到由我们补全的部分:分配 pages 数组并初始化为 0,十几秒就能写完:
1 | |
继续阅读,接下来会调用 page_init() 初始化 pages 数组中的每一个 PageInfo ,主要是设置引用计数为 0 并链到 freelist 上,之后是三个检查函数,Exercise 1 中提到我们这一步只需要补全到 check_page_free_list(),所以接下来开始补全 page_init()
1 | |
page_init():初始化 pages 数组与 freelist
惯例先看注释:初始化 pages 结构体与 freelist
1 | |
接下来按注释进行补全,我们需要明确哪些页在/不在空闲状态:
- 第一张物理内存页为在使用状态,保存着实模式的 IDT 与 BIOS 结构
[PGSIZE, npages_basemem * PGSIZE)为可用的空闲内存[IOPHYSMEM, EXTPHYSMEM)这一块内存用作 IO,对我们来说是一个“内存空洞”,也不应当被使用[EXTPHYSMEM, ...)这一块扩展内存,有的是在使用着的,有的又是空闲的,我们需要绕开:- 内核镜像
- 页表
- 其他数据结构
最后一个似乎比较棘手,但我们知道 boot_alloc() 初始化 nextfree 时用到一个变量 end 指向内核 bss 段末尾,说明往后的都是可用的内存,因此我们只需要将第三项往后一直到 nextfree 的内存页设为使用状态、nextfree 往后的内存设为空闲页链入 freelist 即可
这里我们需要注意一个点:boot_alloc() 分配的是虚拟内存,但是 pages 数组对应的是物理内存,因此这里别忘了进行转换(笔者就在这碰了坑)
注意以上这些标准之后,修改 page_init() 的代码如下:
1 | |
page_alloc():分配单个空闲页面
这一块比较简单,直接从 freelist 中取出一个页面即可,这里注意如果有 ALLOC_ZERO 则需要我们帮忙清零,而且我们分配时不应当增加引用计数,这应该是由 caller 完成的
这里我们别忘了在清零时应当用 page2kva 将 PageInfo 结构体地址转化为其对应页面的虚拟地址
1 | |
page_free():释放单个页面
主要是一些检查之后插入 freelist 头部即可,笔者还自行加了一个类似 ptmalloc 中对头部的简易 double free 检测(笑)
1 | |
到这里 Exercise 1 就完成了,接下来进入 Part2.
Part 2: Virtual Memory
一上来就是 Exercise 2,主要是让我们了解 80386 下的分段和分页
Exercise 2. Look at chapters 5 and 6 of the Intel 80386 Reference Manual, if you haven’t done so already. Read the sections about page translation and page-based protection closely (5.2 and 6.4). We recommend that you also skim the sections about segmentation; while JOS uses the paging hardware for virtual memory and protection, segment translation and segment-based protection cannot be disabled on the x86, so you will need a basic understanding of it.
分段大家都懂,就是一个段寄存器里存放段选择子对应一个段描述符表示一块连续的内存称为一个segment,分页则是依托页表这一结构建立起虚拟地址到物理地址间的映射,那么是不是说明分页出现以后分段就自然而然地消失了呢?答案是否定的,分页与分段其实是同时存在的,因为这是由硬件(CPU)提供的功能
下图是一张分页与分段相结合的逻辑地址到物理地址间转换的过程
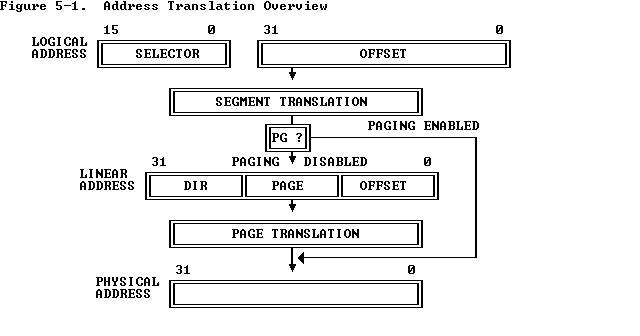
笔者这里参照其提供的文档简述一下分段+分页下的地址翻译
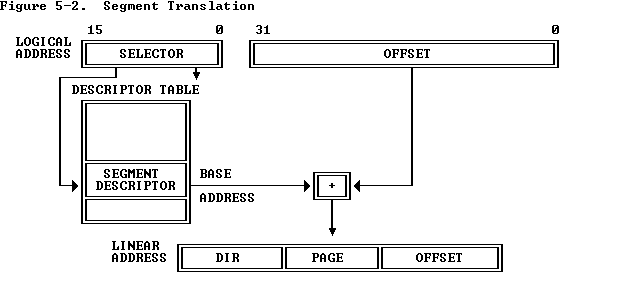
Segment Translation
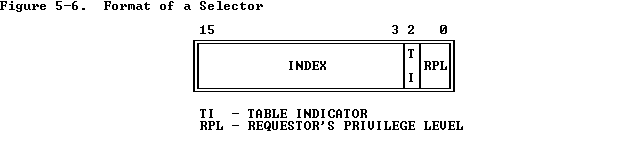
进入保护模式之后,段寄存器并没有弃用,仍然承担着其“描述一个内存段”的作用,但仅有 16 位的、数量少得可怜的段寄存器早已无法满足人们的需求,因此在保护模式下段寄存器不再直接存放段的基址,而是存放着「段选择子」(segment selector)——真正的段描述符(segment descriptor)存放在一个名为「段描述符表」(segment descriptor table)的一块连续内存上,段选择子用以标识对应的段描述符在段描述符表中的下标与段的权限
因此在访问一个虚拟地址(逻辑地址)时首先需要通过段描述符翻译成对应的线性地址(若未开启分页则翻译的结果便直接为物理地址)
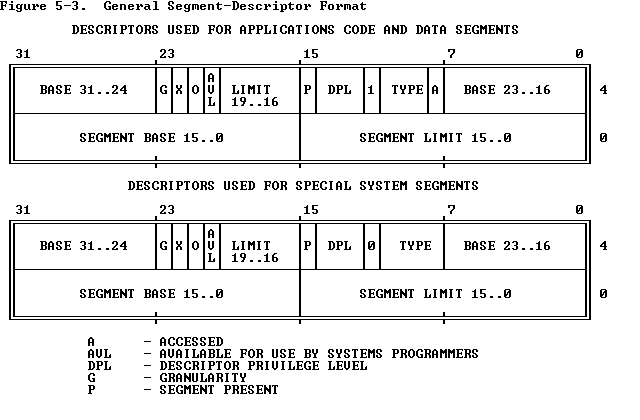
一个段描述符有着如下结构,需要注意的是系统段与普通的数据段和代码段等是有些许区别的,后者就是我们常用的普通的段,而前者通常用于表示中断门、陷阱门、调用门等
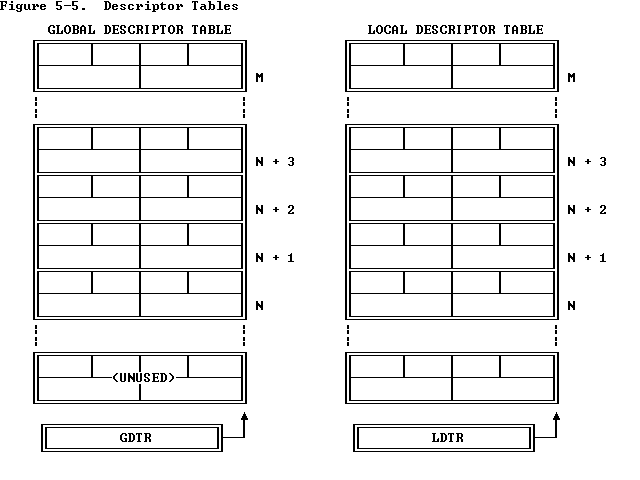
当然,既然段寄存器里存放的变成了段选择子,那么我们自然需要一个新的结构来对应表示段描述符表的地址,段描述符表分为两种——全局段描述符表与局部段描述符表,因而页引入了两个新的寄存器——GDTR 与 LDTR
需要注意的是,全局段描述符表的第一个段描述符为不可用的段描述符
最后我们来看段寄存器中存放的段选择子,结构较为简单,主要就是存放了对应的段描述符在段描述符表中的下标、访问权限、对应位于全局/局部段描述符表
关于分段机制,更详细深入的说明参见 https://arttnba3.cn/2021/06/24/CODE-0X00-A3OS/#%E4%B8%89%E3%80%81%E5%85%A8%E5%B1%80%E6%8F%8F%E8%BF%B0%E7%AC%A6%E8%A1%A8%EF%BC%88Global-Descriptor-Table%EF%BC%89
Page Translation
讲完了分段机制,接下来到分页机制,分页机制将物理内存以「页」为粒度进行管理,通过「页表」这一数据结构完成线性地址到物理地址之间的映射
在保护模式下,是否开启分页是通过 Cr0 寄存器的 PG 位标识的,但是分段是默认开启的,怎么处理分段与分页之间的冲突呢?笔者认为可以这么理解:在开启分页之前,分段是直接对物理地址空间进行分段;在开启分页之后,分段是对页表映射后的线性地址空间进行分段,相当于是在分段与物理地址之间插入了一个中间层
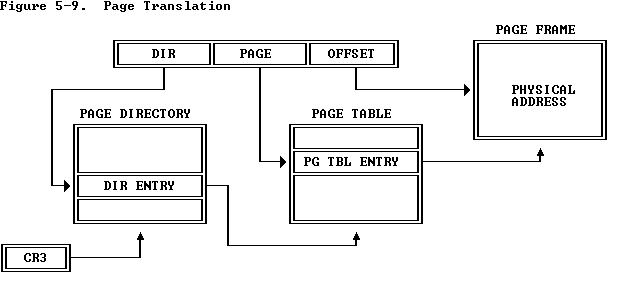
于是我们接下来来看 32 位下启用二级页表的分页机制,在分页机制下一个 32 位的线性地址有着这样的三段式结构:

在 Cr3 寄存器中存放着页目录表的地址;MMU在将一个线性地址翻译成物理地址时,首先通过 Cr3 寄存器获取到页目录表地址,通过线性地址的 DIR 域找到页目录表对应下标的页目录表项(Page Directory Entry),页目录表项中存放着对应的页表的地址,再通过线性地址的 PAGE 域找到页表对应下标的页表项(Page Table Entry),页表项中存放着对应的物理页地址,最后通过 OFFSET 域(即页内偏移)访问到对应物理页的对应数据
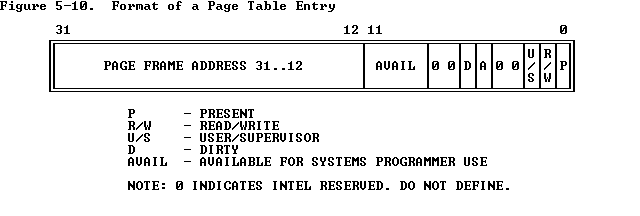
一个页(目录)表项有着如下的结构,由于页目录表、页表、物理页都是以页为单位对齐的,因此我们只需要存放以页为单位的地址即可,空闲下来的这些位被用以存放页访问、读写权限等
Virtual, Linear, and Physical Addresses
我们现在正式对一堆各种地址名词下定义:
- 「虚拟地址」:基于分段机制表示的地址,由一个段选择子与段内偏移组成
- 「线性地址」:基于分页机制表示的地址,是经过了分段翻译后的一个地址
- 「物理地址」:RAM 上的真实地址
得到如下转换图例:
1 | |
其实在分页机制出现之后,分段机制就没有什么存在的意义了,因此你可以看到现代操作系统基本上都很少提分段的概念,大部分情况下虚拟地址就直接是线性地址(当然,其实还是有一些地方用到分段的权限验证等特性的)
同样地,为了简化地址翻译的操作,在 boot/boot.S 中 JOS 初始化了一个所有的段描述符都对应段基址 0、段界限 0xffffffff 的全局段描述符表,这样虚拟地址实际上就直接是线性地址了
下面来看 Exercise 3,主要让我们熟悉 Qemu 提供的一些查看内存的指令
Exercise 3. While GDB can only access QEMU’s memory by virtual address, it’s often useful to be able to inspect physical memory while setting up virtual memory. Review the QEMU monitor commands from the lab tools guide, especially the
xpcommand, which lets you inspect physical memory. To access the QEMU monitor, press Ctrl-a c in the terminal (the same binding returns to the serial console).Use the xp command in the QEMU monitor and the x command in GDB to inspect memory at corresponding physical and virtual addresses and make sure you see the same data.
Our patched version of QEMU provides an info pg command that may also prove useful: it shows a compact but detailed representation of the current page tables, including all mapped memory ranges, permissions, and flags. Stock QEMU also provides an info mem command that shows an overview of which ranges of virtual addresses are mapped and with what permissions.
先按 Ctrl + A,然后再按 C,进入 Qemu 的 monitor 模式,使用 info pg 指令查看分页映射,如下:
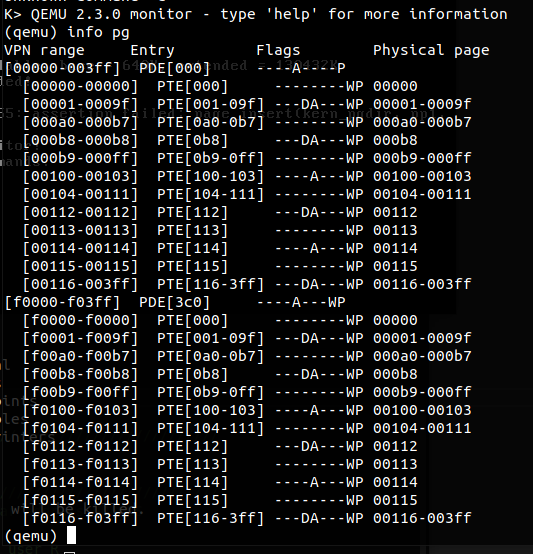
使用 xp 命令查看对应物理内存上数据与两个映射的虚拟地址上数据,完全一致
最后是 info mem 查看地址空间权限,虚拟地址空间起始 4MB 仅为可读权限,位于虚拟地址高 256MB 的起始 4MB 为可读写权限,但实际上对应的都是同一块物理地址空间

继续往下,在 JOS 中定义了两个 uint32_t 的别名 uintptr_t 与 physaddr_t 表示虚拟地址与物理地址(在编译器看来其实没有什么区别)
| C type | Address type |
|---|---|
T* |
Virtual |
uintptr_t |
Virtual |
physaddr_t |
Physical |
接下来是 MIT 6.828 的一个小习题:
Question
- Assuming that the following JOS kernel code is correct, what type should variable
xhave,uintptr_torphysaddr_t?
2
3
4mystery_t x;
char* value = return_a_pointer();
*value = 10;
x = (mystery_t) value;
我们知道虚拟地址是可以通过 MMU 进行翻译访问到物理地址的,但是一个物理地址经过 MMU 之后得到的可能是奇形怪状的东西(比如说物理地址同值的虚拟地址已经建立了一个映射),所以这里的 x 应当是 uintptr_t 类型
Reference counting
在用以表示单个物理页框的 PageInfo 结构体中的成员 pp_ref 用以表示一张页面被引用的次数(引用计数),引用计数为 0 时表示该页为空闲页,但是引用计数的增/减应当由使用者完成,因此在我们调用 page_alloc() 之后应当立即将引用计数 + 1,而当引用计数为 0 时我们才应当调用 page_free() 释放一张内存页
最后这个工作 JOS 归并在
page_decref()中完成
Page Table Management
接下来是 Exercise4,让我们完成对页表的管理,补全对应函数
Exercise 4. In the file
kern/pmap.c, you must implement code for the following functions.
2
3
4
5
6pgdir_walk()
boot_map_region()
page_lookup()
page_remove()
page_insert()
check_page(), called frommem_init(), tests your page table management routines. You should make sure it reports success before proceeding.
pgdir_walk():(创建并)返回 PTE
按惯例先看注释,对于一个给定的页目录表地址与一个线性地址,该函数应当返回对应的「页表项」的地址,若对应的页表为空且指定了 create 标志位,则分配一张新的物理页作为新的页表,若否、或是分配物理页失败则直接返回 NULL;分配成功后应当增加该页的引用计数
1 | |
参照源码其他地方的相关写法,利用 JOS 提供的一些宏很容易就能补完该函数
1 | |
boot_map_region():建立虚拟地址区域到物理地址区域映射
惯例先看注释,主要是建立虚拟地址 [va, va+size) 到物理地址 [pa, pa+size) 之间的映射,提示我们使用 pgdir_walk()
1 | |
对应写入页表项条目即可,注意这里不需要改变页的引用计数
1 | |
page_lookup():返回虚拟地址对应 PageInfo 地址
主要是让我们查找页表,返回虚拟地址对应的 PageInfo
1 | |
直接用前面写的 pgdir_walk() 找到页表项再用 pa2page() 把物理地址转成 PageInfo 的虚拟地址即可,JOS 还提供了一个方便的页表项到物理地址转化的宏 PTE_ADDR() (一开始笔者都是纯手写…)
1 | |
page_remove():解除页表虚拟地址映射
主要是解除页表上对应虚拟地址到物理地址间的映射
1 | |
清空页表项并减少引用计数即可,若引用计数为 0 则释放该页,别忘了使用 tlb_invalidate() 清除 TLB 中缓存
1 | |
page_insert():建立虚拟地址到物理页映射
建立单个虚拟地址到单张物理页上的映射,分配并增加页引用计数,若已有一个映射则移除现有映射并清空 TLB 对应条目
1 | |
官方推荐用 page_remove() 完成对现有页的解引用,但是会重复调用 pgdir_walk(),所以笔者直接展开操作
1 | |
到这里时运行 lab2 的分数检查程序应该有 40 分了
Part 3: Kernel Address Space
kernel 占据高 256MB的虚拟地址空间而 user 使用剩余的虚拟地址空间
Permissions and Fault Isolation
因为一张页目录表同时映射了用户空间与内核空间,因此我们需要通过页表中的权限位限制用户对一些地址空间的访问:
- 对于
ULIM往高地址的内存,用户无权访问 - 对于
[UTOP, ULIM)这块区域的内存,用户与内核都只有只读权限,这块区域的映射将页表、PageInfo 数组等结构暴露给用户,但只有位于内核空间的映射可以写入页表与 PageInfo 数组
Initializing the Kernel Address Space
接下来是 Exercise 5:完成 mem_init() 的剩余部分
Exercise 5. Fill in the missing code in
mem_init()after the call tocheck_page().Your code should now pass the
check_kern_pgdir()andcheck_page_installed_pgdir()checks.
mem_init():(part2)
目光放回 mem_init(),接下来又到了该我们补全的地方:将 pages 映射到线性地址 UPAGES 上,新建映射的权限应为用户与内核都可读,但 pages 结构体应当为内核可读写而用户不可知,因此应当建立新的映射,这里该用上我们之前写的 boot_map_region() 了
1 | |
然后到初始化内核栈了,这里内核栈被分为两块:
- 常规的可读写内核栈
- 内核栈保护页面,读写到该页面上时说明栈爆了,称为 guard page
guard page 不需要我们建立新的映射,因为如果爆栈了读写到 guard page 自然会触发 page fault,这时我们便知道爆栈了
需要注意内核栈应仅为内核可读写,应设置页表项的 Supervisor 权限位,即不使用 PTE_U
1 | |
最后是建立内核空间的映射,将高虚拟地址处的内核映射到物理地址起始处
1 | |
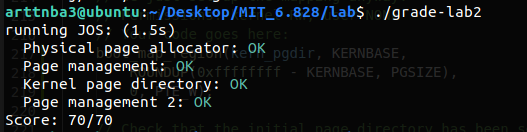
完成这一切之后运行分数判断程序,全部通过,至此,lab2 的所有编程练习完美通过
下面是习题 Time
Question
What entries (rows) in the page directory have been filled in at this point? What addresses do they map and where do they point? In other words, fill out this table as much as possible:
Entry Base Virtual Address Points to (logically): 1023 ? Page table for top 4MB of phys memory 1022 ? ? . ? ? . ? ? . ? ? 2 0x00800000 ? 1 0x00400000 ? 0 0x00000000 [see next question]
破题🐕都不做We have placed the kernel and user environment in the same address space. Why will user programs not be able to read or write the kernel’s memory? What specific mechanisms protect the kernel memory?
由于页表项相关权限位的存在,导致用户进程(运行在 ring3)无法读写内核的内存空间,内存分页机制保护了内核内存
What is the maximum amount of physical memory that this operating system can support? Why?
操作系统最大可支持的物理内存应当为 4GB,这是一个 32 位长度的地址能够表示的范围上限
How much space overhead is there for managing memory, if we actually had the maximum amount of physical memory? How is this overhead broken down?
看不懂题目,摸了!对于页表结构而言,一个二级页表刚好能满载 4GB 空间,需要一张页目录表与 1024 张页表,总计4198400字节空间;对于 PageInfo 结构体数组而言,一个 PageInfo 结构体占用的空间为 8 字节(4 字节对齐),那么要管理 4GB 的空间总计需要1048576个 PageInfo 结构体,占据8388608字节的空间;两者总计消耗 0.29% 的内存空间,笔者认为这个开销还是挺小的Revisit the page table setup in
kern/entry.Sandkern/entrypgdir.c. Immediately after we turn on paging, EIP is still a low number (a little over 1MB). At what point do we transition to running at an EIP above KERNBASE? What makes it possible for us to continue executing at a low EIP between when we enable paging and when we begin running at an EIP above KERNBASE? Why is this transition necessary?因为在启用分页之后低 1MB 的线性空间仍然映射到低 1MB 的物理空间,因此此时仍能正常运行;在
call i386_init时跳转到kern/init.c中的i386_init()函数,此时 eip 便位于内核虚拟地址空间中了;在页表中建立双重映射;因为在开启分页之后 eip 暂时还运行在低地址空间,因此要先有个临时的双重映射保证进入内核虚拟地址空间之前的正常运行
接下来是选做部分:MIT 6.828 的 Challenge
Challenge! We consumed many physical pages to hold the page tables for the KERNBASE mapping. Do a more space-efficient job using the PTE_PS (“Page Size”) bit in the page directory entries. This bit was not supported in the original 80386, but is supported on more recent x86 processors. You will therefore have to refer to Volume 3 of the current Intel manuals. Make sure you design the kernel to use this optimization only on processors that support it!
这个 challenge 的意思大概就是开启 4MB 的大页,这首先需要我们修改 Cr4 寄存器,设置 Page-Size Extensions 标志位为 1 后内存页的大小就从 4KB 变成了 4MB,还需要设置页表项的 PTE_PS 位,主要都是苦力活这里就先摸了(
下一个 Challenge,新增一个 showmappings 命令:
Challenge! Extend the JOS kernel monitor with commands to:
- Display in a useful and easy-to-read format all of the physical page mappings (or lack thereof) that apply to a particular range of virtual/linear addresses in the currently active address space. For example, you might enter
'showmappings 0x3000 0x5000'to display the physical page mappings and corresponding permission bits that apply to the pages at virtual addresses 0x3000, 0x4000, and 0x5000.- Explicitly set, clear, or change the permissions of any mapping in the current address space.
- Dump the contents of a range of memory given either a virtual or physical address range. Be sure the dump code behaves correctly when the range extends across page boundaries!
- Do anything else that you think might be useful later for debugging the kernel. (There’s a good chance it will be!)
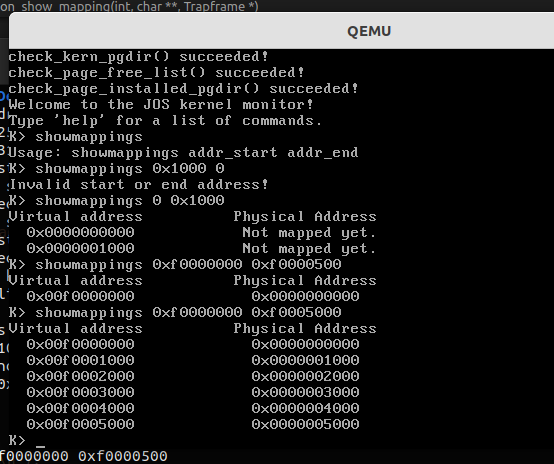
使用 strtol 将字符串转为数字后使用 page_lookup() 查阅页表后打印即可
1 | |
效果如下所示
Address Space Layout Alternatives
当前的 JOS 内存布局并非是唯一的一种,一个操作系统还能将内核映射在线性低地址空间、而将线性高地址空间给用户进程使用,但由于 x86的一种向后兼容模式——虚拟 8086 模式将处理器“硬连线”到线性地址空间底部,因此若内核映射到此处则完全不可用
虽然这可能比想象中困难,但我们仍然有能将内核映射到低线性地址空间的方案——允许用户进程直接访问整个地址空间,但仍将内核与各进程间分割开来
笔者评价:闲得慌
下面是三个闲得慌的 Challenge:
Challenge! Each user-level environment maps the kernel. Change JOS so that the kernel has its own page table and so that a user-level environment runs with a minimal number of kernel pages mapped. That is, each user-level environment maps just enough pages mapped so that the user-level environment can enter and leave the kernel correctly. You also have to come up with a plan for the kernel to read/write arguments to system calls.
大概是给内核设置一个独立的页表,而用户进程仅保留必须用到的内核映射,例如内核入口点(比如说系统调用),笔者认为这个实现差不多是 KPTI 的思想,这里就不手抄一份 KPTI 了,用户进程还啥影子都没有,写个🐓
Challenge! Write up an outline of how a kernel could be designed to allow user environments unrestricted use of the full 4GB virtual and linear address space. Hint: do the previous challenge exercise first, which reduces the kernel to a few mappings in a user environment. Hint: the technique is sometimes known as “follow the bouncing kernel.” In your design, be sure to address exactly what has to happen when the processor transitions between kernel and user modes, and how the kernel would accomplish such transitions. Also describe how the kernel would access physical memory and I/O devices in this scheme, and how the kernel would access a user environment’s virtual address space during system calls and the like. Finally, think about and describe the advantages and disadvantages of such a scheme in terms of flexibility, performance, kernel complexity, and other factors you can think of.
大概是设计与实现上面的方案,并确保自己明确其中的细节
Challenge! Since our JOS kernel’s memory management system only allocates and frees memory on page granularity, we do not have anything comparable to a general-purpose
malloc/freefacility that we can use within the kernel. This could be a problem if we want to support certain types of I/O devices that require physically contiguous buffers larger than 4KB in size, or if we want user-level environments, and not just the kernel, to be able to allocate and map 4MB superpages for maximum processor efficiency. (See the earlier challenge problem about PTE_PS.)Generalize the kernel’s memory allocation system to support pages of a variety of power-of-two allocation unit sizes from 4KB up to some reasonable maximum of your choice. Be sure you have some way to divide larger allocation units into smaller ones on demand, and to coalesce multiple small allocation units back into larger units when possible. Think about the issues that might arise in such a system.
完善内核内存管理系统,提供更大粒度与更小粒度的 allocator(比如说 buddy system + slub allocator),这里就不手抄一份 buddy system 和 slub allocator 了,笔者暂时也没有更好的内存分配方案
👴是懒🐕👴自豪
至此,lab2 全部完成
0x03.Lab 3: User Environments
在这一部分我们终于要迈入用户进程的世界,实现特权级的分离,并完成系统调用的编写以及一个用户进程的运行
注意:本 lab 中 environment 与 process 代指同一事物——运行的进程的抽象体,6.828 在这里更多使用 environment 而不是 process 是为了指出 JOS environment 与 UNIX process 提供了不同的接口,且不提供相同的语义
首先是惯例地将 lab 3代码拉到本地
1 | |
这里笔者本想先跑一跑内核玩玩,但是遇到一个奇怪的问题:在分配页目录表地址空间后、建立映射时会 panic 掉,经笔者调试发现在 boot_alloc() 中初始化 nextfree 的值所指向的那张内存页上仍然存在着一些内核变量,即这并非是一个闲置的内存页,于是我们的指向页目录表的指针就被 memset 清零了…
为什么?让我们将目光放回
boot_alloc()函数中,在我们初始化 nextfree 时使用的是一个外部引入的变量end对内存页进行向上对齐得到的地址,这里说是由链接器生成的
2
3
4
5
6
7
8
9// Initialize nextfree if this is the first time.
// 'end' is a magic symbol automatically generated by the linker,
// which points to the end of the kernel's bss segment:
// the first virtual address that the linker did *not* assign
// to any kernel code or global variables.
if (!nextfree) {
extern char end[];
nextfree = ROUNDUP((char *) end, PGSIZE);
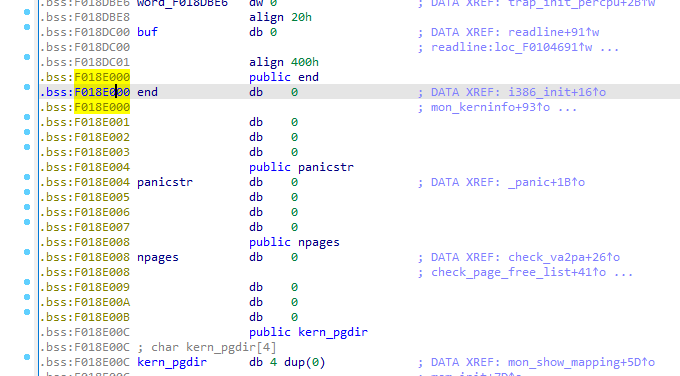
}**但经过笔者反编译内核文件、打印 end 变量信息发现,其并不指向 bss 的末尾,后面还有几个变量,且其刚好落在内存页对齐的地址…**这也是为什么 ROUNDUP 不能顺利拯救 nextfree 的原因,可能也是为什么之前没有出现该问题的原因:之前 end 不一定刚好落在内存页对齐的地址,向上对齐一个页自然就早已超出 bss 了,但是现在链接器恰好将其生成在了一个微妙的位置
笔者甚至怀疑 end 可能之前甚至都不在 bss 段末尾,可能也不是链接器生成的“末尾变量”…但是一看 IDA 的反编译结果,好像确乎有个 end 在整个镜像的最末尾,但他又指回了那个位置尴尬的 end 变量
笔者暂且不知道是什么原因导致了这个现象的发生,目前的解决方案是在计算 nextfree 时多加一个 page 进行 ROUNDUP,但在后面的 check_kern_pgdir 里面又 panic 掉了…
lab2 跑得好好的 lab3 咋突然莫名其妙炸了,👴不理解
于是笔者将 lab2 分支的 kern/pmap.c 拷贝过来,让 end 加上一个 page,内存管理这一块又一切正常了…
👴愿意称之为灵异事件
那就只能是 lab3 中的一些改动把内存管理给 crash 掉了,笔者检索该函数的 panic 信息,发现确乎是在检查 lab3 新增的内存映射区域时 panic 的(这块内存我们还没映射)
2
3
4// check envs array (new test for lab 3)
n = ROUNDUP(NENV*sizeof(struct Env), PGSIZE);
for (i = 0; i < n; i += PGSIZE)
assert(check_va2pa(pgdir, UENVS + i) == PADDR(envs) + i);所以接下来重新开始 lab3 的旅程
但👴觉得 end 确乎是对齐错了

在 lab3 中新增了以下文件:
inc/ |
env.h |
Public definitions for user-mode environments |
|---|---|---|
trap.h |
Public definitions for trap handling | |
syscall.h |
Public definitions for system calls from user environments to the kernel | |
lib.h |
Public definitions for the user-mode support library | |
kern/ |
env.h |
Kernel-private definitions for user-mode environments |
env.c |
Kernel code implementing user-mode environments | |
trap.h |
Kernel-private trap handling definitions | |
trap.c |
Trap handling code | |
trapentry.S |
Assembly-language trap handler entry-points | |
syscall.h |
Kernel-private definitions for system call handling | |
syscall.c |
System call implementation code | |
lib/ |
Makefrag |
Makefile fragment to build user-mode library, obj/lib/libjos.a |
entry.S |
Assembly-language entry-point for user environments | |
libmain.c |
User-mode library setup code called from entry.S |
|
syscall.c |
User-mode system call stub functions | |
console.c |
User-mode implementations of putchar and getchar, providing console I/O |
|
exit.c |
User-mode implementation of exit |
|
panic.c |
User-mode implementation of panic |
|
user/ |
* |
Various test programs to check kernel lab 3 code |
Part A: User Environments and Exception Handling
在新加入的头文件 inc/env.h 中包含了 JOS 的基本的用户环境定义,内核使用结构体 Env 来标识每一个用户环境,在本 lab 中我们需要完成 JOS 的多环境支持
在 kern/env.c 中,内核维护三个与环境有关的全局变量:
1 | |
在 JOS 启动时会初始化一个长度为 NENV 的 Env 结构体数组,其中闲置的 Env 结构体链在 env_free_list 中,而 curenv 指向当前环境的 Env 结构体(类似于 Linux 内核中的 current() 指向 当前 CPU 上运行的进程的 task_struct),在启动阶段 curenv 为 NULL
笔者认为还是叫进程好听,既然是同一个东西,没有必要为了和 UNIX 区分开来而特意改个莫名其妙的名字
Environment State
Env 结构体定义如下,笔者认为可以类比做 Linux 下的 task_struct :
1 | |
各字段说明如下:
env_tf: 进程上下文中的寄存器状态
env_link: 在
env_free_list链表中指向下一个空闲 Env 结构体env_id: 唯一标识单个进程的 id,在 Env 结构体被重新分配后通常会发生改变
env_parent_id: 父进程的 id
env_type: 进程类型,对于大部分进程而言应当为
ENV_TYPE_USER在后续的 lab 中会补充更多的为系统服务而出现的类型
用户进程与内核进程的既视感
env_status: 进程状态,可选值范围如下:
ENV_FREE: 该 Env 结构体空闲ENV_RUNNABLE: 该 Env 结构体对应着一个等待运行的进程ENV_RUNNING: 该 Env 结构体对应着一个正在运行的进程ENV_NOT_RUNNABLE: 该 Env 结构体对应进程未准备好继续运行(例如在等待另一个进程的信号)ENV_DYING: 该 Env 结构体对应一个僵尸进程,我们将在 lab4 中用到它
env_pgdir: 进程页目录表
需要注意的是,JOS 中的进程并没有自己的内核栈,同一时刻内只有一个进程可以处在内核态,所以 JOS 只需要一个单独的内核栈
Allocating the Environments Array
首先是一个小练习,在 mem_init() 中为 envs 数组分配空间
Exercise 1. Modify
mem_init()inkern/pmap.cto allocate and map theenvsarray. This array consists of exactlyNENVinstances of theEnvstructure allocated much like how you allocated thepagesarray. Also like thepagesarray, the memory backingenvsshould also be mapped user read-only atUENVS(defined ininc/memlayout.h) so user processes can read from this array.You should run your code and make sure
check_kern_pgdir()succeeds.
注意应在 page_init() 之前调用 boot_alloc() 分配空间,在这之后再进行映射,不要图省事写到一起
1 | |
Creating and Running Environments
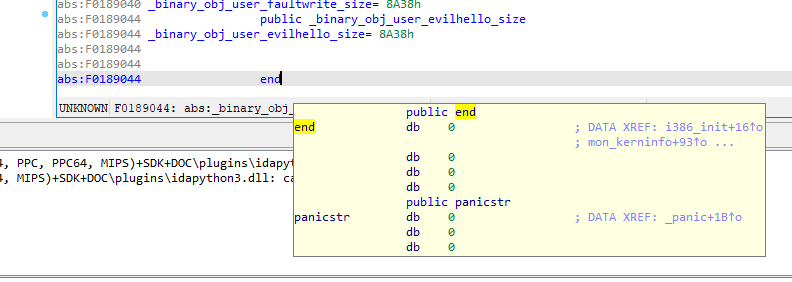
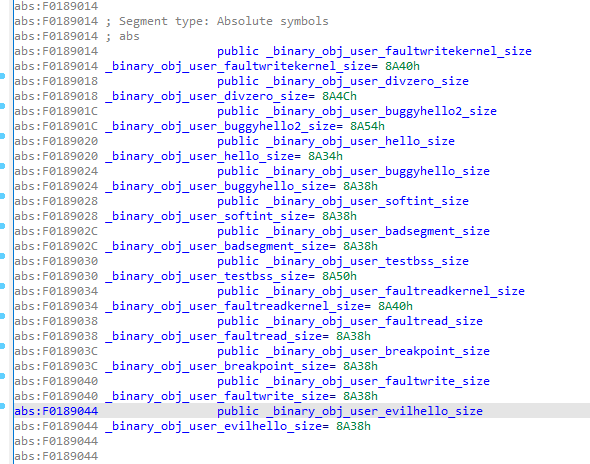
我们将在 kern/env.c 中编写运行用户环境所需的代码,因为目前还没有文件系统,所以目前临时的一个做法是将一个 ELF 文件以 raw 格式(链接内核时使用 -b binary 选项)嵌入到内核镜像中,这也是为什么我们能在内核符号文件 obj/kern/kernel.sym 中见到一些奇怪符号的缘故,这也是为什么实验一开始笔者反编译内核镜像见到奇怪的符号的缘故
在 kern/init.c 中的 i386_init() 中我们可以看到启动用户进程的代码,然而设置用户进程的代码尚未完工,这也是我们接下来需要完成的——Exercise2:
Exercise 2. In the file
env.c, finish coding the following functions:
env_init()Initialize all of the
Envstructures in theenvsarray and add them to theenv_free_list. Also callsenv_init_percpu, which configures the segmentation hardware with separate segments for privilege level 0 (kernel) and privilege level 3 (user).
env_setup_vm()Allocate a page directory for a new environment and initialize the kernel portion of the new environment’s address space.
region_alloc()Allocates and maps physical memory for an environment
load_icode()You will need to parse an ELF binary image, much like the boot loader already does, and load its contents into the user address space of a new environment.
env_create()Allocate an environment with
env_allocand callload_icodeto load an ELF binary into it.
env_run()Start a given environment running in user mode.
As you write these functions, you might find the new cprintf verb
%euseful – it prints a description corresponding to an error code. For example,
2r = -E_NO_MEM;
panic("env_alloc: %e", r);will panic with the message “env_alloc: out of memory”.
在开始之前,我们先看实验说明提供给我们的一个内核运行链:
start(kern/entry.S)i386_init(kern/init.c)cons_initmem_initenv_inittrap_init(still incomplete at this point)env_createenv_runenv_pop_tf
现在开始补全实验代码。
env_init():初始化 Env 结构体,建立 freelist
首先看 env_init() 函数的注释,主要是将 envs 数组中所有 Env 结构体链到 env_free_list 上,并确保与数组相同的从前向后的连接顺序
1 | |
后向遍历 envs 数组建立单向链表即可
1 | |
env_setup_vm():分配进程环境资源
惯例先看注释,主要是让我们分配用户进程所需资源:就目前而言只是分配一个页目录表,并建立对应的内核入口点的映射
1 | |
所有的进程共享同一份内核空间(UTOP 往上的虚拟空间),除了UVPT——每个进程各自应当有一份独立的页目录表,因此在该函数中我们需要初始化单个进程的页表对内核空间的映射,参照 inc/memlayout.h 中的布局
在 JOS 中其实是类似于普通 OS 以前的做法:每个进程共享一份完整的内核地址空间的映射,但笔者认为其实我们只需要映射只读的 pages 数组与 envs 数组即可,内核的其他区域用户是没有任何访问权限的,那其实没必要建立映射,笔者认为比较理想的一个状态是类似 KPTI 那样的——用户态与内核态各自有一张页表,其中内核态页表完整映射内核空间,用户态页表仅映射内核入口点,同时两张页表都完整映射用户空间
这并非不能实现,但是这或许需要对 JOS 源码进行相当大的改动,且该函数除了创建用户进程以外还承担了创建内核进程的任务,而后者是需要对内核空间有访问权限的,且 KPTI 确乎会带来一定的开销(但是可以防止熔断与幽灵漏洞的攻击,可能作为一个安全研究员第一想到的并不是性能而是安全性),因此这里笔者还是选择老老实实地完整拷贝一份内核页表
这里别忘了 page_alloc() 分配的是 page 结构体的地址,我们还需要手动转为虚拟地址
1 | |
而且仔细想来,KPTI并非是基于安全性的改进,而是对漏洞不得不做出的妥协,况且这也就只是做个实验而已,暂时还是不大张旗鼓地改了
region_alloc():为进程分配物理页面,建立映射
主要是为用户进程的 va 起始处 len 长度的虚拟地址空间分配物理页面,别忘了大小按页面粒度对齐以及页表项用户可写权限
1 | |
load_icode():解析 ELF 文件,作为新进程载入
先看注释,让我们手写一个 ELF 解析器,为各个存在于 ELF 中的段分配空间(例如 bss 段在 ELF 中就不占空间)
1 | |
主要还是苦力活,解析 ELF header,选出可载入段(ph->p_type == ELF_PROG_LOAD),分配内存,在页表中建立映射,不过这里提示我们可以抄一抄 boot/main.c 中的解析方法(那👴当然要抄🌶)
关于 ELF 格式网上大把资料,不会的可以参见 https://arttnba3.cn/2021/06/24/CODE-0X00-A3OS/#%E4%B8%83%E3%80%81%E5%8F%AF%E6%89%A7%E8%A1%8C-ELF-%E6%96%87%E4%BB%B6%E6%A0%BC%E5%BC%8F%E6%B5%85%E6%9E%90
这里我们需要注意的是,由于我们仅需要在用户空间建立映射,而我们在分配完空间之后还需要将数据拷贝上去,考虑到用户空间页表中也映射了内核空间,我们可以先切换到用户页表处理数据,完成之后再切换回内核页表,在 JOS 中提供了一个 lcr3() 让我们能直接更改 cr3 寄存器的值(该寄存器中存放着页目录表的地址)
别忘了将 ELF header 中的 entry (程序入口点)给到 Env 结构体中寄存器结构体的 eip
1 | |
env_create():创建进程环境
调用 env_alloc() 分配 PCB、调用 load_icode() 解析载入 ELF 即可
1 | |
env_run():将进程加入运行队列
分为三步走:
- 若当前有进程在运行(curenv != NULL),将其状态设为
ENV_RUNNABLE - 将 curenv 设为待运行进程的 Env并改变其状态、增加运行次数计数,切换到用户页表
- 恢复用户进程运行上下文,从内核态切换到用户态
1 | |
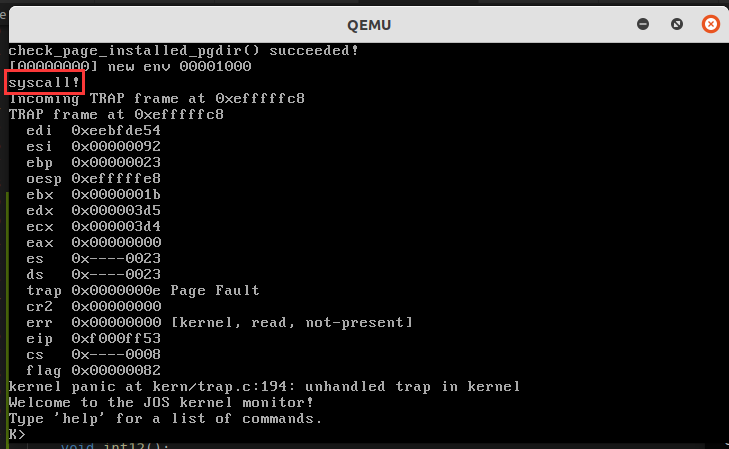
完成这一切后,我们来跑一下这份代码,你会发现内核成功地运行了程序 hello,并在其尝试调用 0x30号中断时 触发了 triple fault 导致运行暂停
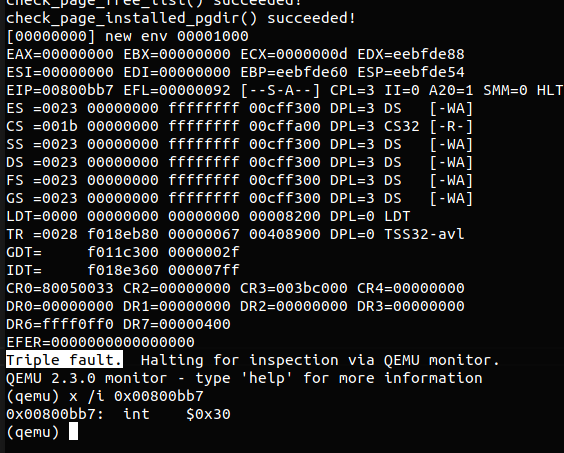
那为什么会触发 triple fault 呢?如同 32位 Linux kernel 所做的一般,JOS 也将系统调用实现为一个中断,这便是第一个 fault(需要注意 fault 并非都代表错误,很多机制其实是通过这种“fault”的触发而实现的);而由于 JOS 尚未设置中断处理程序,因此 CPU 会生成一个 general protection exception,这便是 double fault;然后 CPU 又要处理生成的这个 exception,但是没有对应的处理程序(套娃了),于是就 triple fault 了,但是这并不会无限嵌套下去,在 triple fault 的时候系统就完全无法运行了,通常情况下就重启了,因为我们是 patched qemu 所以会被 qemu 挂起
Handling Interrupts and Exceptions
因此接下来我们来实现中断处理与异常处理,首先是 Exercise 3,阅读了解中断与异常相关基础知识
Exercise 3. Read Chapter 9, Exceptions and Interrupts in the 80386 Programmer’s Manual (or Chapter 5 of the IA-32 Developer’s Manual), if you haven’t already.
中断(interrupt)与异常(exception)是两种特别的改变控制流的方式,其工作原理类似于非编程式的 call 指令——改变正常的程序流程以处理外部事件或报告错误与异常情况
中断与异常的区别在于中断用以处理处理器外的异步事件,而异常则是处理器在运行时检测到异常事件后的处理
中断与异常通常有如下来源:
- 中断:
- 可屏蔽中断,通过 INTR 引脚发出
- 不可屏蔽中断,通过 NMI 引脚发出
- 异常:
- 由处理器检测到的,具体可分为 faults、traps 与 aborts
- 编程式的,通过指令 into、int 3、int n、bound 可触发异常,通常称之为“软中断”,但处理器将其作为异常来处理
Identify Interrupts
处理器将不同的中断与异常进行独立标号,其中 NMI 与异常对应标号 0 ~ 31(并非所有标号都有对应用途,部分标号为未来保留);可屏蔽中断的标识符由外部中断控制器(例如 Intel 8259A 的可编程中断控制器(Programmable Interrupt Controller))确定,并在处理器的中断确认序列中与处理器通信,8259A 的 PIC 分配的标号可以由软件指定,范围为 32 ~ 255
根据异常报告的方式与是否支持重启指令将其分为三类:
Faults:在“指令造成异常前”被报告的异常,可以是在指令开始执行时或是执行过程中被检测到,若在执行指令时检测到异常,则会保存当前上下文,完成异常处理后再恢复上下文,重新从造成异常的指令开始执行
举个🌰:Linux 中的 page fault 就是这样的一种异常,当读写尚未分配内存页的地址时(比如说 mmap 分配了一个 vma 但是还没分配物理页框)便会触发缺页异常处理程序,分配内存页后再重新从读写的指令开始运行
Traps:在检测到异常的指令后立即在指令边界报告的异常(
别问,👴也没看懂英文原文啥意思)举个🌰:系统调用的流程简化后类似于一个陷阱,用户态进程布置好数据后通过指令陷入到内核态,内核完成处理后再返回用户态,执行下一条指令
Aborts:是一种既不精确定位指令也不重启程序的异常,通常用来报告严重的错误(例如硬件错误或非法值)
例如除以 0 可能就是一种 Abort?
下表显示了中断与异常对应类型的标识符
1 | |
Enabling and Disabling Interrupts
若多个中断同时发生,我们不应当在处理一个中断时跑去处理另一个中断,因此需要明确什么时候能进行中断处理
对于不可屏蔽中断而言,处理器在执行到 iret 指令之前都会忽略 NMI 引脚上的中断信号
对于可屏蔽中断而言,当 IF 标志位为 0 时中断被关闭,只有在 IF == 1时才能进行,与其他标志位一样,在处理器重置时 IF 会被清空,我们可以通过 cli 与 sli 指令清空或设置 IF 标志位,这两个指令只有在 CLI (特权级)<= IOPL 时才可用,否则会触发保护异常
IF 标志位还会被这些操作影响:
pushf指令将 eflags 寄存器的值推到栈上- 在任务切换时会调用
popf与iret指令载入标志位寄存器 - 在通过中断门时会自动重置 IF 标志位,关闭中断
RF 标志位用以控制 debug fault,对于给定指令其最多会被触发一次
对 ss 寄存器的更改(mov 或 pop)也会影响一些中断与异常,例如我们改变堆栈(ss:esp)的过程中(刚好改了 ss 没改 esp)处理了中断或异常,则堆栈指针在中断/异常处理的过程中是不一致的,因此 80386 在更改 ss 的指令后的指令边界处禁止 NMI、INTR、debug fault 或单步陷阱,可能会有例外:page fault 或 general protection fault,因此我们需要使用 80386 的 lss 指令
Priority Among Simultaneous Interrupts and Exceptions
中断与异常的处理同样有着优先级,处理器会先处理高优先级的异常而丢弃低优先级的异常,当中断处理返回时会发现被丢弃的异常并重新处理;优先级顺序如下:
1 | |
Interrupt Descriptor Table
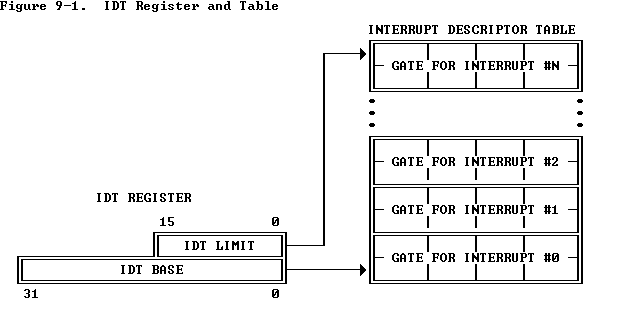
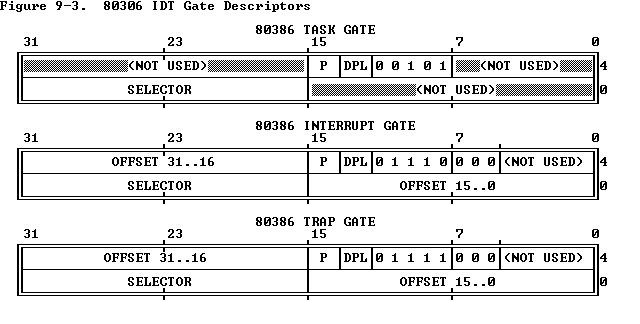
类似于段描述符表,中断同样有着对应的门描述符(Gate Descriptor)结构与一张中断描述符表(Interrupt Descriptor Table),不同于 GDT 与 LDT,IDT 的第一个描述符是可用的,因为中断与异常一共有着 256 个标号,因此一张中断描述符表上最多可以有 256 个中断描述符(也可以少于这个数量)
中断描述符表的地址存放在 IDT 寄存器(IDTR)中,我们可以通过 lidt 指令(通过线性地址装载 IDT,只能在 0 特权级下执行)与 sidt 指令(拷贝当前 IDTR 的值,可以在任何特权级下执行)操作 IDTR
中断描述符表的结构如下:

IDT Descriptor
中断描述符表中包含如下三种描述符:
- 任务门(用作任务切换,后面可能会讲到)
- 中断门
- 陷阱门
描述符的结构如下所示
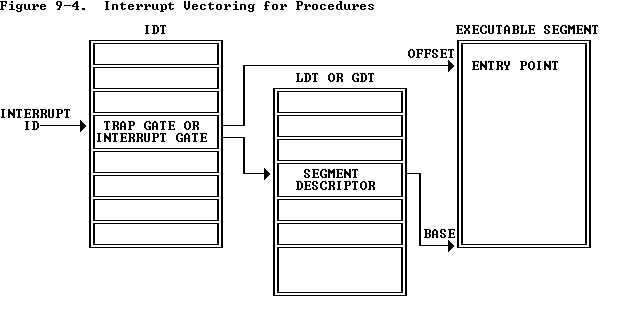
Interrupt Procedures
如同 call 指令一般,中断与异常其实就是“call”中断处理程序——处理器通过中断或异常标号作为 IDT 的索引找到对应的中断描述符,若是一个中断门或陷阱门则其会以类似“call”调用门的方式调用处理程序,若是一个任务门,则会以类似“call”任务门的方式引起任务切换
中断门与陷阱门并不直接指向处理程序,而是通过下图的方式找到处理程序地址:门的选择子指向一个 GDT/LDT 中的可执行段,门的 offset 域指向中断/异常处理程序的开头
如同 call 指令引起的控制流转移一般,中断与异常的处理过程同样使用堆栈存储返回原始过程所需的信息,并使用 iret 指令从栈上恢复这些信息,如同下图所示:
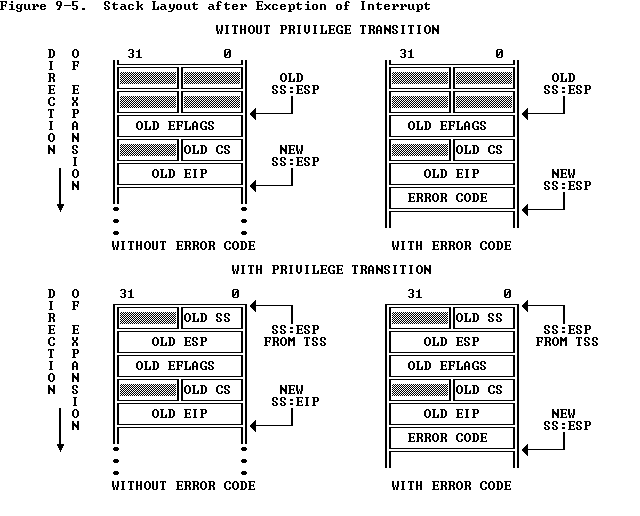
在通过中断门或陷阱门后会将 eflags 存到栈上,并重置 TF (trap flag)标志位,以此防止单步执行的调试过程影响中断响应,完成后 iret 指令会从栈上恢复 eflags,需要注意的是通过中断门后会重置 IF ,但通过陷阱门并不会重置 IF
在中断过程中 CPU 不允许将控制权转移到低于当前特权级的段上,否则会触发 general protection fault,因此我们可以通过任一下列策略防止这种情况的发生:
- 将处理程序放在合适的段中,这样的策略适合一些特殊的异常处理程序(例如 divided by zero),这样的处理程序必须仅使用堆栈中的可用数据,若其需要来自数据段的数据,则需要确保数据段的特权级为 3,从而使其不受访问保护
- 将处理程序放在特权级 0 的段中
Interrupt Tasks
IDT 中的任务门并不直接指向一个任务,如同下图所示,门的选择子指向 GDT 中的一个 TSS 描述符,当中断或异常触发通过任务门时,将会进行任务的切换
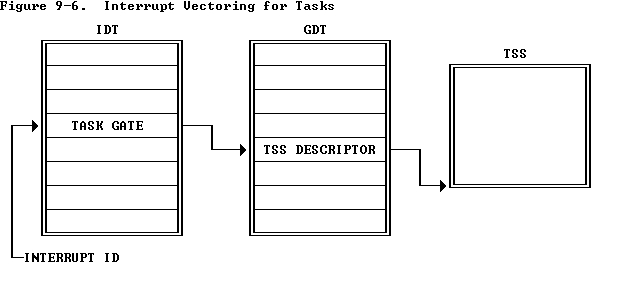
使用一个独立的任务来处理中断有如下优点:
- 会自动保存进程上下文
- 中断处理程序可以通过一个单独的地址空间与其他任务独立开来,比如通过一个 LDT 或 独立页表
任务的切换参见 Chapter 7.,需要说明的是中断任务同样通过 iret 指令返回原进程;若是任务切换是由一个带着错误代码的异常引起的,则处理器会自动将错误代码存到处理程序的栈上
在 80386 中使用中断任务时,实际上有两个调度器:软件调度器(OS的一部分)与硬件调度器(处理器中断机制的一部分),软件调度器的设计应该考虑到硬件调度器可以在启用中断时调度中断任务这一事实
Interrupt Summary
下表总结了 386 所识别的异常:
1 | |
详细说明参见 https://pdos.csail.mit.edu/6.828/2018/readings/i386/s09_08.htm
Error Code
若异常与一个特定的段相关联,则处理器会将一个错误代码存到异常处理程序的栈上,格式如下图所示

在错误代码中并不包含特权级字段,取而代之的是两个新的位:
- EXT bit:程序外部的事件造成了异常
- I-bit(IDT-bit):错误代码的 index 字段引用 IDT 中的门描述符
若未设置 I-bit,则 TI 位指示错误代码引用 GDT(0)还是 LDT(1),剩下的 14 位为段选择子的高 14 位
下表总结了异常中的错误代码信息:
1 | |
Basics of Protected Control Transfer
异常与中断都是“被保护的控制流切换”——将处理器切换至内核态(CPL=0),且不会给用户态代码影响内核或其他环境的机会
在 Intel 术语中,一个中断通常是由处理器外部的异步事件触发的,例如外设的 I/O;而异常则是由当前运行的代码同步触发的事件,例如非法内存访问
为了确保中断与异常“真正受到保护”,其被设计为:触发其的代码只能在特定条件下进入内核的特定位置,通过以下两种机制:
- 中断描述符表:处理器确保中断与异常只能通过特定的入口点进入内核,这便是中断描述符表中的「门」结构,x86允许多达 256 个不同的入口点——对应 256 个中断描述符表索引,处理器从该表中对应条目加载:
- eip:异常处理程序代码地址
- cs:代码段选择子,在其 0 ~ 1 位中包含运行异常处理程序的特权级(在 JOS 中所有异常都在 0 特权级下处理)
- 任务状态段:处理器需要一个地方来保存中断发生前的上下文,以便在完成处理后恢复上下文,但这个区域不应当被用户进程访问,中断处理需要陷入内核,于是也需要独立的内核堆栈,因此任务状态段(TSS)结构指定了内核堆栈的地址与段选择子,处理器将旧的 ss、esp、eflags、cs、eip、(可选)error code 压到内核栈上,从中断描述符中加载 cs 与 eip,并设置
ss:esp以引用新的堆栈
我们在 JOS 中 TSS 仅用来定义从用户态切换到内核态时应切换到的内核堆栈,不使用其他字段
Types of Exceptions and Interrupts
说过了.jpg
本节我们将扩展 JOS 的 0 ~31 号异常向量,下一届我们将扩展软中断(0x30)作为 JOS 的系统调用入口点,在 lab4 中我们将扩展 JOS 以让其处理硬件中断(例如时钟中断)
An Example
懒得看,反正就那回事
Nested Exceptions and Interrupts
对于内核中的嵌套中断而言不需要重复切换内核堆栈,只需要保存旧的上下文到内核堆栈上即可
Setting Up the IDT
接下来我们将设置 IDT 的 0~31 号中断向量,随后我们会设置系统调用中断的处理程序,在后面的 lab 中设置 32 ~ 47 号中断(设备中断)
我们应当实现如下所示控制流程:
1 | |
每一个异常或中断都应在 trapentry.S 中有其自己的 handler,而 trap_init() 应当初始化这些 handler,每个 handler 应当在栈上建立一个 struct Trapframe(参见 inc/trap.h)并将其指针作为参数调用 trap(),由其对应调用到相应的处理函数
补充了那么多的基础知识,接下来是 Exercise 4——编辑 trapentry.S 与 trap.c 实现中断与异常处理
Exercise 4. Edit
trapentry.Sandtrap.cand implement the features described above. The macrosTRAPHANDLERandTRAPHANDLER_NOECintrapentry.Sshould help you, as well as the T_* defines ininc/trap.h. You will need to add an entry point intrapentry.S(using those macros) for each trap defined ininc/trap.h, and you’ll have to provide_alltrapswhich theTRAPHANDLERmacros refer to. You will also need to modifytrap_init()to initialize theidtto point to each of these entry points defined intrapentry.S; theSETGATEmacro will be helpful here.Your
_alltrapsshould:
- push values to make the stack look like a struct Trapframe
- load
GD_KDinto%dsand%espushl %espto pass a pointer to the Trapframe as an argument to trap()call trap(cantrapever return?)Consider using the
pushalinstruction; it fits nicely with the layout of thestruct Trapframe.Test your trap handling code using some of the test programs in the
userdirectory that cause exceptions before making any system calls, such asuser/divzero. You should be able to get make grade to succeed on thedivzero,softint, andbadsegmenttests at this point.
我们需要在 trapentry.S 中建立中断入口点,这里 JOS 预先为我们提供了两个宏用来声明这些入口点,他们最终都会跳转到 _alltraps 标号处:
1 | |
我们先参照 inc/trap.h 中提供的 T_* 宏声明对应入口点,对于会有 error code 的中断使用 TRAPHANDLER 宏,否则使用
TRAPHANDLER_NOEC 宏,是否有 error code 参见上面的表格;宏里的 name 字段好像是可以随意声明的:
1 | |
之后就是实现 _alltraps,按注释我们应当向栈上压入对应数据形成一个 Trapframe 结构体,实际上只需要推入 es、ds、PushRegs 结构体,剩余的都会在我们运行到 _alltraps 前被压入栈上:
1 | |
这里的 padding 其实不需要我们手动压入栈上,我们在使用 pushl 指令压入 ds 与 es 时他们会自动扩展为 4 字节;之后我们还需要将 ds 与 es 的值设为 GD_KD,最后压入 esp 后手动调用 trap() 即可:
1 | |
最后使用 SETGATE 宏在 trap_init() 中装载中断描述符,其接收的第一个参数是一个 Gatedesc 类型结构体,用来表示一个门描述符:
1 | |
这里因为我们还没有定义任何处理函数所以直接声明新的函数即可,现在还没有出现陷阱所以都是普通的中断,这里注意系统调用与调试中断的特权级应设为3,因为用户进程需要能够访问其入口点:
一开始笔者在想,好像还没有函数定义啊,后面看了一眼别人的实验报告,直接声明新的函数,还没有函数体,属实佩服…
1 | |
这里笔者将 syscall 定义为一个打印函数,运行效果如下,成功通过中断门完成了系统调用:
当然,后面 panic 掉了,因为我们的中断处理程序没有完成
这个时候运行评分程序应当有 30 分
接下来看一下 Challenge,让我们自动化生成一个 table:
Challenge! You probably have a lot of very similar code right now, between the lists of
TRAPHANDLERintrapentry.Sand their installations intrap.c. Clean this up. Change the macros intrapentry.Sto automatically generate a table fortrap.cto use. Note that you can switch between laying down code and data in the assembler by using the directives.textand.data.
不会做,摸了
最后是习题 Time:
Questions
Answer the following questions in your
answers-lab3.txt:
What is the purpose of having an individual handler function for each exception/interrupt? (i.e., if all exceptions/interrupts were delivered to the same handler, what feature that exists in the current implementation could not be provided?)
笔者只能想到是为了降低代码的耦合性,因为其实并非是不能全部通过同一函数实现中断处理,只不过是把各个中断处理程序塞到中断入口点里罢了
Did you have to do anything to make the
user/softintprogram behave correctly? The grade script expects it to produce a general protection fault (trap 13), butsoftint‘s code saysint $14. Why should this produce interrupt vector 13? What happens if the kernel actually allowssoftint‘sint $14instruction to invoke the kernel’s page fault handler (which is interrupt vector 14)?因为 General Protection Fault 属于 0 特权级,用户态无权限触发,因此在访问其向量时会触发 Page Fault
接下来进入 Part B,继续完善我们的中断处理程序
Part B: Page Faults, Breakpoints Exceptions, and System Calls
本节中我们将改进中断处理代码以实现一些需要通过异常处理实现的重要的原语
Handling Page Faults
缺页异常是一个十分重要的机制,出于性能的考虑,我们并不需要在一开始就为对应线性地址分配物理页,而可以在访问到他们时触发缺页异常后再分配物理页(例如 mmap 映射区域)
当触发缺页异常时,处理器会将造成缺页异常的线性地址存放在 cr2 寄存器中,JOS 提供了一个缺页异常处理函数 page_fault_handler(),在接下来的 Exercise 5 中我们需要修改 trap_dispatch() 以处理缺页异常
Exercise 5. Modify
trap_dispatch()to dispatch page fault exceptions topage_fault_handler(). You should now be able to get make grade to succeed on thefaultread,faultreadkernel,faultwrite, andfaultwritekerneltests. If any of them don’t work, figure out why and fix them. Remember that you can boot JOS into a particular user program using make run-x or make run-x-nox. For instance, make run-hello-nox runs the hello user program.
笔者直接用一个大的 switch 进行操作:
1 | |
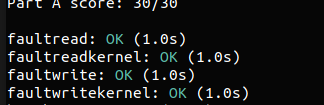
运行评分程序,成功通过缺页异常部分:
The Breakpoint Exception
断点异常通常被用于调试程序,调试原理是将程序中对应指令替换为 int3 软中断;在 JOS 中我们将其转化为任何用户环境都可以唤醒一个 JOS kernel monitor 的一个“伪系统调用”
接下来是 Exercise 6,补完 trap_dispatch() 使得断点异常能唤起一个 kernel monitor
Exercise 6. Modify
trap_dispatch()to make breakpoint exceptions invoke the kernel monitor. You should now be able to get make grade to succeed on thebreakpointtest.
简单修改一下之前的大 switch 即可:
1 | |
此时应该能通过 grade 中的断点评分

接下来又是 Challenge,完成单步调试器:
Challenge! Modify the JOS kernel monitor so that you can ‘continue’ execution from the current location (e.g., after the
int3, if the kernel monitor was invoked via the breakpoint exception), and so that you can single-step one instruction at a time. You will need to understand certain bits of theEFLAGSregister in order to implement single-stepping.Optional: If you’re feeling really adventurous, find some x86 disassembler source code - e.g., by ripping it out of QEMU, or out of GNU binutils, or just write it yourself - and extend the JOS kernel monitor to be able to disassemble and display instructions as you are stepping through them. Combined with the symbol table loading from lab 1, this is the stuff of which real kernel debuggers are made.
闲出屁来才有时间去做这玩意,👴忙着呢
之后是习题 Time:
Questions
The break point test case will either generate a break point exception or a general protection fault depending on how you initialized the break point entry in the IDT (i.e., your call to
SETGATEfromtrap_init). Why? How do you need to set it up in order to get the breakpoint exception to work as specified above and what incorrect setup would cause it to trigger a general protection fault?这取决于 IDT 中门描述符的特权级,若特权级为 0 ,用户进程没有权限访问对应页面,自然会触发缺页异常;若特权级为3,则自然能正常通过门描述符触发断点异常。
What do you think is the point of these mechanisms, particularly in light of what the
user/softinttest program does?目的是不允许用户随意通过门描述符进入不该进入的处理程序中
System calls
用户进程通过系统调用向内核请求资源,当用户进程进行系统调用时,处理器进入内核态,保存用户进程上下文,之后内核执行对应的系统调用代码,最后恢复回用户进程
在 JOS 中我们使用 int 0x30 来实现系统调用,进程通过对应的寄存器传递系统调用号(eax)与参数(edx,ecx,ebx,edi,esi),返回值存放在 rax 寄存器中
接下来是 Exercise 7,补完 JOS 的系统调用机制
Exercise 7. Add a handler in the kernel for interrupt vector
T_SYSCALL. You will have to editkern/trapentry.Sandkern/trap.c‘strap_init(). You also need to changetrap_dispatch()to handle the system call interrupt by callingsyscall()(defined inkern/syscall.c) with the appropriate arguments, and then arranging for the return value to be passed back to the user process in%eax. Finally, you need to implementsyscall()inkern/syscall.c. Make suresyscall()returns-E_INVALif the system call number is invalid. You should read and understandlib/syscall.c(especially the inline assembly routine) in order to confirm your understanding of the system call interface. Handle all the system calls listed ininc/syscall.hby invoking the corresponding kernel function for each call.Run the
user/helloprogram under your kernel (make run-hello). It should print “hello, world“ on the console and then cause a page fault in user mode. If this does not happen, it probably means your system call handler isn’t quite right. You should also now be able to get make grade to succeed on thetestbsstest.
首先是在大 switch 里调用 JOS 的 syscall 接口,这里别忘了显式地将返回值给到 eax
1 | |
之后修改 kern/syscall.c 中的 syscall() 函数,笔者本想选择声明一个系统调用表,在进行调用时直接查表调用即可,但是 JOS 已经写了一个 switch 在这里,那就一切从简吧(笑):
1 | |
完成之后应当能通过 grade 里的 testbss:

之后是 Challenge,修改代码使用 sysenter 与 sysexit 实现系统调用机制
hallenge! Implement system calls using the
sysenterandsysexitinstructions instead of usingint 0x30andiret.The
sysenter/sysexitinstructions were designed by Intel to be faster thanint/iret. They do this by using registers instead of the stack and by making assumptions about how the segmentation registers are used. The exact details of these instructions can be found in Volume 2B of the Intel reference manuals.The easiest way to add support for these instructions in JOS is to add a
sysenter_handlerinkern/trapentry.Sthat saves enough information about the user environment to return to it, sets up the kernel environment, pushes the arguments tosyscall()and callssyscall()directly. Oncesyscall()returns, set everything up for and execute thesysexitinstruction. You will also need to add code tokern/init.cto set up the necessary model specific registers (MSRs). Section 6.1.2 in Volume 2 of the AMD Architecture Programmer’s Manual and the reference on SYSENTER in Volume 2B of the Intel reference manuals give good descriptions of the relevant MSRs. You can find an implementation ofwrmsrto add toinc/x86.hfor writing to these MSRs here.Finally,
lib/syscall.cmust be changed to support making a system call withsysenter. Here is a possible register layout for thesysenterinstruction:
2
3
4
5
6eax - syscall number
edx, ecx, ebx, edi - arg1, arg2, arg3, arg4
esi - return pc
ebp - return esp
esp - trashed by sysenterGCC’s inline assembler will automatically save registers that you tell it to load values directly into. Don’t forget to either save (push) and restore (pop) other registers that you clobber, or tell the inline assembler that you’re clobbering them. The inline assembler doesn’t support saving
%ebp, so you will need to add code to save and restore it yourself. The return address can be put into%esiby using an instruction likeleal after_sysenter_label, %%esi.Note that this only supports 4 arguments, so you will need to leave the old method of doing system calls around to support 5 argument system calls. Furthermore, because this fast path doesn’t update the current environment’s trap frame, it won’t be suitable for some of the system calls we add in later labs.
You may have to revisit your code once we enable asynchronous interrupts in the next lab. Specifically, you’ll need to enable interrupts when returning to the user process, which
sysexitdoesn’t do for you.
没那闲工夫,👴选择摸了
User-mode startup
用户进程的入口点在 lib/entry.S,其在初始化后会调用 libmain(),接下来我们要修改该函数:将全局变量 thisenv 指向当前进程的 Env 结构体
libmain() 之后会调用 umain(),定义于 user/hello.c 中,在打印 hello world 之后其会尝试访问 thisenv->env_id,在之前的实验中这会触发异常,接下来我们应当初始化 thisenv 以让他不触发异常
于是我们来到了 Exercise 8,进入到用户态的世界(其实系统调用那里已经在用户态与内核态“来去之间”了)
Exercise 8. Add the required code to the user library, then boot your kernel. You should see
user/helloprint “hello, world“ and then print “i am environment 00001000“.user/hellothen attempts to “exit” by callingsys_env_destroy()(seelib/libmain.candlib/exit.c). Since the kernel currently only supports one user environment, it should report that it has destroyed the only environment and then drop into the kernel monitor. You should be able to get make grade to succeed on thehellotest.
获取到进程 id 后遍历 envs 数组即可
1 | |
这时运行评分程序应当能通过 hello:

Page faults and memory protection
OS 通常依赖于硬件以保护内存,当一个程序尝试访问非法地址或无权限地址时处理器会停止进程运行,并带着造成异常的指令信息陷入内核,若该异常可以被修复则内核将其修复后再让程序继续运行,否则会终止程序运行
一个可以被修复的异常的范例便是栈的增长,在初始时我们仅为用户进程栈分配了一张页,当栈突破一张页的大小时便会触发缺页异常,此时内核应当自动分配一个新的内存页到该处,并让程序继续运行
系统调用同样可以在内存保护上造成问题:大部分的系统调用接口都会让用户程序向内核传递一个指针,而内核需要解引用这些指针,这便会有两个问题“
- 内核空间中的缺页异常比用户空间中的缺页异常要严重得多,若内核在操纵自己的数据结构时出现缺页异常,那就是 kernel bug,应当引起 kernel panic,但若这些指针来自于用户进程,则应当要标识出这缺页异常是代表用户进程的
- 内核有着高于用户进程的权限,因此用户程序可能会传递一个指向用户不可读写但是内核可读写的区域,这也是内核需要注意的
因此接下来我们要实现一个地址检查的功能,内核需要用其来检查用户程序传入的指针是否指向用户空间,以及页表是否允许相关操作
以此,内核永远不会因为解引用用户提供的指针而造成缺页异常,若内核发生了缺页异常,则应当 panic——这就是接下来的 Exercise 9,修改 kern/trap.c 让内核态下发生的缺页异常造成 kernel panic
Exercise 9. Change
kern/trap.cto panic if a page fault happens in kernel mode.Hint: to determine whether a fault happened in user mode or in kernel mode, check the low bits of the
tf_cs.Read
user_mem_assertinkern/pmap.cand implementuser_mem_checkin that same file.Change
kern/syscall.cto sanity check arguments to system calls.Boot your kernel, running
user/buggyhello. The environment should be destroyed, and the kernel should not panic. You should see:
2
3
4[00001000] user_mem_check assertion failure for va 00000001
[00001000] free env 00001000
Destroyed the only environment - nothing more to do!Finally, change
debuginfo_eipinkern/kdebug.cto calluser_mem_checkonusd,stabs, andstabstr. If you now runuser/breakpoint, you should be able to run backtrace from the kernel monitor and see the backtrace traverse intolib/libmain.cbefore the kernel panics with a page fault. What causes this page fault? You don’t need to fix it, but you should understand why it happens.
首先是修改缺页异常处理程序,若我们需要确定一个缺页异常发生在用户态还是内核态,只需要检查 Trapframe 中 cs 段寄存器的 RPL 位即可:
1 | |
user_mem_check():检查用户地址合法性
最后是修改 user_mem_check(),主要是以下两点:
- 检查地址是否落在用户空间
- 检查页表项,用户是否有相应权限
这里需要注意的是可能发生的整型溢出导致的地址回绕:
1 | |
最后是修改 debuginfo_eip(),在 usd, stabs, stabstr 这三个地方加上 user_mem_check() 进行地址合法性检查
1 | |
最后是 Exercise 10,防止 evilhello 导致 kernel panic
Exercise 10. Boot your kernel, running
user/evilhello. The environment should be destroyed, and the kernel should not panic. You should see:
2
3
4[00000000] new env 00001000
...
[00001000] user_mem_check assertion failure for va f010000c
[00001000] free env 00001000
我们先看 user/evilhello.c ,里面为系统调用 sys_cputs() 传递了一个内核空间中的地址
1 | |
因此我们只需要在对应系统调用加上地址合法性检查即可:
1 | |
运行评分程序,我们成功通过了所有测试,拿到满分
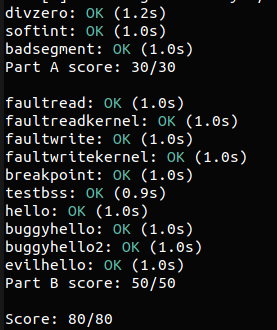
至此, lab3 全部完成
0x04. Lab 4: Preemptive Multitasking
在 lab4 中我们将实现抢占式多任务调度
首先还是先 commit lab3 的代码,把 lab4 分支拉下来:
1 | |
在 lab4 当中新增了如下文件:
kern/cpu.h |
Kernel-private definitions for multiprocessor support |
|---|---|
kern/mpconfig.c |
Code to read the multiprocessor configuration |
kern/lapic.c |
Kernel code driving the local APIC unit in each processor |
kern/mpentry.S |
Assembly-language entry code for non-boot CPUs |
kern/spinlock.h |
Kernel-private definitions for spin locks, including the big kernel lock |
kern/spinlock.c |
Kernel code implementing spin locks |
kern/sched.c |
Code skeleton of the scheduler that you are about to implement |
Part A: Multiprocessor Support and Cooperative Multitasking
在本 lab 的第一部分,我们将扩展 JOS 以让其能运行在一个多处理器系统上,并实现一些系统调用以允许用户级的进程创建新的进程;我们同时还将实现 协作式的 轮询调度(round-robin scheduling),允许内核在当前进程自愿放弃CPU 时进行进程调度;在 Part C 中我们还将实现 抢占式 的调度,其允许内核在一段时间后重新获取 CPU 的控制权
Multiprocessor Support
我们将让 JOS 支持”对称式多处理“(symmetric multiprocessing)——一种所有 CPU 都有对系统资源同等的权限的多处理器模型。在引导过程中,SMP 中的 CPU 可以分为两种:由一个引导处理器(bootstrap processor,BSP)负责系统的初始化与启动工作,剩余的应用处理器(application processors,APs)则在系统运行之后再由 BSP 唤醒。而由哪个 CPU 来作为 BSP 则是由硬件与 BIOS 决定的。
在 SMP 系统中,每个 CPU 都附带有一个本地 APIC (LAPIC)单元,其不仅负责分发中断,还负责为其连接的 CPU 提供一个标识符,本次实验我们将利用 LAPIC 单元的下列基本功能(参见 kern/lapic.c)
- 读取 LAPIC ID 以识别代码当前运行的 CPU(参见
cpunum()) - 从 BSP 向 APs 发送
STARTUP这一处理器间中断(interprocessor interrupt)以将其唤醒(参见lapic_startap()) - 在 part C 中,我们对 LAPIC 的内置计时器进行编程以触发时钟中断从而支持抢占式多任务(参见
apic_init())
Exercise 1. Implement
mmio_map_regioninkern/pmap.c. To see how this is used, look at the beginning oflapic_initinkern/lapic.c. You’ll have to do the next exercise, too, before the tests formmio_map_regionwill run.
处理器通过 MMIO 访问其 LAPIC:一部分物理内存被硬连线到部分 IO 设备的寄存器上,因此我们可以使用普通的存取指令来访问设备寄存器,相应地这块内存便是一个内存空洞。LAPIC 对应的内存空洞则在物理地址 0xFE000000 处,占用 32 MB,我们无法通过基于 KERNBASE 的线性映射进行访问(超出 32 位地址了),但 JOS 在 MMIOBASE 处留了 4MB 的空白所以我们可以映射到此处
接下来是 Exercise 1,让我们实现 mmio_map_region()
Exercise 1. Implement
mmio_map_regioninkern/pmap.c. To see how this is used, look at the beginning oflapic_initinkern/lapic.c. You’ll have to do the next exercise, too, before the tests formmio_map_regionwill run.
这个函数主要的作用就是将指定的物理内存映射到对应的虚拟内存上,只不过目标是 mmio 内存,直接使用我们之前写的 boot_map_region() 即可,以页为单位从 MMIOBASE 开始映射,若剩余的留给 MMIO 的区域不够则 panic,这里别忘了页表项标志位应设为 PTE_W | PTE_PCD | PTE_PWT (可写 && 禁用高速缓存 && 页级通写位):
1 | |
Application Processor Bootstrap
在启动 APs 之前 BSP 应当收集多处理器系统的相关信息,例如 CPU 总数、APIC IDs 以及 LAPIC 单元的 MMIO 地址,mp_init() 函数通过读取 BIOS 的内存区中的 MP 配置表来获取这些信息;在boot_aps() 中将 APs 启动(实模式),并将 AP 入口代码拷贝到一个实模式下可寻址的内存区域,不同于 bootloader,我们可以控制 APs 开始执行代码的位置,我们将入口代码复制到 0x7000 (MPENTRY_PADDR)处,不过其实任何 640KB 以下的未使用的页对齐的物理地址都可以被使用
之后 boot_aps() 通过向每一个 APs 的 LAPIC 单元发送 STARTUP IPI 以唤醒他们,其中包含有入口点的地址,在经过简单的设置之后 每个 AP 都将进入开启分页的保护模式,并调用 mp_main() 函数;boot_aps() 会等到每个被唤醒的 AP 在设置自己对应的 struct CpuInfo 中的 cpu_status 域的 CPU_STARTED 标志位后才会接着唤醒下一个
接下来是 Exercise 2,阅读启动过程的代码并修改 page_init() 以避免将 MPENTRY_ADDR 对应的页也链到 freelist 上
Exercise 2. Read
boot_aps()andmp_main()inkern/init.c, and the assembly code inkern/mpentry.S. Make sure you understand the control flow transfer during the bootstrap of APs. Then modify your implementation ofpage_init()inkern/pmap.cto avoid adding the page atMPENTRY_PADDRto the free list, so that we can safely copy and run AP bootstrap code at that physical address. Your code should pass the updatedcheck_page_free_list()test (but might fail the updatedcheck_kern_pgdir()test, which we will fix soon).
首先拜读一下 boot_aps(),逻辑还是比较简单的,主要就是拷贝启动代码到 0x7000,之后通过 lapic_startap() 唤醒单个 AP 并进行忙等待直到其设置自己的 CPU_STARTED 标志位,而 mp_main() 则主要是将内核页表装载到 AP 自己的 cr3 上,以及初始化自己的环境、IDT、从运行队列中取出进程(后面这些都需要我们在后续实现)
我们直接看修改 page_init(),如果在建 freelist 时对每一张内存页都进行一次判断那就太耗时了,笔者的选择是等到 freelist 建完之后再将对应页进行脱链
1 | |
接下来是习题:
Question
- Compare
kern/mpentry.Sside by side withboot/boot.S. Bearing in mind thatkern/mpentry.Sis compiled and linked to run aboveKERNBASEjust like everything else in the kernel, what is the purpose of macroMPBOOTPHYS? Why is it necessary inkern/mpentry.Sbut not inboot/boot.S? In other words, what could go wrong if it were omitted inkern/mpentry.S?
Hint: recall the differences between the link address and the load address that we have discussed in Lab 1.
MPBOOTPHYS 宏主要的作用就是计算 entry code 中需要用到的地址的真实物理地址,因为 entry code 在被链接进内核二进制文件后其地址不一定是 0x7000 起始,但是我们将其加载到了该位置,因此对于绝对地址的索引需要计算其加载到该地址上之后的地址
Per-CPU State and Initialization
对于一个多处理器 OS 而言我们很有必要为每个 CPU 都分配一块私有空间(例如 Linux 中的 percpu 变量),我们可以分配一个数组并使用 cpunum() 获取到 CPU 标号作为下标索引,以下是我们应当注意的 per-CPU state:
Per-CPU kernel stack.
每个 CPU 都应当有属于其自己的堆栈,在 JOS 中数组
percpu_kstacks[NCPU][KSTKSIZE]为每个 CPU 保留一份自己的堆栈区域;正如在 lab2 中我们将 BSP 的堆栈映射到了 KSTACKTOP 下,在本 lab 中我们将为每个 CPU 创建自己的堆栈,且应确保其堆栈占用一块连续的虚拟内存区域Per-CPU TSS and TSS descriptor.
我们同样需要一个 per-CPU 任务状态段来确定每个 CPU 的内核栈的位置,每个 CPU 的 TSS 被存放在
cpus[i].cpu_ts中,对应的 TSS descriptor 则在gdt[(GD_TSS0) >> 3] + i],定义于kern/trap.c中的全局变量ts则不再使用Per-CPU current environment pointer.
因为每个 CPU 都可以独立运行用户进程,因此我们将符号
curenv重定义为cpus[cpunum()].cpu_env,指向运行在当前 CPU 上进程的 PCBPer-CPU system registers.
所有的寄存器对一个 CPU 而言都是私有的,因此我们还需要在每个 CPU 上都初始化其 cr3、gdt、idt…
接下来是 Exercise 3,修改 mem_init_mp() 以为每个 CPU 分配一个内核栈
Exercise 3. Modify
mem_init_mp()(inkern/pmap.c) to map per-CPU stacks starting atKSTACKTOP, as shown ininc/memlayout.h. The size of each stack isKSTKSIZEbytes plusKSTKGAPbytes of unmapped guard pages. Your code should pass the new check incheck_kern_pgdir().
直接用 boot_map_region 创建映射即可,注意这里不管我们有多少个 CPU 都要建立 NCPU 个内核栈(这个时候 ncpu 变量还没初始化,而且整个 percpu_kstack 数组的大小是在编译期确定的)
1 | |
接下来是 Exercise 4,更改 trap_init_percpu() 以让其能正常在所有 CPU 上运行
Exercise 4. The code in
trap_init_percpu()(kern/trap.c) initializes the TSS and TSS descriptor for the BSP. It worked in Lab 3, but is incorrect when running on other CPUs. Change the code so that it can work on all CPUs. (Note: your new code should not use the globaltsvariable any more.)
主要就是把全局变量 ts 替换成 thiscpu 指向的 CpuInfo 结构体的 cpu_ts 成员即可,以及修改全局段描述符表中对应段描述符为 tss 描述符时注意使用 cpunum() 来获取当前 CPU 的标号,还有就是注意将 tss 的 esp 初始化为对应 cpu 的栈,这里还要注意一点就是 ltr 指令所用的值应为 对应的描述符在全局描述符表中的偏移 :
1 | |
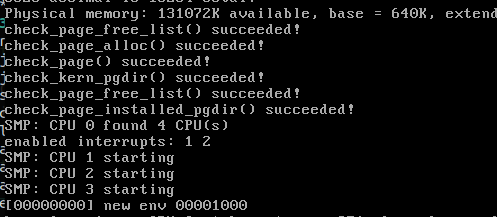
运行 make qemu CPUS=4,可以看到我们的几个处理器都成功地启动了:
Locking
伴随着多处理器系统的出现, 条件竞争 (race condition)成为了我们不得不考虑的一个问题,因此我们需要使用 锁 来保护临界区中的数据,在同一时间段只有一个 CPU 可以改变临界区内的数据,比较朴素的一个办法就是使用一个全局的 big kernel lock ,当用户进程进入内核态时上锁,退出后再解锁,这样在同一时刻只有一个用户进程可以运行在内核态,确保了内核数据的安全
在 kern/spinlock.h 中定义了一个大的内核锁 kernel_lock,同时提供了加锁与解锁的函数 lock_kernel() 和 unlock_kernel(),我们应当在以下四个地方使用大内核锁:
- 在 BSP 唤醒 APs 前请求锁(
i386_init()) - 在初始化当前 AP 后请求锁(
mp_main()),之后调用sched_yield()以在该 AP 上运行用户进程 - 在从用户态陷入内核态时请求锁(
trap()),为了确定陷阱发生在用户态还是内核态,我们应当检查tf_cs的 RPL - 在从内核态切换到用户态之前释放锁(
env_run()),不要过早或过晚,否则可能会造成竞态或死锁
于是接下来就是 Exercise 5:在上述位置补充相应的锁
Exercise 5. Apply the big kernel lock as described above, by calling
lock_kernel()andunlock_kernel()at the proper locations.
在 JOS 中,一个自旋锁起其实被定义为一个普通的整型变量,但是上锁与解锁的操作是通过原子指令完成的,而原子指令的实现其实是通过 lock 前缀完成的,被该前缀修饰的指令在访问内存时同时会完成对总线的控制,直到指令结束,从而从硬件层面保证了指令的原子性
1 | |
现在你知道一个自旋锁该怎么实现了吧 ;)那么互斥锁呢?互斥锁的实现其实需要依赖额外的辅助结构…
这里 lock_kernel() 和 unlock_kernel()直接操作的就是大内核锁,所以我们直接将其放置在对应位置即可:
1 | |
1 | |
1 | |
1 | |
下面是习题 time:为什么有了大内核锁我们还要为每个 CPU 分配一个独立的内核栈?
Question
- It seems that using the big kernel lock guarantees that only one CPU can run the kernel code at a time. Why do we still need separate kernel stacks for each CPU? Describe a scenario in which using a shared kernel stack will go wrong, even with the protection of the big kernel lock.
我们在从用户态陷入到内核态再到获取到锁中间仍有一段需要压栈的过程,因此若多个用户进程同时陷入内核态则会破坏掉内核栈上保存的属于其他用户进程的栈帧
之后是 Challenge,为四个地方加上锁:
Challenge! The big kernel lock is simple and easy to use. Nevertheless, it eliminates all concurrency in kernel mode. Most modern operating systems use different locks to protect different parts of their shared state, an approach called fine-grained locking. Fine-grained locking can increase performance significantly, but is more difficult to implement and error-prone. If you are brave enough, drop the big kernel lock and embrace concurrency in JOS!
It is up to you to decide the locking granularity (the amount of data that a lock protects). As a hint, you may consider using spin locks to ensure exclusive access to these shared components in the JOS kernel:
- The page allocator.
- The console driver.
- The scheduler.
- The inter-process communication (IPC) state that you will implement in the part C.
第四个在 part C 才实现,我们先看前三个
首先是 page allocator,我们在这里声明一个全局的锁变量,在 page_init() 中对其初始化,并在 page_alloc() 与 page_free() 中都加入对该锁的使用,这里笔者选择为这两个函数再添加一层 wrapper 来使用锁
1 | |
console driver 其实也是同样的思路,不过笔者分为读和写两个锁:
1 | |
scheduler 现在还没有写呢,所以👴选择摸了
Round-Robin Scheduling
关于这个算法,笔者在这篇博客里写了他的来龙去脉
接下来我们需要实现 轮询调度算法 :
sched_yield()用以从遍历envs[]数组并选择第一个状态为ENV_RUNNABLE的进程去运行sched_yield()不应当让一个进程被同时跑在两个 CPU 上- JOS 还实现了一个新的系统调用
sys_yield()以让当前用户进程休眠,使当前 CPU 去运行另一个进程
接下来是 Exercise 6 了,在 sched_yield() 中实现轮询调度算法:
Exercise 6. Implement round-robin scheduling in
sched_yield()as described above. Don’t forget to modifysyscall()to dispatchsys_yield().Make sure to invoke
sched_yield()inmp_main.Modify
kern/init.cto create three (or more!) environments that all run the programuser/yield.c.Run make qemu. You should see the environments switch back and forth between each other five times before terminating, like below.
Test also with several CPUS: make qemu CPUS=2.
2
3
4
5
6
7
8
9
10
11...
Hello, I am environment 00001000.
Hello, I am environment 00001001.
Hello, I am environment 00001002.
Back in environment 00001000, iteration 0.
Back in environment 00001001, iteration 0.
Back in environment 00001002, iteration 0.
Back in environment 00001000, iteration 1.
Back in environment 00001001, iteration 1.
Back in environment 00001002, iteration 1.
...After the
yieldprograms exit, there will be no runnable environment in the system, the scheduler should invoke the JOS kernel monitor. If any of this does not happen, then fix your code before proceeding.
前面的 Challenge 说到为 scheduler 加锁,因此笔者选择在 kern/env.h 中声明一个自旋锁,定义放在 kern/env.c 中
1 | |
在 env_init() 中对其初始化
1 | |
最后就是实现 sched_yield() 了,这里为了保证公平因此我们应当从当前进程往后进行遍历而不是每次都从 env[0] 开始,需要注意的是若我们轮询一遍进程数组发现没有其他可运行进程的话需要返回到发起 yield 的进程
1 | |
这里我们的自旋锁还需要保护整个 env 数组,在 env_alloc() 与 env_free() 上套一层 wrapper:
1 | |
这里笔者为了完成加锁的那个 Challenge,走了不少弯路…也掉了几次坑….
别忘了在 kern/syscall.c 中补充上对 sys_yield() 的调用:
1 | |
之后是习题 Time:
Question
- In your implementation of
env_run()you should have calledlcr3(). Before and after the call tolcr3(), your code makes references (at least it should) to the variablee, the argument toenv_run. Upon loading the%cr3register, the addressing context used by the MMU is instantly changed. But a virtual address (namelye) has meaning relative to a given address context–the address context specifies the physical address to which the virtual address maps. Why can the pointerebe dereferenced both before and after the addressing switch?- Whenever the kernel switches from one environment to another, it must ensure the old environment’s registers are saved so they can be restored properly later. Why? Where does this happen?
两个 Challenge,
Challenge! Add a less trivial scheduling policy to the kernel, such as a fixed-priority scheduler that allows each environment to be assigned a priority and ensures that higher-priority environments are always chosen in preference to lower-priority environments. If you’re feeling really adventurous, try implementing a Unix-style adjustable-priority scheduler or even a lottery or stride scheduler. (Look up “lottery scheduling” and “stride scheduling” in Google.)
Write a test program or two that verifies that your scheduling algorithm is working correctly (i.e., the right environments get run in the right order). It may be easier to write these test programs once you have implemented
fork()and IPC in parts B and C of this lab.
Challenge! The JOS kernel currently does not allow applications to use the x86 processor’s x87 floating-point unit (FPU), MMX instructions, or Streaming SIMD Extensions (SSE). Extend the
Envstructure to provide a save area for the processor’s floating point state, and extend the context switching code to save and restore this state properly when switching from one environment to another. TheFXSAVEandFXRSTORinstructions may be useful, but note that these are not in the old i386 user’s manual because they were introduced in more recent processors. Write a user-level test program that does something cool with floating-point.