本文最后更新于:2025年4月29日 晚上
今天👴要吃🐧火锅!
0x00.一切开始之前 这一篇文章主要讲 如何快速成为 kernel ylg 如何编译构建一个最基本的 Linux 运行环境;)
Pre.安装依赖 环境是Ubuntu20.04
1
2
$ sudo apt-get update $ sudo apt-get install git fakeroot build-essential ncurses-dev xz-utils qemu flex libncurses5-dev libssl-dev bc bison libglib2.0-dev libfdt-dev libpixman-1-dev zlib1g-dev libelf-dev
0x01.获取内核镜像(bzImage) 大概有如下三种方式:
下载内核源码后编译
直接下载现成的的内核镜像,不过这样我们就不能自己魔改内核了2333
直接使用自己系统的镜像
方法一:自行编译内核源码 The Linux Kernel Archives 为我们提供了原始的主线内核不同版本的源代码,我们可以在该网站上下载自己所需要的版本的内核源码,或是在不同的镜像站中获取,例如清华大学开源软件镜像站 便提供了不同版本的内核源码。
根据 Archive kernel releases ,我们可以知道内核主要有以下几种类别:
Prepatch (RC) :主线内核的预发布版本,包含了最新的待测试的内核特性,由 Linus Torvalds 维护
Mainline:主线内核版本,RC 版本的新特性经过测试后便会合并到主线,每9~10周发一个版本,由 Linus Torvalds 维护
Stable:主线内核发布后便会变为 Stable 状态,其仅会被 stable kernel 维护者从主线树后向移植一些漏洞修复,直到下个内核版本释出。Stable kernel 根据需要进行更新,通常是一周一次
Longterm:部分内核版本会被选作长期支持版(LTS),相比起 Stable 内核有着更久的支持时长,通常仅会被后向移植重要的漏洞修复,且更新周期较慢(尤其是对于更老的版本)
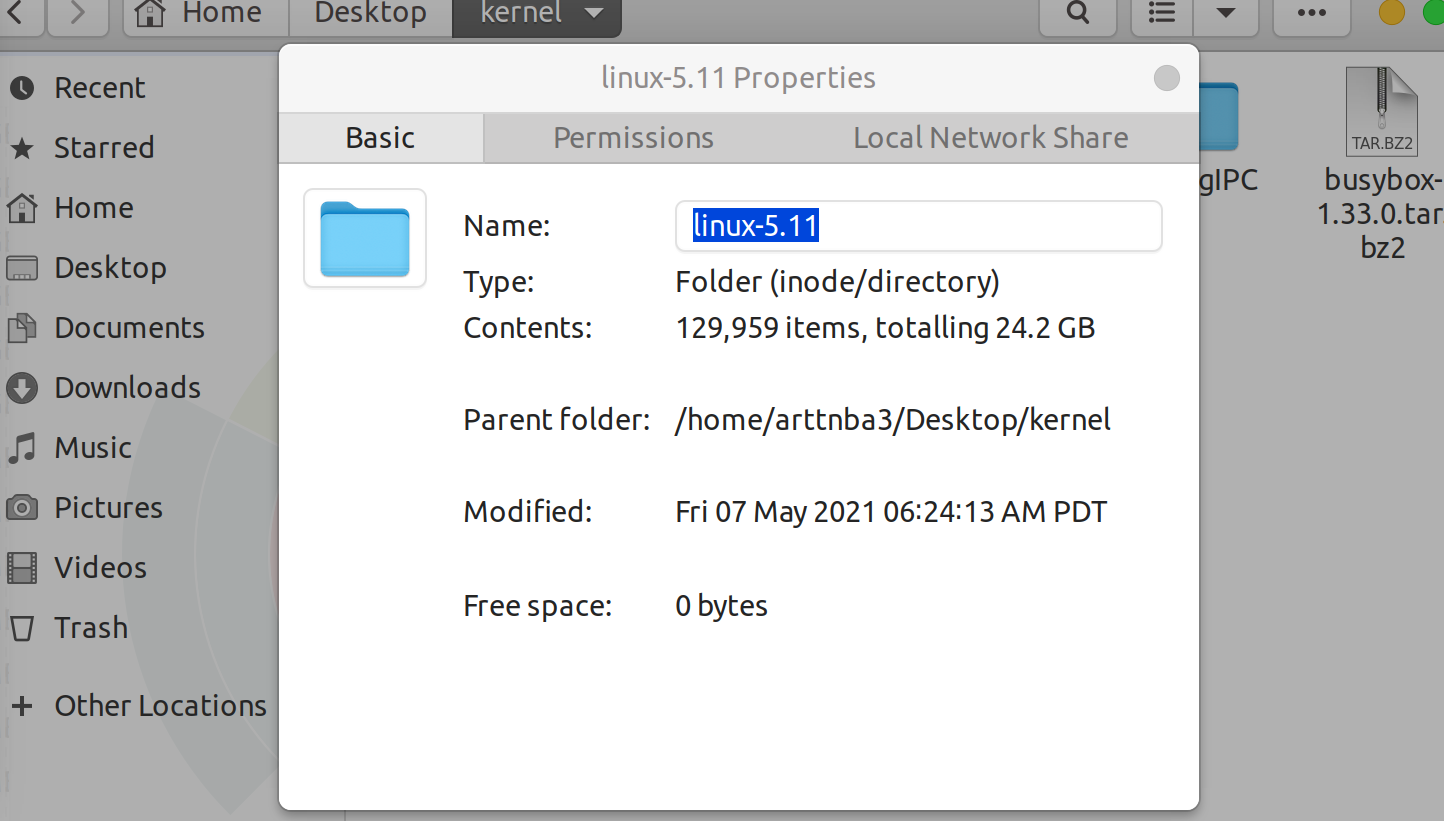
I.获取内核源码 这里我们直接前往 Linux Kernel Archive 下载对应版本的内核源码(你也可以选择镜像站),笔者这里选用5.11这个版本的内核镜像:
1 $ wget https://cdn.kernel.org/pub/linux/kernel/v5.x/linux-5.11.tar.xz
完成下载后进行解压:
1
2
$ unxz linux-5.11.tar.xz $ tar -xf linux-5.11.tar
为了防止内核被恶意修改,内核团队提供了签名校验,在发布内核时,发布者会对内核进行签名。因此为了校验,我们首先需要导入内核维护者的公钥,这里我们选择导入 Linus Torvalds 和 Greg Kroah-Hartman 的公钥:
1
2
3
4
5
6
7
8
9
10
$ gpg2 --locate-keys torvalds@kernel.org gregkh@kernel.org
接下来我们使用 TOFU 信任对应的密钥:
1
2
$ gpg2 --tofu-policy good 38DBBDC86092693E
然后我们可以开始校验内核签名了,首先下载签名文件:
1 $ wget https://cdn.kernel.org/pub/linux/kernel/v5.x/linux-5.11.tar.sign
接下来进行校验,可以看到校验结果正常:
1
2
3
4
5
6
7
8
$ gpg2 --trust-model tofu --verify linux-5.11.tar.sign
II.配置编译选项 在正式进行内核源码编译之前,我们还需要准备一份编译选项,其包含了内核编译相关的配置,通常存放于源码目录下的 .config 文件中。不过我们不需要从零开始手动编写,而是可以通过内核的编译配置系统进行动态生成。
通常情况下,我们在内核源码目录下使用如下命令进入图形化的内核配置面板, 这也是最常用的内核配置方法 ,其会读取 .config 文件的配置并允许我们在图形化的界面中进行修改,并在该文件不存在时则是会调用 make defconfig 先生成一份默认配置:
需要注意,图形化配置界面依赖于 ncurses 库,这通常可以从你的发行版仓库安装。
由此我们可以知道以下命令会直接生成上面命令的默认输出结果——make defconfig 生成一份默认的内核配置,其会读取 arch/架构/configs 目录下的配置文件作为基础配置,其包括一份默认启用的内核功能以及驱动编译配置等,这通常会编译上绝大部分常见的驱动,并根据当前系统环境进行相应的微调(例如与硬件平台相关的一些配置):
相应地,你可以手动地为每个内核编译选项进行配置,下面的这个命令不会读取默认配置,而会逐条询问每一条内核配置是否开启,用户需要在命令行逐条回复 y (编译进内核)、m (作为内核模块编译,部分配置会提供该选项) 、n(不编译),如果你有较多的空闲时间且对内核架构有着较为完整的了解,可以考虑运行这个命令进行配置:
此外,你可以使用如下的命令(任选一条)来动态检测当前环境所包含的内核模块(lsmod 命令所显示的内核模块),并在内核编译过程中仅 编译这些模块,这通常适合嵌入式开发等需要定制化精简与裁剪内核的场景, 但往往不适合通用场景 :
1
2
$ make localyesconfig $ make localmodconfig
相对应的,如下命令(任选一条)会尽可能多地启用可用的内核选项,在生成的配置中包含了尽可能多的内核特性与驱动:
1
2
$ make allyesconfig $ make allmodconfig
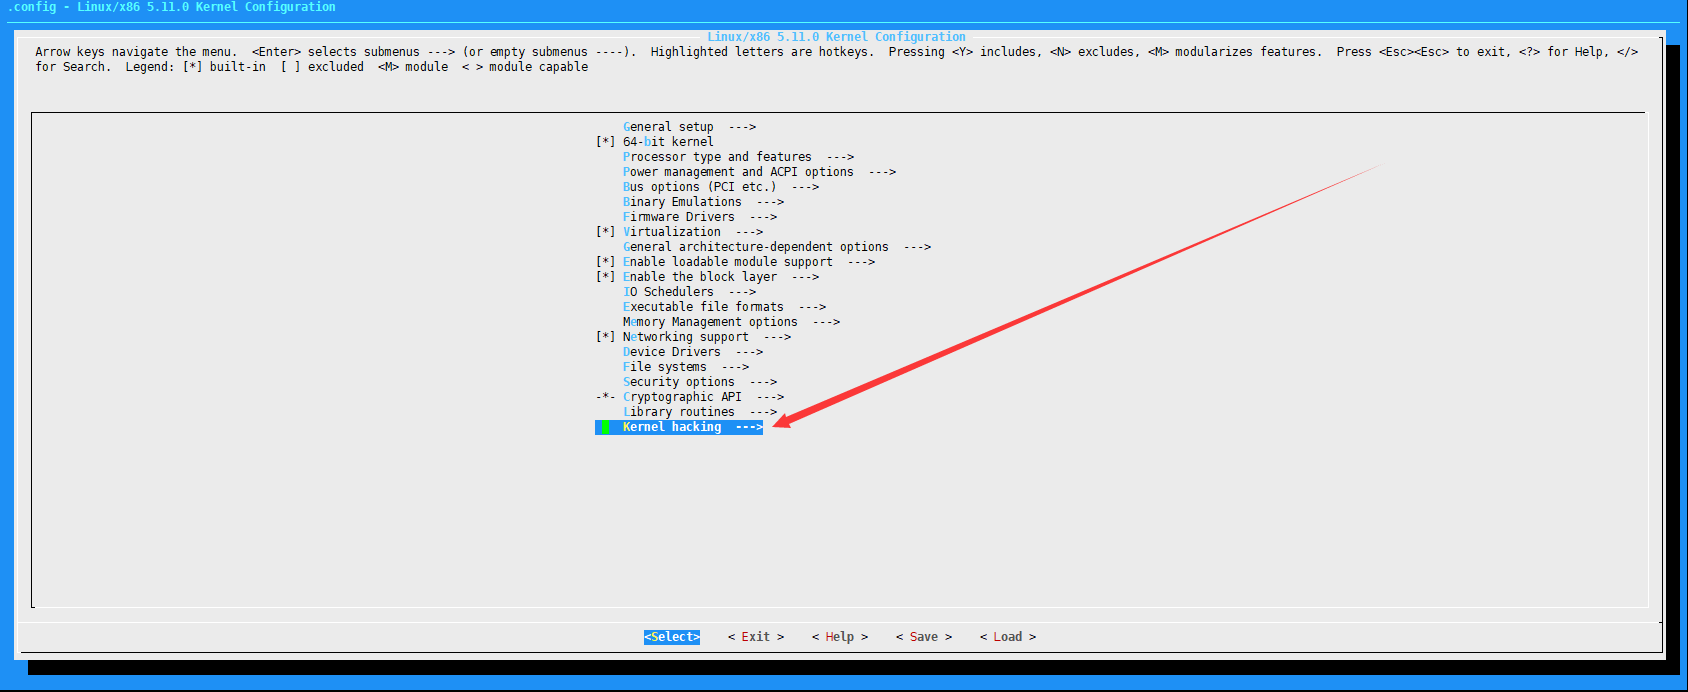
这里我们选择最常用的 make menuconfig ,进入如下配置界面
保证勾选如下配置(默认都是勾选了的):
Kernel hacking —> Kernel debugging
Kernel hacking —> Compile-time checks and compiler options —> Compile the kernel with debug info
Kernel hacking —> Generic Kernel Debugging Instruments –> KGDB: kernel debugger
kernel hacking —> Compile the kernel with frame pointers
一般来说不需要有什么改动,直接保存退出即可,你也可以根据你的需求手动更改一些编译选项
III.开始编译 运行如下命令开始编译,生成内核镜像
1 $ make -j$(nproc ) bzImage
直接 make -j$(nproc) 也行,但是会额外编译出很多你可能不一定需要的东西
笔者机器比较烂,大概要等一顿饭的时间…
以及编译内核会比较需要空间,一定要保证磁盘剩余空间充足
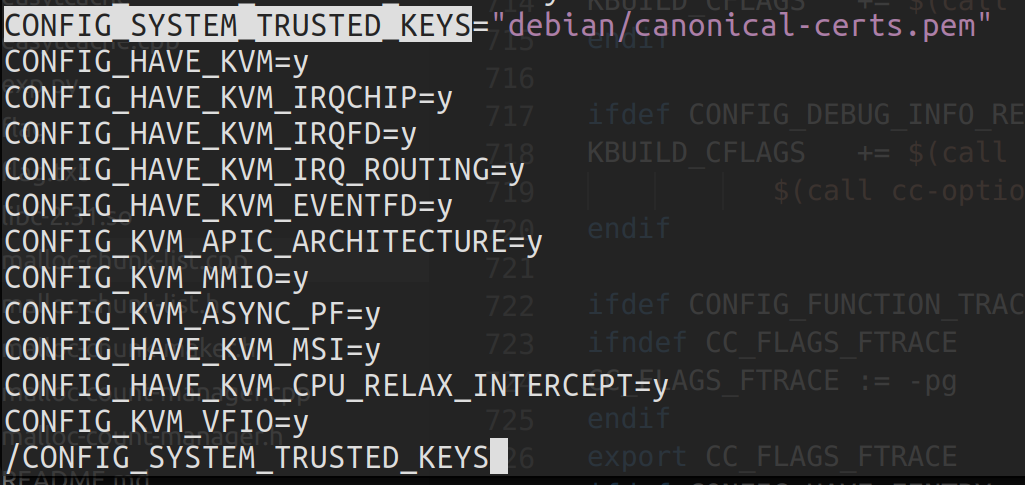
IV.可能出现的错误 笔者编译时出现过这个错误:
1 make[1]: *** No rule to make target 'debian/canonical-certs.pem', needed by 'certs/x509_certificate_list'. Stop
只需要在 .config 文件中找到 CONFIG_SYSTEM_TRUSTED_KEYS,等于号后面的值改为 ""
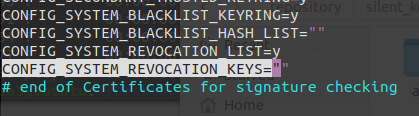
笔者还遇到过这个错误:
1 make[1]: *** No rule to make target 'debian/canonical-revoked-certs.pem', needed by 'certs/x509_revocation_list'. Stop.
这时需要在 .config 文件中将 CONFIG_SYSTEM_REVOCATION_KEYS 项等号后面的值改为 ""
笔者还遇到过这个错误:
1
2
3
arch /x86/entry/thunk_64.o: warning: objtool: missing symbol tablearch /x86/entry/thunk_64.o] Error 1'arch/x86/entry/thunk_64.o'
主要出现于编译老版本内核的情况,解决方案是在内核源码目录下创建一个 objtool.patch 文件写入如下内容:
1 2 3 4 5 6 7 8 9 10 11 12 13 14 15 16 17 @@ -380,8 +380,11 @@ static int read_symbols(struct elf *elf)- WARN("missing symbol table"); - return -1; + /* + * A missing symbol table is actually possible if it's an empty + * .o file. This can happen for thunk_64.o. + */ + return 0;
之后运行如下命令:
1 $ patch -p1 < ./objtool.patch
重新开始编译即可
V.编译结果 完成之后会出现如下信息:
1 Kernel: arch/x86/boot/bzImage is ready (#1)
我们主要关注生成的这两个文件:
vmlinux:原始内核文件 在当前目录下提取到vmlinux,为编译出来的原始内核文件
1
2
$ file vmlinux
bzImage:压缩内核镜像 在当前目录下的arch/x86/boot/目录下提取到bzImage,为压缩后的内核文件,适用于大内核
1
2
$ file arch /x86/boot/bzImage
zImage && bzImage zImage–是vmlinux经过gzip压缩后的文件。
https://blog.csdn.net/xiaotengyi2012/article/details/8582886
本节主要进行一个常见的操作系统实验:添加一个系统调用
1.分配系统调用号 在arch/x86/entry/syscalls/syscall_64.tbl中添加我们自己的系统调用号,这里用笔者个人比较喜欢的数字114514
1 114514 64 arttnba3_test sys_arttnba3_test
2.声明系统调用 在include/linux/syscalls.h中添加如下函数声明:
1 2 long sys_arttnba3_test (void ) ;
3.添加系统调用函数定义 在kernel/sys.c中添加如下代码(放置于最后一行的#endif /* CONFIG_COMPAT */之前):
1 2 3 4 5 SYSCALL_DEFINE0(arttnba3_test)"arttnba3\'s personal syscall has been called!\n" );return 114514 ;
这里的SYSCALL_DEFINE0()本质上是一个宏,意为接收0个参数的系统调用 ,其第一个参数为系统调用名
笔者定义了一个简单的输出一句话的系统调用,在这里使用了内核态的printk()函数,输出的信息可以使用dmesg进行查看
4.重新编译内核 这一步参照之前的步骤即可,通过这一步我们要将我们自己的系统调用编译到内核当中
5.测试系统调用 我们使用如下的例程测试我们的新系统调用
1 2 3 4 5 6 #include <unistd.h> int main (void ) 114514 );return 0 ;
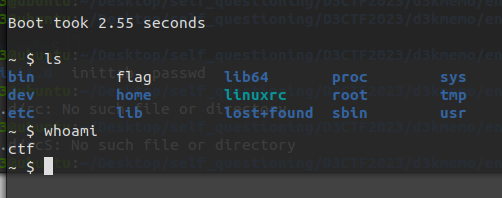
编译,放入磁盘镜像中后重新打包,qemu起内核后尝试运行我们的例程,结果如下:
因为dmesg输出的东西太多,这里还附加用了grep命令过滤
可以看到,我们的系统调用arttnba3_test被成功地嵌入了内核当中,并成功地被测试例程所调用,撒花~🌸
方法二:下载现有内核镜像 我们也可以自己下载发行版仓库中已有的内核镜像,而不需要自行编译一整套Linux内核,以 Ubuntu 为例,我们可以使用如下命令列出可下载内核镜像
1 $ sudo apt search linux-image-
选一个自己喜欢的下载就行,笔者所用的阿里云源似乎没有最新的5.11的镜像,这里用5.8的做个示范:
1 $ sudo apt download linux-image-5.8.0-43-generic
下载下来是一个deb文件,解压:
1
2
3
4
5
6
7
8
9
10
$ dpkg -X ./linux-image-5.8.0-43-generic_5.8.0-43.49~20.04.1_amd64.deb extract
其中的 ./boot/vmlinuz-5.8.0-43-generic 便是bzImage内核镜像文件
方法三:使用系统自带的内核镜像 一般位于/boot/目录下,也可以直接拿出来用,实际上其来源通常和方法二是一样的
0x02.使用 busybox 构建文件系统 BusyBox 是一个集成了三百多个最常用 Linux 命令和工具的软件,包含了例如 ls 、cat 和 echo 等常见的命令,相比起各大发行版中常用的 GNU core utilities ,BusyBox 更加的轻量化,且更容易进行配置,因此我们将用 busybox 为我们的内核提供一个基本的用户环境
一、编译busybox I.获取 busybox 源码 我们首先在 busybox.net 下载自己想要的版本,笔者这里选用 busybox-1.33.0.tar.bz2 这个版本:
1 $ wget https://busybox.net/downloads/busybox-1.33.0.tar.bz2
外网下载的速度可能会比较慢,可以在前面下载Linux源码的时候一起下载,也可以选择去国内的镜像站下载
然后进行解压:
1 $ tar -jxvf busybox-1.33.0.tar.bz2
II.编译 busybox 源码 接下来我们配置编译选项,进入到源码根目录运行如下命令进入图形化配置界面:
勾选 Settings —> Build static binary file (no shared lib)
若是不勾选则需要单独配置 libc,比较麻烦
接下来就是编译了,速度会比编译内核快很多:
1
2
$ make -j$(nproc ) $ make install
编译完成后会生成一个 _install 目录,接下来我们将会用它来构建我们的文件系统
二、建立文件系统 I.初始化文件系统 一些简单的初始化操作…
1
2
3
4
5
6
$ cd _install$ mkdir -pv {bin,sbin,etc,proc,sys,dev,home/ctf,root,tmp,lib64,lib/x86_64-linux-gnu,usr/{bin,sbin}}$ touch etc/inittab$ mkdir etc/init.d$ touch etc/init.d/rcS$ chmod +x ./etc/init.d/rcS
II.配置初始化脚本 首先配置 etc/inttab ,写入如下内容:
1
2
3
4
5
6
::sysinit:/etc/init.d/rcS
在上面的文件中指定了系统初始化脚本,因此接下来配置 etc/init.d/rcS,写入如下内容,主要是挂载各种文件系统:
1
2
3
4
5
6
7
8
9
10
11
12
13
# !/bin/sh
也可以在根目录下创建 init 文件,写入如下内容:
1
2
3
4
5
6
7
8
9
10
11
12
13
14
15
16
17
18
19
20
# !/bin/sh
别忘了添加可执行权限:
III.配置用户组 1 2 3 4 5 $ echo "root:x:0:0:root:/root:/bin/sh" > etc/passwd$ echo "ctf:x:1000:1000:ctf:/home/ctf:/bin/sh" >> etc/passwd$ echo "root:x:0:" > etc/group$ echo "ctf:x:1000:" >> etc/group$ echo "none /dev/pts devpts gid=5,mode=620 0 0" > etc/fstab
在这里建立了两个用户组 root 和 ctf ,以及两个用户 root 和 ctf
IV.配置glibc库 将需要的动态链接库拷到相应位置即可
为了方便笔者这里就先不弄了,直接快进到下一步,以后有时间再补充(咕咕咕
三、打包文件系统为镜像文件 I. 打包为 cpio 文件 使用如下命令打包文件系统为 cpio 格式
1 $ find . | cpio -o --format=newc > ../../rootfs.cpio
也可以这么写
1 $ find . | cpio -o -H newc > ../core.cpio
这里的位置是笔者随便选的,也可以将之放到自己喜欢的位置
II. 打包为 ext4 镜像 这里也可以将文件系统打包为 ext4 镜像格式,首先创建空白 ext4 镜像文件,这里 bs 表示块大小,count 表示块的数量:
1 $ dd if =/dev/zero of=rootfs.img bs=1M count=32
之后将其格式化为 ext4 格式:
挂载镜像,将文件拷贝进去即可:
1 2 3 4 $ mkdir tmp$ sudo mount rootfs.img ./tmp/ $ sudo cp -rfp _install/* ./tmp/ $ sudo umount ./tmp
四、向文件系统中添加文件 若是我们后续需要向文件系统中补充一些其他的文件,可以选择在原先的_install文件夹中添加(不过这样的话若是配置多个文件系统则会变得很混乱),也可以解压文件系统镜像后添加文件再重新进行打包
cpio 文件 I.解压磁盘镜像 1 $ cpio -idv < ./rootfs.cpio
该命令会将磁盘镜像中的所有文件解压到当前目录下
II.重打包磁盘镜像 和打包磁盘镜像的命令一样
1 $ find . | cpio -o --format=newc > ../new_rootfs.cpio
ext4 镜像 直接 mount 后再 umount jike:
1 2 3 $ sudo mount rootfs.img ./tmp/ $ $ sudo umount ./tmp
0x03.使用qemu运行内核 终于到了最激动人心的时候了:我们即将要将这个Linux内核跑起来——用我们自己配置的文件系统与内核
安全起见,我们并不直接在真机上运行这个内核,而是使用qemu在虚拟机里运行
配置启动脚本 I. 使用 cpio 文件作为文件系统 首先将先前的bzImage和rootfs.cpio放到同一个目录下
接下来编写启动脚本
写入如下内容:
1 2 3 4 5 6 7 8 9 10 11 # !/bin/sh
部分参数说明如下:
-m:虚拟机内存大小-kernel:内核镜像路径-initrd:初始文件系统路径,cpio 文件系统会被载入到内存当中(initramfs)-monitor:将监视器重定向到主机设备 /dev/null,这里重定向至 null 主要是防止CTF 中被人通过监视器直接拿 flag-append:附加参数选项
kaslr:开启内核地址随机化,你也可以改为 nokaslr 进行关闭以方便我们进行调试rdinit:指定初始启动进程,这里我们指定了 /sbin/init 作为初始进程,其会默认以 /etc/init.d/rcS 作为启动脚本loglevel=3 & quiet:不输出logconsole=ttyS0:指定终端为 /dev/ttyS0,这样一启动就能进入终端界面
-cpu:设置CPU选项,在这里开启了smep保护-smp:设置对称多处理器配置,这里设置了两个核心,每个核心一个线程-nographic:不提供图形化界面,此时内核仅有串口输出,输出内容会被 QEMU 重定向至我们的终端-s:相当于-gdb tcp::1234的简写(也可以直接这么写),后续我们可以通过gdb连接本地端口进行调试
运行boot.sh,成功启动~撒花~🌸🌸🌸
II. 使用 ext4 镜像作为文件系统 编写如下启动脚本即可:
1 2 3 4 5 6 7 8 9 10 11 12 #!/bin/bash "console=ttyS0 root=/dev/sda rw rdinit=/sbin/init kaslr pti=on quiet oops=panic panic=1" \
涉及改动的参数如下:
-hda:我们将 ext4 镜像挂载为一个真正的硬盘设备,优点在于更贴近真实环境(同时 flag 不会被在内存中泄漏),缺点在于所有对文件系统的操作都会“落盘”-append:我们修改了 root=/dev/sda rw ,因为 ext4 镜像被挂载为一个 SATA 硬盘,而 Linux 中第一个 SATA 硬盘的路径为 /dev/sda ,因此我们将根文件系统路径指向设备路径,并给予可读写权限
成功运行:
0x04.编写可装载内核模块(LKMs)
写这一部分把我的虚拟机搞崩了好几次…Or2
我们的Linux kernel虽然成功启动了,但是其本身的功能似乎有些单调,那么我们不如自己编写可装载内核模块(Loadable Kernel Modules)来扩充内核的功能吧!
〇、预备知识 前面我们讲到,LKM同样是ELF格式文件,但是其不能够独立运行,而只能作为内核的一部分存在
同样的,对于LKM而言,其所处在的内核空间与用户空间是分开的,对于通常有着SMAP/SMEP保护的Linux而言,这意味着LKM并不能够使用libc中的函数,也不能够直接与用户进行交互
虽然我们同样能够使用C语言编写LKM,但是作为内核的一部分,LKM编程在一定意义上便是内核编程, 内核版本的每次变化意味着某些函数名也会相应地发生变化,因此LKM编程与内核版本密切相关
一、简单的测试模块 我们来编写这样一个简单的内核模块,其功能是在载入/卸载时会在内核缓冲区打印字符串:
1 2 3 4 5 6 7 8 9 10 11 12 13 14 15 16 17 18 19 20 21 22 23 #include <linux/module.h> #include <linux/kernel.h> #include <linux/init.h> static int __init kernel_module_init (void ) "<1>Hello the Linux kernel world!\n" );return 0 ;static void __exit kernel_module_exit (void ) "<1>Good bye the Linux kernel world! See you again!\n" );"GPL" );"arttnba3" );
头文件
linux/module.h:对于LKM而言这是必须包含的一个头文件linux/kernel.h:载入内核相关信息linux/init.h:包含着一些有用的宏
通常情况下,这三个头文件对于内核模块编程都是不可或缺的
入口点/出口点 内核模块的初始化函数在编译时通过 module_init() 定义,在内核模块被载入时会调用所定义的函数,这里我们将初始化函数设定为 kernel_module_init
内核模块的卸载函数在编译时通过 module_exit() 定义,在内核模块被卸载时会调用所定义的函数,这里我们将卸载函数定义为 kernel_module_exit
其他…
__init 与 __exit 宏:用来显式标识内核模块出入口函数MODULE_AUTHOR() & MODULE_LICENSE():声明内核作者与发行所用许可证
二、编译内核模块:makefile 与 Kbuild 与一般的可执行文件所不同的是,我们应当使用 Makefile 来构建一个内核模块,并使用 Kbuild 说明编译规则
首先创建一个 Kbuild 文件,写入如下内容:
1 2 3 4 5 MODULE_NAME ?= hellokernel$(MODULE_NAME) .o$(MODULE_NAME) -y += main.o
简单说明一下这个 Kbuild:
MODULE_NAME ?= hellokernel :定义了一个局部变量 MODULE_NAME ,值为 hellokernelobj-m += $(MODULE_NAME).o :指定了编译的结果应当为.ko文件,即可装载内核模块,同时指定了模块名为 hellokernel ,当模块编译时相应的源文件所编译得到的中间文件会先被链接为 hellokernel.o ,之后再构建 .ko 文件;其他可替代标识为: obj-y 编译进内核 ,obj-n 不编译 $(MODULE_NAME)-y += main.o :编译该内核模块所需要的文件,例如这里我们需要 main.c ,那么我们就在该变量中添加 main.o
接下来创建一个名为 Makefile 的文件,写入如下内容:
1 2 3 4 5 6 7 CURRENT_PATH := $(shell pwd) $(shell uname -r) /buildall: $(LINUX_KERNEL_SRC) M=$(CURRENT_PATH) modulesclean: $(LINUX_KERNEL_SRC) M=$(CURRENT_PATH) clean
这里简单说明一下这个 makefile :
LINUX_KERNEL_SRC := /lib/modules/$(shell uname -r)/build :当前系统所使用的内核源码路径make -C $(LINUX_KERNEL_SRC) M=$(CURRENT_PATH) modules:-C 表示进入源码目录进行编译,M= 意味着当前正在编译一个外部模块、该变量用以指示外部模块的源码目录, modules 则意为进行内核模块编译操作make -C $(LINUX_KERNEL_SRC) M=$(CURRENT_PATH) clean:同上,不过此时进行的是清理指令
接下来在终端执行如下指令,我们的内核模块就会自动进行构建
随后会输出如下信息,标志着内核模块的编译顺利完成
1 2 3 4 5 6 7 make -C /lib/modules/5.8.0-43-generic/build M=/home/arttnba3/Music modules
测试一下,内核模块成功运行,撒花~🌸
三、提供应用程式I/O接口 虽然说我们的新模块成功跑起来了,但是除了在内核缓冲区进行输入输出以外好像就做不了什么了,我们希望我们写的内核模块能够向我们提供更多的功能并能够让用户与其进行交互,以发挥更多的作用
I.设备注册 前面讲到,*NIX/Linux的哲学之一便是万物皆文件,一切都可以被抽象为文件,一切都可以使用访问文件的方式进行操作 ,这提供了高层次上的操作一致性
同样地,我们若是想要能够与我们的内核模块进行交互,则同样可以通过文件进行——注册一个“虚拟设备节点”,随后我们的用户态程序便可以使用系统调用read、write、ioctl来完成与内核模块间的通信
设备分类 在Linux中I/O设备分为如下两类:
字符设备:在I/O传输过程中以字符为单位 进行传输的设备,例如键盘、串口等。字符设备按照字符流的方式被有序访问,不能够进行随机读取 块设备:在块设备中,信息被存储在固定大小的块中,每个块有着自己的地址,例如硬盘、SD卡等。用户可以对块设备进行随机访问——从任意位置读取一定长度的数据
file_operations结构体 在注册设备之前,我们需要用到一个结构体——file_operations来完成对设备的一些相关定义,该结构体定义于include/linux/fs.h中,相关源码比较长不在此贴出,在其中定义了大量的函数指针
笔者感觉作用类似于OOP中的接口类 ,或者是虚函数表
一个文件应当拥有一个file_operations实例,并指定相关系统调用函数指针所指向的自定义函数,在后续进行设备的注册时会使用该结构体
主设备号 & 次设备号 在Linux内核中,使用类型dev_t(unsigned long)来标识一个设备的设备号
一个字符的设备号由主设备号与次设备号组成,高字节存储主设备号,低字节存储次设备号:
主设备号:标识设备类型,使用宏MAJOR(dev_t dev)可以获取主设备号次设备号:用以区分同类型设备,使用宏MINOR(dev_t dev)可以获取次设备号
Linux还提供了一个宏 MKDEV(int major, int minor);,用以通过主次设备号生成对应的设备号
设备节点(struct device_node & struct device) 基于“万物皆文件”的设计思想,Linux中所有的设备都以文件的形式进行访问,这些文件存放在/dev目录下,一个文件就是一个设备节点
在Linux kernel中使用结构体device描述一个设备,该结构体定义于include/linux/device.h(内核源码路径)中,每个设备在内核中都有着其对应的device实例,其中记录着设备的相关信息
在DTS(Device Tree Source,设备树)中则使用device_node结构体表示一个设备
设备类(struct class) 在Linux kernel中使用结构体class用以表示高层次抽象的设备 ,该结构体定义于include/linux/device/class.h中
每个设备节点实例中都应当包含着一个指向相应设备类实例的指针
设备的注册与注销 方便起见,我们接下来将会注册一个字符型设备 ,大致的一个步骤如下:
使用由内核提供的函数register_chrdev(unsigned int major, const char *name, const struct file_operations *fops)进行字符型设备注册,该函数定义于include/linux/fs.h,会将注册成功后的主设备号返回,若失败则会返回一个负值,参数说明如下:
major:主设备号,若为0则由内核分配主设备号
name:设备名,由用户指定
fops:该设备的文件操作系统(file_operations结构体)指针
使用宏class_create(owner, name)创建设备类 ,该宏定义于include/linux/device.h中,其核心调用函数是__class_create(struct module *owner, const char *name, struct lock_class_key *key)
使用函数device_create(struct class *cls, struct device *parent, dev_t devt, void *drvdata, const char *fmt, ...)创建设备节点 ,若成功则最终会在/dev目录下生成我们的设备节点文件,各参数说明如下:
cls:该设备的设备类
parent:该设备的父设备节点,通常情况下应当为某种总线或主机控制器,若该设备为顶级设备则设为NULL
devt:该设备的设备号
drvdata:该驱动的相关信息,若无则填NULL
fmt:设备名称
设备的注销则是逆着上面的进程进行,同样有着相对应的三个函数:device_destroy(struct class *cls, dev_t devt)、class_destroy(struct class *cls)、unregister_chrdev(unsigned int major, const char *name),用法相似,这里就不一一赘叙了
✳ 需要注意的是若是注册设备的进程中的某一步出错了,我们在退出内核态函数之前应当手动调用注销函数清理原先的相关资源
设备权限 内核模块运行在内核空间,所创建的设备节点只有root用户才有权限进行读写,对于其他用户而言便毫无意义,这并不是我们想要的,因此我们需要通过进一步的设置使得所有用户都有权限通过设备节点文件与我们的内核模块进行交互
在内核中使用inode结构体表示一个文件,该结构体定义于include/linux/fs.h中,其中用以标识权限的是成员i_mode
而在内核中对于使用flip_open()打开的文件,Linux内核中使用 file 结构体进行描述,该结构体定义于include/linux/fs.h中,其中有着指向内核中该文件的 inode 实例的指针,使用file_inode()函数可以获得一个 file 结构体中的 inode 结构体指针
那么我们不难想到,若是在内核模块中使用file_open()函数打开我们的设备节点文件,随后修改 file 结构体中的 inode 指针指向的 inode 实例的 i_mode 成员,便能够修改该文件的权限
需要注意的是rwx三个权限位仅占3位,因而应当使用八进制进行操作:__inode->i_mode |= 0666;,而不是16进制
最终的代码如下:
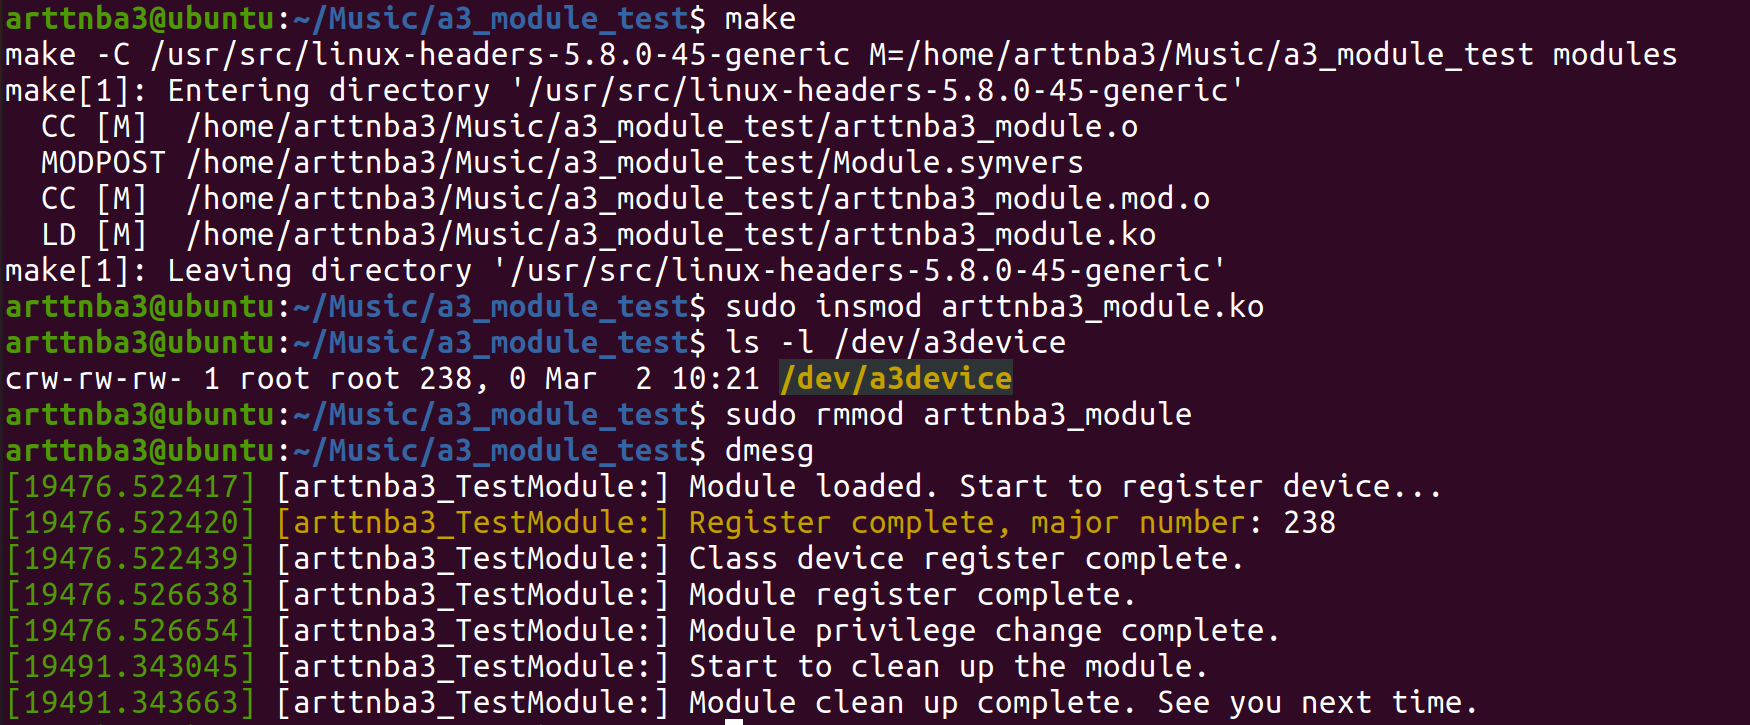
1 2 3 4 5 6 7 8 9 10 11 12 13 14 15 16 17 18 19 20 21 22 23 24 25 26 27 28 29 30 31 32 33 34 35 36 37 38 39 40 41 42 43 44 45 46 47 48 49 50 51 52 53 54 55 56 57 58 59 60 61 62 63 64 65 66 67 68 69 70 71 72 73 74 75 76 77 78 79 80 81 82 83 84 85 #include <linux/module.h> #include <linux/kernel.h> #include <linux/init.h> #include <linux/fs.h> #include <linux/device.h> #define DEVICE_NAME "a3device" #define DEVICE_PATH "/dev/a3device" #define CLASS_NAME "a3module" static int major_num;static struct class * module_class =NULL ;static struct device * module_device =NULL ;static struct file * __file =NULL ;struct inode * __inode =NULL ;static struct file_operations a3_module_fo =static int __init kernel_module_init (void ) "[arttnba3_TestModule:] Module loaded. Start to register device...\n" );0 , DEVICE_NAME, &a3_module_fo);if (major_num < 0 )"[arttnba3_TestModule:] Failed to register a major number.\n" );return major_num;"[arttnba3_TestModule:] Register complete, major number: %d\n" , major_num);if (IS_ERR(module_class))"[arttnba3_TestModule:] Failed to register class device!\n" );return PTR_ERR(module_class);"[arttnba3_TestModule:] Class device register complete.\n" );NULL , MKDEV(major_num, 0 ), NULL , DEVICE_NAME);if (IS_ERR(module_device))"[arttnba3_TestModule:] Failed to create the device!\n" );return PTR_ERR(module_device);"[arttnba3_TestModule:] Module register complete.\n" );0 );if (IS_ERR(__file))0 ));"[arttnba3_TestModule:] Unable to change module privilege!\n" );return PTR_ERR(__file);0666 ;NULL );"[arttnba3_TestModule:] Module privilege change complete.\n" );return 0 ;static void __exit kernel_module_exit (void ) "[arttnba3_TestModule:] Start to clean up the module.\n" );0 ));"[arttnba3_TestModule:] Module clean up complete. See you next time.\n" );"GPL" );"arttnba3" );
在这里我们用到了一个函数IS_ERR(),定义于include/linux/err.h中,其核心为宏IS_ERR_VALUE(),即对于内核中的一些操作(如创建设备节点等)若是失败,则通常会返回一个小于-4095的负值,该函数用以进行判定
编译,测试,我们的内核模块成功地注册了一个名叫a3device的设备并成功注册到了/dev目录下,撒花~🌸
接下来我们只要为内核模块编写相应的API,便可以在用户态应用程式上通过虚拟设备/dev/a3device完成与内核模块间的通信
II.编写系统调用接口函数 我们编写如下的三个简单的函数使得用户应用程式可以通过open、close、read、write、ioctl与其进行交互
在这里我们引入了自旋锁spinlock_t类型变量以增加对多线程的支持
需要注意的是file_operations结构体中ioctl的函数指针应当为unlocked_ioctl,close对应的函数指针应当为release
✳ 以及内核空间与用户空间之间传递数据应当使用 copy_from_user(void *to, const void *from, unsigned long n)、copy_to_user(void *to, const void *from, unsigned long n)函数
最终的代码如下:
我们的模块也逐渐大了起来,出于软件设计的考虑笔者选择将部分内容单独封装在一个头文件中
a3module.h
1 2 3 4 5 6 7 8 9 10 11 12 13 14 15 16 17 18 19 20 21 22 23 24 25 26 27 28 29 30 31 32 33 34 35 36 37 38 39 40 41 42 #include <linux/module.h> #include <linux/kernel.h> #include <linux/init.h> #include <linux/fs.h> #include <linux/device.h> #define DEVICE_NAME "a3device" #define CLASS_NAME "a3module" #define NOT_INIT 0xffffffff #define READ_ONLY 0x1000 #define ALLOW_WRITE 0x1001 #define BUFFER_RESET 0x1002 static int major_num;static int a3_module_mode = READ_ONLY;static struct class * module_class =NULL ;static struct device * module_device =NULL ;static void * buffer = NULL ;static spinlock_t spin;static int __init kernel_module_init (void ) ;static void __exit kernel_module_exit (void ) ;static int a3_module_open (struct inode *, struct file *) ;static ssize_t a3_module_read (struct file *, char __user *, size_t , loff_t *) ;static ssize_t a3_module_write (struct file *, const char __user *, size_t , loff_t *) ;static int a3_module_release (struct inode *, struct file *) ;static long a3_module_ioctl (struct file *, unsigned int , unsigned long ) ;static long __internal_a3_module_ioctl(struct file * __file, unsigned int cmd, unsigned long param);static struct file_operations a3_module_fo =
arttnba3_module.c
1 2 3 4 5 6 7 8 9 10 11 12 13 14 15 16 17 18 19 20 21 22 23 24 25 26 27 28 29 30 31 32 33 34 35 36 37 38 39 40 41 42 43 44 45 46 47 48 49 50 51 52 53 54 55 56 57 58 59 60 61 62 63 64 65 66 67 68 69 70 71 72 73 74 75 76 77 78 79 80 81 82 83 84 85 86 87 88 89 90 91 92 93 94 95 96 97 98 99 100 101 102 103 104 105 106 107 108 109 110 111 112 113 114 115 116 117 118 119 120 121 122 123 124 125 126 127 128 129 130 131 132 133 134 135 136 137 138 139 140 141 142 143 144 145 146 147 148 149 150 151 152 153 154 155 156 157 158 159 160 161 162 163 164 165 166 167 168 169 170 171 172 173 174 175 176 177 178 179 180 181 182 183 184 185 186 187 188 189 190 191 192 193 194 195 196 197 198 199 200 201 202 203 204 205 206 207 208 209 210 211 #include <linux/module.h> #include <linux/kernel.h> #include <linux/init.h> #include <linux/fs.h> #include <linux/device.h> #include <linux/slab.h> #include "a3module.h" "GPL" );"arttnba3" );static int __init kernel_module_init (void ) "[arttnba3_TestModule:] Module loaded. Start to register device...\n" );0 , DEVICE_NAME, &a3_module_fo);if (major_num < 0 )"[arttnba3_TestModule:] Failed to register a major number.\n" );return major_num;"[arttnba3_TestModule:] Register complete, major number: %d\n" , major_num);if (IS_ERR(module_class))"[arttnba3_TestModule:] Failed to register class device!\n" );return PTR_ERR(module_class);"[arttnba3_TestModule:] Class device register complete.\n" );NULL , MKDEV(major_num, 0 ), NULL , DEVICE_NAME);if (IS_ERR(module_device))"[arttnba3_TestModule:] Failed to create the device!\n" );return PTR_ERR(module_device);"[arttnba3_TestModule:] Module register complete.\n" );return 0 ;static void __exit kernel_module_exit (void ) "[arttnba3_TestModule:] Start to clean up the module.\n" );0 ));"[arttnba3_TestModule:] Module clean up complete. See you next time.\n" );static long a3_module_ioctl (struct file * __file, unsigned int cmd, unsigned long param) long ret;return ret;static long __internal_a3_module_ioctl(struct file * __file, unsigned int cmd, unsigned long param)"[arttnba3_TestModule:] Received operation code: %d\n" , cmd);switch (cmd)case READ_ONLY:if (!buffer)"[arttnba3_TestModule:] Please reset the buffer at first!\n" );return -1 ;"[arttnba3_TestModule:] Module operation mode reset to READ_ONLY.\n" );break ;case ALLOW_WRITE:if (!buffer)"[arttnba3_TestModule:] Please reset the buffer at first!\n" );return -1 ;"[arttnba3_TestModule:] Module operation mode reset to ALLOW_WRITE.\n" );break ;case BUFFER_RESET:if (!buffer)0x500 , GFP_ATOMIC);if (buffer == NULL )"[arttnba3_TestModule:] Unable to initialize the buffer. Kernel malloc error.\n" );return -1 ;"[arttnba3_TestModule:] Buffer reset. Module operation mode reset to READ_ONLY.\n" );memset (buffer, 0 , 0x500 );break ;case NOT_INIT:"[arttnba3_TestModule:] Module operation mode reset to NOT_INIT.\n" );NULL ;return 0 ;default :"[arttnba3_TestModule:] Invalid operation code.\n" );return -1 ;return 0 ;static int a3_module_open (struct inode * __inode, struct file * __file) if (buffer == NULL )0x500 , GFP_ATOMIC);if (buffer == NULL )"[arttnba3_TestModule:] Unable to initialize the buffer. Kernel malloc error.\n" );return -1 ;memset (buffer, 0 , 0x500 );"[arttnba3_TestModule:] Device open, buffer initialized successfully.\n" );else "[arttnba3_TestModule:]Warning: reopen the device may cause unexpected error in kernel.\n" );return 0 ;static int a3_module_release (struct inode * __inode, struct file * __file) if (buffer)NULL ;"[arttnba3_TestModule:] Device closed.\n" );return 0 ;static ssize_t a3_module_read (struct file * __file, char __user * user_buf, size_t size, loff_t * __loff) const char * const buf = (char *)buffer;int count;if (a3_module_mode == NOT_INIT)"[arttnba3_TestModule:] Buffer not initialized yet.\n" );return -1 ;0x500 ? 0x500 : size);return count;static ssize_t a3_module_write (struct file * __file, const char __user * user_buf, size_t size, loff_t * __loff) char * const buf = (char *)buffer;int count;if (a3_module_mode == NOT_INIT)"[arttnba3_TestModule:] Buffer not initialized yet.\n" );-1 ;else if (a3_module_mode == READ_ONLY)"[arttnba3_TestModule:] Unable to write under mode READ_ONLY.\n" );-1 ;else 0x500 ? 0x500 : size);return count;
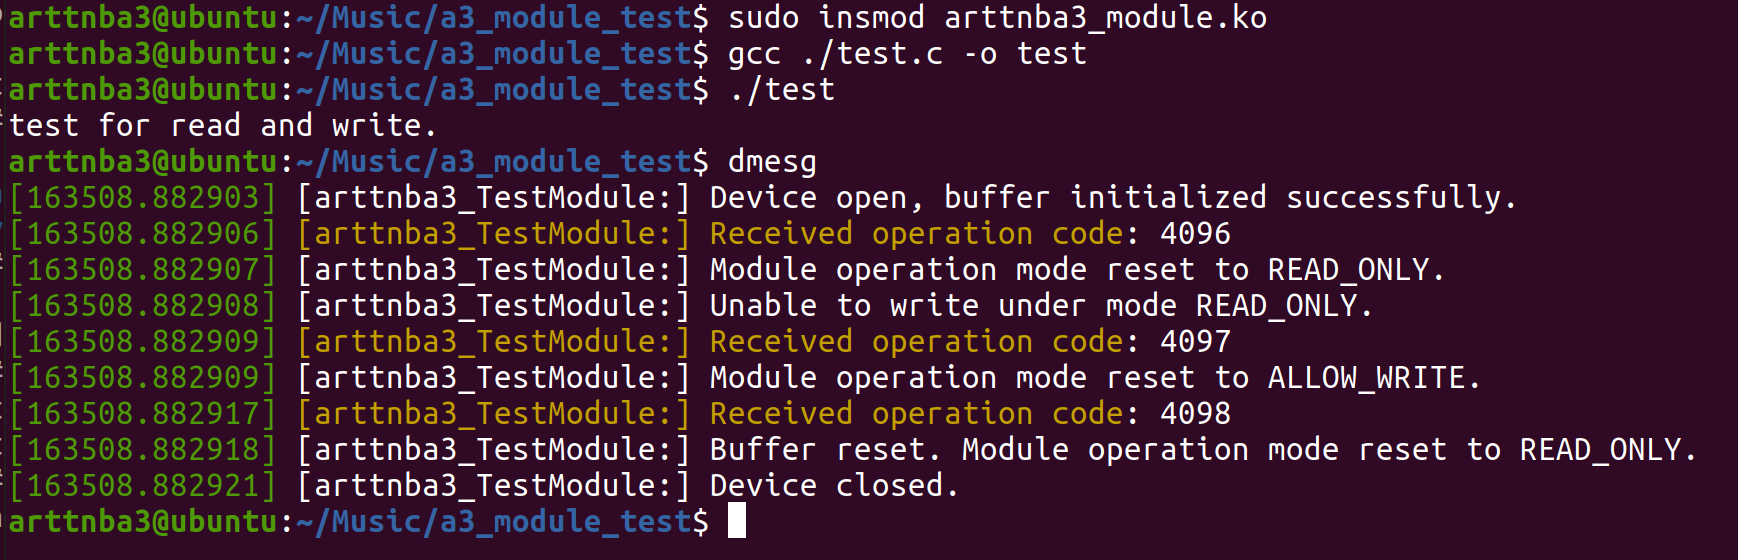
编译成功
接下来我们开始编写用户态程序以测试我们的模块功能是否正常
III.测试模块接口 我们编写如下程序来测试我们的接口是否正常:
1 2 3 4 5 6 7 8 9 10 11 12 13 14 15 16 17 18 19 20 21 22 23 24 25 26 27 28 29 30 #include <unistd.h> #include <stdio.h> #include <stdlib.h> #include <string.h> #include <fcntl.h> #include <sys/ioctl.h> char * buf = "test for read and write.\n" ;int main (void ) char ch[0x100 ];int fd = open("/dev/a3device" , 2 );int len = strlen (buf);0x1000 , NULL );0x1001 , NULL );0 , ch, len);0x1002 , NULL );0 , ch, len);return 0 ;
编译运行,一切正常,撒花~🌸
除了创建虚拟设备节点供通信以外,我们也可以选择创建虚拟文件节点的方式与用户进程间进行通信
procfs:进程文件系统 procfs即进程文件系统( Process file system ),其中包含一个伪文件系统 ,在系统启动时动态生成文件,不会占用真正的储存空间,而是占用一定的内存
procfs用以通过内核访问进程信息,通常被挂载到/proc目录下
proc_ops 结构体 类似于file_operations结构体,不同的是该结构体被用于procfs
定义于include/linux/proc_fs.h中,仅定义了少量函数指针成员,如下:
1 2 3 4 5 6 7 8 9 10 11 12 13 14 15 16 struct proc_ops {unsigned int proc_flags;int (*proc_open)(struct inode *, struct file *);ssize_t (*proc_read)(struct file *, char __user *, size_t , loff_t *);ssize_t (*proc_read_iter)(struct kiocb *, struct iov_iter *);ssize_t (*proc_write)(struct file *, const char __user *, size_t , loff_t *);loff_t (*proc_lseek)(struct file *, loff_t , int );int (*proc_release)(struct inode *, struct file *);__poll_t (*proc_poll)(struct file *, struct poll_table_struct *);long (*proc_ioctl)(struct file *, unsigned int , unsigned long );#ifdef CONFIG_COMPAT long (*proc_compat_ioctl)(struct file *, unsigned int , unsigned long );#endif int (*proc_mmap)(struct file *, struct vm_area_struct *);unsigned long (*proc_get_unmapped_area) (struct file *, unsigned long , unsigned long , unsigned long , unsigned long ) ;
创建虚拟文件夹 使用proc_mkdir(const char *, struct proc_dir_entry *)函数可以快速创建虚拟文件夹,第一个参数用以指定文件夹名,第二个参数用以指定该📂挂载于哪个procfs节点下,若为NULL则自动挂载到/proc目录下
该函数的返回值为proc_dir_entry类型的指针,该结构体定义于fs/proc/internal.h中,我们可以通过这个结构体指针管理我们的虚拟文件
创建虚拟文件节点 使用proc_create(const char *name, umode_t mode, struct proc_dir_entry *parent, const struct proc_ops *proc_ops)函数可以快速创建一个文件节点
name:文件名mode:文件读写执行权限parent:该文件挂载的procfs节点,若为NULL则自动挂载到/proc目录下proc_ops:该文件的proc_ops结构体
该函数的返回值同样为proc_dir_entry类型的指针
注销虚拟文件节点 函数remove_proc_entry(const char *, struct proc_dir_entry *)用以注销此前创建的文件,其中第一个参数为文件名,第二个参数为其挂载的节点,若为NULL则默认为/proc目录
测试模块接口 我们此前的模块代码只需稍加修改即可适用于procfs,这里只贴出修改后的部分:
a3module.c
1 2 3 4 5 6 7 8 9 10 11 12 13 14 15 static int __init kernel_module_init (void ) 0666 , NULL , &a3_module_fo);return 0 ;static void __exit kernel_module_exit (void ) "[arttnba3_TestModule:] Start to clean up the module.\n" );NULL );"[arttnba3_TestModule:] Module clean up complete. See you next time.\n" );
a3module.h
1 2 3 4 5 6 7 8 9 10 11 12 #define PROC_NAME "a3proc" static struct proc_dir_entry * a3_module_proc =NULL ;static struct proc_ops a3_module_fo =
我们使用如下程序进行测试:
1 2 3 4 5 6 7 8 9 10 11 12 13 14 15 16 17 18 19 20 21 22 23 24 25 26 27 28 29 30 #include <unistd.h> #include <stdio.h> #include <stdlib.h> #include <string.h> #include <fcntl.h> #include <sys/ioctl.h> char * buf = "test for read and write.\n" ;int main (void ) char ch[0x100 ];int fd = open("/proc/a3proc" , 2 );int len = strlen (buf);0x1000 , NULL );0x1001 , NULL );0 , ch, len);0x1002 , NULL );0 , ch, len);return 0 ;
成功运行~撒花~🌸
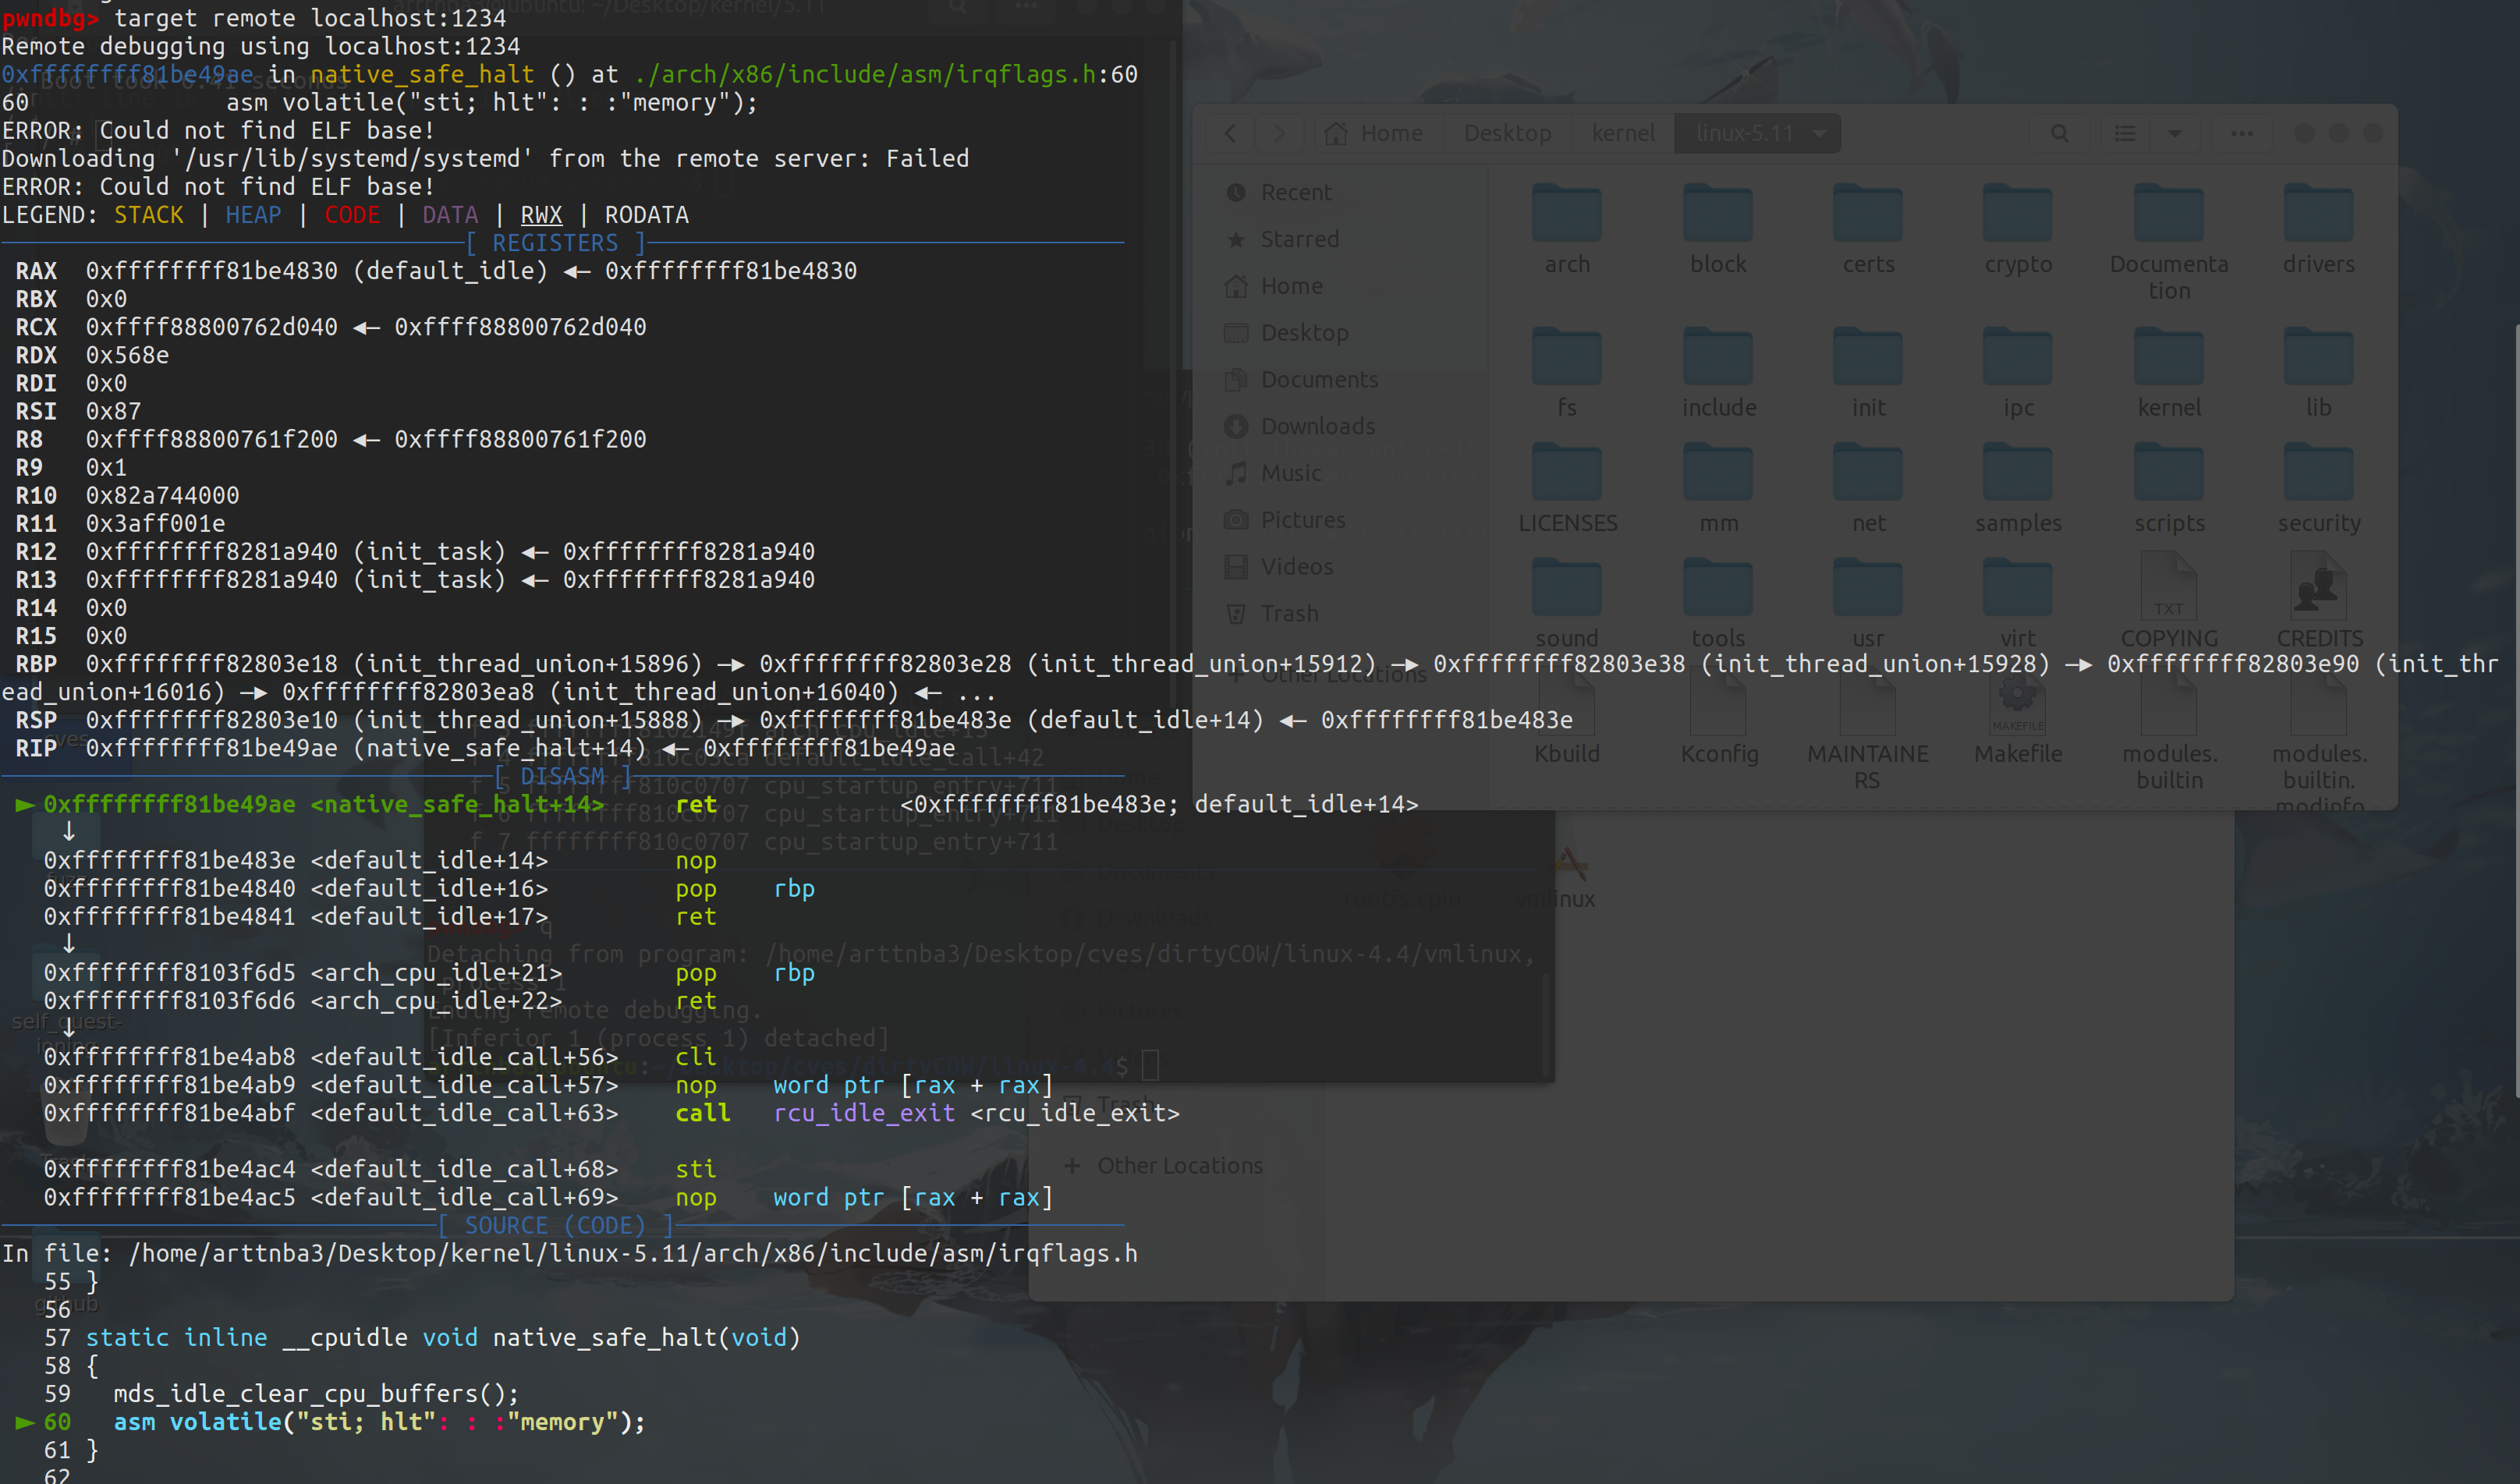
0x05.使用 qemu + gdb 调试Linux内核 一、载入内核符号表 直接使用 gdb 载入之前在源码根目录下编译出来的未压缩内核镜像 vmlinux 即可
二、remote连接 我们启动时已经将内核映射到了本地的1234端口,只需要gdb连接上就行
1 2 pwndbg> set architecture i386:x86-64pwndbg> target remote localhost:1234
笔者的gdb使用了pwndbg这个插件
需要注意的是若要源码调试则需要用我们手动编译的内核
三、解压 bzImage 镜像 有的时候我们只有压缩后的内核镜像bzImage (例如在一些 CTF 题目中),此时我们可以使用如下脚本进行解压(来自github ):
1 2 3 4 5 6 7 8 9 10 11 12 13 14 15 16 17 18 19 20 21 22 23 24 25 26 27 28 29 30 31 32 33 34 35 36 37 38 39 40 41 42 43 44 45 46 47 48 49 50 51 52 53 54 55 56 57 58 59 60 61 62 63 64 # !/bin/sh # SPDX-License-Identifier: GPL-2.0-only # ---------------------------------------------------------------------- # extract-vmlinux - Extract uncompressed vmlinux from a kernel image # # (c) 2009,2010 Dick Streefland <dick@streefland.net> # # # Check invocation: # Prepare temp files: # That didn't work, so retry after decompression. # Finally check for uncompressed images or objects: # Bail out:
用法如下:
1 $ ./extract-vmlinux ./bzImage > vmlinux
四、寻找gadget 用ROPgadget或者ropper都行,笔者比较喜欢使用ROPgadget
1 $ ROPgadget --binary ./vmlinux > gadget.txt
1 $ ropper --file ./vmlinuz --nocolor > gadget2.txt
一般出来大概有个几十MB
也可以直接用 pwntools 暴力搜自己想要的 gadget(笔者比赛做内核题时经常这么做;)
五、调试内核模块 使用 gdb 调试内核模块和调试普通的可执行文件大致上是相同的,不过我们需要额外指定各个需要被我们调试的 section 的载入地址
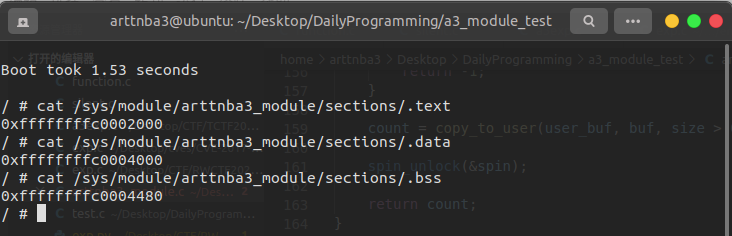
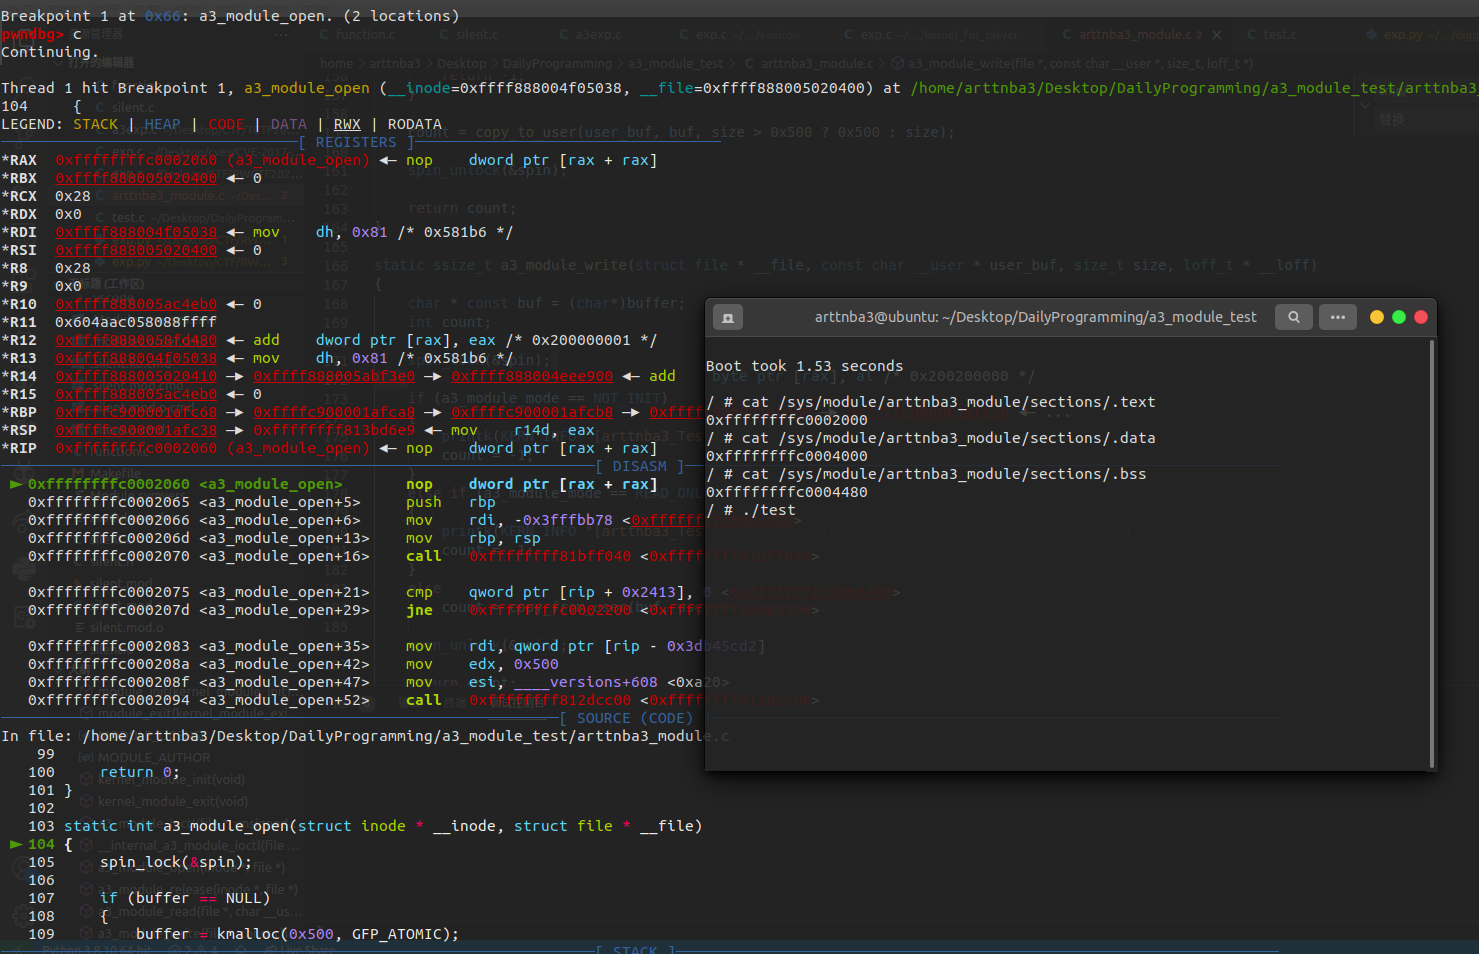
首先通过读取 /sys/module/模块名/sections/ 目录下对应的文件获取对应 section 在内核中的载入地址,例如我们调试时需要用到 .text、.data、.bss 这三个段的数据:
之后在使用 gdb 连接上 qemu 后,使用 add-symble-file 命令载入内核模块信息,默认指定为 .text 段
1 (gdb) add-symbol-file ./arttnba3_module.ko 0xffffffffc0002000 -s .data 0xffffffffc0004000 -s .bss 0xffffffffc0004480
之后就可以正常调试内核模块了
若是你只需要对代码段进行调试,也可以通过 lsmod 命令或者读取 /proc/modules 以获取代码段的载入地址
0x06.编写自己的shell
注:实际生产开发中推荐使用bash/dash等成熟的shell,这里仅仅是做了一个勉强能用的小玩具
我们的kernel虽然成功地跑了起来,但是不可置否的是,仅有一个白色的/#作为提示符的默认shell似乎过于丑陋了(),于是我们接下来试着开发一个属于自己的可爱的shell吧!
通常而言,一个shell可以简化为如下形式:
参考自《现代操作系统》P31 图 1-19
1 2 3 4 5 6 7 8 9 10 11 12 13 14 15 16 17 18 19 20 while (1 )int pid = fork();if (pid < 0 )puts ("Unable to fork the child, inner error." );else if (pid == 0 ) else NULL );
当我们在shell中进行输入时,fork()出子进程来执行我们的输入,父进程则等待我们的子进程执行完成
一、打印提示符 一个“比较好看”的shell应当形如如下形式:
bash,大多数Linux发行版上默认的shell
即我们在输入命令之前应当有如下结构的提示符:
1 user@hostname:current_path$
获取用户相关信息可以使用getpwuid(getuid())获取一个passwd结构体
获取主机名则可以使用gethostname()函数
获取当前路径可以使用getcwd()函数,按照bash的风格若是包含当前用户的home路径则我们应当将其缩写为~
改变字体颜色则可以用相应的转义序列控制字符,便不在此赘叙
最终我们得到的打印提示符的函数如下:
1 2 3 4 5 6 7 8 9 10 11 12 13 14 15 16 17 18 19 20 21 22 23 24 25 26 27 28 29 30 31 32 33 34 35 36 37 38 39 40 41 42 43 44 45 46 47 48 49 50 51 52 53 54 55 56 57 58 59 60 61 62 63 64 65 66 67 68 69 70 71 72 73 74 75 76 77 78 uid_t uid;int user_path_len;char local_host_name[0x100 ];char user_path[0x100 ];char current_path[0x200 ];struct passwd * user_info =NULL ;void typePrompt (void ) strlen (user_info->pw_dir);if (gethostname(local_host_name, 0x100 ))printf ("\033[31m\033[1m[x] Unable to get the hostname, inner error.\033[0m\n" );exit (-1 );if (!getcwd(current_path, 0x200 ))printf ("\033[31m\033[1m[x] Unable to get the current path, inner error.\033[0m\n" );exit (-1 );if (uid == 0 ) printf (user_info->pw_name);printf ("@" );printf (local_host_name);printf (":" );if (strlen (current_path) > user_path_len)memcpy (user_path, current_path, user_path_len);'\0' ;if (!strcmp (user_path, user_info->pw_dir))printf ("~" );printf (current_path + user_path_len);else printf (current_path);else printf (current_path);printf ("# " );else printf ("\033[32m\033[1m" );printf (user_info->pw_name);printf ("@" );printf (local_host_name);printf ("\033[0m\033[1m" );printf (":" );printf ("\033[34m" );if (strlen (current_path) > user_path_len)memcpy (user_path, current_path, user_path_len);'\0' ;if (!strcmp (user_path, user_info->pw_dir))printf ("~" );printf (current_path + user_path_len);else printf (current_path);else printf (current_path);printf ("\033[0m" );printf ("$ " );
简单测试一下,以假乱真还是没什么问题的()
二、输入读取 对于用户的一次输入,毫无疑问我们不应当也不可能无限进行读取,因此我们应当对输入的读取的字符的上限做一个限制,超出这个限制长度往后的字符尽数丢弃
同样地,为了避免一开始就分配过大的内存空间,笔者选择使用malloc进行动态内存分配,一开始时先分配一个适当大小的缓冲区,后续若输入超出这个大小则重新分配一个两倍大小的缓冲区
对于输入历史是否记录,我们还需要进行判断,若是用户仅仅是在不断敲击ENTER,那么就没必要记录了
I.后台执行 有的时候我们想要让应用被放到后台去执行,那么我们的父进程(shell)就不应当等待子进程,笔者选择仿照bash的方式——若最后一个字符是'&'则不等待子进程执行,这里我们选择在读取命令时使用一个返回值进行标识
II.历史命令 为了模拟bash的功能,我们还应当实现!!执行上一条命令、!数字执行历史记录中的某条命令,简单判断即可
完整代码如下:
1 2 3 4 5 6 7 8 9 10 11 12 13 14 15 16 17 18 19 20 21 22 23 24 25 26 27 28 29 30 31 32 33 34 35 36 37 38 39 40 41 42 43 44 45 46 47 48 49 50 51 52 53 54 55 56 57 58 59 60 61 62 63 64 65 66 67 68 69 70 71 72 73 74 75 76 77 78 79 80 81 82 83 84 85 86 87 88 89 90 91 92 93 94 95 96 97 98 99 100 101 102 103 104 105 106 int readCommand (void ) unsigned long long count = 0 ;char ch;while ((ch = getchar()) != '\n' )if (count == command_buf_size)if (2 * command_buf_size > BUF_MAX) while ((ch = getchar()) != '\n' )continue ;break ;char * new_buf = (char *)malloc (2 * command_buf_size);if (!new_buf) while ((ch = getchar()) != '\n' )continue ;break ;memcpy (new_buf, command_buf, command_buf_size);2 ;free (command_buf);'\0' ;if (count == 0 )return FLAG_NULL_INPUT;if (count > 1 )if (command_buf[0 ] == '!' )if (command_buf[1 ] == '!' )if (!his_full && his_count == 0 )puts ("\033[31m\033[1m[x] No available command, history is empty.\033[0m" );return FLAG_NULL_INPUT;char * temp = malloc (command_buf_size);int flag = FLAG_EXECVE_WAIT;if (command_buf[count - 1 ] == '&' )1 ] = '\0' ;strcpy (temp, history[((his_count + HIS_MAX - 1 ) % HIS_MAX)]);strncat (temp, command_buf + 2 , command_buf_size - strlen (temp));strcpy (command_buf, temp);free (temp);printf ("\n%s\n" , command_buf);return flag;else if (command_buf[1 ] >= '0' && command_buf[1 ] <= '9' )int num_end = 1 ;while (command_buf[num_end] >= '0' && command_buf[num_end] <= '9' )char ch = command_buf[num_end];'\0' ;int his = atoi(command_buf + 1 );if (his < 0 || his >= HIS_MAX || !history[his])puts ("\033[31m\033[1m[x] No available command, invalid history index.\033[0m" );return FLAG_NULL_INPUT;char * temp = malloc (command_buf_size);int flag = FLAG_EXECVE_WAIT;if (command_buf[count - 1 ] == '&' )1 ] = '\0' ;strcpy (temp, history[his]);strncat (temp, command_buf + num_end, command_buf_size - strlen (temp));strcpy (command_buf, temp);free (temp);printf ("\n%s\n" , command_buf);return flag;if (command_buf[count - 1 ] == '&' )1 ] = '\0' ;return FLAG_EXECVE_BACKGROUND;return FLAG_EXECVE_WAIT;
三、命令行解析 最为简单的解析方式便是使用strtok()函数进行分割,这里我们选择以空格" "作为分隔符
同样地,一行命令中的参数数量不应当过多,我们应当限制仅读取一定数量的参数
代码如下:
1 2 3 4 5 6 7 8 9 10 11 12 13 14 15 16 17 18 #define ARGS_MAX 0x100 char * args[0x100 ];int args_count = 0 ;void analyseCommand (void ) 0 ;" " );char * ptr;while (ptr = strtok(NULL , " " ))if (args_count + 1 == ARGS_MAX)break ;
四、命令执行 相比起execve(),execvp()函数更适合用以执行我们输入的命令,同时我们解析后的命令行格式可以直接传入,较为方便
1 2 3 4 5 6 7 8 9 10 11 12 void createChild (int flag) int pid = fork();if (pid < 0 ) printf ("\033[31m\033[1m[x] Unable to fork the child, inner error.\033[0m\n" );else if (pid == 0 ) 0 ], args);else if (flag == FLAG_EXECVE_WAIT)NULL );
五、内建命令 部分命令如cd(改变当前工作目录)、history(查看历史)、exit(退出)等命令若是直接使用execvp()执行的话我们会发现毫无效果 ,因此这几个命令我们需要自行建立在我们的shell当中
cd命令可以直接使用chdir()函数改变当前工作目录,需要注意的是对于字符串"~"我们应当单独解析——将其替换为用户工作目录后再进行字符串拼接history命令则需要我们预先有一个储存历史命令的缓冲区,同时当历史记录达到上限时我们应当进行清除,这里我们选择模拟一个循环链表以在历史命令满之后每次输入命令时都会去除现存的最早的命令exit命令则只需要在主进程中识别到该字符串时直接调用exit()即可
同样地,在主进程若是检测到输入的命令为内建命令,则应当不调用 execvp(),在这里笔者选择添加一个返回值进行判定
代码如下:
1 2 3 4 5 6 7 8 9 10 11 12 13 14 15 16 17 18 19 20 21 22 23 24 25 26 27 28 29 30 31 32 33 34 35 36 37 38 39 40 41 42 43 44 45 46 47 48 49 50 51 52 53 54 55 56 57 58 59 60 61 62 63 64 65 66 67 68 69 70 71 72 73 74 75 76 77 78 79 80 81 82 83 84 static char * history[HIS_MAX];static int his_count = 0 ;static int his_start = 0 ;static int his_full = 0 ;int innerCommand (void ) if (!strcmp (args[0 ], "exit" ))puts ("Exit the a3shell now, see you again!" );exit (-1 );else if (!strcmp (args[0 ], "cd" ))if (args_count > 1 )puts ("cd: too many arguments" );else if (args[1 ][0 ] == '~' && args[1 ][1 ] == '/' )char * dir = malloc (strlen (args[1 ]) + strlen (user_info->pw_dir));strcpy (dir, user_info->pw_dir);strncat (dir, args[1 ][1 ], strlen (args[1 ]) - 1 );free (dir);NULL ;else 1 ]);return 1 ;else if (!strcmp (args[0 ], "history" ))if (args[1 ] && !strcmp (args[1 ], "-c" ))0 ;0 ;0 ;return 1 ;int count = 0 ;if (his_full)for (int i = his_start; i < HIS_MAX; i++)printf (" %d " , count++);puts (history[i]);for (int i = 0 ; i < his_start;i++)printf (" %d " , count++);puts (history[i]);else for (int i = 0 ; i < his_count; i++)printf (" %d " , count++);puts (history[i]);return 1 ;return 0 ;void historyRecord (void ) malloc (strlen (command_buf));strcpy (history[his_count], command_buf);if (his_full)if (his_count == HIS_MAX)0 ;1 ;
六、代码测试 最终我们的主程序如下:
1 2 3 4 5 6 7 8 9 10 11 12 13 14 15 16 17 18 19 20 21 22 23 24 25 26 27 28 29 #include <unistd.h> #include <stdio.h> #include <stdlib.h> #include <string.h> #include <fcntl.h> #include <sys/ioctl.h> #include <pwd.h> #include <sys/types.h> #include "func.c" int main (void ) while (1 )memset (args, 0 , sizeof (char *) * 0x100 );int flag = readCommand();if (flag == FLAG_NULL_INPUT)continue ;if (innerCommand())continue ;return 0 ;
完整代码见https://github.com/arttnba3/a3shell
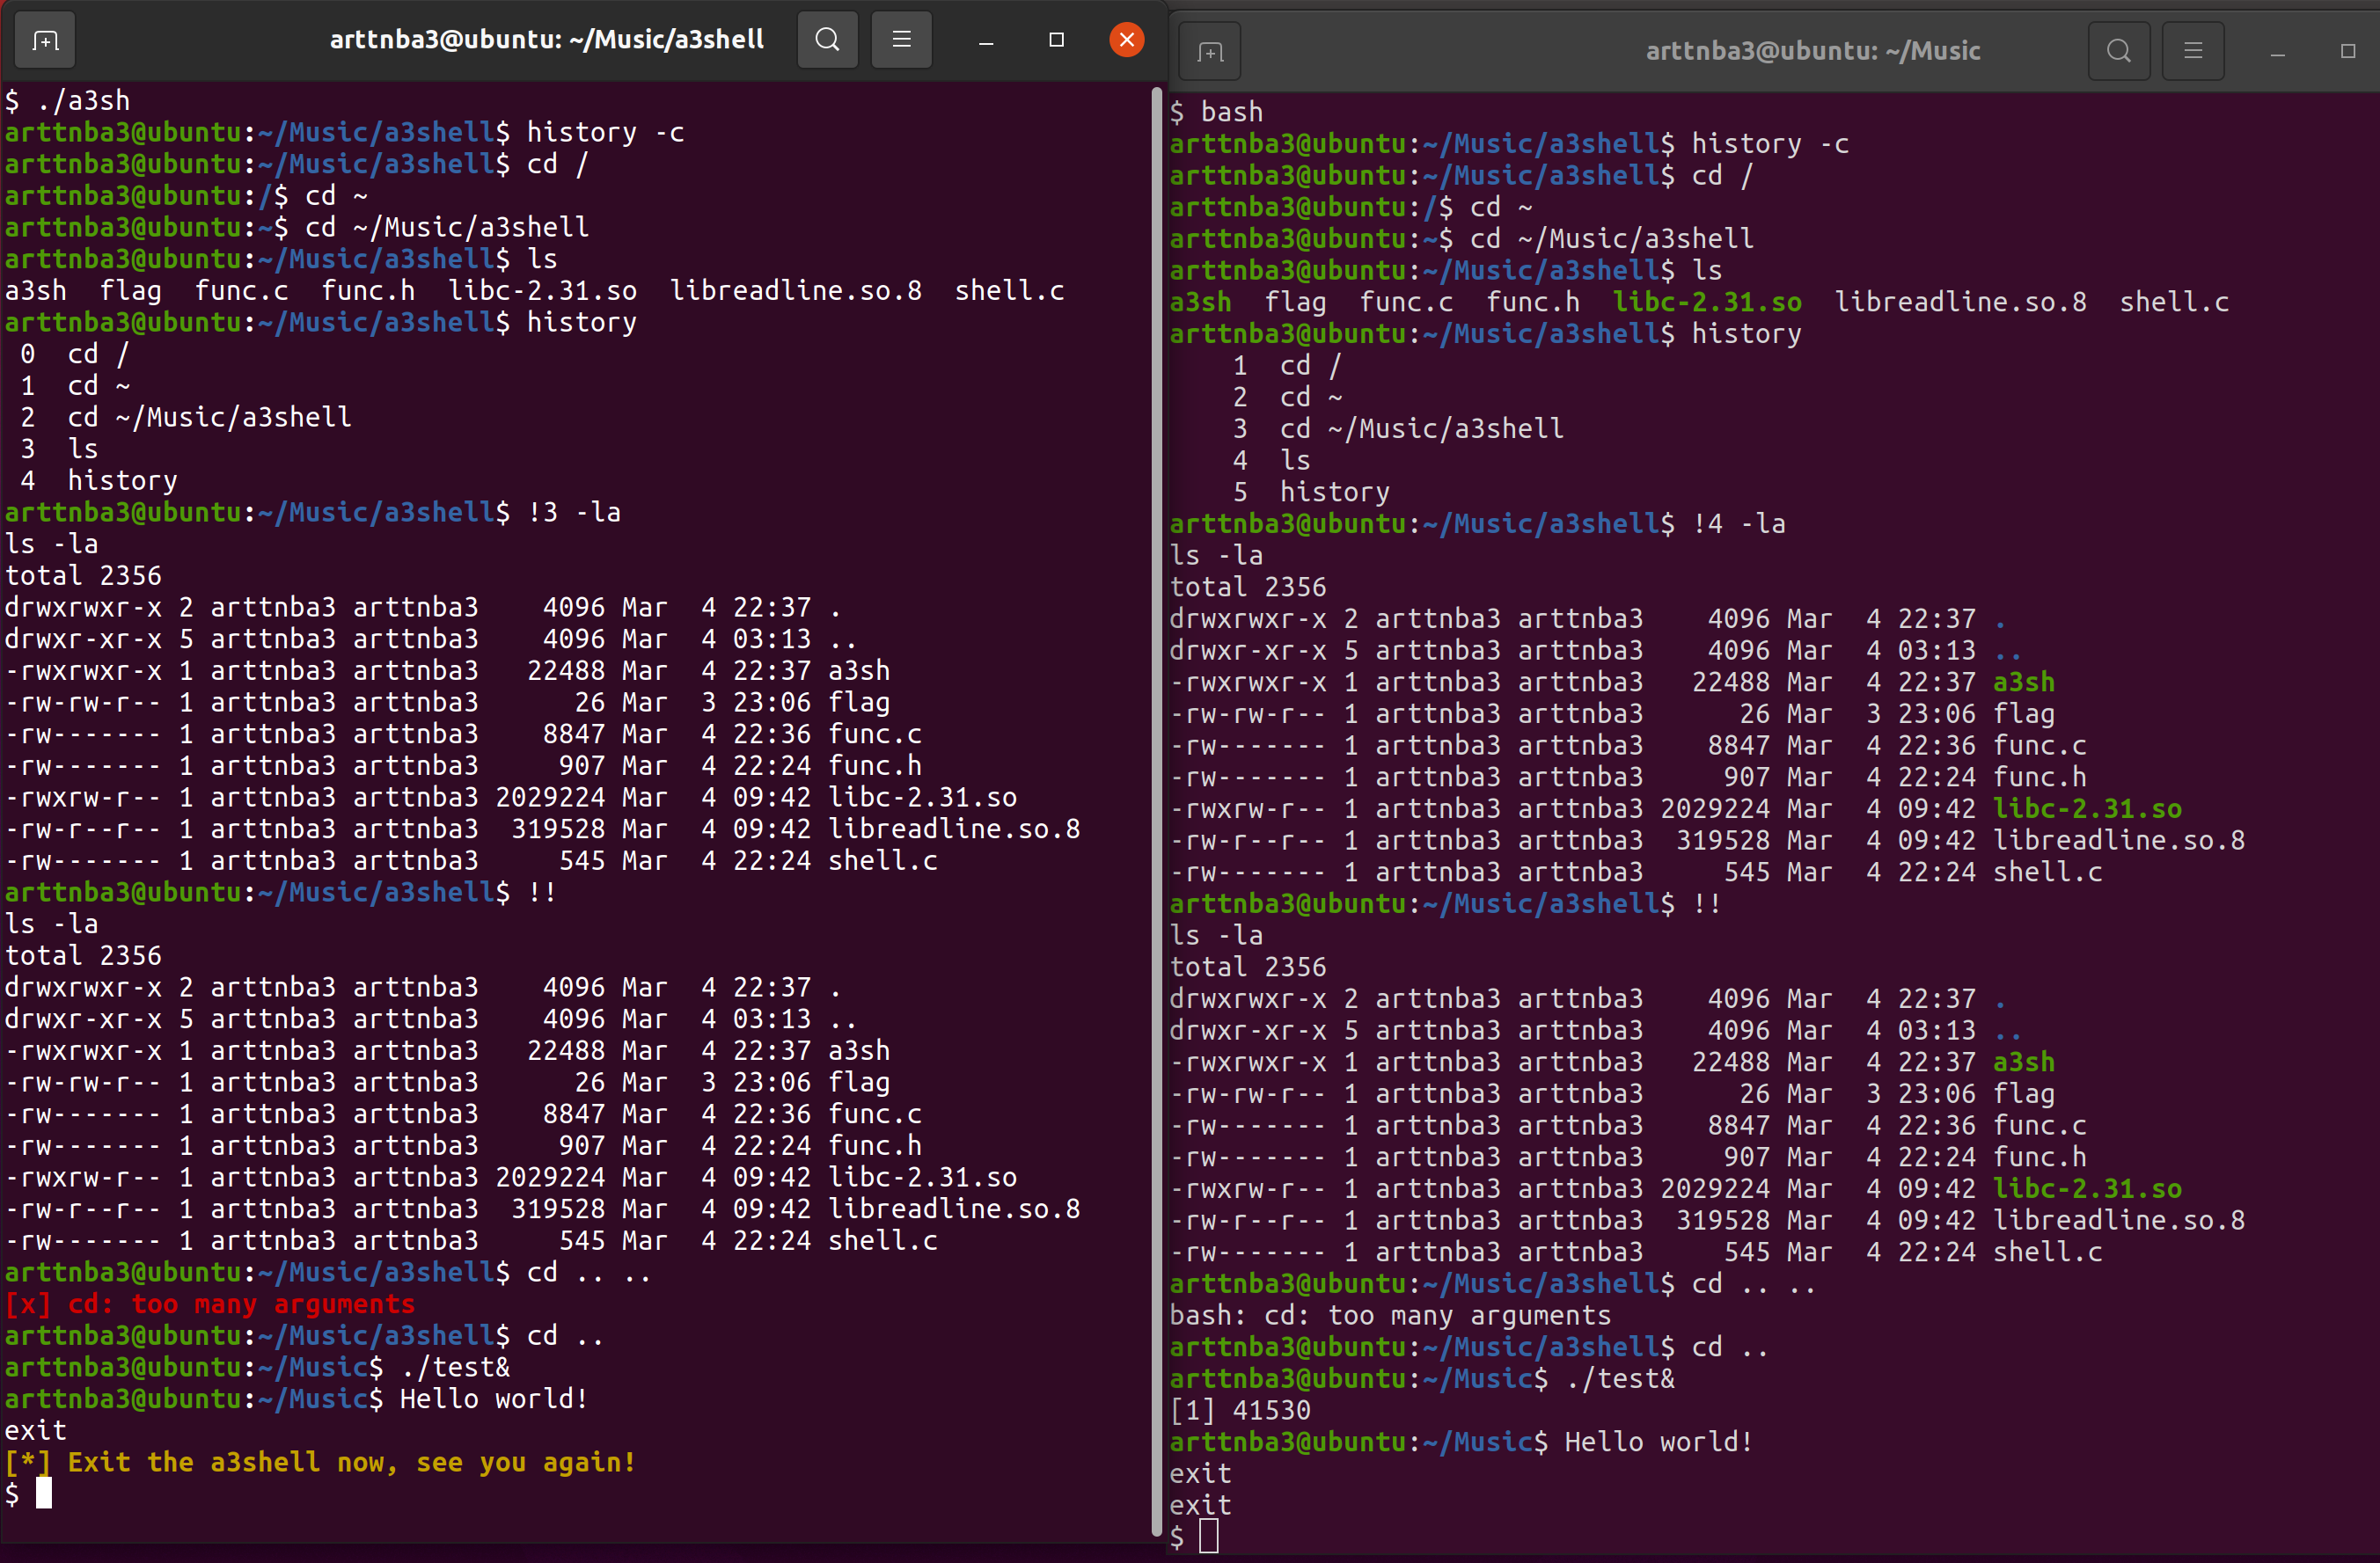
编译运行,示意图如下,左边为a3shell,右边为bash
勉强能用(),后面还会继续进行进一步的优化(如代码补全等
毫无疑问的是,一个成熟易用的shell应当还要具备如代码补全、上下切换历史记录等功能,因此我们决定为我们的shell添加这样的功能,让她成为一个更加强大的shell
在这里我们将会用到一个库The GNU Readline Library
I.安装readline库 1 2 $ sudo apt-get install libreadline-gplv2-dev $ sudo apt-get install libreadline6-dev
也可以在这里 下载源码
II.使用readline读取输入 需要#include <readline/readline.h>
只需要将我们原来的readCommand()函数换为readline()函数即可,返回值即为读取到的输入
需要注意的是我们需要手动进行释放,否则会造成内存泄漏
readline()函数接收一个参数作为输入前的提示符,我们只需要稍微原有函数将拼接好的提示符传入即可
✳需要注意的是我们传入的提示符字符串应当以 '\001'开头 、'\002'结尾
对于空行而言,readline()将会返回一个空字符串(buf[0] == ‘\0’)而不是NULL
III.记录历史输入 readline库提供了强大的历史输入记录功能,在使用readline()函数读取输入后我们可以使用add_history()记录输入,传入的参数则是readline()返回的字符串
添加历史后我们便可以像普通的shell那样使用↑↓来显示历史输入记录
打印的功能依然需要我们自定义,在readline lib中使用一个HIST_ENTRY结构体数组来记录我们传入的历史输入,而使用history_list()便可以获得指向该结构体数组的指针
使用clear_history()则可以清除所有历史记录
代码如下:
1 2 3 4 5 6 7 8 9 10 #include <readline/history.h> for (int i = 0 ; his[i]; i++)printf (" %d\t\t" , i);puts (his[i]->line);
###IV. 编译运行
需要注意的是我们编译时应当添加上-lreadline参数
示例:
1 $ gcc shell.c -o a3sh -lreadline
程序完整代码见https://github.com/arttnba3/a3shell
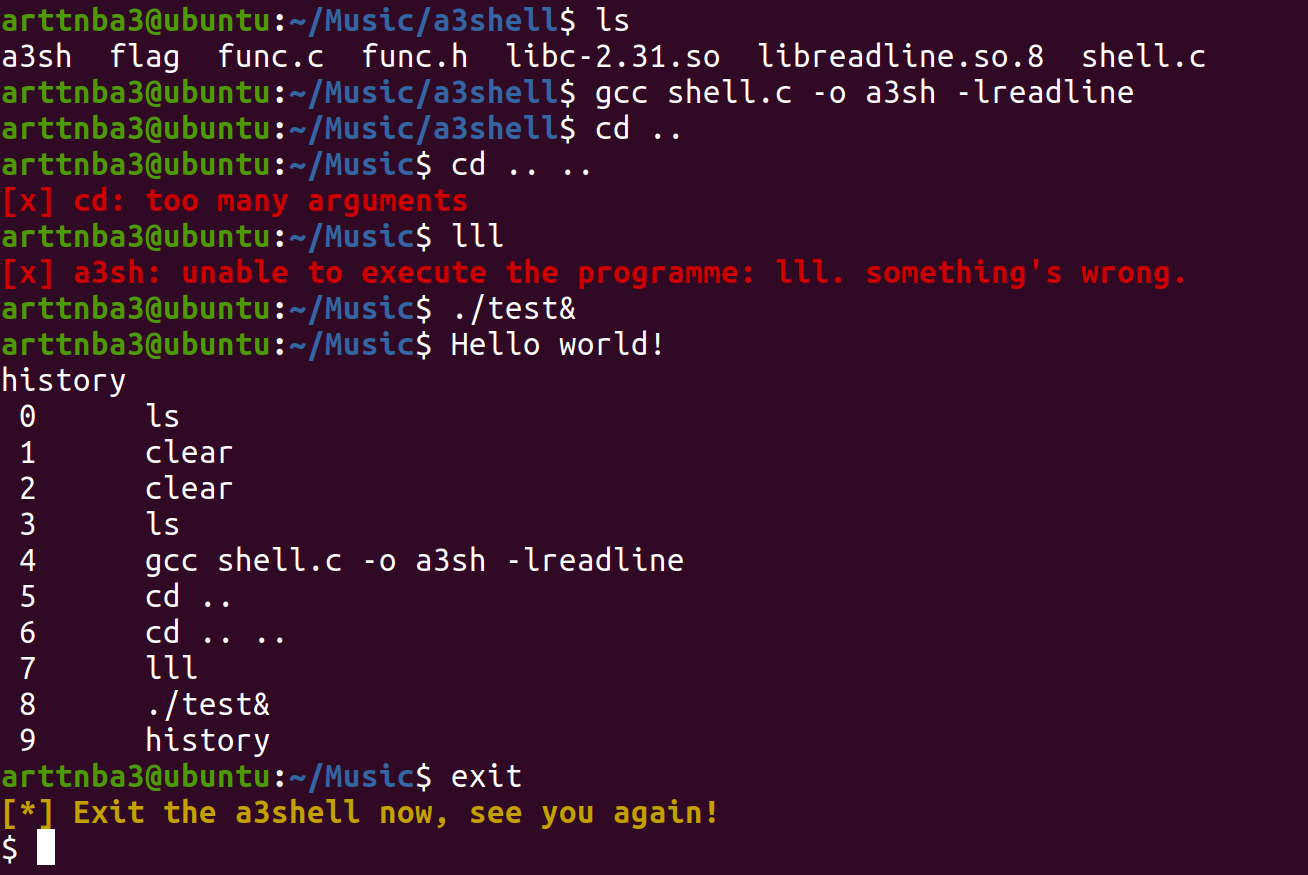
大概效果图如下(自动补全的效果没法表现出来,感受一下…)
说实话按照笔者个人的体验而言这个库并不算特别完善…
0x07.替换内核 好像一切都没有问题了,我们来把我们的新内核换到我们的主机上吧!
我们原有的机子的内核版本为 5.8.0
在编译好内核后,我们在之前的源码目录下继续执行如下指令:
1 2 3 4 5 6 $ sudo make modules $ sudo make modules_install $ sudo make install $ sudo update-initramfs -c -k 5.11.0 $ sudo update-grub $ sudo apt-get install linux-source
这里的 5.11.0 应为你自己的新内核版本号
需要注意的是在执行命令之前我们应当预留足够的空间
会比你预想中的可能还要再大一些
之后输入 reboot 命令重启即可
重新进入系统,我们可以看到我们的内核版本已经被替换为 5.11.0
0x08.CTF中kernel类题目的部署 和常规的CTF题目的布置方法是相类似的,最常见的办法便是使用ctf_xinted + docker布置,我们只需要配置用 ctf_xinetd 启动 boot.sh 即可
首先下载ctf_xinted:
1 $ git clone https://github.com/Eadom/ctf_xinetd.git
之后将内核复制进来,大概的架构如下:
1 2 3 4 5 6 7 8 9 10 11 12 $ tree
Dockerfile
因为不需要太多东西所以写的比较简洁,一开始安装 qemu 可能会多耗一点点时间,DEBIAN_FRONTEND=noninteractive 主要用于省去配置中的一些交互
1 2 3 4 5 6 7 8 9 10 11 12 13 14 15 16 17 18 19 20 21 22 FROM ubuntu:20.04
ctf.xinted
这里直接把 boot.sh 给起了就行
1 2 3 4 5 6 7 8 9 10 11 12 13 14 15 16 17 18 19 service ctf
之后使用如下命令启动xinted
1 2 $ sudo docker build -t "kernel" . $ sudo docker run -d -p "0.0.0.0:25000:25000" -h "kernel" --name="kernel" kernel
init 和 boot.sh 也应当进行适当修改:
init
1 2 3 4 5 6 7 8 9 10 11 12 13 14 15 16 17 18 19 20 21 #!/bin/sh exec 0</dev/consoleexec 1>/dev/consoleexec 2>/dev/consolechown root:root /flagchmod 600 /flagecho -e "\nBoot took $(cut -d' ' -f1 /proc/uptime) seconds\n"
boot.sh
1 2 3 4 5 6 7 8 9 10 11 #!/bin/sh "root=/dev/ram console=ttyS0 oops=panic panic=1 loglevel=3 quiet kaslr" \